
A beautiful candle can do a lot of heavy lifting. It can make a tiny apartment feel like a boutique hotel, turn a Tuesday night bath into a spa situation, and politely cover the fact that someone reheated fish in the microwave. But a candle is not a “light it and forget it” object. It is more like a houseplant with a flame: charming, mood-setting, and much happier when you know what you are doing.
Inspired by the practical, small-batch wisdom of Brooklyn candle shops, this guide explains how to care for candles so they burn cleaner, last longer, smell better, and look good from the first spark to the final half-inch of wax. Whether you love soy candles, coconut wax blends, beeswax tapers, luxury scented candles, or that mysterious gift candle you found in the closet, proper candle care makes a noticeable difference.
The good news? You do not need a chemistry degree or a velvet smoking jacket. You need a wick trimmer, a safe surface, a little patience, and the willingness to stop treating candles like tiny campfires in glass jars.
Why Candle Care Matters More Than You Think
Candle care is about three things: performance, safety, and value. A well-maintained candle gives you an even wax pool, a steady flame, better scent throw, and fewer smoky surprises. A poorly maintained candle may tunnel down the middle, collect soot, overheat its container, or burn through faster than your enthusiasm during a Monday meeting.
Most candle problems start with simple habits: burning for too short a time, leaving the wick too long, placing the candle near a draft, or ignoring debris in the wax. These mistakes are common, but they are also easy to fix. Think of candle care as a tiny ritual. Before lighting, trim. While burning, monitor. After extinguishing, clean and reset. That rhythm keeps your candle looking polished and performing properly.
The Brooklyn Shop Approach: Small Details, Big Difference
Brooklyn candle makers are known for thoughtful design: clean fragrance blends, minimalist vessels, and hand-poured batches that feel personal rather than factory-stamped. The care advice from shops like Brooklyn Candle Studio is refreshingly practical: trim the wick to about 1/4 inch before each burn, keep candles away from drafts, never leave them unattended, and give the wax enough time to melt evenly.
That advice may sound simple, but it is the candle equivalent of “drink water and sleep.” Everyone knows it. Not everyone does it. And yes, your candle can tell.
Start with the First Burn
Let the Wax Melt All the Way Across
The first burn sets the tone for the life of the candle. When you light a container candle for the first time, let the melted wax reach the edges of the vessel before blowing it out. This usually takes two to four hours, depending on the candle’s width, wax type, wick size, and room conditions.
Why does this matter? Wax has a “memory.” If you burn a candle for only 20 minutes the first time, the wax may continue melting only within that small ring during future burns. That creates tunneling, where the candle burns down the center while a wall of unused wax clings to the sides. It is tragic, wasteful, and frankly rude after you paid good money for that sandalwood-and-fig masterpiece.
Avoid Marathon Burns
Long burns are not better. Most container candles should not be burned for more than about four hours at a time. After that, the wick can mushroom, the jar can become too hot, and the fragrance may burn off less gracefully. If you want a candlelit evening that lasts longer, rotate between candles or take a break, let the wax cool, trim the wick, and relight later.
Trim the Wick Before Every Burn
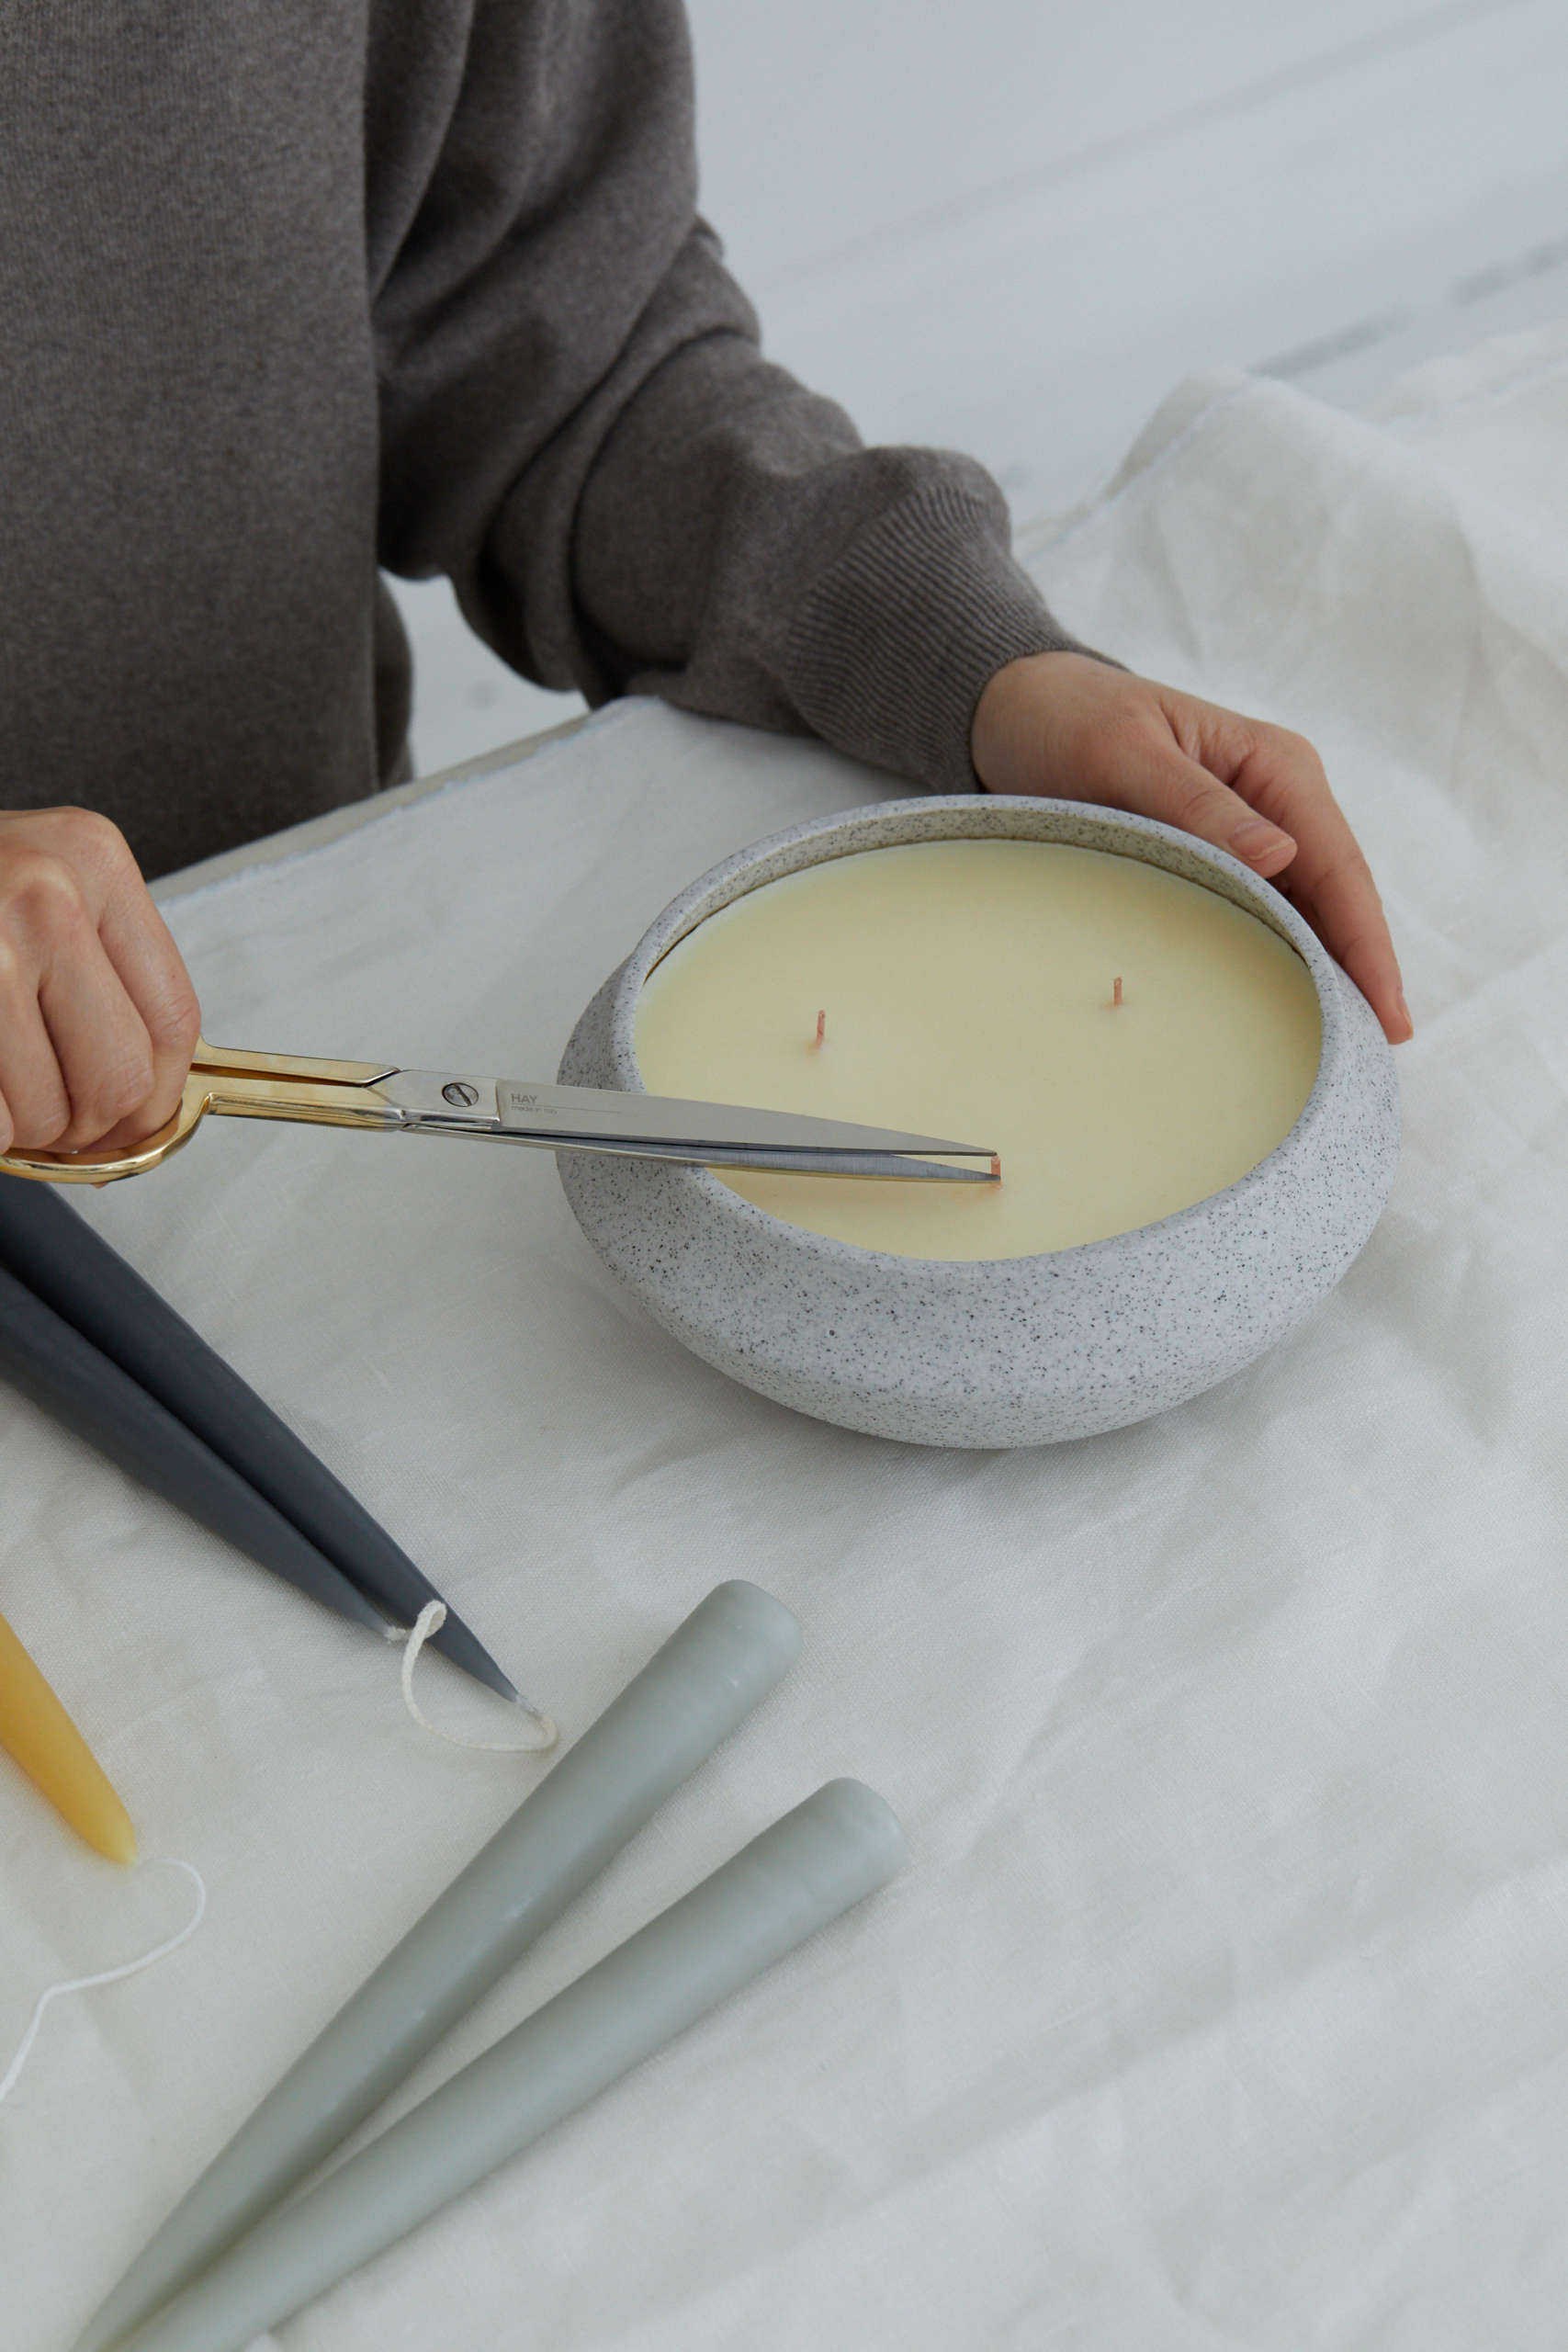
If there is one candle care tip to tattoo on your shopping list, it is this: trim the wick. A wick that is too long creates a large, flickering flame, which can cause soot, uneven melting, smoke, and faster wax consumption. Keep the wick around 1/4 inch before lighting.
A wick trimmer is ideal because it reaches into jars easily and catches the trimmed bit. But sharp scissors or nail clippers can work in a pinch. The goal is a clean, upright wick that is short enough to burn steadily but not so short that the flame drowns in wax.
What About Mushrooming?
That little black bulb at the top of the wick is called mushrooming. It forms when carbon builds up during burning. A small amount is normal, especially with highly fragranced candles, but a big mushroom can cause smoking and a wobbly flame. Once the candle is fully cool, trim it off before the next burn. Do not drop the charred piece into the wax unless you enjoy the look of pepper flakes in your candle.
Choose the Right Place to Burn a Candle
Where you place a candle affects how it burns. Keep candles on a stable, heat-resistant surface away from curtains, books, bedding, paper, plants, and anything else that could catch fire. A candle belongs on a clear table, tray, or counternot balanced on a stack of magazines like it is auditioning for a disaster movie.
Also avoid drafts from windows, fans, air conditioners, heaters, and busy walkways. Moving air makes the flame dance, and while that may look romantic, it can cause uneven burning, soot, smoke, and hot wax splatter. A calm candle is a happy candle.
Follow the Two-Foot Rule
Many candle safety guides recommend keeping burning candles at least two feet away from anything flammable. That includes curtains, holiday decorations, towels, clothing, books, and furniture with fabric edges. In small apartments, this can feel like solving a puzzle, but it is worth it. Candles create ambiance. They should not create a call to the fire department.
Never Leave a Burning Candle Unattended
This is the least glamorous candle tip and the most important. Never leave a burning candle unattended. Extinguish it before leaving the room, going to sleep, stepping into the shower, or deciding to “just run downstairs for one second.” That second has a suspicious way of turning into 20 minutes.
Keep candles away from children and pets, too. Cats are elegant, mysterious creatures until they discover a flame with their tail. Dogs can knock over tables. Toddlers are basically tiny quality-control inspectors with no safety training. Place candles where curious hands, paws, and wagging tails cannot reach them.
How to Extinguish a Candle Properly
Blowing out a candle works, but it is not always the cleanest method. A strong puff can splatter hot wax, create smoke, and push the wick off-center. A candle snuffer is gentler and helps reduce smoke. A wick dipper can also be used to bend the wick briefly into the wax pool and then lift it back up, which coats the wick and prepares it for the next burn.
If you blow out the flame, do it gently. Avoid using the candle lid to smother the flame unless the maker says it is safe to do so. Some lids are decorative, not designed for heat or smoke.
Recenter the Wick While the Wax Is Soft
After extinguishing the candle, check the wick. If it has leaned to one side, carefully nudge it back toward the center while the wax is still soft but no longer dangerously hot. A centered wick helps the candle burn evenly the next time and prevents one side of the jar from overheating.
Use a wick dipper, skewer, or dedicated candle toolnot your finger. Hot wax is not a hand lotion, no matter how luxurious it smells.
Keep the Wax Pool Clean
Debris in the wax pool can interfere with burning and may become a safety hazard. Remove trimmed wick pieces, matches, dust, pet hair, and anything else that falls into the candle. Once the wax has cooled, you can gently wipe the inside rim of the vessel with a soft cloth or paper towel.
If soot appears on the glass, let the candle cool completely, then clean the inside with a slightly damp cloth. Regular cleaning keeps the vessel attractive and prevents buildup from getting worse.
How to Prevent Candle Tunneling
Tunneling happens when only the wax near the wick melts, leaving a ring of hard wax around the sides. To prevent it, burn the candle long enough for the wax pool to reach the edges, especially on the first burn. Keep the wick trimmed, avoid drafts, and do not burn for only a few minutes at a time.
If your candle has already tunneled, you may be able to fix it. One common method is the foil trick: trim the wick, light the candle, then loosely wrap aluminum foil around the top edge of the container, leaving an open space above the flame for ventilation. The foil helps reflect heat back toward the unmelted wax around the edges. After about an hour, the surface may even out. Watch the candle closely the entire time, and never cover the flame completely.
Know When to Retire a Candle
It is tempting to burn every last drop of wax, especially when the candle smells like a vacation you cannot currently afford. But burning a candle too low can overheat the container. For most jar candles, stop using it when about 1/2 inch of wax remains at the bottom. For some candles, the maker may recommend stopping at 1/4 inch, so always check the label.
Once the candle is finished, consider repurposing the vessel. Clean glass jars can become pencil cups, cotton swab holders, tiny planters, or storage for matches. A well-designed candle jar deserves a second act.
How to Store Candles
Store candles in a cool, dry place away from direct sunlight. Heat can soften wax and affect fragrance, while sunlight can discolor wax or fade labels. If the candle has a lid, use it to keep dust off the surface. If not, store it in a box or cabinet.
Highly scented candles can lose some fragrance over time, especially when exposed to air, light, and temperature swings. For the best experience, burn candles within a reasonable period after purchase instead of saving them forever for a “special occasion.” A regular Wednesday counts. Life is short. Light the good candle.
Special Tips for Different Candle Types
Soy Candles
Soy candles often burn cooler and longer than some paraffin candles, but they still need proper care. Let the wax pool reach the edges, trim the wick, and keep the candle away from drafts. Soy wax may show frosting or surface texture changes over time; this is usually cosmetic and does not mean the candle is bad.
Beeswax Candles
Beeswax candles have a naturally warm scent and often burn cleanly when maintained well. Keep the wick trimmed and place tapers in secure holders. Because beeswax can be dense, a proper wick size is important for even burning.
Pillar Candles
Pillar candles should be burned long enough to create a broad wax pool, but not so long that the outer wall collapses. Place pillars on a heat-resistant plate or holder that catches drips. Trim the wick and keep the candle away from drafts.
Taper Candles
Tapers are elegant, but they need sturdy holders. Make sure the candle stands straight and fits securely. If it wobbles, do not light it. A crooked taper may drip excessively or fall over, which is not the kind of drama your dinner table needs.
Common Candle Care Mistakes
Burning for Too Short a Time
Short burns cause tunneling. Give the candle enough time to melt evenly across the top.
Skipping the Wick Trim
A long wick can create soot, smoke, and an oversized flame. Trim before every burn.
Burning Near a Window or Vent
Drafts make flames unstable and can cause uneven wax melting. Choose a calm spot.
Letting Debris Stay in the Wax
Matches, wick trimmings, and dust do not belong in the wax pool. Remove them once the candle is cool.
Using the Candle as a Night-Light
A real flame should never be used while sleeping. If you want bedtime glow, use a flameless candle instead.
Brooklyn-Inspired Candle Rituals for Everyday Life
One of the best things about shopping from a neighborhood candle maker is the sense of ritual. A candle is not just a product; it is a pause button. In a Brooklyn apartment, where space is precious and outside noise is basically a roommate, lighting a candle can signal a shift: work is done, dinner is starting, guests are arriving, or the bathroom has officially become a spa.
Try pairing scents with routines. Use a bright citrus or herbal candle while cleaning, a warm amber or cedar scent while reading, and a soft lavender or musk scent during evening wind-down time. Keep fragrance strength in mind. A large, powerful candle in a small room can become overwhelming. A lighter candle may be better for bathrooms, desks, and bedrooms, while richer scents work well in open living areas.
Personal Experience: What Candle Care Looks Like in Real Life
The first time I learned to care for candles properly, it was not because I was wise. It was because I ruined a very nice candle. It had a beautiful ceramic vessel, a scent that promised “cashmere woods,” and a price tag that suggested it should have come with emotional support. I lit it for about 25 minutes while cleaning the kitchen, blew it out, and felt very responsible. The next time I lit it, the flame dug a neat little hole straight down the center. Around the sides sat a thick ring of untouched wax, silently judging me.
That was my introduction to tunneling. Before then, I assumed candles simply did what candles did. Some burned well, some did not. But after talking with candle lovers and reading advice from makers, I realized the candle was not the problem. I was the problem. My short burn had trained the wax to melt in a narrow circle. The candle had memory, and apparently it remembered my impatience.
Since then, I have treated the first burn like a small ceremony. I light the candle only when I know I can leave it burning long enough for the wax to melt to the edge. I set it on a tray, away from curtains and air vents. I trim the wick first, even if it looks “probably fine,” because “probably fine” is how soot happens. Then I let it burn while I read, cook, or tidy up. The whole room feels calmer, and the candle burns evenly the next time.
Another lesson came from a candle I kept near a drafty window. The flame flickered beautifully, which I thought was charming. Unfortunately, the wax melted unevenly, one side of the glass darkened with soot, and the scent seemed weaker than usual. Once I moved candles away from windows, vents, and fans, they behaved better. The flames steadied. The jars stayed cleaner. The scent filled the room more smoothly instead of disappearing into the air like it had somewhere better to be.
I also learned that trimming the wick is not optional. A long wick may feel harmless, but it can turn a candle from cozy to chaotic. The flame gets taller, the top of the wick mushrooms, and the jar can collect black marks. A quick trim before lighting gives the flame a neat shape and keeps the burn slower and cleaner. It is one of those tiny habits that feels fussy until you see the difference.
My favorite candle routine now is simple. Before guests arrive, I choose one scent for the main room and avoid mixing too many fragrances. I trim the wick, clear the table, light the candle early enough for the fragrance to develop, and keep it away from snacks, napkins, and anything that might float too close. After guests leave, I extinguish it with a snuffer, check that the wick is centered, and let the wax cool before putting the lid back on. It takes less than a minute of attention, but it makes the candle feel cared for rather than consumed.
The biggest experience-based tip is this: do not save candles so long that you never enjoy them. Many people treat beautiful candles like formal china, waiting for the perfect moment. But candles are made to be used. Light one during a rainy afternoon, a solo dinner, a work-from-home reset, or a quiet Sunday morning. Proper care helps the candle last longer, but the real point is to enjoy it while it is here.
Final Thoughts: Better Candle Care, Better Burns
Caring for candles is not complicated. Trim the wick, burn long enough for an even melt pool, avoid drafts, keep the wax clean, use a safe surface, and never leave a flame unattended. These habits help your candles last longer, smell better, and look as polished on burn ten as they did on day one.
From a Brooklyn shop counter to your own coffee table, the message is the same: candles reward patience. Treat them well, and they will return the favor with steady light, beautiful fragrance, and the kind of cozy atmosphere that makes home feel a little more intentional. And if you happen to feel fancy while using a wick trimmer, congratulations. That is part of the experience.