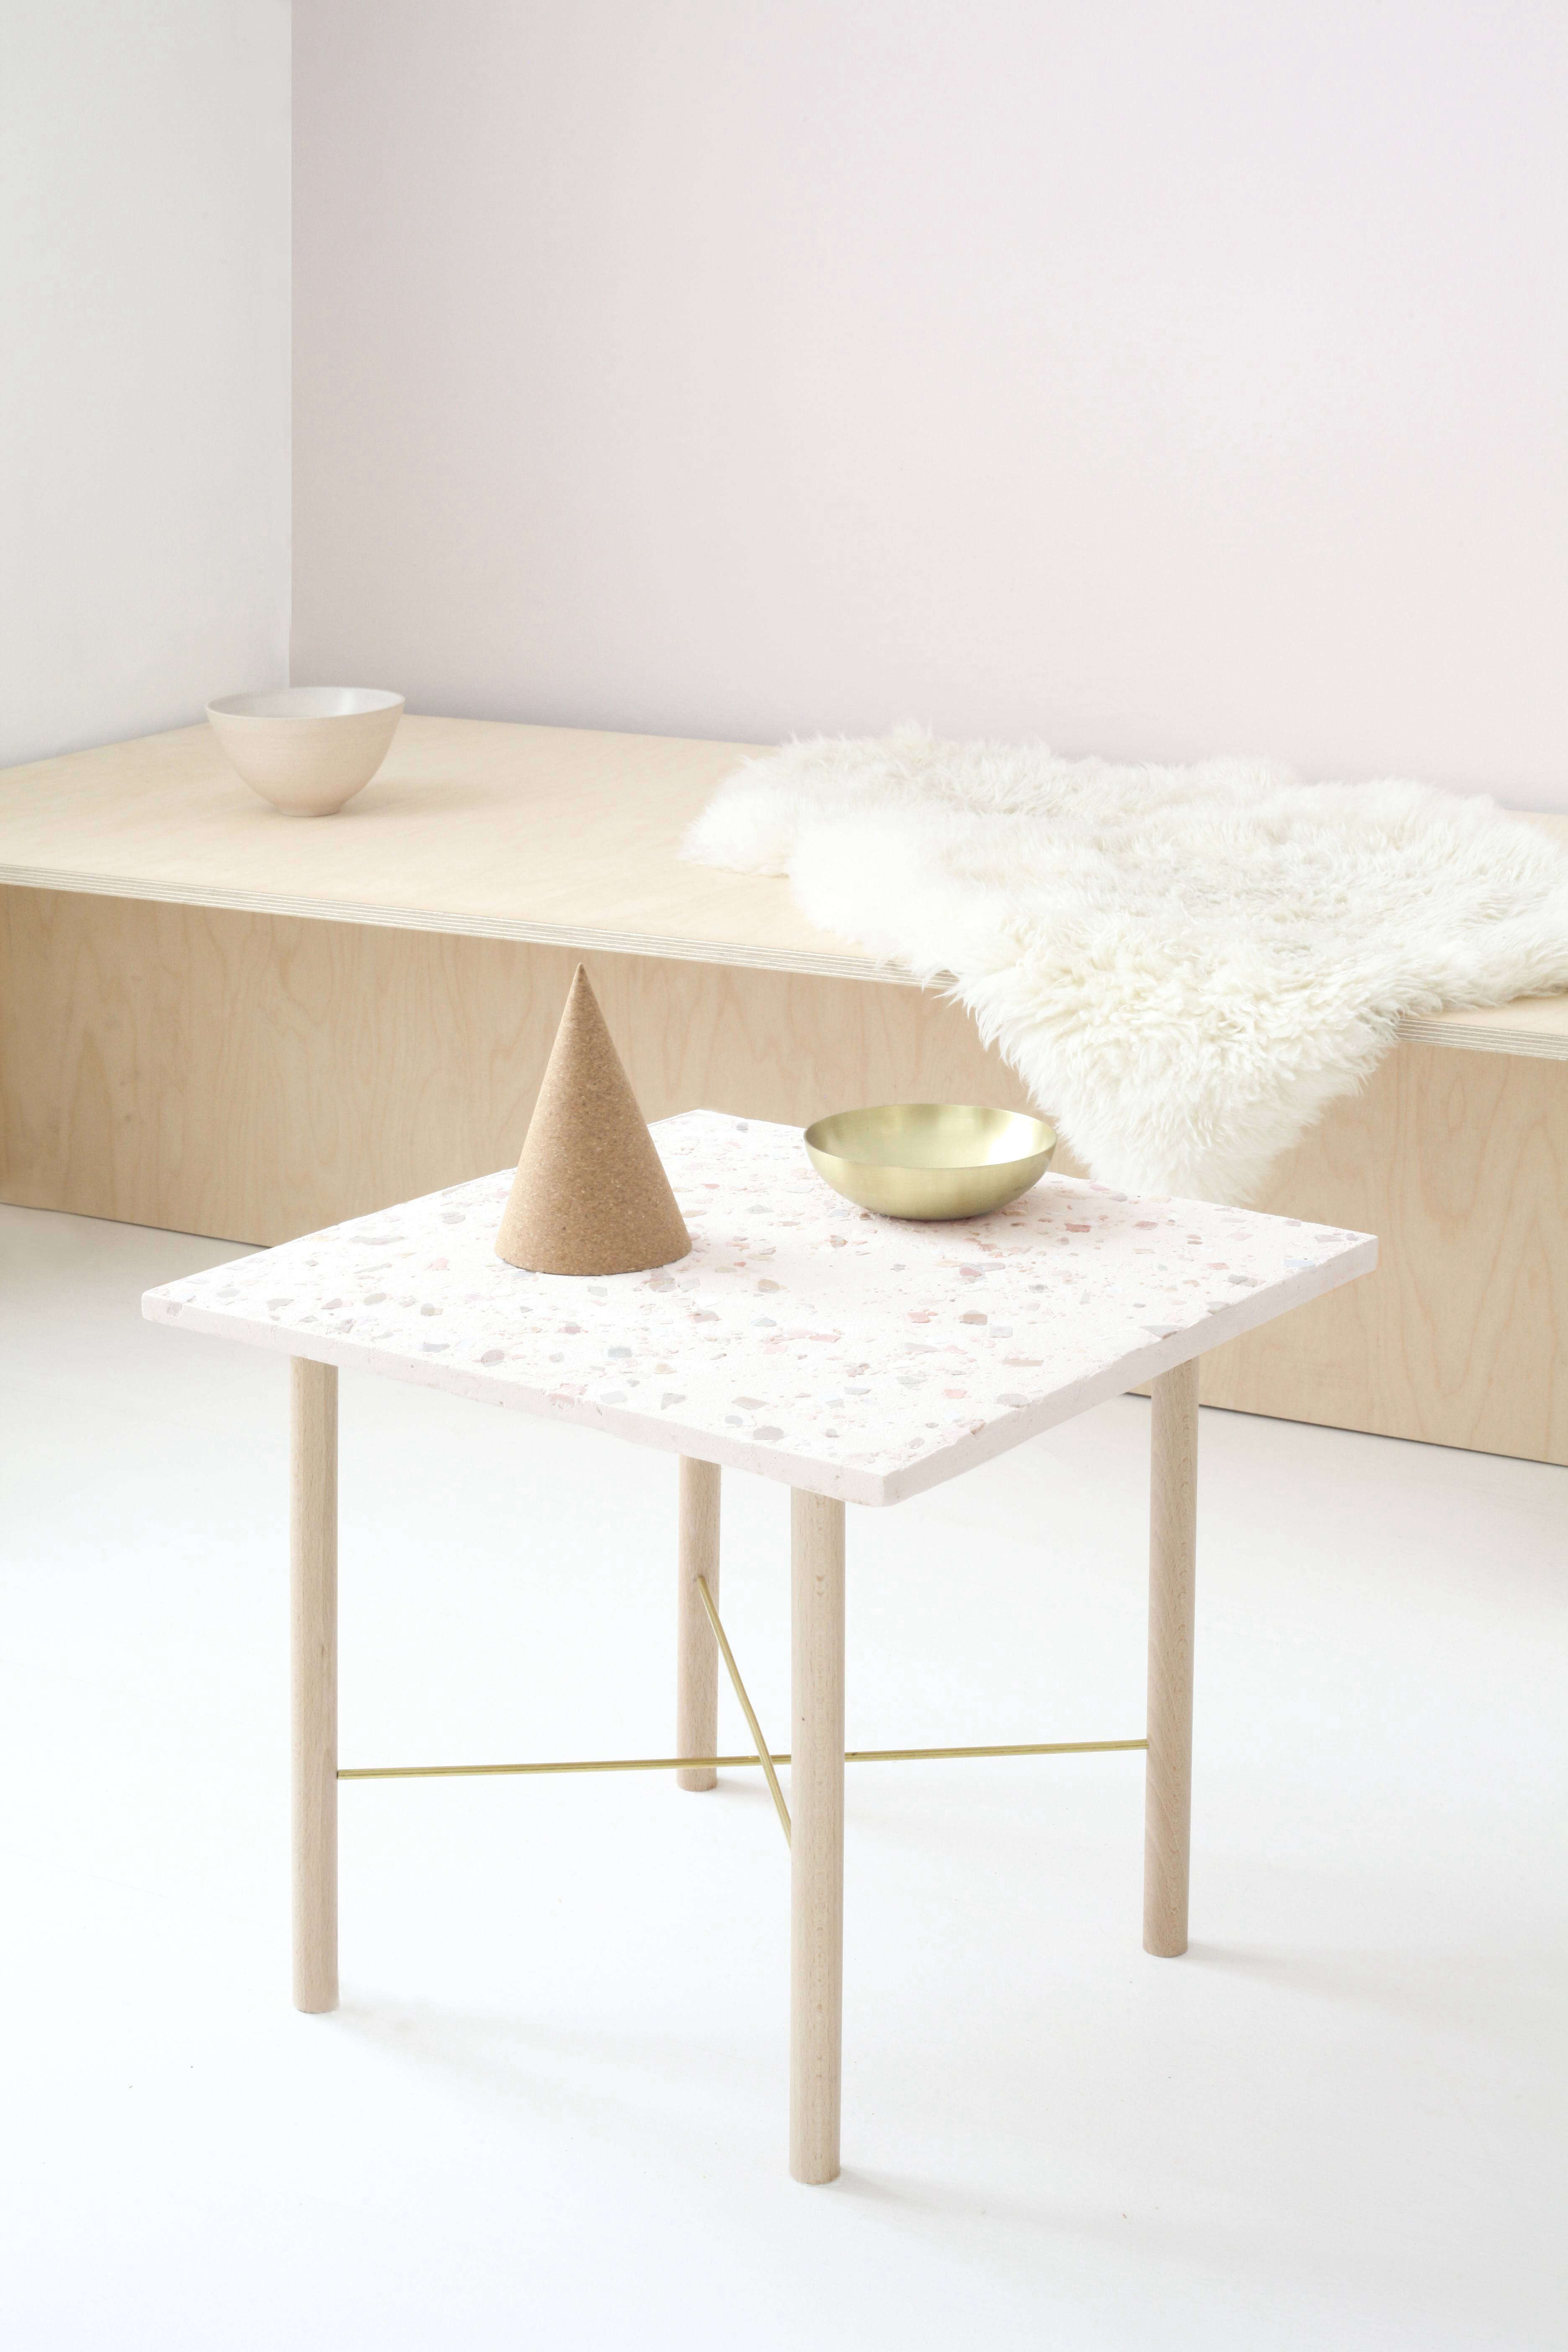

Terrazzo has a funny way of making ordinary furniture look like it has a passport, a gallery invitation, and a very well-edited Instagram feed. The DIY Terrazzo Table by Heju of Paris is a perfect example: a small coffee table with clean architectural lines, a handmade terrazzo-style top, soft color, and enough charm to make your living room feel like it briefly studied design in France.
Inspired by the Paris-based design studio Heju, founded by Hélène Pinaud and Julien Schwartzmann, this project blends minimalist furniture construction with the playful speckled surface of terrazzo. The original concept uses a simple MDF structure, white cement, fine sand, pale-pink grout, and broken tile pieces to create a small handmade table that feels refined without being stiff. Think Japanese-Scandinavian calm meets “I smashed tiles with a hammer and somehow made art.”
This guide breaks down the idea behind the Heju terrazzo table, explains how to adapt the method for a home DIY project, and shares practical tips on materials, color, safety, curing, sanding, sealing, styling, and avoiding the classic DIY disaster known as “why is this still wet?”
What Makes the Heju Terrazzo Table So Appealing?
The charm of the DIY terrazzo table by Heju of Paris comes from contrast. The base is simple and geometric. The tabletop is expressive and slightly unpredictable. The color palette is gentle rather than loud. The result is a piece that looks intentional, not crafty in the “glue-gun at midnight” sense.
Traditional terrazzo is a composite surface made by embedding marble, granite, quartz, glass, ceramic, or other chips into cement or resin, then grinding and polishing it into a smooth finish. It has been used for floors, counters, stairs, walls, and decorative objects because it is durable, customizable, and visually rich. The Heju version borrows that classic look but scales it down into a manageable furniture project.
Instead of pouring a huge terrazzo floor, you create a small slab in a mold. Instead of hiring a crew with industrial grinders, you rely on patience, hand sanding, good sealing, and realistic expectations. The finished table is not meant to imitate a commercial terrazzo installation perfectly. It is meant to celebrate the handmade version: charming, imperfect, tactile, and full of personality.
About Heju of Paris: Minimalism with a Soft Side
Heju Studio is known for interiors and design objects that combine clean architectural thinking with warmth, color, and craft. Their work often reflects Japanese and Scandinavian influences: pale wood, soft geometry, restrained palettes, curved details, and spaces that feel peaceful without becoming boring. The terrazzo table fits right into that world.
What makes the Heju approach useful for DIYers is that it does not treat handmade design as second best. The project is not about copying an expensive showroom table down to the millimeter. It is about understanding proportion, material, and restraint. A small square top, slim legs, brass accents, and blush-colored terrazzo chips can feel more sophisticated than a giant statement piece shouting from the corner.
In other words, this is not a table that screams, “Look at me!” It politely clears its throat and somehow becomes the most interesting object in the room.
Materials You Need for a DIY Terrazzo Table
The original Heju-inspired table uses simple materials: MDF panels for the base and mold, wooden dowels for legs, brass rods for diagonal support, white cement, fine sand, powdered grout, and small broken tile or stone pieces for the terrazzo effect. You can adapt the materials depending on what is available at your local hardware store.
For the tabletop mold
- MDF panel cut to the final tabletop size, such as 16 by 16 inches
- Four MDF strips to create the mold walls
- Construction adhesive or neoprene glue
- Painter’s tape or clamps to hold the mold edges while drying
- Plastic sheet or release agent to help remove the slab
For the terrazzo mixture
- White cement or fine concrete mix
- Fine sand
- Powdered grout or mineral pigment for color
- Broken ceramic tile, marble chips, glass mosaic, or porcelain scraps
- Clean water
- Mixing tub or bucket
- Trowel or putty knife
For the table base
- MDF square or plywood support panel
- Wood dowels or ready-made furniture legs
- Brass rods, metal braces, or cross supports
- Drill and screws
- Wood glue
- Fine sandpaper
- Paint, stain, or clear finish
For finishing
- Wet-dry sandpaper in several grits
- Concrete sealer or stone sealer
- Microfiber cloths
- Gloves, safety glasses, and a properly fitted dust mask or respirator
Safety First: Terrazzo Is Cute, Cement Dust Is Not
Before you start mixing, cutting, sanding, or smashing tile, take safety seriously. Cement, grout, sand, and tile dust can irritate your skin, eyes, and lungs. Dry sanding concrete-like surfaces can release fine dust, including silica-containing particles depending on the materials used. That is not the kind of confetti anyone wants at a design party.
Work outdoors or in a highly ventilated area. Wear gloves when handling cement and grout because wet cement can be harsh on skin. Use safety glasses when breaking tiles. When sanding, wet-sand whenever possible to keep dust down, and wear a suitable respirator. Keep children, pets, snacks, and open coffee cups away from the work area. Terrazzo is lovely; terrazzo-flavored coffee is not.
Step-by-Step: How to Make a Heju-Inspired DIY Terrazzo Table
Step 1: Choose your size and shape
A small square coffee table is the most faithful to the Heju idea and also the easiest shape for beginners. A tabletop around 16 by 16 inches is manageable, stylish, and light enough to move without needing a construction crew or a dramatic motivational speech.
You can also make a round, oval, or rectangular version, but a square mold is simpler to build from MDF. If this is your first DIY terrazzo project, keep the design modest. A small success beats a large, cracked slab of regret.
Step 2: Build the MDF mold
Cut one MDF panel to the exact size of your tabletop. Then cut four strips for the sides of the mold. Glue the strips around the base panel to form a shallow tray. The mold should be strong enough to hold wet cement without bowing.
Seal the inside corners with tape or a thin bead of caulk if needed. A clean mold produces cleaner edges. To make removal easier, line the bottom with plastic sheet or apply a release agent. This is one of those small steps that prevents you from later whispering, “Please come out,” to a slab of cement at 11 p.m.
Step 3: Prepare the terrazzo chips
Place ceramic tiles, mosaic glass, or marble scraps inside several layers of heavy plastic bag or wrap them in a towel. Gently break them with a hammer. Aim for a mix of sizes: tiny flecks, medium chips, and a few larger fragments. Avoid pieces that are too sharp, too thick, or too uniform.
The best terrazzo patterns look relaxed but balanced. If every chip is the same size, the surface can feel flat. If the chips are too large, the tabletop may look chaotic. A varied mix gives that natural, speckled terrazzo look.
Step 4: Plan the color palette
The Heju table is famous for its soft pink mood, but you do not have to copy it exactly. A blush cement base with white, rose, terracotta, and pale stone chips feels warm and Parisian. A cream base with green and gray chips feels fresh and botanical. A white base with black, caramel, and rust fragments leans modern and graphic.
Keep your palette to three or four main colors. Terrazzo can become visually noisy very quickly. The goal is cheerful sophistication, not a bowl of cereal after a small earthquake.
Step 5: Scatter chips in the mold
Before adding the cement mixture, scatter some of your chips across the bottom of the mold. This bottom side will become the visible top once the slab is removed and flipped. Spread the chips evenly, but do not arrange them too perfectly. Randomness is part of the charm.
Save extra chips to mix into the cement. This helps the terrazzo pattern continue below the surface and gives you more visible flecks after sanding.
Step 6: Mix the cement, sand, grout, and pigment
Combine the dry ingredients first. A practical DIY mix can include white cement, fine sand, and a small amount of powdered grout or pigment. Add water slowly and mix until you get a thick, spreadable consistency. Many DIY guides describe the texture as similar to toothpaste, thick cake batter, or a beauty mask. Basically, it should hold together without being soupy.
Too much water can weaken the slab and increase cracking. Too little water makes the mixture hard to spread and may leave voids. Add small amounts, mix thoroughly, and give the material a minute to hydrate before adding more.
Step 7: Pour and level the tabletop
Pour the mixture gently into the mold, taking care not to push all the decorative chips into one sad corner. Use a trowel to spread the mix evenly. Tap the sides of the mold to release trapped air bubbles. You can also lift the mold slightly and gently tap it against your work surface.
Add a few more chips into the wet mixture if you want greater depth. Smooth the top as much as possible, but remember that the visible side will be the bottom of the mold after flipping.
Step 8: Let it cure patiently
Let the slab cure for several days before demolding. The Heju-style method allows roughly three days of drying before handling. Depending on humidity, temperature, slab thickness, and your exact mix, it may need longer.
Do not rush this step. Cement-based projects reward patience and punish curiosity. If you demold too early, edges may crumble or the slab may crack. Cover the slab loosely to slow moisture loss and reduce the chance of surface cracking.
Step 9: Demold, sand, and reveal the pattern
Once the slab is firm, carefully remove the mold walls and flip the tabletop. The first reveal is always exciting. It is also usually a little underwhelming until sanding begins. Wet-sand the surface gradually, starting with a coarser grit if needed and moving to finer grits for smoothness.
Sanding exposes more of the chips and evens out the texture. Do not attack the surface like you are trying to erase a bad memory. Use steady, even pressure. Rinse frequently, check your progress, and stop when the chips are visible and the surface feels smooth enough for a tabletop.
Step 10: Seal the tabletop
Cement-based terrazzo needs sealing. A good sealer helps protect against moisture, stains, and everyday use. Choose a concrete, stone, or countertop sealer appropriate for indoor furniture. Apply thin coats according to the product instructions, allowing proper drying time between coats.
If the table will hold drinks, plants, or snacks, sealing matters even more. Coasters are still a good idea. The table may look fancy, but it does not want to spend its life wearing coffee rings.
Step 11: Build or attach the base
The original Heju-inspired design uses a simple base made with MDF, wood dowel legs, and brass rods for diagonal support. You can follow that spirit or simplify the build with ready-made furniture legs. The key is proportion: keep the base light, clean, and visually quiet so the terrazzo top remains the star.
Attach the legs securely to a support panel, then fasten the terrazzo slab to the base with construction adhesive suitable for the materials. Allow everything to cure fully before flipping, moving, or styling the table.
Design Variations for Your DIY Terrazzo Table
The soft Paris version
Use white cement, pale-pink grout, blush ceramic chips, cream stone, and brass accents. Pair it with a light wood base. This version feels closest to Heju’s gentle, minimalist look.
The modern graphic version
Use a white or gray base with black, charcoal, and tan chips. Add slim black metal legs. This works beautifully in apartments with modern art, neutral sofas, or dramatic lighting.
The Mediterranean version
Use warm ivory cement with terracotta, green, blue, and sandy beige chips. Pair it with oak or rattan. This version feels sunny, relaxed, and ready for citrus fruit in a ceramic bowl.
The recycled-material version
Use leftover tile from a bathroom remodel, broken porcelain, recycled glass, or stone scraps. This approach celebrates terrazzo’s resourceful roots while giving your project a personal backstory.
Common Mistakes to Avoid
The most common mistake is using too much water in the cement mix. A watery mix may seem easier to pour, but it can weaken the slab and make curing less predictable. Add water slowly and stop when the consistency is thick but workable.
Another mistake is skipping the release layer in the mold. MDF can grip the cement, especially if moisture swells the edges. A little preparation makes demolding much easier.
Do not forget safety gear when breaking tiles or sanding. Chips can fly, dust can linger, and your lungs are not interested in participating in your interior design journey. Also avoid placing the finished table outdoors unless your materials, sealer, and base are specifically suitable for exterior use.
How to Style a DIY Terrazzo Coffee Table
A terrazzo table already has pattern, so styling should be thoughtful. Try a stack of two art books, a small ceramic tray, and one sculptural object. A glass vase with a single branch works better than a cluttered bouquet. If your tabletop has pink tones, balance it with warm neutrals, pale wood, off-white textiles, or muted green accents.
In a small living room, this table can act as a focal point without overwhelming the space. In a bedroom, a smaller version can become a side table. In a studio apartment, it can serve as a coffee table, plant stand, and proof that you have excellent taste even if your laundry chair says otherwise.
Is a DIY Terrazzo Table Worth the Effort?
Yes, if you enjoy slow, hands-on projects and do not mind a bit of mess. This is not a five-minute craft. It involves measuring, mixing, waiting, sanding, sealing, and possibly negotiating with a stubborn mold. But the reward is a custom piece of furniture that feels far more special than something pulled flat-packed from a shelf.
The DIY Terrazzo Table by Heju of Paris is especially worthwhile because it teaches several useful skills at once: mold making, cement mixing, color planning, surface finishing, and furniture assembly. Even if the final result has tiny imperfections, those details often make the table more beautiful. Handmade objects should not look like they were manufactured by robots with unlimited sanding belts.
Experience Notes: What It Feels Like to Make a DIY Terrazzo Table
Making a terrazzo table is one of those projects that starts with confidence and quickly introduces you to humility. At first, everything feels simple. You gather MDF, cement, sand, tiles, and pigment. You imagine yourself calmly creating a design object worthy of a Paris apartment. Then you start breaking tiles and realize the hammer has its own artistic opinions.
The first memorable experience is choosing the chips. This sounds easy until you are staring at tile fragments and asking whether pale pink, coral, ivory, and beige are “subtly layered” or just “aggressively salmon.” The trick is to test small combinations before committing. Lay the chips on white paper and step back. If the colors still look good from across the room, they will likely work in the tabletop.
Mixing the cement is another lesson in restraint. Beginners often want to add more water because the mixture looks too thick. Wait. Mix longer. Scrape the sides of the bucket. Cement has a dramatic personality and may need a minute before it behaves. Once it reaches a spreadable texture, it becomes easier to place in the mold without drowning the chips.
The curing stage is the hardest part emotionally because nothing appears to be happening. You check the slab. It looks the same. You check again. Still the same. This is where good DIYers develop character, or at least learn to distract themselves with another project. Giving the slab enough time to cure is one of the biggest differences between a successful tabletop and a crumbly disappointment.
Demolding feels like opening a present you made for yourself. Sometimes the first look is not impressive. The surface may seem dull, uneven, or too plain. Then sanding begins, and suddenly the chips appear more clearly. This is the magic moment. The table starts to look less like a cement pancake and more like terrazzo. Wet sanding is slower but cleaner, and it gives you better control over the finish.
Sealing is where the project becomes furniture. The surface deepens slightly, the colors sharpen, and the tabletop begins to feel finished. A matte sealer keeps the handmade softness, while a satin finish adds a bit more polish. Gloss can work, but on a small pastel terrazzo table, too much shine may feel less Heju and more hotel lobby.
The final assembly is surprisingly satisfying. Once the slab is attached to the base, the object suddenly has presence. It is no longer a craft experiment sitting on a workbench. It is a table. You can place it beside a sofa, set down a book, add a small vase, and casually pretend you did not spend three days worrying about whether cement could sense fear.
The best part of the experience is that no two tables come out exactly alike. Your chip placement, pigment strength, sanding pressure, and tiny imperfections create a one-of-a-kind piece. That is the real beauty of the Heju-inspired terrazzo table: it gives you a framework, but the final personality belongs to your hands.
Conclusion
The DIY Terrazzo Table by Heju of Paris is more than a pretty furniture project. It is a lesson in material play, color restraint, and the pleasure of making something that feels both modern and personal. With MDF, cement, sand, grout, tile chips, patience, and a proper sealer, you can create a small terrazzo coffee table that looks refined without losing its handmade soul.
For best results, keep the scale manageable, choose a thoughtful color palette, protect yourself from dust, cure the slab properly, and finish it with care. The process may be messy, but the final table has the kind of quiet charm that makes a room feel collected, creative, and slightly Parisian. And honestly, any project that lets you smash tiles and call it design deserves a little applause.
Note: This article is written for web publication and synthesizes real design, terrazzo, concrete finishing, and DIY furniture guidance into an original, reader-friendly guide.