
Note: This article is written for web publishing and synthesizes practical guidance from reputable U.S. home-improvement, décor, renter-friendly living, and manufacturer resources. Always check the instructions on your specific hanging product and your lease before trusting your favorite framed print to gravity’s questionable sense of humor.
Introduction: Beautiful Walls, Zero Nail Holes
Knowing how to hang art without nails is one of those life skills that feels small until you are standing in front of a blank wall, holding a framed print, a roll of adhesive strips, and the tiny fear that your security deposit is quietly packing its bags. Whether you live in a rental apartment, a dorm room, a freshly painted home, or a place with plaster walls that crumble if you look at them wrong, nail-free wall art solutions can save your walls and your mood.
The good news? You do not need a hammer to make a room feel finished. From adhesive picture hanging strips to leaning art, picture ledges, removable hooks, magnetic frames, tension rods, and decorative tape, there are plenty of clever ways to display wall art without drilling holes. The trick is choosing the right method for the weight of your artwork, the type of wall surface, and how often you like to rearrange your décor. If you change your wall layout every time you drink iced coffee and feel inspired, flexibility matters.
This guide covers 7 clever ways to hang wall art without nails, including when each method works best, what to avoid, and how to make your display look intentional rather than “I panicked and stuck this here.” You will also find practical placement tips, safety advice, and real-world experience at the end to help you avoid the classic mistakes: crooked frames, falling canvases, peeled paint, and the mysterious art avalanche at 2:00 a.m.
Before You Start: Match the Method to the Art
Before choosing a nail-free hanging method, weigh your artwork. Not emotionally, although some pieces do have drama. Physically weigh it or check the product description. Lightweight posters, small canvas prints, and unframed photos are easy to hang without nails. Heavy framed art, mirrors, glass-covered prints, and expensive originals require more caution.
Also inspect your wall. Adhesive products usually perform best on smooth painted drywall, painted wood, tile, metal, glass, and similar clean surfaces. They are often less reliable on textured walls, brick, fabric, delicate wallpaper, dusty surfaces, or walls with peeling paint. If your wall has the texture of a crunchy snack, adhesive strips may not be your hero.
A simple rule: the heavier or more valuable the artwork, the more stable the support should be. For fragile, irreplaceable, oversized, or glass-heavy pieces, consider a no-nail display method such as a picture ledge, furniture display, easel, or professional renter-approved solution rather than relying only on adhesive.
1. Use Adhesive Picture Hanging Strips
Best for: Framed prints, small canvases, lightweight gallery walls
Adhesive picture hanging strips are the superstar of damage-free decorating. They work like a removable hook-and-loop system: one strip attaches to the back of the frame, the matching strip attaches to the wall, and the two pieces lock together. When installed correctly, they can hold many lightweight and medium-weight frames without nails, screws, or tools.
For the best results, clean the wall first with rubbing alcohol and let it dry. Avoid household cleaners because they can leave residue that weakens the adhesive. Press the strips firmly onto the frame and wall, then follow the product’s recommended waiting time before hanging the artwork. Some products require about an hour for the adhesive bond to strengthen. Yes, waiting is annoying. So is watching your framed art swan-dive onto the floor.
Choose strips based on the weight and size of the frame. A small 8-by-10 photo needs much less support than a large framed poster. Use enough strips to distribute weight evenly, usually near the top corners and sometimes along the sides. Do not use adhesive strips on freshly painted walls until the paint has cured according to the product instructions. Many manufacturers recommend waiting several days after painting before applying strips.
Adhesive strips are excellent for renters because they can often be removed cleanly when pulled slowly in the correct direction. However, they are not perfect for every situation. Avoid using them on wallpaper, damaged paint, soft frame backing, or above beds and cribs. Also, do not trust adhesive strips with priceless family heirlooms, heavy mirrors, or anything you would dramatically mourn if it fell.
2. Try Removable Adhesive Hooks
Best for: Canvas art, wire-backed frames, lightweight wall décor
Removable adhesive hooks are another smart way to hang wall art without nails. Unlike flat strips, adhesive hooks give you a small hook shape that works with sawtooth hangers, wire-backed frames, lightweight canvases, hanging signs, and seasonal décor. They are especially useful when your frame already has hardware attached and you do not want to remove it.
To use adhesive picture hooks, first check the weight rating. A hook rated for one pound is not secretly a superhero just because your frame “feels light.” Pick a hook designed for the weight of your art, clean the wall, press the hook firmly in place, and wait before hanging. Many adhesive hooks need time to bond properly before supporting weight.
This method is great for small framed prints in bedrooms, offices, entryways, and dorm rooms. Clear adhesive hooks can also work well for lightweight acrylic frames or small decorative pieces where you do not want the hanger to be obvious. For canvas art, look for hooks or hangers designed specifically for canvas frames so the art sits securely and does not tilt forward.
The main downside is visibility. Some adhesive hooks can peek out above the frame if the art is small or the hanger sits low. To avoid that, measure carefully and test the frame position before sticking anything permanently. Painter’s tape can help you mark the top of the frame and the hook location. Think of it as rehearsal for your wall, minus the stage fright.
3. Lean and Layer Art on Furniture
Best for: Renters, large framed pieces, casual modern styling
If you want to display art without putting anything on the wall, lean it. This method is stylish, simple, and wonderfully commitment-free. Place framed artwork on a mantel, console table, dresser, bookshelf, floating shelf, sideboard, or even directly on the floor if the piece is large enough. Lean it gently against the wall and layer smaller pieces in front for a collected, designer-approved look.
Leaning art works especially well in living rooms, bedrooms, offices, and dining areas. A large framed print behind a lamp on a console table can look intentional and elegant. Smaller frames layered on a bookshelf can add personality without making the shelf feel cluttered. The method also makes it easy to swap art seasonally or whenever your taste evolves from “minimalist calm” to “maximalist garden party.”
For safety, make sure the artwork is stable. Use museum putty, non-slip pads, or small rubber bumpers behind the lower corners to prevent slipping. If you have pets, younger siblings, or a robot vacuum with main-character energy, avoid placing delicate glass frames where they can be knocked over. Larger pieces can be leaned on the floor, but they should sit at a slight angle and have enough support behind them.
The beauty of leaning art is that it creates a relaxed, layered room. It also solves the problem of heavy or valuable art that you do not want to trust to adhesives. No holes, no tools, no measuring meltdown.
4. Install Picture Ledges or Floating Shelves
Best for: Rotating displays, gallery walls, framed collections
A picture ledge is a shallow shelf designed to hold frames, prints, small canvases, and decorative objects. Technically, installing a ledge may require screws or anchors, so it is not always a completely hole-free solution. However, it can dramatically reduce wall damage because you install one shelf and then rearrange many pieces of art without adding new holes every time.
For homeowners, picture ledges are one of the most practical ways to display a flexible gallery wall. For renters, check your lease first. Some landlords allow small screw holes if they are patched later; others prefer no holes at all. If screws are not allowed, use a sturdy freestanding bookcase, console shelf, or mantel as a ledge-style alternative.
Picture ledges are ideal for people who like to change art often. You can layer frames by height, add a small plant, include a sculptural object, or rotate family photos without measuring new nail spots. They are also forgiving. If one frame is slightly off-center, it looks artsy. If a nailed gallery wall is off-center, it looks like the wall sneezed.
To style a ledge, start with the largest piece in the back, then layer medium and small frames in front. Mix vertical and horizontal pieces for movement. Keep spacing loose but balanced. If the display is above a sofa, leave enough breathing room so the shelf does not feel like it is hovering awkwardly over people’s heads.
5. Hang Lightweight Prints with Decorative Tape or Washi Tape
Best for: Posters, postcards, photos, dorm rooms, temporary displays
Decorative tape, especially washi tape, is a fun and budget-friendly way to hang lightweight wall art without nails. It works best for unframed posters, art prints, postcards, children’s artwork, mood boards, and photo walls. You can tape the corners directly or create a faux frame around the print using colorful tape.
This method is popular in dorm rooms, home offices, craft rooms, and teen bedrooms because it is easy to change. Want a grid of travel photos? Tape. Want a rotating inspiration board? Tape. Want to display a concert poster without buying a frame? Tape again, the tiny hero of casual décor.
Before using decorative tape, test a small piece in an inconspicuous area. Some tape can still lift paint, especially on delicate, matte, old, or poorly prepared walls. Washi tape is typically gentler than standard packing tape or duct tape, which should not be used on painted walls unless you enjoy explaining rectangular paint scars.
For a clean look, use a level or measure from a nearby edge like a door frame or desk. If you are making a photo grid, keep equal spacing between pieces. For posters, place tape along all four corners and add extra small loops behind the center if needed. Because this method is for lightweight paper, do not use it for framed art, canvas, glass, or anything with weight.
6. Use Poster Putty, Mounting Putty, or Removable Dots
Best for: Posters, small paper art, classroom displays, temporary décor
Poster putty and removable adhesive dots are classic nail-free options for lightweight displays. They are especially useful for posters, paper prints, flashcards, classroom decorations, calendars, and small art pieces. Putty is simple: roll a small amount, place it behind the corners, press the art onto the wall, and adjust as needed.
One advantage of putty is that it lets you reposition items easily. If your poster is crooked, you can fix it without peeling off an entire adhesive strip. It is also inexpensive and easy to find. For temporary decorating, school projects, party signs, or kids’ art walls, it is a practical choice.
There are limitations. Putty can leave oily marks on some paper or paint, especially if left for a long time. It may not hold well in humid rooms, on dusty walls, or on textured surfaces. It is also not designed for framed pieces or anything heavy. Use it for light paper items, not your framed diploma, unless you want your diploma to learn about gravity firsthand.
To reduce marks, use only the amount needed and remove it slowly. Test first, especially on light-colored paint. If you are displaying valuable prints, avoid putting putty directly on the artwork. Use a protective backing board or choose a frame and a different hanging method.
7. Create a No-Nail Display with Tension Rods, Strings, or Clip Systems
Best for: Photo walls, small prints, narrow spaces, creative displays
Tension rods, string displays, and clip systems are clever alternatives when you want a flexible art wall without nails. A tension rod can fit inside a window frame, between two bookcases, inside an alcove, or across a small nook. From there, you can hang lightweight art using clips, rings, ribbons, or string.
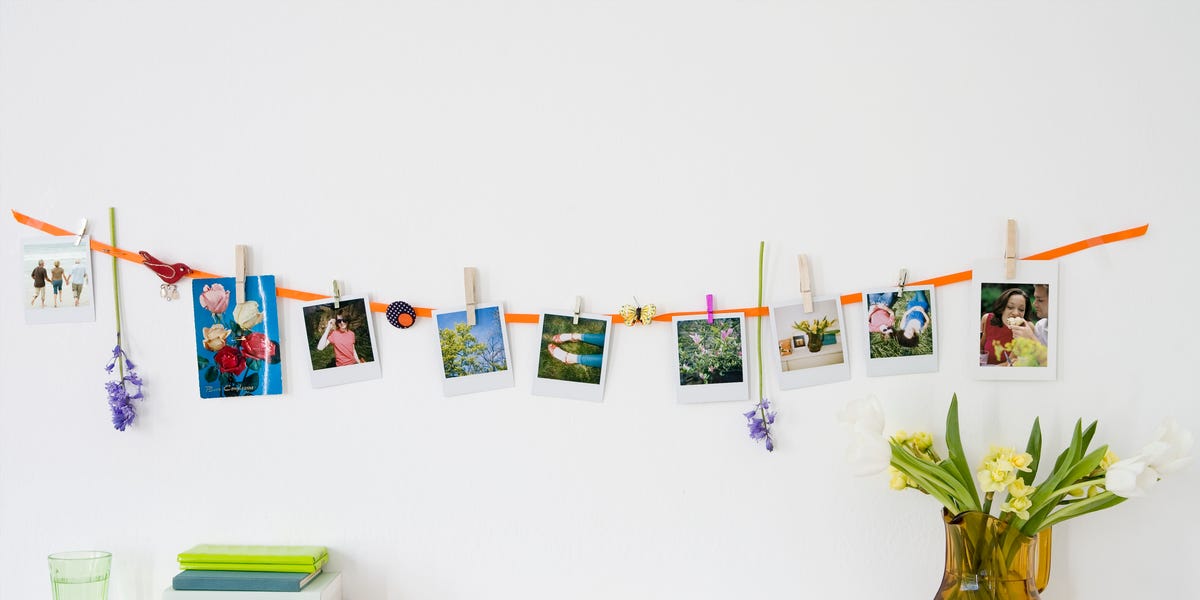
A string-and-clip display is perfect for photos, postcards, small prints, greeting cards, and rotating inspiration boards. You can use removable adhesive hooks to hold each end of the string, then clip the art along the line. This creates a casual, creative look that works beautifully in bedrooms, offices, dorm rooms, craft spaces, and kids’ rooms.
For a more polished look, use matching clips and keep the string level. For a playful look, let the line swag slightly. You can also run several rows vertically or horizontally to create a mini gallery. The biggest benefit is flexibility: swapping art takes seconds. No tools. No dust. No dramatic measuring session.
Just remember that clip systems are for lightweight items. Do not hang heavy framed art from a piece of twine unless you are conducting a physics experiment. If using adhesive hooks to support the string, check the weight rating and include the combined weight of all photos, clips, and decorations.
Smart Placement Tips for Nail-Free Wall Art
Use the 57-Inch Rule
A common gallery guideline is to hang artwork so the center of the piece sits about 57 inches from the floor. This puts the art near average eye level and helps create a balanced look. For gallery walls, use the center of the entire arrangement rather than the center of each individual frame.
Leave Space Above Furniture
When hanging art above a sofa, bed, console, or desk, avoid floating it too high. A good starting point is to leave about 6 to 10 inches between the top of the furniture and the bottom of the art. The art should feel connected to the furniture, not like it is trying to escape through the ceiling.
Plan Before You Stick
Use painter’s tape, paper templates, or a quick floor layout before applying adhesive products. This helps you test spacing and balance before anything touches the wall. For gallery walls, keep consistent spacing between frames, often around 2 to 4 inches for smaller arrangements and slightly more for larger pieces.
Respect Weight Limits
Every nail-free method has limits. Check the package, follow the instructions, and never combine random products in hopes of creating a super-hanger. Adhesives can fail if overloaded, installed poorly, exposed to moisture, or applied to unsuitable surfaces.
Common Mistakes to Avoid
The first mistake is skipping wall prep. Dust, grease, cleaner residue, and moisture can weaken adhesives. Clean the surface and let it dry completely before installing strips or hooks.
The second mistake is hanging too soon. Many adhesive products need time to bond. Waiting may feel unnecessary, but it is part of the holding process. Pour a coffee. Walk away. Let the adhesive do its tiny engineering job.
The third mistake is using nail-free products on the wrong surface. Wallpaper, brick, rough plaster, fabric panels, and heavily textured walls can reduce adhesive performance. If the surface is questionable, choose leaning art, a ledge, an easel, or a freestanding display instead.
The fourth mistake is trusting adhesives with valuable art. If a piece is expensive, fragile, sentimental, or impossible to replace, use a more secure display method. Damage-free does not always mean risk-free.
of Real-Life Experience: What Actually Works When Hanging Art Without Nails
After trying different no-nail wall art methods in apartments, dorm-style rooms, home offices, and freshly painted spaces, the biggest lesson is simple: the wall decides more than you do. Smooth painted drywall is usually friendly to adhesive strips and hooks. Textured walls are suspicious. Brick walls laugh at your optimism. Wallpaper is beautiful, but it often refuses to cooperate with removable adhesives without damage.
Adhesive picture hanging strips are the best all-around option for small and medium framed prints. They create a clean look because nothing shows from the front, and they are easy to remove when used correctly. The most important habit is pressing firmly and waiting before hanging. People often rush this step because the frame feels light. Then, a few hours later, the frame performs a surprise floor inspection. Waiting is not a suggestion; it is part of the installation.
For renters, leaning art is underrated. A large framed print on a console table can make a room feel styled instantly. It also avoids the stress of choosing the “perfect” spot. If you move the sofa, change the lamp, or decide your room now has a completely different personality, the art can move with no wall drama. Layering two or three pieces creates depth and makes inexpensive prints look more curated.
For photo walls, string-and-clip displays are surprisingly useful. They are not formal, but they are charming. They work best when the photos are similar in size or color tone. If everything is random, it can look messy. If you repeat one element, such as black clips, natural wood clips, or white borders, the whole display looks intentional. This method is excellent for students, creative workspaces, and anyone who likes changing photos often.
Decorative tape is fun, but it should be treated as temporary. It is perfect for posters, postcards, and mood boards, especially when you want color around the edges. However, not all tape is gentle. Cheap tape can dry out, curl, or pull paint. Always test first. Also, avoid using tape on expensive prints because adhesive can damage the paper over time.
Picture ledges are the best long-term solution for people who constantly rearrange art. Even if the ledge itself requires installation, it prevents dozens of future holes. A single ledge above a desk or sofa can hold framed prints, small canvases, books, and decorative objects. The display can change with seasons, holidays, or moods. In other words, it supports your inner interior designer without turning the wall into Swiss cheese.
The most practical advice is to use more than one method. Adhesive strips can handle lightweight frames. A ledge can hold rotating art. A console table can support heavier pieces. Clips can display casual photos. When you mix methods, your room feels more natural and less like every frame was installed by the same overly serious robot.
Finally, remember that nail-free hanging is not just about avoiding holes. It is about flexibility. You can test layouts, move art around, and let your home evolve. Blank walls are fine, but art gives a room character. And when you can hang it without nails, you get the character without the patching compound. That is what experts call a win, and what renters call “please let me get my deposit back.”
Conclusion: Nail-Free Walls Can Still Look Finished
Learning how to hang art without nails gives you more freedom to decorate without fear. Adhesive picture hanging strips and removable hooks are excellent for many lightweight and medium-weight frames. Decorative tape, poster putty, and clip systems are perfect for casual paper displays. Leaning art, picture ledges, shelves, and furniture-based arrangements offer safer options for larger or more valuable pieces.
The best method depends on the artwork, the wall surface, the weight, and how permanent you want the display to feel. Clean the wall, follow product instructions, respect weight limits, and plan your layout before sticking anything in place. With the right approach, your wall art can look polished, personal, and renter-friendlyno hammer required.