
Ankle taping can look almost suspiciously easy when an experienced athletic trainer does it. A roll of white tape flashes around the foot, a few strips disappear behind the heel, and 60 seconds later the ankle looks ready for overtime. Try the same thing for the first time, however, and you may create something that resembles a poorly wrapped birthday present.
The difference is technique. A traditional athletic ankle tape job is designed to provide external support while limiting excessive ankle motion, particularly the inversion movement commonly associated with lateral ankle sprains. Sports-medicine organizations recognize taping and bracing as useful forms of external ankle support, especially for athletes returning to activity after a previous sprain. Rehabilitation, balance training, strength, and an appropriate return-to-sport progression remain just as important.
This guide explains how to tape an ankle like an athletic trainer in 10 steps using a classic rigid athletic-tape approach with anchors, stirrups, horseshoes, a figure-eight, and heel locks. It is intended for general sports support and education, not as a way to hide a serious injury and send someone back onto the field.
Before You Tape: Make Sure the Ankle Should Be Taped
Do not assume every painful ankle simply needs more tape. Significant swelling, deformity, severe tenderness, numbness, inability to bear weight, or pain that continues to worsen can indicate an injury requiring professional evaluation. Ankle sprains range from mild ligament stretching to complete ligament tears, and fractures, tendon injuries, and high ankle sprains can sometimes produce similar symptoms.
If an athlete has just suffered a significant injury, taping should not be used as a clever way of making the ankle look functional. Medical evaluation and appropriate rehabilitation come first. Early return to sport may eventually include taping or bracing, but readiness also depends on pain, motion, strength, balance, stability, and sport-specific function.
What You Need to Tape an Ankle
A professional-looking tape job does not require a suitcase full of equipment. For a standard closed-basket-weave ankle taping technique, gather:
- 1.5-inch nonelastic athletic tape
- Pre-wrap or underwrap, if desired
- Adhesive spray, if appropriate
- Heel-and-lace pads or small pieces of lubricated gauze
- Athletic tape scissors or tape cutters
- A clean, dry surface for the athlete to sit on
Rigid athletic tape provides mechanical support differently from stretchy kinesiology tape. If your goal is the classic athletic-trainer ankle tape job seen before football, basketball, volleyball, soccer, or court sports, nonelastic athletic tape is generally the material being discussed here.
How to Tape an Ankle Like an Athletic Trainer: 10 Steps
Step 1: Check the Skin and Prepare the Ankle
Start with clean, dry skin. Check for cuts, blisters, rashes, existing tape irritation, or areas that are unusually tender. Tape over damaged skin can turn a small problem into a much angrier small problem.
If excessive hair interferes with adhesion, trimming may help. Athletic trainers sometimes use adhesive spray before applying underwrap, although this is optional and should not be used on irritated skin or on someone who reacts to the product.
Place heel-and-lace pads over high-friction areas, typically at the front of the ankle and around the Achilles region. These pads help protect the skin where layers of tape may rub during running and cutting.
Step 2: Position the Foot at Approximately 90 Degrees
Have the athlete sit with the lower leg supported and the foot extending beyond the edge of the table or bench. Hold the ankle in a neutral position, with the foot approximately perpendicular to the lower leg.
This position matters more than beginners expect. If you tape while the toes are pointed downward, the final job may become restrictive or uncomfortable once the athlete stands. Maintaining neutral alignment while the tape is applied creates a more functional support.
The athlete should stay relaxed but keep the foot position steady throughout the procedure. Suddenly pointing the toes halfway through is an excellent way to make the tape job interesting for all the wrong reasons.
Step 3: Apply Pre-Wrap Without Making It Too Thick
Beginning around the midfoot, apply a thin layer of pre-wrap toward the lower leg. Cover the area that will receive tape while generally leaving the heel exposed unless your preferred method specifies otherwise.
Pre-wrap protects sensitive skin and makes tape removal more comfortable, but too much can reduce how securely the tape holds. Think “thin protective layer,” not “winter scarf for the ankle.”
Some athletic trainers tape directly to appropriately prepared skin for maximum adhesion. Others routinely use underwrap. The choice may depend on the athlete’s skin, sport, duration of use, and taping protocol.
Step 4: Place the Upper and Lower Anchors
Next, create the foundation of the tape job. Apply one or two anchor strips around the lower leg several inches above the ankle bones. These should lie smoothly against the skin without being pulled aggressively tight.
Add an anchor around the midfoot near the base of the metatarsals while leaving the toes free. Avoid wrapping tightly across the forefoot because swelling or movement inside a shoe can make an overly snug anchor uncomfortable.
The anchor strips provide attachment points for the supporting pieces that come next. Wrinkles should be smoothed out whenever possible because a tiny fold can feel remarkably large after an hour inside a cleat.
Step 5: Add Three Stirrup Strips
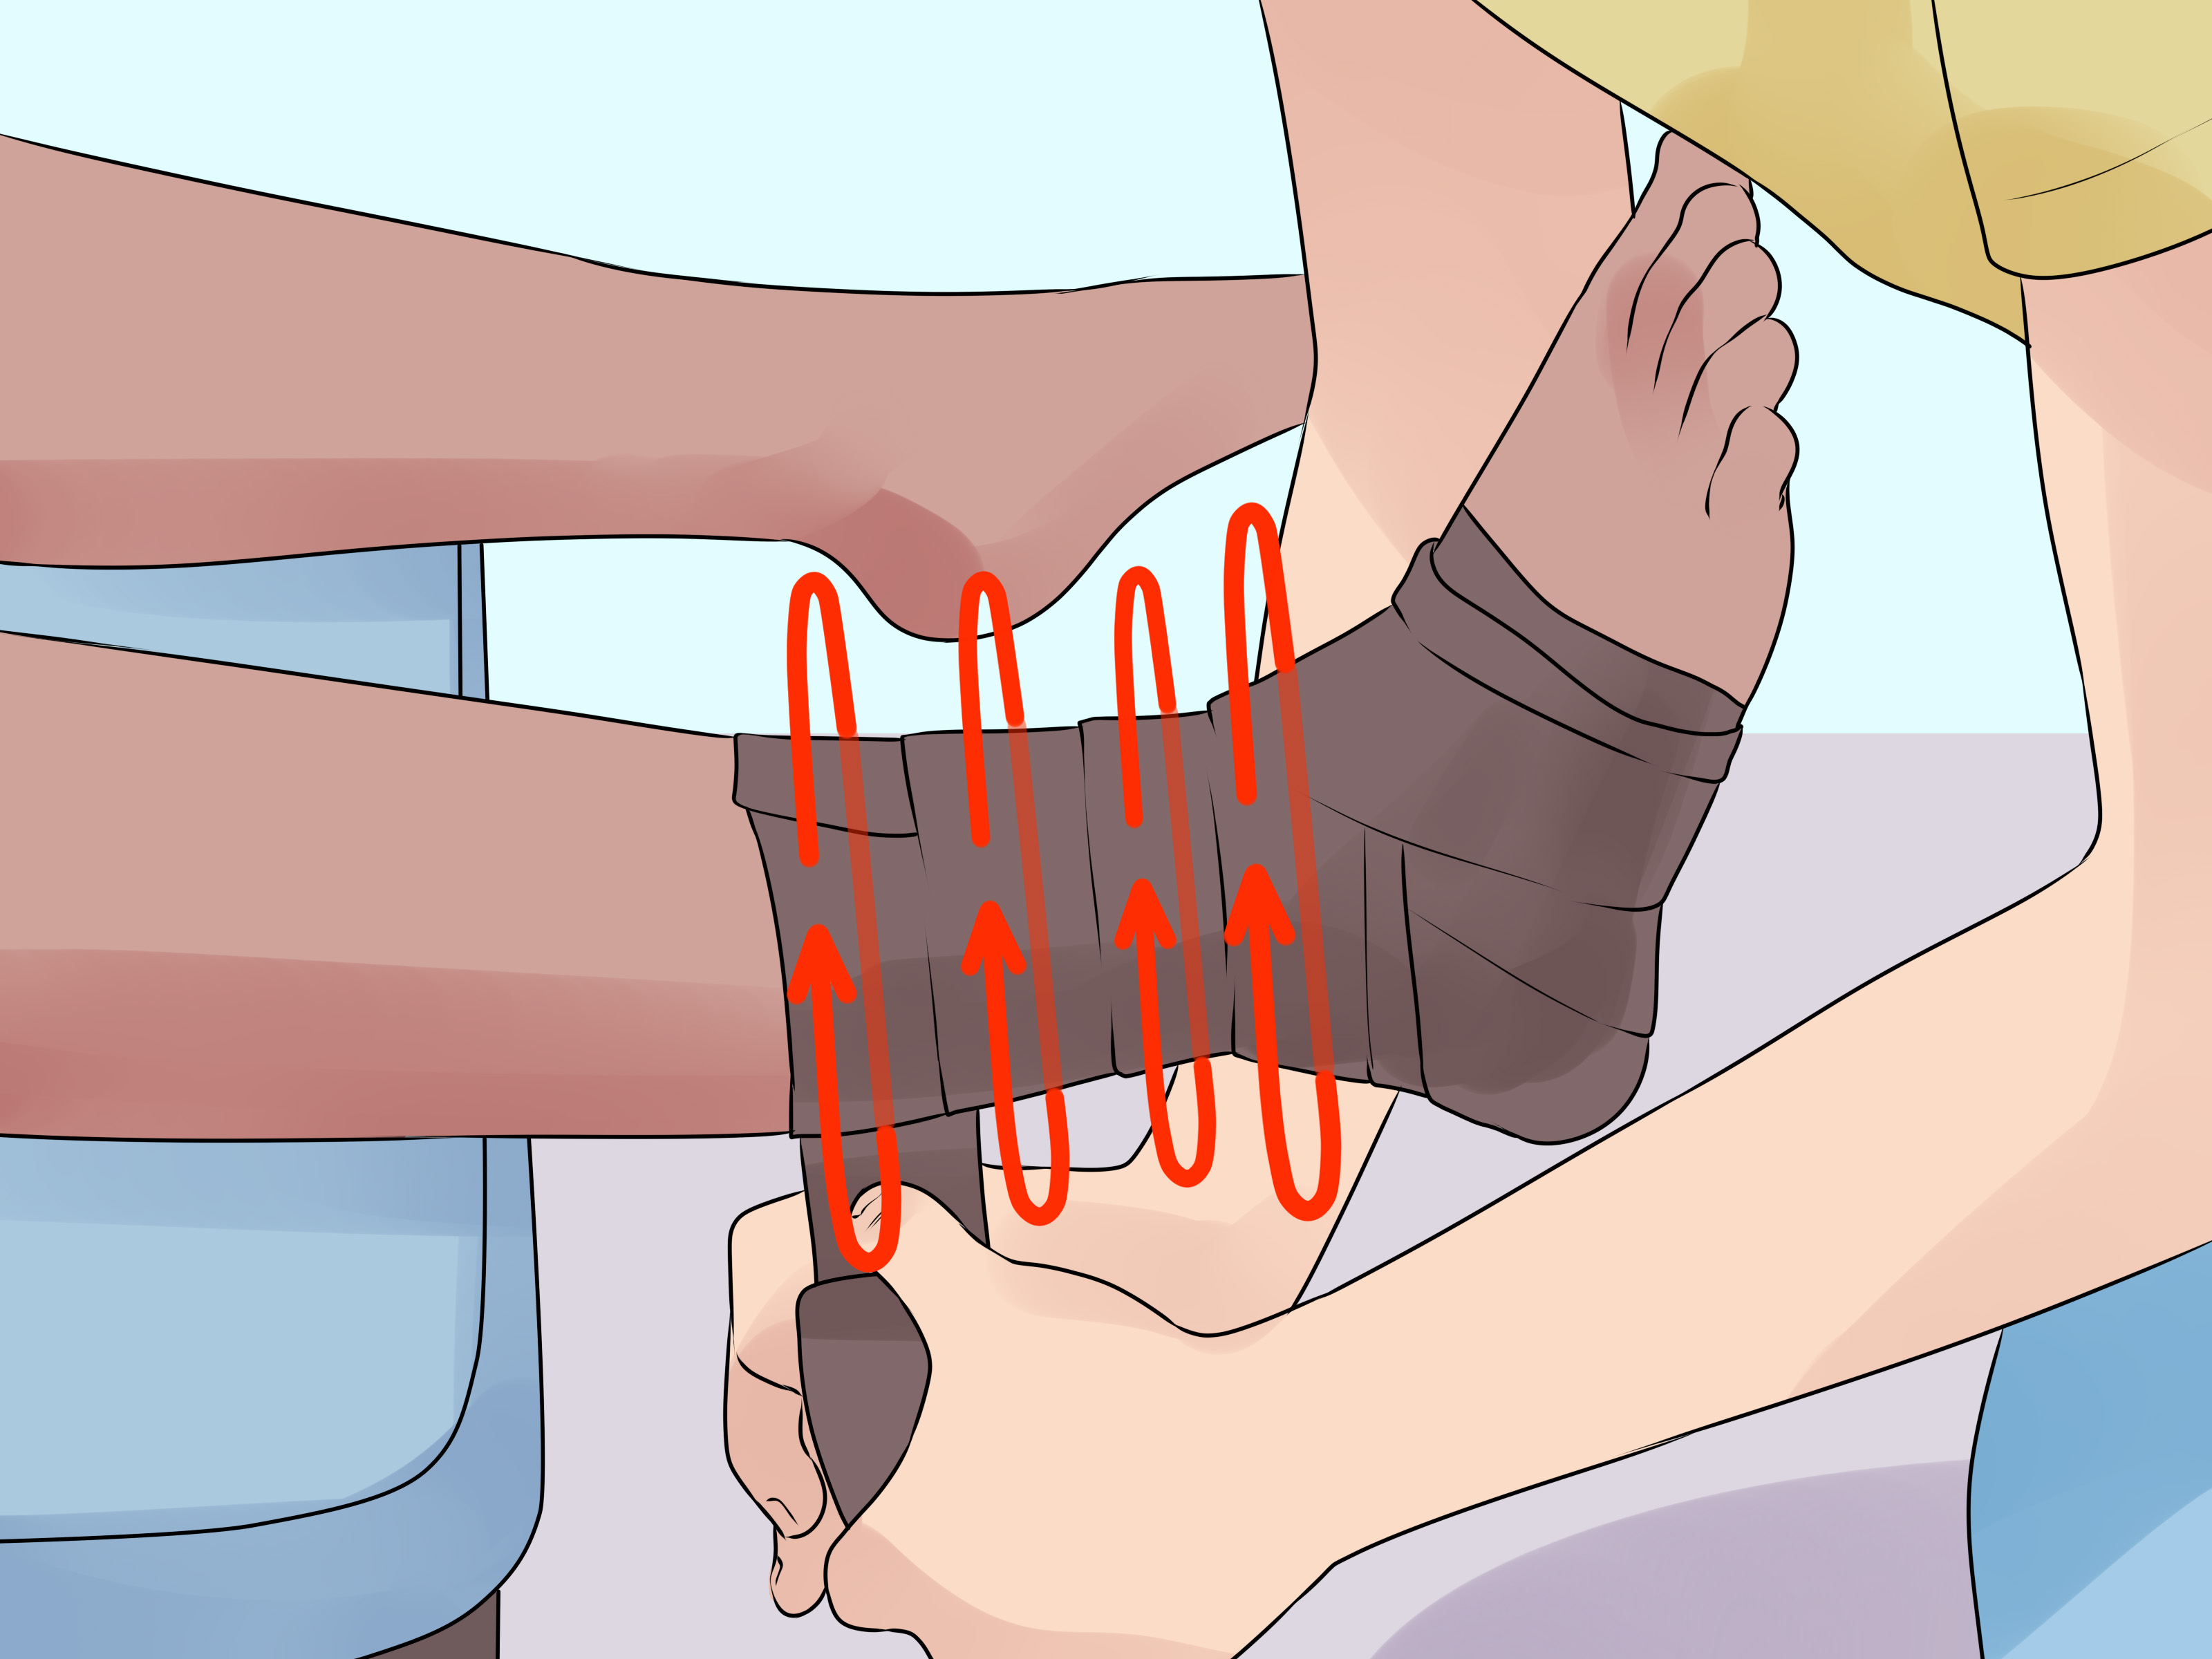
The stirrups are among the most important parts of traditional ankle taping. Starting at the inside portion of the upper anchor, bring a strip downward along the medial ankle, under the heel, and upward along the outside of the ankle to the opposite side of the upper anchor.
Apply approximately three stirrups, overlapping each previous strip by roughly half its width.
For the common goal of protecting against excessive inversion, the direction and tension of these strips are chosen to support the lateral ankle. The tape should feel firm without pulling the foot into an unnatural position.
Properly applied external ankle support can reduce the risk of ankle sprains, particularly in athletes with a history of previous injury.
Step 6: Alternate With Horseshoe Strips
Horseshoes wrap around the back of the ankle and connect the sides of the tape job. Begin near the foot anchor, travel behind the Achilles area, and finish on the opposite side.
Apply several overlapping horseshoes while working gradually upward. Combined with the stirrups, these strips form the familiar basket-weave structure used in traditional ankle taping.
Avoid putting excessive direct pressure over the Achilles tendon. The goal is controlled support, not to make the athlete wonder whether their foot has been vacuum-sealed.
Step 7: Apply a Figure-Eight
Now add a figure-eight strip to connect and reinforce the ankle and foot portions of the tape job.
Begin near the upper ankle anchor. Bring the tape diagonally across the front of the ankle, around the bottom of the foot, across the top of the foot, and back around the ankle to complete the figure-eight pattern.
Keep consistent tension and lay the tape flat as it changes direction. Avoid folding or twisting the strip. The figure-eight provides additional support while tying several components of the tape job together.
Step 8: Add Medial and Lateral Heel Locks
Heel locks are the part that often makes a beginner’s tape job suddenly look much more professional.
Starting above the ankle, guide the tape diagonally toward the heel. Pass around one side of the heel, underneath and behind it, then return upward across the ankle. Repeat in the opposite direction to lock the other side.
The tape should closely contour the heel without bunching. Experienced athletic trainers smoothly change the angle of the tape while maintaining even tension, which is why heel locks usually require a little practice.
One heel lock on each side may be sufficient for a basic tape job; some protocols use additional reinforcement depending on the athlete and purpose.
Step 9: Close the Tape Job
Use overlapping strips to cover exposed sections between the foot and lower-leg anchors. Work methodically so the finished surface is smooth, with minimal gaps and no unnecessary bulky layers.
Closing strips help secure the supporting components and prevent loose tape edges from catching on socks or equipment.
More tape does not automatically equal more support. Athletic taping is about strategic placement. Adding layer after layer simply because the roll is still in your hand can create unnecessary stiffness, pressure, and bulk inside the shoe.
Step 10: Check Circulation, Comfort, and Function
Never finish taping and immediately send the athlete sprinting away.
Ask whether the tape feels supportive rather than painfully tight. Check the toes for normal color and warmth. The athlete should not experience numbness, tingling, unusual coldness, throbbing, or increasing pain.
Have the athlete stand, walk, and perform gentle sport-appropriate movements if medically cleared. The tape should resist unwanted motion while still allowing the functional movement required for activity.
If circulation or sensation appears abnormal, remove the tape promptly rather than hoping the ankle will “get used to it.” Numbness, tingling, coldness, and worsening pain are warning signs that warrant attention.
Common Ankle-Taping Mistakes
Pulling Every Strip as Tight as Possible
Athletic tape is already rigid. You do not need to stretch it like you’re tying furniture to the roof of a car. Excessive tension can create pressure points and circulation problems.
Forgetting the Foot Position
One of the easiest mistakes is allowing the athlete’s toes to drop downward while taping. Keep the ankle near neutral throughout the procedure.
Creating Wrinkles
Wrinkles can rub against skin during repeated movement. Smooth each strip as you go rather than trying to fix an entire wrinkled masterpiece at the end.
Using Tape Instead of Rehabilitation
Tape supports an ankle; it does not rebuild strength, balance, coordination, or proprioception. Rehabilitation programs emphasizing range of motion, strengthening, balance, and progressive functional activity are important for reducing recurrent problems.
Tape vs. Ankle Brace: Which Is Better?
Both options have legitimate uses. Athletic taping can provide customized support and is popular when an athlete prefers a low-profile setup inside a shoe. A brace is reusable, easier to apply consistently, and often less expensive over time.
Evidence summarized by sports-medicine organizations supports external ankle supports for reducing recurrent ankle-sprain risk. Some research finds taping and bracing similarly effective, while bracing may offer advantages in consistency, cost, and ease of use.
The better option therefore depends on the athlete, sport, injury history, medical recommendations, footwear, comfort, and access to someone who knows how to tape correctly.
When Should Athletes Use Ankle Tape?
Ankle taping is commonly considered when an athlete has a history of ankle sprains, is gradually returning after an injury, participates in sports with frequent jumping or direction changes, or has been advised to use external support by a medical professional.
Basketball, football, soccer, volleyball, and tennis include movements that can place substantial demands on ankle stability. Previous ankle injury is an important risk factor for another sprain, which is why preventive strategies often combine external support with balance and strength training.
However, healthy athletes do not automatically need tape simply because they play sports. Training, appropriate footwear, conditioning, strength, flexibility, neuromuscular control, and sport-specific preparation also contribute to injury prevention.
Real-World Experience: What You Learn After Practicing Athletic Ankle Taping
Reading the steps teaches you the pattern. Actually holding the roll teaches you why athletic trainers practice the pattern repeatedly.
During a first attempt, many people focus almost entirely on remembering what comes next: anchor, stirrup, horseshoe, stirrup again, figure-eight, heel lock. That mental checklist is useful, but good taping quickly becomes less about memorizing strip names and more about understanding what each strip is supposed to accomplish.
The biggest practical lesson is usually tension control. Beginners commonly believe strong support requires pulling hard. After a few attempts, it becomes obvious that rigid athletic tape can create plenty of support with surprisingly moderate tension. A smooth strip applied in the correct direction usually works better than a brutally tight one placed badly.
Heel locks tend to produce another learning moment. On paper, the path seems straightforward. In real life, the heel is round, the tape is flat, and physics is apparently feeling mischievous. The first few locks may wrinkle near the heel. With practice, you learn to change the angle gradually, guide the tape with both hands, and let it conform to the shape rather than forcing it.
Speed also comes naturally only after consistency. An experienced athletic trainer may finish an ankle quickly because the sequence has become automatic. Trying to imitate that speed too early often produces gaps, wrinkles, crooked anchors, and enough discarded tape to decorate a small locker room. Accurate placement should come before speed.
An illustrative example is an athlete preparing to return to basketball after completing rehabilitation for a lateral ankle sprain. The athlete has regained strength, can perform balance drills, and has been cleared for progressively harder activity. During the first taped practice, the athlete may notice that the ankle feels slightly more restricted during cutting movements but comfortably supported during landing. After a few minutes, the tape becomes something they barely think aboutwhich is generally preferable to spending the entire practice wondering what their ankle is doing.
Another useful experience is comparing the tape before and after activity. Athletic tape can gradually loosen as an athlete sweats and repeatedly runs, jumps, and changes direction. That does not necessarily mean it suddenly provides zero benefit, but it illustrates why taping technique, sport duration, and individual preference matter. Older research has documented reductions in tape’s mechanical restraint during activity, one reason reusable braces are attractive for some athletes.
Perhaps the most important lesson is learning what tape cannot do. A beautifully taped ankle can still belong to an athlete who lacks strength, balance, confidence, or adequate healing. Sports medicine guidance consistently emphasizes rehabilitation and progressive return to activity rather than relying on external support alone.
In other words, becoming good at ankle taping means learning when to use the tape, how to apply it, how to check it afterward, and when the smarter move is to put down the roll and send the athlete to a qualified healthcare professional.
Final Thoughts
Learning how to tape an ankle like an athletic trainer is mainly a matter of mastering a repeatable sequence: prepare the skin, position the foot, create anchors, build stirrups and horseshoes, add a figure-eight and heel locks, close the tape job, and check the athlete carefully afterward.
A good ankle tape job should feel secure without causing numbness, excessive pressure, or pain. More importantly, taping should be considered one part of ankle management rather than a replacement for diagnosis or rehabilitation. Strength, balance, mobility, proprioception, appropriate footwear, and gradual return to sport all matter when the goal is keeping an athlete safely active.
Note: This article is for general education and sports-support information. Do not use taping to continue playing through a suspected fracture, severe sprain, significant instability, numbness, deformity, or inability to bear weight. Seek evaluation from a physician, physical therapist, certified athletic trainer, or other qualified healthcare professional when an ankle injury may be significant.