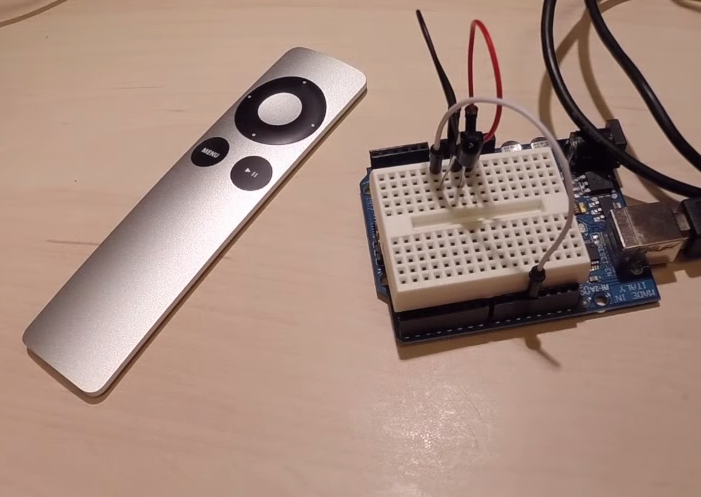

The Apple Remote looks almost comically simple. A directional ring, a center button, Menu, and Play/Pause hardly resemble the command center of a secret laboratory. Yet with the right receiver and a little software, this pocket-size controller can operate far more than an Apple TV.
You can use an Apple Remote to launch computer applications, control presentations, manage a media center, switch lights, move a small robot, trigger smart-home scenes, or run custom scripts. It will not magically communicate with a coffee maker through sheer confidence, of course. The trick is placing a programmable bridge between the remote and whatever you want to control.
This guide explains how the system works, which Apple Remote models are best for experimentation, what hardware you need, and how to build practical projects without turning your living room into an electrical engineering crime scene.
First, Identify Which Apple Remote You Have
“Apple Remote” can refer to several different products, and the distinction matters. The older white plastic and aluminum Apple Remotes communicate through infrared light. They were supplied with early Apple TV models and supported by various older Macs with built-in infrared receivers.
Modern Siri Remote and Apple TV Remote models work differently. They use Bluetooth to communicate with Apple TV, while infrared is primarily used for controlling compatible televisions and audio receivers. Apple also supports HDMI-CEC through Apple TV for functions such as power, input switching, volume, and mute.
The Legacy Apple Remote
The older aluminum Apple Remote is usually the better choice for custom projects. Its buttons transmit infrared commands that can be detected by an inexpensive IR receiver module. It is small, durable, easy to find secondhand, and refreshingly free of touch-sensitive surfaces that interpret an accidental thumb movement as a personal attack.
These remotes are especially useful for Arduino, ESP32, Raspberry Pi, Linux media centers, and USB infrared receiver projects.
The Modern Siri Remote
The current Siri Remote is excellent for Apple TV but less convenient as a general-purpose DIY controller. Its main navigation commands travel over Bluetooth rather than ordinary infrared. Although the remote contains an IR transmitter, it is designed mainly to operate TV and receiver functions.
For a project that depends on capturing every button directly, use a legacy white or aluminum Apple Remote. For controlling an Apple TV, television, or home theater system, the newer Siri Remote remains the more capable option.
How an Apple Remote Can Control Other Devices
An infrared remote does not send instructions such as “turn on the lamp” or “start the robot.” It transmits a timed pattern of invisible light pulses. A compatible receiver detects that pattern and converts it into digital information.
Your software then assigns an action to each recognized command:
- The Up button could increase a lamp’s brightness.
- The Down button could dim it.
- Play/Pause could start or stop music.
- Menu could launch an application.
- The center button could activate an entire smart-home scene.
Arduino’s IRremote ecosystem supports receiving and decoding remote-control signals, while ESPHome offers components for detecting infrared and radio-frequency commands. LIRC performs a similar job on Linux by decoding remote signals and mapping them to key presses or executable commands.
What You Need
The exact parts depend on the project, but most Apple Remote control systems use the same basic structure.
1. An Infrared Apple Remote
The aluminum A1294 remote is a popular choice, although the older white model can also work. Check the battery before troubleshooting your code for three hours. A weak coin-cell battery has successfully impersonated many imaginary software bugs.
2. An Infrared Receiver
A microcontroller project typically uses a small demodulating IR receiver module. Many common modules are designed around a carrier frequency near 38 kHz, but you should confirm the requirements of your receiver and the protocol your software detects.
For a computer, a USB receiver such as Flirc offers an easier route. Flirc behaves like a keyboard, allowing remote-control buttons to be assigned to keyboard keys. That means any application with keyboard shortcuts can potentially be controlled without writing a complete infrared decoder.
3. A Processing Device
Your processing device translates button presses into useful actions. Common choices include:
- An Arduino for relays, motors, LEDs, and simple electronics
- An ESP32 for Wi-Fi-connected devices and Home Assistant projects
- A Raspberry Pi for scripts, media centers, servers, and automation
- A Mac, Windows PC, or Linux computer with a USB IR receiver
4. Output Hardware or Software
The final component is whatever performs the action. It might be a relay module, motor driver, smart-home automation, media application, keyboard shortcut, web request, or shell script.
When controlling electrical equipment, use properly rated, enclosed, commercially manufactured relay hardware. Do not connect household voltage directly to a breadboard unless your goal is to control everything in the house by tripping the circuit breaker.
The Simplest Method: Turn the Remote Into a Wireless Keyboard
The fastest way to control a computer is to use a USB infrared receiver that presents itself as a keyboard. Connect the receiver, open its configuration software, select a keyboard layout, and teach it the Apple Remote buttons.
You might map the controls like this:
| Apple Remote Button | Keyboard Command | Possible Action |
|---|---|---|
| Play/Pause | Spacebar | Pause or resume media |
| Left | Left Arrow | Rewind or return to the previous slide |
| Right | Right Arrow | Fast-forward or advance a slide |
| Up | Volume Up | Increase system volume |
| Down | Volume Down | Reduce system volume |
| Menu | Escape | Close a menu or exit full-screen mode |
This setup works well with media players, presentation software, music applications, photo viewers, and home-theater computers. It also avoids deep operating-system modifications because the computer sees ordinary keystrokes rather than a mysterious custom accessory.
Build an Arduino Apple Remote Controller
An Arduino-based controller offers more flexibility. Connect the output pin of an IR receiver module to a digital input, provide the correct power and ground connections, and run an infrared decoding example from a suitable library.
Open the serial monitor and press each Apple Remote button. Record the decoded value or raw timing data produced for every command. Once the buttons have been identified, replace the diagnostic output with actions.
Example Button Logic
The Apple Remote is only the input device. The Arduino sketch determines what each button means, which is why the same remote can control an LED strip today and a miniature drawbridge tomorrow.
Useful Arduino Projects
- A remote-controlled desk lamp
- A camera shutter or time-lapse trigger
- A small two-motor robot
- A servo-operated cabinet or curtain
- A workshop timer
- A presentation cue light
- A low-voltage relay controller
Infrared requires reasonable line of sight. Strong sunlight, hidden receivers, reflective surfaces, and badly positioned sensors can reduce reliability. Mount the receiver where it can clearly see the remote rather than burying it behind three books, a plant, and your confidence.
Control a Raspberry Pi With an Apple Remote
A Raspberry Pi can translate Apple Remote signals into keyboard events, media commands, shell scripts, network requests, or Home Assistant actions. Linux includes support for many IR receiver devices, while LIRC remains valuable when you need custom decoding or highly specific command mappings.
LIRC’s irexec utility can execute an arbitrary command when the configured remote button is detected. For example, one button could launch Kodi, another could shut down the Pi safely, and another could call a script that changes smart-light settings.
Practical Raspberry Pi Actions
- Start or stop a media server
- Launch a playlist
- Run a backup script
- Display a dashboard
- Toggle a GPIO output
- Send a message through an automation service
- Call a local web API
For important actions such as shutdown, require a long press or a two-button sequence. Otherwise, one misplaced elbow could turn a casual movie night into an unscheduled server-maintenance window.
Use an Apple Remote With Home Assistant
An ESP32 running ESPHome can act as the bridge between an infrared Apple Remote and Home Assistant. ESPHome’s remote receiver component can detect supported infrared signals and expose them as events or binary sensors. Home Assistant can then use those events as automation triggers.
A single Play/Pause press might activate a “Movie Night” scene that dims the lights, closes motorized shades, turns on the television, and adjusts the thermostat. The Menu button could restore the room when the movie ends.
Example Smart-Home Layout
- Up: Increase living-room brightness
- Down: Decrease living-room brightness
- Left: Activate the previous lighting scene
- Right: Activate the next lighting scene
- Center: Toggle the main lamp group
- Play/Pause: Start Movie Night
- Menu: Run the Everything Off scene
You can also combine the receiver with an infrared transmitter. ESPHome supports both receiving and sending common remote-control signals, while Home Assistant integrations can work with compatible universal remote hardware such as Broadlink devices. This allows one Apple Remote command to trigger a different IR command for a television, fan, or air conditioner.
Pairing and Interference Problems
Legacy Apple Remotes can be linked to compatible Apple TV hardware so that one remote does not unintentionally operate another nearby unit. Apple’s documented process uses Menu plus Left to unlink and Menu plus Right to link the aluminum or white remote.
For a custom receiver project, pairing behavior depends on the decoder and configuration. Some systems recognize only the command portion of the transmission, while others can distinguish different remote identifiers.
If several Apple Remotes are in the same room, record the complete data received from each one. Do not assume that every receiver or library handles remote IDs in the same way.
Common Problems and Fixes
The Receiver Detects Nothing
Check the battery, receiver pinout, supply voltage, ground connection, software input pin, and line of sight. IR receiver modules that look nearly identical may use different pin arrangements, so consult the datasheet instead of trusting the shape of the plastic package.
Every Button Produces the Same Result
Your code may be reading a repeat frame created when a button is held down. Log complete command data and distinguish between an initial press and repeated signals.
Commands Trigger Twice
Add debouncing or a short delay that prevents the same command from running repeatedly within a defined period. This is especially important for power toggles and scripts.
The Range Is Poor
Move the receiver into clear view, reduce direct sunlight, confirm that the receiver is intended for the transmitted carrier frequency, and keep noisy power wiring away from the signal connection.
The New Siri Remote Does Not Behave Like the Old One
That is expected. Modern Siri Remote navigation relies mainly on Bluetooth communication with Apple TV. Its infrared hardware does not make every button available as a conventional DIY IR command. Use a legacy Apple Remote for straightforward receiver projects.
Five Creative Ways to Control Anything With an Apple Remote
1. Build a Distraction-Free Music Controller
Place a small computer near your speakers and map the Apple Remote to play, pause, skip, volume, and playlist commands. You can control music without unlocking a phone and immediately becoming trapped in a 40-minute expedition through notifications.
2. Create a Presentation Remote
Use a USB IR receiver to map Left and Right to slide navigation, Play/Pause to start the presentation, and Menu to exit. The remote is compact, professional-looking, and unlikely to contain a surprise laser powerful enough to distract the front row.
3. Operate a Workshop Camera
An Arduino or Raspberry Pi can translate the center button into a camera trigger. Other buttons can adjust delays, start a time-lapse sequence, or activate a preview light.
4. Control a Small Robot
Map the directional controls to motor movement and use the center button as a stop command. Because infrared requires line of sight, this design is best for indoor demonstrations rather than sending a robot bravely into another county.
5. Launch Smart-Home Scenes
An ESP32 receiver can forward button presses to Home Assistant. This creates a simple physical controller for guests who should not need an app, an account, a password, and a software update just to turn on a lamp.
Experience Notes From Realistic Apple Remote Projects
The most important lesson from typical Apple Remote builds is that the software is rarely the hardest part. The first decoding test may work within minutes: press a button, watch a hexadecimal value appear, and briefly feel like the commander of a very small spacecraft. Reliability problems usually begin when the breadboard prototype is moved into its permanent enclosure.
Receiver placement makes an enormous difference. A sensor that works perfectly on a desk may respond poorly after being installed behind smoked plastic, underneath a shelf, or beside a bright window. A successful enclosure should provide a clear path between the remote and the IR receiver. A small dark window designed for infrared can make the finished project look cleaner without completely hiding the sensor.
Button repetition is another common surprise. Holding a directional button may produce an initial command followed by repeat frames. That behavior is useful when adjusting volume or brightness, but dangerous when a button triggers a toggle. A light could switch on, switch off, and switch on again before your thumb leaves the remote. The solution is to treat continuous controls and one-time actions differently. Brightness changes can accept repeats, while power commands should include a cooldown period or respond only to the first frame.
Simple mappings are usually better than clever ones. A six-button remote has limited space, and complicated combinations become difficult to remember. One practical approach is to reserve the directional ring for adjustment, the center button for selection, Play/Pause for the main activity, and Menu for canceling or returning to a safe state.
Long presses can provide a second layer of control without making the remote confusing. A short press on Play/Pause might toggle music, while a long press launches the full Movie Night automation. A short Menu press could return to the previous screen, while a long Menu press shuts down the media center safely.
It also helps to design for failure. Network-dependent smart-home commands should not leave equipment in an unsafe state if Wi-Fi disappears. Motors need travel limits. Relays need suitable ratings. Scripts should verify conditions before running destructive commands. A remote button is wonderfully convenient, which is precisely why it should not be able to erase a drive or unlock a door after one accidental press.
For computer control, a keyboard-emulating USB receiver is generally the least frustrating method. It avoids driver adventures and works with applications that already support shortcuts. For electronics, an Arduino provides predictable local control. For connected automation, an ESP32 and Home Assistant offer the broadest range of actions. A Raspberry Pi sits comfortably in the middle, especially when scripts, media software, and GPIO devices must work together.
The final lesson is that “control anything” does not require the remote to communicate directly with every device. The Apple Remote only needs to reach one reliable bridge. That bridge can translate six familiar buttons into network messages, keyboard shortcuts, GPIO changes, infrared transmissions, or automation events. Once that translation layer exists, the humble remote becomes less of an Apple accessory and more of a tiny universal command panel.
Conclusion
An Apple Remote cannot literally control every device by itself, but it can become the trigger for almost any action a computer, microcontroller, or smart-home platform can perform. The legacy infrared models are particularly useful because their signals are easy to capture with affordable receiver hardware.
Start with one simple action, confirm that every button is decoded reliably, and then expand the project. Before long, the same minimalist remote that once paused a movie could be controlling lights, launching scripts, moving motors, operating a media center, or preparing your entire living room for movie night.
Note: Test custom projects with low-voltage equipment first. Use enclosed, properly rated hardware for household electrical loads, and add confirmation steps for security-sensitive or destructive actions.