
Refinishing 60-year-old hardwood floors is one of those home projects that feels equal parts restoration, archaeology, and upper-body workout. You are not just making a floor prettier. You are rescuing a piece of the house’s history from decades of muddy shoes, furniture dents, pet drama, mystery stains, and at least one previous owner who apparently believed area rugs were a permanent life decision.
The good news is that old hardwood floors are often worth saving. In fact, many floors from the 1950s and 1960s were made from solid hardwood, commonly oak, and built to be sanded and refinished more than once over their lifetime. That means what looks tired, yellowed, scratched, or blotchy today may still have plenty of life left in it. The bad news? Old floors do not forgive impatience. Rush the sanding, ignore moisture problems, choose the wrong finish, or skip basic prep, and your “character-rich vintage floor” can turn into “expensive cautionary tale with swirl marks.”
This guide breaks down how to evaluate, prep, sand, stain, seal, and maintain older hardwood floors the smart way. Whether you are hiring a pro or braving a rental sander and a weekend full of dust, here is how to give those veteran boards the comeback tour they deserve.
Why 60-Year-Old Hardwood Floors Are Usually Worth Refinishing
Older hardwood floors have something many brand-new products spend a lot of marketing money trying to imitate: real age, real grain, and real character. A 60-year-old floor often has tighter board widths, richer wood tones, and a more lived-in look than many newer factory-finished options. Even when the finish is dull, the wood underneath can still be beautiful.
Refinishing is often more practical than replacement, too. If the boards are structurally sound, not severely water-damaged, and still thick enough to sand, refinishing lets you keep the original material while changing the color, sheen, and overall style. In plain English, it is the home-improvement version of getting a great haircut instead of a full face transplant.
That said, not every old floor should be refinished automatically. Some should be repaired first, some only need recoating, and some are simply too damaged to save without major patchwork.
Refinish, Recoat, or Replace: Know Which Job You Actually Have
When a full refinish makes sense
A full refinish is the right move when the floor has deep scratches, worn-through finish, discoloration, uneven sheen, old wax buildup, or a stain color you no longer want. This process sands the floor down to bare wood and rebuilds the surface with stain and protective finish.
When a recoat may be enough
If the floor is mostly dull with only light surface scratches, you may not need to sand to bare wood. A screen-and-recoat approach lightly abrades the existing finish and adds a fresh coat on top. It is faster, less messy, and less aggressive than a full refinish. It is not magic, though. It will not erase deep gouges, pet stains, dark water marks, or major finish failure.
When replacement enters the chat
If boards are badly cupped, rotted, split, warped, loose over large areas, or have been sanded down too many times already, replacement or selective board weaving may be the better option. The goal is not to save wood at all costs. The goal is to save what still deserves saving.
Before You Sand Anything, Inspect the Floor Like a Detective
Old floors hide secrets. Some are charming. Some are the reason people invent new curse words. Before refinishing, inspect the space carefully.
Check board thickness
Many older solid hardwood floors were installed at a thickness that allows multiple refinishes. Still, you want to confirm there is enough usable wood left above the tongue-and-groove joint. If the boards are too thin, an aggressive sanding job can do real damage. This is especially important if the floor has already been refinished once or twice over the decades.
Look for moisture issues
If you see cupping, crowning, black stains, or movement between boards, do not blame age alone. Moisture is often the real villain. Sanding before the moisture problem is solved can lock in trouble or make the floor look worse later. Check for plumbing leaks, damp crawlspaces, wet basements, poor ventilation, or entry areas that have been repeatedly soaked.
Find repairs that need attention first
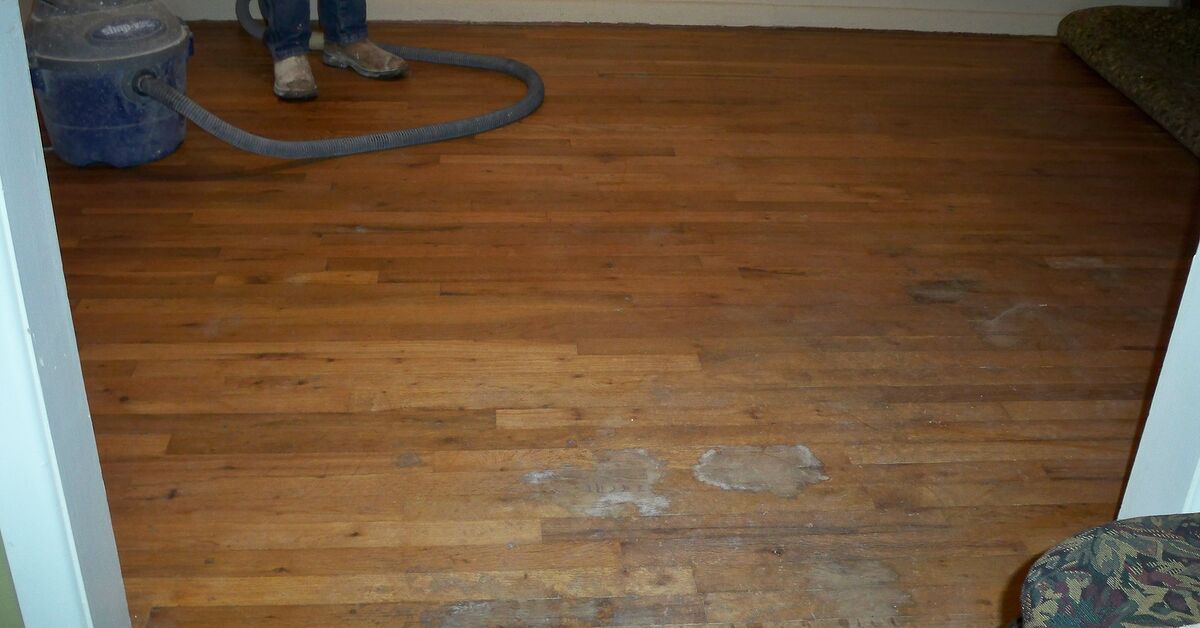
Loose boards, popped nails, cracked planks, termite damage, and wide gaps should be addressed before finishing work begins. Small holes and minor imperfections can often be filled. Larger damaged sections may need patching or board replacement so the finished result does not look like the floor survived a bar fight.
Identify old coatings
Wax, shellac, old polyurethane, and mystery-era finishes do not all behave the same way. This matters because some modern coats will not bond properly over certain existing products. If you are considering a recoat instead of a full sand-down, test adhesion carefully or consult a pro.
Think about lead-safe precautions in older homes
The floor itself is not usually the main lead issue, but sanding in an older home can disturb painted trim, baseboards, thresholds, and nearby surfaces if the house predates modern lead-paint rules. Containment, dust control, and proper cleanup matter much more in these homes. If children or pregnant family members are in the picture, caution is not optional.
How to Refinish 60-Year-Old Hardwood Floors Step by Step
1. Empty the room completely
Take out furniture, curtains, rugs, décor, and anything else that likes collecting dust. Remove or protect floor vents, doorway openings, and adjacent rooms. Floor refinishing dust has Olympic-level commitment. It will travel.
2. Clean and prep the surface
Sweep, vacuum, and remove grime before sanding. Set any exposed nails slightly below the wood surface. Repair loose boards. Replace broken planks. If gaps are seasonal and small, do not panic-fill every one of them. Old floors move, and overfilling can create a mess later.
3. Sand carefully, not heroically
This is the step that separates “restored” from “why does the dining room look wavy?” Most full refinishing jobs use multiple sanding passes, starting with a coarser grit to remove old finish and flatten the surface, then moving to medium and finer grits to refine the scratch pattern. Edges and corners require separate attention.
With older floors, aggressive sanding is risky. The goal is to remove the old finish and even out wear without taking off more wood than necessary. Keep the machine moving, overlap passes consistently, and do not camp out in one spot unless you are trying to carve a decorative trench into your oak.
4. Vacuum like you mean it
After sanding, vacuum thoroughly and follow up with microfiber or tack-style dust removal as appropriate for the finish system you plan to use. Any lingering dust can show up in the finish as gritty specks, which is a fancy way of saying your floor will look like it moisturized with breadcrumbs.
5. Decide whether to stain
Old hardwood looks gorgeous in its natural tone, especially if the grain has aged well. But refinishing is also a chance to shift the room’s whole personality. Want a lighter, cleaner look? Go natural or use a pale stain. Want warmth and drama? Medium or dark tones can get you there. Test stain samples first. Vintage wood absorbs color differently depending on species, age, prior sun exposure, and repair patches.
6. Seal and finish the floor
Once the wood is bare and clean, apply sealer if your system calls for it, then add the protective finish coats. Water-based polyurethane is popular for its faster dry time, lower odor profile, and clearer color. Oil-based polyurethane tends to amber over time and usually takes longer to dry and cure, but many people love the warmth it gives traditional wood floors.
Neither option is universally “best.” A quiet bedroom in a historic bungalow may want a different sheen and feel than a high-traffic hallway with kids, dogs, and a household member who treats cleats as indoor shoes.
7. Respect dry time and cure time
Dry enough to walk on and fully cured are not the same thing. Follow product directions for foot traffic, socks-only use, replacing furniture, laying rugs, and wet cleaning. This is not the moment for impatience. You have already waited 60 years. Give the finish a few more days.
The Best Finish Choices for Old Hardwood Floors
Water-based polyurethane
This is a favorite for homeowners who want a more natural wood color, faster turnaround, and less lingering odor. It generally dries faster between coats and tends to yellow less over time. It is especially appealing if you want a fresh, modern look instead of the classic amber tone.
Oil-based polyurethane
This finish is known for rich warmth and a traditional appearance. It can be a great match for older homes where a slightly deeper, honeyed tone feels right. The trade-off is longer cure time and stronger odor.
Sheen matters more than people think
Gloss shows off light and drama, but it also shows dust, paw prints, and every tiny flaw. Satin is popular because it gives a softer look and hides day-to-day life better. Matte or extra-matte works beautifully if you want an old-house look that feels calm and understated rather than gym-floor shiny.
Common Mistakes That Can Ruin a Vintage Floor
- Sanding before solving moisture issues: if the floor is actively taking on moisture, refinishing will not fix the root problem.
- Going too aggressive with the first grit: older floors are not endless. You do not get bonus points for removing half a century and half the board thickness.
- Skipping repairs: finish does not hide loose boards, missing wood, or structural movement.
- Using the wrong cleaner afterward: too much water, steam mops, oily products, or random DIY mixtures can damage the finish and dull the floor.
- Recoating over incompatible products: old wax and some maintenance products can cause adhesion problems.
- Moving furniture back too soon: this is how beautiful new finishes get their first scratch before they even enjoy adulthood.
DIY or Hire a Pro?
DIY refinishing can work well if the room is manageable, the floor is in decent condition, and you are comfortable learning the equipment. Renting sanders and doing the labor yourself can save money, but floor sanding has a steep learning curve. One pause too long with the wrong machine can leave chatter marks, dips, or edge scars that stare at you forever.
Hiring a professional is usually worth it when the floor is heavily damaged, patched in multiple places, stained by pets or water, or part of a historic home where matching boards and preserving thickness matter. Pros are also a smart choice when you want dust containment, a high-performance finish system, or a shorter project timeline.
In many cases, refinishing is still more economical than replacing original hardwood, especially if the boards are solid and fundamentally sound. Even selective repairs plus refinishing can preserve character while modernizing the look.
How to Maintain Newly Refinished Old Floors
Once your 60-year-old floors look gorgeous again, the mission shifts from rescue to protection.
- Use felt pads under furniture.
- Sweep or vacuum regularly with a hardwood-safe attachment.
- Clean spills quickly.
- Avoid steam mops and soaking the floor with water.
- Use cleaners made for finished hardwood, not all-purpose kitchen chemistry experiments.
- Put mats at entry doors, but wait until the finish has cured fully before laying rugs.
- Trim pet nails, unless your dog is paying for the refinishing.
Final Thoughts
Refinishing 60-year-old hardwood floors is part craftsmanship and part restraint. The smartest approach is not to make the wood look brand new at any cost. It is to reveal what is still beautiful, repair what is truly broken, and protect the floor so it can keep doing its job for decades to come.
The charm of old hardwood is not perfection. It is continuity. Every softened grain line, subtle patch, and gentle variation tells the story of a real home that has been lived in. A good refinish does not erase that story. It edits out the grime, quiets the damage, and lets the best parts speak up again.
So if your old floors are dull, scratched, tired, or hidden under years of questionable finish choices, do not write them off too quickly. Under that worn surface may be one of the best features in the whole house, patiently waiting for you to stop covering it with rugs and start giving it the respect of a proper comeback.
Real-World Experiences With Refinishing 60-Year-Old Hardwood Floors
One of the most common experiences people describe after refinishing old hardwood floors is surprise. Not mild surprise. Full, hand-on-heart, “Wait, these were under here the whole time?” surprise. Floors that looked permanently tired often turn out to have beautiful grain once the old yellowed finish comes off. What many homeowners think is ugly wood is frequently just ugly finish. That distinction can save a lot of regret and a lot of money.
Another common experience is discovering that old floors have a personality of their own. New flooring tends to be predictable. Old flooring tends to negotiate. One room sands evenly and behaves like a dream. The next room reveals patched boards, darker traffic lanes, old nail repairs, sun-faded edges, and one oddly dramatic stain that appears to date back to the Eisenhower administration. This is normal. Refinishing vintage floors is rarely a perfectly uniform exercise.
People also learn very quickly that sanding is both satisfying and humbling. The first few passes can feel magical as worn finish disappears and raw wood appears. Then the reality sets in: edges take longer, dust gets everywhere, and your shoulders begin sending strongly worded complaints to management. Many DIYers say the biggest lesson is that prep and cleanup take far more time than expected. The glamorous before-and-after photos never show the hours spent vacuuming, taping plastic, removing staples, and crouching around corners with an edger.
Color choice is another area where experience matters. Many homeowners go into the project convinced they want the darkest stain imaginable, only to realize that dark floors show every speck of dust and every scratch with theatrical flair. Others expect pale natural floors and then fall in love with the warmer tone of the original wood once sealer hits it. Testing samples on the actual floor, under the room’s real lighting, is one of the wisest decisions people make during the process.
There is also the emotional side, which sounds cheesy until you live it. Old floors often connect people to the history of a home. Once refinished, they can change how the whole house feels. Rooms look brighter. Trim suddenly makes more sense. Furniture sits differently in the space. The house stops feeling like a project and starts feeling like home again. That emotional payoff is a big reason so many homeowners say the mess, noise, and temporary inconvenience were absolutely worth it.
And finally, nearly everyone who has gone through the process comes away with the same conclusion: old hardwood rewards patience. Not speed. Not shortcuts. Not wild optimism with a rental sander. Patience. The homeowners and contractors who get the best results are the ones who respect the age of the material, fix problems before coating over them, and understand that “beautiful” does not mean “flawless.” In fact, the slight imperfections are usually what make a 60-year-old hardwood floor look honest, warm, and impossible to fake.