
Making a 7 chakra bracelet is one of those rare DIY projects that feels calm, creative, and oddly satisfyinglike organizing your desk, but prettier and with fewer paper clips. A 7 chakra bracelet combines colored beads or gemstones that represent the seven major chakras, traditionally understood as energy centers associated with the body, emotions, and spiritual awareness. Whether you wear it during meditation, yoga, journaling, prayer, breathwork, or simply because it looks fantastic with a linen shirt, this handmade bracelet can become a small daily reminder to slow down and return to balance.
Before we begin, let’s keep things grounded. A chakra bracelet is not a medical treatment, and crystals should not replace professional healthcare. Think of it as a wearable mindfulness tool: something beautiful that helps you set an intention, focus your attention, and create a soothing ritual. That is where the real “healing” beginsnot because a bead magically pays your bills or answers emails, but because making and wearing the bracelet can help you become more intentional about your mood, energy, and self-care.
What Is a 7 Chakra Bracelet?
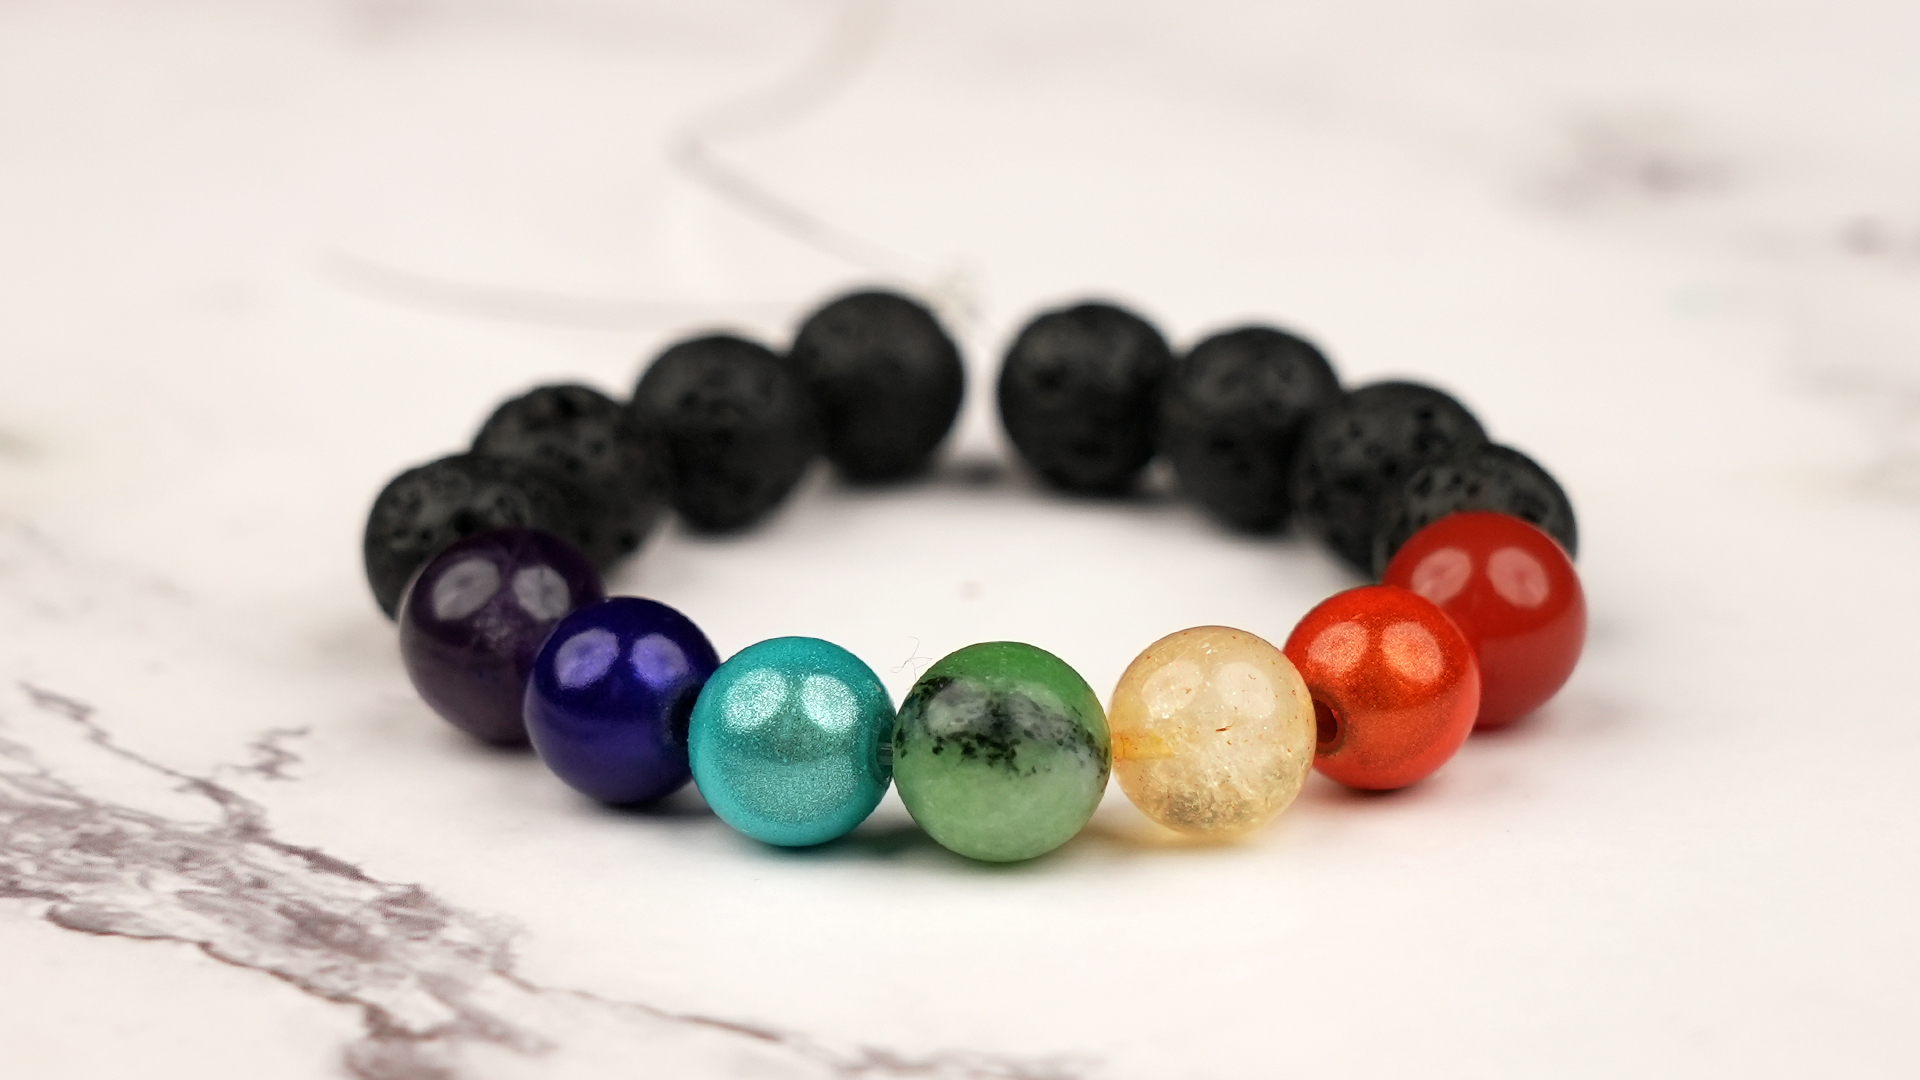
A 7 chakra bracelet is a beaded bracelet designed around the seven chakra system. Each chakra is commonly connected with a color, a body area, and a symbolic theme. In bracelet-making, those colors are represented by gemstones, glass beads, lava beads, wood beads, or crystal-style beads. The finished bracelet usually includes one bead or a small group of beads for each chakra, arranged from root to crown or used as colorful accents among neutral spacer beads.
The classic chakra color order is red, orange, yellow, green, blue, indigo, and violet or clear. Many makers place the colors in this order to represent rising energy from the base of the spine to the top of the head. Others use the colors as a repeated pattern around the wrist. There is no craft police hiding behind the curtain. If your design is intentional, comfortable, and secure, you are doing it right.
The 7 Chakras, Colors, and Bracelet Stone Ideas
Choosing stones is the fun part, but it can also feel like being asked to pick a favorite dessert. There are many options, and most of them are beautiful. Below is a beginner-friendly guide to common colors and bead choices for a 7 chakra healing bracelet.
| Chakra | Color | Symbolic Theme | Common Bead Ideas |
|---|---|---|---|
| Root Chakra | Red | Grounding, stability, safety | Red jasper, garnet, red agate |
| Sacral Chakra | Orange | Creativity, emotion, flow | Carnelian, orange aventurine, sunstone |
| Solar Plexus Chakra | Yellow | Confidence, willpower, motivation | Citrine, tiger’s eye, yellow jade |
| Heart Chakra | Green | Love, compassion, forgiveness | Green aventurine, jade, malachite |
| Throat Chakra | Blue | Communication, truth, expression | Sodalite, turquoise, blue lace agate |
| Third Eye Chakra | Indigo | Intuition, insight, clarity | Lapis lazuli, sodalite, azurite |
| Crown Chakra | Violet or Clear | Connection, wisdom, awareness | Amethyst, clear quartz, howlite |
If you are new to bracelet-making, choose 8mm beads. They are easy to handle, large enough to show color clearly, and comfortable for most wrists. Smaller 6mm beads look delicate and elegant, while 10mm beads make a bolder statement. If you have tiny wrists, 10mm beads may feel like wearing a cheerful little tire. Start with 8mm and adjust from there.
Supplies You Need to Make a 7 Chakra Bracelet
The good news: you do not need a professional jewelry studio. You need a clean table, decent lighting, and the emotional strength to stop beads from rolling under the couch.
- 7 chakra beads or gemstones in the chakra colors
- Spacer beads such as lava stone, wood, hematite, glass, or metal beads
- Stretch elastic cord, usually 0.7mm to 1mm depending on bead hole size
- Scissors or flush cutters
- Bead stopper, binder clip, or small piece of tape
- Ruler or measuring tape
- Jewelry glue, such as flexible craft adhesive, for securing the knot
- Optional charm, tassel, or focal bead
- Optional beading board or towel to keep beads from escaping
Elastic cord is the easiest choice for beginners because it creates a stretch bracelet with no clasp. For durability, select the thickest elastic cord that can pass through your beads comfortably. If your bead holes are small, use thinner cord. If the holes are generous, use thicker cord or double the cord for extra strength. The bracelet should stretch gently over your hand without feeling like it is auditioning for a slingshot.
How to Measure Your Wrist Correctly
Wrap a soft measuring tape around your wrist where you want the bracelet to sit. If you do not have measuring tape, use a strip of paper or string, mark the overlap, and measure it with a ruler. Add about half an inch for a snug fit or three-quarters of an inch for a looser fit. For example, if your wrist measures 6.5 inches, a finished bracelet length of around 7 inches is usually comfortable.
Remember that bead size affects fit. Larger beads take up more inner space, so a bracelet made with 10mm beads may feel tighter than one made with 6mm beads, even if both are technically the same length. This is why test-fitting before tying the final knot is not optional. It is the difference between “handmade wellness jewelry” and “why is my wrist being hugged by a boa constrictor?”
Design Ideas Before You Start Stringing
1. Classic 7 Chakra Centerpiece
Place one bead for each chakra in the center of the bracelet, then fill the rest with neutral beads like black lava stone, matte onyx, sandalwood, or white howlite. This design keeps the chakra colors visible without making the bracelet look too busy.
2. Repeating Chakra Pattern
Repeat the seven colors all the way around the bracelet. This creates a bright, symbolic piece that feels energetic and playful. It is a great choice if you want the chakra theme to be obvious.
3. Minimalist Healing Bracelet
Use mostly one neutral bead type, then add seven small colored gemstone beads as accents. This works beautifully for people who want a subtle bracelet they can wear every day with casual or professional outfits.
4. Lava Stone Essential Oil Bracelet
Lava beads are porous and often used in aromatherapy jewelry. Add the chakra beads as accents and use lava stone for the rest of the bracelet. If you use essential oils, apply only a tiny amount to the lava beads, avoid skin irritation, and do not use oils you are sensitive to.
Step-by-Step: How to Make a 7 Chakra Bracelet for Healing
Step 1: Prepare Your Workspace
Lay a towel, felt mat, or beading board on your table. This keeps beads from rolling away dramatically like they are escaping a tiny gemstone prison. Arrange your beads in the order you want before cutting your cord. This gives you a chance to adjust colors, spacing, and symmetry.
Step 2: Cut the Elastic Cord
Cut a piece of elastic cord about 10 to 12 inches long for an average adult bracelet. You need extra length for tying knots, so do not cut it too short. A common beginner mistake is trying to save cord and then having two tiny ends to tie together. That path leads to frustration, squinting, and language your yoga teacher would not approve of.
Step 3: Pre-Stretch the Cord
Hold the elastic cord between your fingers and gently stretch it several times along its length. Pre-stretching helps reduce sagging after the bracelet has been worn. Be gentle. You are not trying to prove dominance over the cord; you are simply helping it relax before it becomes jewelry.
Step 4: Add a Bead Stopper
Clip one end of the cord with a bead stopper or fold a small piece of tape around it. This keeps beads from sliding off while you work. If you skip this step, at least one bead will launch itself across the room. This is not a prophecy. It is bracelet physics.
Step 5: String the Beads
Begin adding beads according to your chosen design. For a classic layout, string half of your neutral beads first, then add the seven chakra beads in order: red, orange, yellow, green, blue, indigo, and violet or clear. Then finish with the remaining neutral beads. Keep checking the pattern as you go. It is much easier to fix a misplaced bead now than after the bracelet is tied.
Step 6: Check the Fit
Carefully wrap the unfinished bracelet around your wrist. The beads should meet comfortably without big gaps. If it feels too tight, add one or two beads. If it feels loose, remove a bead. Your bracelet should slide over your hand with a gentle stretch and sit on your wrist without pinching.
Step 7: Tie a Secure Knot
Use a surgeon’s knot for a stronger finish. Cross the two cord ends, loop one end around the other twice, and pull snug. Then make another knot over it and pull firmly. Some makers add a third knot for security. The goal is a tight knot that does not slip, but do not pull so hard that the elastic weakens or snaps.
Step 8: Add Glue and Hide the Knot
Place a tiny drop of jewelry glue on the knot. Let it become tacky or dry according to the glue instructions. Then trim the cord ends, leaving a small tail. If possible, slide the knot inside a nearby bead with a larger hole. This protects the knot and gives the bracelet a cleaner finish.
Step 9: Let the Bracelet Rest
Allow the bracelet to dry fully before wearing it. Overnight is ideal if you used glue. This waiting period is not glamorous, but neither is chasing beads across the floor because the knot failed. Patience is part of the healing journey, apparently.
How to Set an Intention for Your Chakra Bracelet
Once the bracelet is finished, hold it in your hands and take a few slow breaths. You can set an intention silently or say it aloud. Keep it simple and personal. For example: “I choose balance and calm,” “I speak with honesty and kindness,” or “I return to myself when life feels noisy.” The bracelet becomes a reminder of that intention every time you notice it on your wrist.
You can also connect each bead with a short affirmation. Touch the red bead and think, “I am grounded.” Touch orange and think, “I allow creativity.” Yellow can represent confidence, green compassion, blue honest communication, indigo intuition, and violet spiritual awareness. This turns your bracelet into a miniature meditation toolbasically a tiny wellness coach that does not send calendar invites.
How to Cleanse or Refresh a 7 Chakra Bracelet
Many people like to “cleanse” their chakra bracelet as part of a personal ritual. In practical terms, you should also clean it physically. Wipe gemstone beads with a soft, slightly damp cloth. Avoid soaking elastic bracelets, because water can weaken the cord over time. Avoid harsh chemicals, perfumes, lotions, and swimming pools. Your bracelet may be spiritual, but chlorine remains undefeated.
For symbolic cleansing, you can place the bracelet near a window for gentle moonlight, rest it on a clean cloth, use sound from a bell or singing bowl, or hold it during meditation. If your stones are delicate, avoid direct sunlight for long periods because some crystals may fade. When in doubt, choose the safest method: a soft cloth, a quiet breath, and a renewed intention.
Common Mistakes to Avoid
Using Weak Cord
Thin elastic may be easier to thread, but it can break faster, especially with heavier gemstone beads. Choose cord based on bead weight and hole size.
Skipping the Pre-Stretch
If you do not pre-stretch elastic cord, the bracelet may become loose after a few wears. A little preparation makes the finished piece last longer.
Cutting the Cord Too Short
Always leave extra cord for tying. Short ends make knotting difficult and increase the chance of a weak finish.
Using Too Much Glue
A small drop is enough. Too much glue can make the knot stiff, messy, or visible. The bracelet should look intentional, not like it survived a craft-store accident.
Making Medical Claims
It is fine to make a bracelet for mindfulness, emotional balance, prayer, meditation, or symbolic healing. It is not responsible to claim that a crystal bracelet cures illness, treats anxiety disorders, heals injuries, or replaces medical care. Keep the meaning inspiring and honest.
How to Wear Your 7 Chakra Bracelet
You can wear your chakra bracelet on either wrist. Some traditions connect the left side with receiving energy and the right side with giving energy, but your comfort matters most. Wear it during meditation, yoga, deep breathing, journaling, or stressful workdays when you need a small reminder not to become emotionally fused with your inbox.
For daily wear, remove the bracelet before showering, swimming, heavy exercise, or sleeping. Stretch bracelets last longer when they are rolled gently over the hand instead of pulled hard. Store it in a pouch or jewelry box away from direct sunlight and moisture.
Personal Experience: What Making a 7 Chakra Bracelet Feels Like
The first time you make a 7 chakra bracelet, you may be surprised by how peaceful the process feels. There is something wonderfully grounding about choosing each bead, lining up the colors, and turning a handful of loose materials into something wearable. It slows the mind down. Instead of scrolling, rushing, or juggling seventeen tabs in your brain, you focus on one bead at a time. Red. Orange. Yellow. Green. The rhythm becomes soothing.
One of the most enjoyable parts is deciding what the bracelet should mean to you. Maybe the red bead reminds you to feel steady when life gets unpredictable. Maybe the orange bead gives you permission to be creative without judging every idea before it has had coffee. Maybe the yellow bead becomes your confidence button, the one you mentally press before a meeting, presentation, exam, or difficult conversation. The bracelet is small, but the meaning can be surprisingly personal.
Making the bracelet can also become a beautiful group activity. Friends can sit around a table, choose stones, share intentions, and laugh when someone drops a bead for the fourth time. It works well for yoga circles, wellness retreats, birthday gatherings, craft nights, or quiet weekends at home. Children and teens can enjoy it too, as long as the beads are age-appropriate and small parts are handled safely. The project encourages patience, color recognition, creativity, and a sense of ownership.
Another experience many people love is customizing the bracelet after wearing it for a while. You may start with a classic chakra pattern, then later decide to add a charm, change the spacer beads, or remake it with softer colors. That is part of the charm of DIY jewelry. It grows with you. A bracelet made during a stressful season may later become a reminder of resilience. A bracelet made as a gift may carry the memory of the person who chose each bead with care.
Wearing the bracelet during meditation can deepen the experience. You can touch each bead as you breathe, moving slowly around the bracelet like a gentle counting practice. This gives your hands something to do and your mind something calm to follow. Even on a hectic day, a quick moment with the bracelet can become a reset: inhale, touch a bead, remember your intention, exhale. No incense required. No perfect lotus pose required. No need to look like you live inside a wellness magazine.
The most meaningful part is that the bracelet is handmade. It carries your choices, your time, your attention, and your intention. That alone makes it special. Whether you believe deeply in chakra energy or simply enjoy symbolic jewelry, the act of making a 7 chakra bracelet can feel like a small ceremony of self-care. And honestly, in a world that often asks us to move faster, reply sooner, and do more, making something slowly with your own hands is its own kind of healing.
Conclusion
Learning how to make a 7 chakra bracelet for healing is simple, affordable, and deeply personal. With a few beads, elastic cord, a secure knot, and a clear intention, you can create a meaningful bracelet that supports mindfulness, self-expression, and daily balance. The best design is not the most expensive one; it is the one you will actually wear, notice, and connect with. Choose colors that speak to you, build the bracelet carefully, and let it become a gentle reminder to stay grounded, open-hearted, honest, intuitive, and calm.
Note: This article is intended for DIY crafting, mindfulness, and spiritual self-care. Chakra bracelets and crystals are not medical treatments and should not replace advice from qualified healthcare professionals.