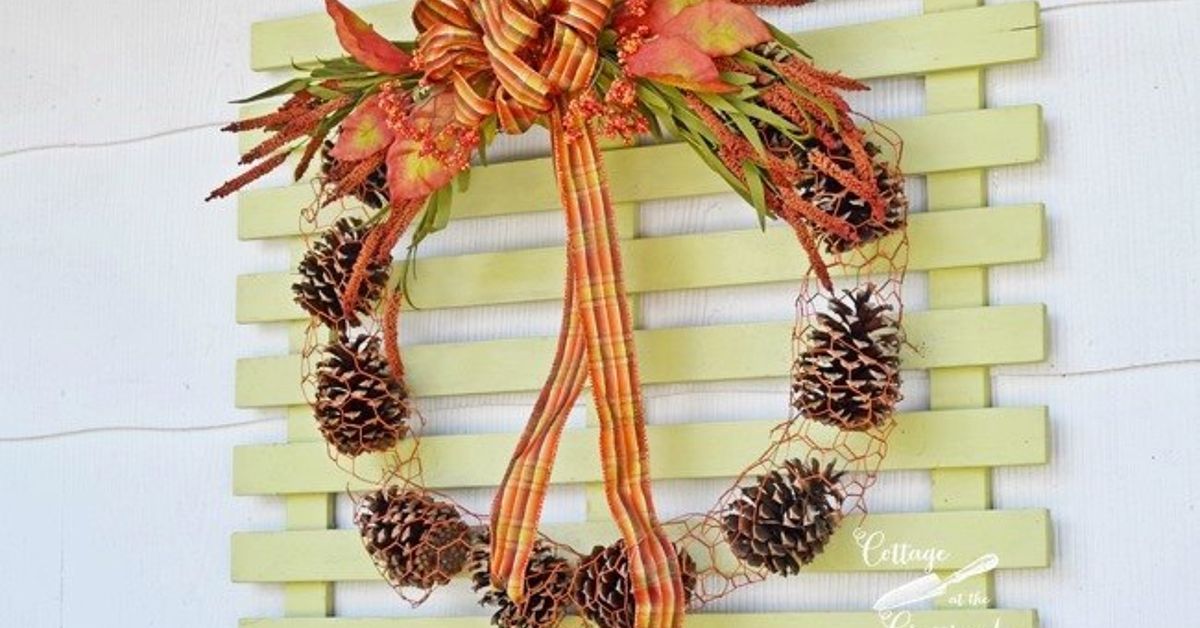

Some fall decorations politely whisper “autumn.” A Chicken Wire and Pine Cone Fall Wreath marches up to your front door wearing boots, carrying a mug of cider, and saying, “Yes, I made this myself.” It is rustic, affordable, wonderfully textured, and surprisingly flexible. Chicken wire brings that farmhouse-meets-vintage-garden charm, while pine cones add the kind of natural fall detail that never looks forced. Together, they create a wreath that feels cozy without looking like your porch was attacked by a craft store clearance aisle.
This DIY fall wreath is perfect for anyone who loves handmade seasonal decor but does not want a project that requires a degree in floral engineering. You can make it with a basic wreath frame, a piece of chicken wire, pine cones, floral wire, ribbon, and a few accent pieces like faux leaves, berries, dried grasses, mini pumpkins, or burlap. The finished look can be simple and woodland-inspired, fuller and more festive, or somewhere in the middlelike a sweater-weather compromise.
In this guide, you will learn how to design, assemble, decorate, hang, and maintain a chicken wire wreath with pine cones for fall. You will also get practical tips on choosing materials, arranging natural elements, avoiding common mistakes, and making the wreath last from early September through Thanksgiving without looking tired by Halloween.
Why Chicken Wire and Pine Cones Work So Well Together
The beauty of a chicken wire wreath is its balance of structure and openness. Unlike a thick foam wreath form, chicken wire gives you a light framework that lets your decorations breathe. It has a rustic, slightly imperfect look that fits fall decor beautifully. Pine cones, meanwhile, bring natural shape, warmth, and texture. They are small sculptural objects from nature, which sounds fancy until you remember they also fall from trees for free.
Chicken wire is especially helpful because it creates built-in places to anchor pine cones, stems, ribbon, and greenery. You can twist floral wire through the openings, tuck in faux leaves, or attach small bundles of dried wheat and grasses. The grid pattern also helps keep the arrangement balanced, especially if you are new to wreath making.
Pine cones are equally useful because they work with almost every fall style. Leave them natural for a woodland wreath, dry-brush them with white paint for farmhouse charm, add a touch of copper or gold for a polished look, or cluster them with orange leaves and berries for a classic harvest wreath. They are sturdy, inexpensive, and forgiving. If one ends up crooked, congratulationsyou have “organic movement.”
Materials You Will Need
You do not need an enormous supply list for this DIY project. The best version of a Chicken Wire and Pine Cone Fall Wreath often comes from mixing a few purchased craft basics with natural or repurposed items.
Basic Supplies
- One wire wreath frame, grapevine wreath, or embroidery hoop
- Chicken wire, cut slightly larger than the frame
- Pine cones in mixed sizes
- Floral wire or thin craft wire
- Wire cutters
- Work gloves
- Hot glue gun and glue sticks
- Burlap, plaid ribbon, velvet ribbon, or twine
- Faux fall leaves, berries, acorns, dried grasses, or mini pumpkins
- Wreath hanger, ribbon loop, or sturdy twine for hanging
Work gloves are not optional if you are handling chicken wire. The cut edges can be sharp, and fall crafting should not include dramatic bandage moments. Use wire cutters rather than scissors, unless you enjoy ruining scissors and questioning your life choices.
Choosing the Right Wreath Base
Your wreath base determines the final style. A metal wire frame creates a clean, sturdy circle and works well for a full, traditional wreath. A grapevine wreath adds instant rustic texture and pairs beautifully with pine cones. An embroidery hoop gives the wreath a modern farmhouse look, especially if you only decorate one side or the lower third.
If you want a full front-door wreath, choose a frame between 14 and 18 inches. For a smaller indoor wreath, 10 to 12 inches works nicely. A larger wreath can look impressive on a porch, but remember that pine cones add weight. If your door opens and closes often, build the wreath sturdy enough to survive daily movement, gusty weather, and that one family member who treats every door like it owes them money.
Preparing Pine Cones for Crafting
If you buy pine cones from a craft store, they are usually clean and ready to use. If you forage them from your yard or a park where collecting is allowed, take a few minutes to prepare them. Shake out loose dirt, remove needles, and brush away debris. Let them dry completely before attaching them to your wreath.
Foraged pine cones can hold moisture, sap, or tiny outdoor passengers. A common approach is to dry them in a warm, well-ventilated place for several days. Some crafters place pine cones on a lined baking sheet at a low oven temperature to help dry them out, but always watch them carefully and never leave them unattended. Pine cones are natural material, and natural material does not need encouragement to become a campfire.
Sort your pine cones by size before you start. Larger pine cones work well as focal points, medium ones fill the main body, and tiny pine cones are excellent for closing gaps. Having them sorted makes arranging much easier and prevents the classic crafting situation where both hands are sticky and the perfect pine cone is somehow under the table.
How to Make a Chicken Wire and Pine Cone Fall Wreath
Step 1: Shape and Attach the Chicken Wire
Lay your wreath frame on a flat surface and cut a piece of chicken wire slightly larger than the opening. Wear gloves while cutting and shaping it. If you are using a round wire frame or embroidery hoop, trim the chicken wire so it overlaps the edge by about one inch. Fold the edges around the frame and secure them with floral wire.
If you are using a grapevine wreath, you can tuck the chicken wire into the back or center opening and wire it in place. The goal is to create a visible or semi-visible mesh surface that looks intentional, not like your wreath had an argument with a garden fence. Trim or fold any sharp ends toward the back.
Step 2: Create a Strong Hanging Loop
Before adding decorations, attach a hanging loop to the back of the wreath. Use floral wire, twine, or ribbon. This step is easy to forget, but adding it after the wreath is decorated can turn into an awkward wrestling match with pine cones. Make sure the loop is centered so the wreath hangs straight.
Step 3: Plan the Pine Cone Layout
Place your pine cones on the wreath before gluing or wiring anything. Try grouping them in clusters of three or five for a natural look. Odd-numbered groupings often feel more balanced and relaxed. Put larger pine cones near the bottom or side of the wreath to create visual weight, then fill outward with smaller ones.
You can cover the whole wreath with pine cones, decorate just one side, or create a crescent shape along the lower half. For a modern look, leave part of the chicken wire exposed. For a fuller harvest style, layer in leaves, berries, and ribbon until the wreath feels abundant.
Step 4: Attach Pine Cones Securely
Use floral wire for the most secure hold. Wrap wire around the base of each pine cone, thread it through the chicken wire or wreath frame, and twist it tightly at the back. Hot glue can help stabilize the pine cones, but wire is more reliable for outdoor or high-traffic doors.
For smaller pine cones, hot glue may be enough, especially if the wreath will hang indoors. Press each pine cone into place and hold it briefly while the glue sets. Avoid using too much glue; thick blobs can show through the design and make the wreath look messy. The goal is “handcrafted charm,” not “hot glue volcano.”
Step 5: Add Fall Foliage and Texture
Once the pine cones are secure, tuck in fall leaves, faux berries, dried wheat, eucalyptus, oak leaves, acorns, or small seed pods. Chicken wire makes this part easy because you can weave stems through the openings. If the stems are too long, trim them with wire cutters.
For a soft farmhouse look, use muted colors like cream, tan, rust, sage green, and brown. For a classic autumn wreath, choose orange maple leaves, burgundy berries, golden wheat, and copper ribbon. For a modern style, keep the palette minimal with natural pine cones, black ribbon, and a few dried grasses.
Step 6: Finish With Ribbon or Burlap
A bow is optional, but it can make the wreath feel complete. Burlap adds rustic texture, plaid ribbon gives cozy fall energy, and velvet ribbon creates a more elegant finish. Place the bow at the top for a traditional look, on the side for asymmetry, or at the bottom for a grounded, farmhouse-inspired design.
If you do not love big bows, use a narrow ribbon loop for hanging instead. This keeps the wreath simple and lets the chicken wire and pine cones stay in the spotlight. Not every wreath needs a bow the size of a Thanksgiving turkey.
Design Ideas for Different Fall Styles
Rustic Farmhouse Wreath
Use a grapevine base, natural chicken wire, pine cones, burlap ribbon, dried wheat, and cream-colored faux berries. Keep the colors warm and muted. This style works especially well on wood doors, white doors, or covered porches with lanterns and pumpkins.
Modern Minimalist Wreath
Use an embroidery hoop or slim metal ring with chicken wire stretched across the center. Decorate only one side with pine cones and dried grasses. Add a black or caramel velvet ribbon. This version looks clean, stylish, and not overly seasonal, which is ideal if you prefer fall decor that does not shout “pumpkin spice committee meeting.”
Classic Harvest Wreath
Use a wire wreath frame and build a fuller design with pine cones, orange leaves, faux berries, mini pumpkins, and acorns. This style is cheerful, colorful, and perfect for Thanksgiving. Keep the chicken wire partly visible so the design still feels handmade and textured.
Woodland Cottage Wreath
Mix pine cones with moss, small twigs, faux mushrooms, dried ferns, and soft ribbon. This style feels like something from a cozy cabin or storybook cottage. It is a great choice for indoor decor, above a mantel, or on a pantry door.
Best Places to Display Your Fall Wreath
The front door is the obvious choice, but it is not the only one. A chicken wire fall wreath also looks beautiful above a fireplace, on a kitchen wall, over a console table, on a garden shed door, or layered over a large mirror. If you use natural pine cones and dried materials, keep the wreath in a protected area away from heavy rain and direct moisture.
For outdoor display, a covered porch is best. Wind, rain, and strong sunlight can fade ribbon, loosen glue, and make natural materials break down faster. If your wreath will face the weather, use more floral wire and fewer delicate dried accents. Faux leaves and berries usually hold up better outdoors than real dried foliage.
Common Mistakes to Avoid
One common mistake is adding too many heavy pine cones to one side. This can make the wreath tilt, sag, or hang awkwardly. Balance the weight as you build, and check how it hangs before finishing. Another mistake is forgetting to hide sharp chicken wire edges. Always fold cut ends toward the back and cover exposed areas with ribbon, greenery, or pine cones.
A third mistake is using only one size of pine cone. Mixed sizes create depth and make the wreath look more natural. If all the pine cones are identical, the wreath can feel flat or overly manufactured. Finally, do not rush the layout. Dry-fitting your design before attaching pieces saves time, glue, and emotional stability.
How to Store the Wreath After Fall
At the end of the season, gently remove dust with a soft brush or a hair dryer on a cool, low setting. Wrap the wreath loosely in tissue paper or place it in a wreath storage box. Avoid crushing the pine cones or bending the chicken wire. Store it in a dry place away from humidity.
If a few pieces loosen while in storage, do not panic. That is normal for handmade wreaths. A little floral wire or hot glue will refresh it next year. You can also update the wreath by swapping ribbon colors or adding new accents. A chicken wire and pine cone base is reusable, which makes it a smart seasonal craft instead of a one-year wonder.
Personal Experience: What Making a Chicken Wire and Pine Cone Fall Wreath Teaches You
The first thing you learn when making a Chicken Wire and Pine Cone Fall Wreath is that rustic does not mean random. At first, it is tempting to grab a pile of pine cones, glue them wherever they land, and call it “natural.” But a good wreath still needs rhythm, spacing, and balance. The best designs usually happen when you slow down and let the materials guide the shape.
Chicken wire can feel a little stubborn in the beginning. It bends, springs back, catches on sleeves, and generally behaves like it has opinions. But once it is attached to the frame, it becomes one of the most useful parts of the project. The openings give you endless anchor points. You can wire pine cones securely, tuck in stems, and adjust decorations without rebuilding the entire wreath. Compared with foam, chicken wire feels more flexible and less wasteful.
Pine cones also teach patience. No two are exactly alike. Some sit flat, some lean dramatically, and some look perfect until you attach them and realize they are facing the wrong direction. The trick is to treat them like natural design pieces instead of identical ornaments. A sideways pine cone can add movement. A tiny pine cone can fill a strange gap. A slightly broken one can hide under a leaf and still contribute. In fall crafting, as in life, not every cone needs to be the star.
Another useful experience is learning how much texture matters. A wreath made only from pine cones can look beautiful, but adding a few contrasting materials makes it more interesting. Soft ribbon balances rough wire. Dried grasses add height. Faux berries bring small dots of color. Leaves create movement. Even a simple piece of burlap can make the wreath feel warmer and more finished.
Color choice matters too. Bright orange and red can be festive, but they can quickly overpower the chicken wire and pine cones. Muted rust, copper, tan, cream, olive, brown, and burgundy often create a more timeless fall wreath. If your home exterior already has strong colors, a neutral wreath may look more elegant. If your door is plain, a bolder harvest palette can bring it to life.
One of the most satisfying parts of this project is how affordable it can be. Pine cones can often be collected for free where allowed, ribbon scraps can be reused, and chicken wire only requires a small piece. Even if you buy every supply, the wreath can cost less than many ready-made fall wreaths. Better yet, it looks personal. Visitors can tell it was made by hand, and that gives it character no store-bought wreath can fully copy.
The project is also forgiving. If one section looks too empty, add leaves. If it looks too busy, remove a few pieces. If the bow seems enormous, trim the tails. If the chicken wire shows more than expected, call it farmhouse style and move forward confidently. Handmade decor does not need to be flawless to be beautiful. In fact, the little imperfections are often what make it feel warm.
By the time the wreath is hanging on the door, the whole process feels worth it. It is not just a decoration; it is a small seasonal ritual. You gather textures, choose colors, work with your hands, and create something that welcomes people before they even knock. That is the real charm of a chicken wire and pine cone fall wreath: it turns simple materials into a cozy hello.
Conclusion
A Chicken Wire and Pine Cone Fall Wreath is the kind of DIY project that checks all the best boxes: affordable, rustic, customizable, and genuinely enjoyable to make. Chicken wire provides structure and farmhouse texture, while pine cones bring natural warmth and seasonal charm. With a few accents like burlap ribbon, faux leaves, berries, wheat, or mini pumpkins, you can create a wreath that fits your home perfectly.
Whether you prefer a minimalist hoop wreath, a full harvest design, or a woodland cottage look, this project gives you plenty of room to be creative. Build it carefully, secure the heavier pieces with wire, protect it from harsh weather, and store it properly when fall ends. Do that, and your wreath can return next year ready for another season of porch compliments.