
For years, the average home workshop laser cutter had one job: make wood, acrylic, cardboard, leather, and the occasional anodized tag look suspiciously professional. Then metal walked into the room, crossed its arms, and said, “Cute beam. Try me.” That is where the DIY fiber laser conversation gets interesting.
A CO2 laser can be a fantastic maker tool, but cutting steel or aluminum is a different beast. Metal reflects, conducts heat, warps, throws fumes, and generally behaves like the stubborn cousin at a family barbecue. A fiber laser, especially one designed around metal processing, brings a shorter wavelength, higher energy density, and better absorption in many metals. Suddenly, the workshop fantasy changes from “I engraved a coaster” to “I made a bracket that actually fits.”
The phrase DIY fiber laser adds metal cutting to the mix captures a major shift in maker culture. Hobbyists, small shops, prototype builders, and metal artists are no longer just admiring industrial laser cutters from afar like expensive museum exhibits. They are studying how fiber laser systems work, how motion control affects accuracy, why assist gas matters, and why safety is not a decorative sticker on the side panel.
This article explores what makes fiber lasers different, why metal cutting is such a leap from engraving, what a DIY-minded setup can teach, and why the smartest builders treat safety engineering as part of the machinenot an optional side quest.
What Makes a Fiber Laser Different?
A fiber laser uses an optical fiber as part of the laser gain medium. In plain English, it creates and delivers a highly focused laser beam through fiber-based technology rather than relying on the same architecture as a traditional CO2 glass tube system. The result is a compact, efficient, and extremely precise laser source that is especially useful for marking, engraving, welding, and cutting metals.
One major reason fiber lasers are so attractive for metal work is wavelength. Many common industrial fiber lasers operate around 1,064 nanometers, which is much shorter than the wavelength of a CO2 laser. Metals that shrug off a CO2 beam more easily can absorb fiber-laser energy more effectively. That does not mean every fiber laser slices through plate steel like a lightsaber in a movie trailer, but it does explain why fiber technology dominates modern sheet-metal fabrication.
For DIY builders, the appeal is obvious. A fiber laser can engrave stainless steel, mark tools, create serial plates, cut thin sheet metal, and open up project categories that a wood-and-acrylic laser simply cannot handle. Custom brackets, control panels, shims, signs, ornaments, small enclosures, and repair parts all become realistic goals when the system is properly designed.
Why Metal Cutting Is a Big Upgrade
Cutting metal is not just engraving with extra confidence. It is a different process with different physics. To cut metal cleanly, the laser must heat a narrow path until the material melts or reacts, while assist gas clears the molten metal from the cut line, also known as the kerf. Without that gas flow, the laser may simply create a glowing scar and a cloud of disappointment.
That is why industrial laser cutters use cutting heads, nozzles, controlled focal distance, motion systems, gas delivery, exhaust systems, and serious enclosures. The beam is only part of the story. The machine also needs to move accurately, keep the focus consistent, manage heat, and remove vaporized material without turning the room into a science fair volcano.
When a DIY fiber laser adds metal cutting to the mix, it brings several practical advantages:
- Cleaner prototypes: Thin metal parts can be cut directly from CAD drawings instead of being drilled, sawed, filed, and muttered at.
- Repeatability: Once the settings and workflow are dialed in, identical parts can be produced more consistently.
- Small-batch flexibility: Makers can create one-off brackets, panels, and components without ordering a full production run.
- Better detail: Fine slots, tabs, holes, and decorative patterns become easier than with many manual methods.
- Less mechanical force: Since laser cutting is non-contact, thin parts are less likely to be bent by cutting pressure.
In short, a fiber laser turns metal from “that material I outsource” into “that material I can prototype with before lunch.” Depending on the project, that can save money, time, and at least three dramatic sighs.
CO2 Laser vs. Fiber Laser: The Workshop Reality
CO2 lasers and fiber lasers are not enemies. They are more like two tools that keep getting invited to the same party even though they prefer different snacks. CO2 lasers are excellent for organic materials such as wood, paper, leather, and acrylic. They are also popular because many desktop and mid-size CO2 machines are relatively affordable.
Fiber lasers, on the other hand, are built for metal. They are commonly used to mark stainless steel, aluminum, brass, copper, titanium, and coated metals. Higher-power fiber laser systems can cut sheet metal with impressive speed and precision. For a maker, that difference matters because the material list changes dramatically.
Where CO2 Lasers Shine
A CO2 laser is still a great choice for signs, model parts, packaging prototypes, decorative acrylic, wood gifts, leather patches, and classroom projects. It can engrave some coated metals and remove marking spray from metal surfaces, but it is usually not the right tool for serious metal cutting.
Where Fiber Lasers Win
A fiber laser is the tool that looks at stainless steel and says, “Finally, a worthy opponent.” It can produce fine marks, deep engraving, and, in properly designed cutting systems, actual metal cuts. It is also typically more efficient than older CO2 architectures for many metal applications.
The catch? Fiber laser systems are more demanding. The beam is often invisible, reflections can be dangerous, metal fumes must be managed, and cutting requires more than simply increasing the power slider until the universe complains.
The Core Ideas Behind a DIY Fiber Laser Metal Cutter
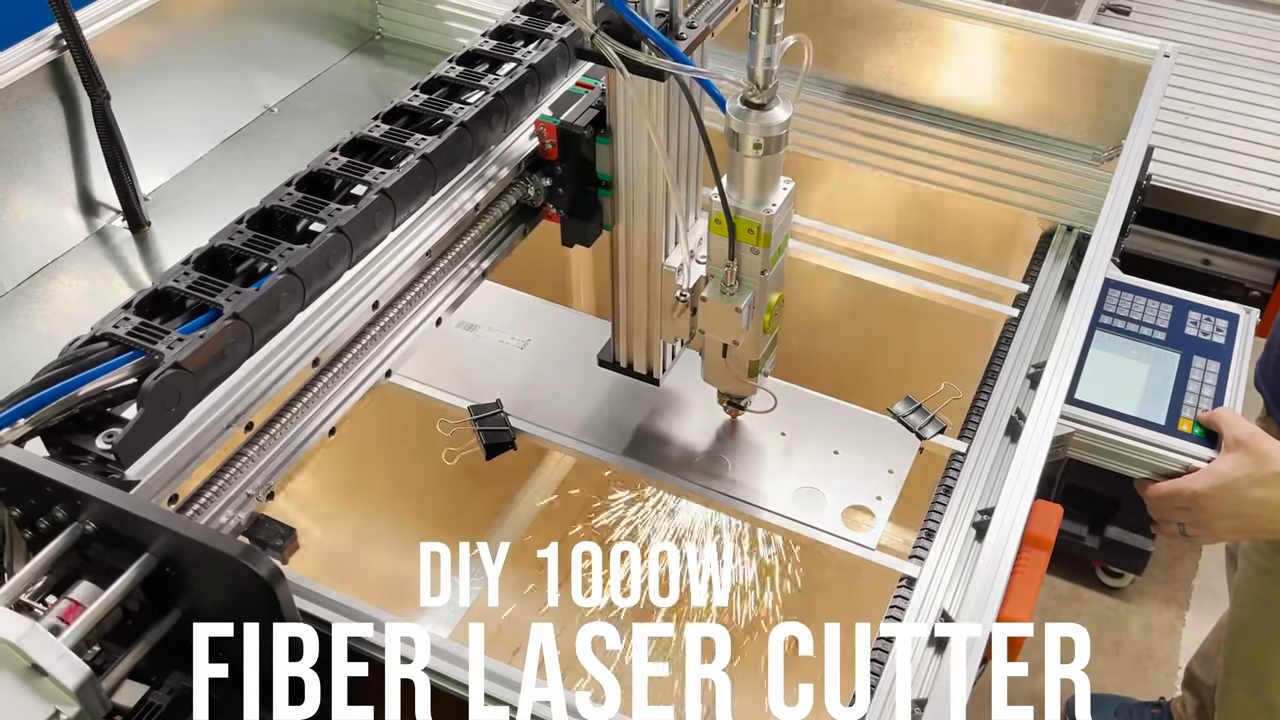
A responsible DIY fiber laser project is not a random pile of shiny parts connected with optimism. It is a machine system. The major building blocks usually include a fiber laser source, beam delivery optics, a cutting head, motion control, a workholding area, assist gas, exhaust, cooling, shielding, and safety interlocks.
For article-level understanding, think of it like a miniature factory cell. The laser source provides energy. The optics shape and focus the beam. The cutting head keeps that beam aimed at the workpiece. The motion system follows the design path. Assist gas clears the cut. Ventilation handles smoke and particulates. The enclosure keeps the dangerous light where it belongs: not in your eyeballs, not bouncing off a wrench, and definitely not wandering around the garage like a tiny invisible villain.
Motion Control Matters
Metal cutting rewards precision. If the motion system has backlash, vibration, uneven speed, or poor alignment, the cut quality suffers. Corners can become rounded, small holes can distort, and edges can pick up dross. A good laser source cannot rescue a sloppy mechanical system forever. It may try, but even photons have standards.
Focus Height Is Critical
The laser must focus energy into a small spot. If the focus is too high or too low, the kerf widens, the edge quality drops, and the machine may fail to pierce the material consistently. Industrial machines often use height sensing and automatic focus control. DIY systems may approach this more simply, but the principle is the same: the beam must meet the metal at the right distance.
Assist Gas Is Not Optional
Assist gas helps blow molten material out of the cut and can influence edge quality, oxidation, and speed. Oxygen, nitrogen, and compressed air are commonly discussed in laser cutting, but each behaves differently. Oxygen can support an exothermic reaction in mild steel, while nitrogen is often used when a cleaner, less oxidized edge is desired. The right choice depends on material, thickness, quality requirements, and equipment design.
Safety: The Part That Deserves the Biggest Font
A DIY fiber laser metal cutter is not a toy. High-power fiber lasers used for cutting are typically in a hazard category where direct exposure, reflections, fumes, fire, electrical systems, and hot metal can all create serious risks. A safe system must be designed around protection from the beginning.
Proper safety planning includes a fully enclosed beam path, interlocked access panels, emergency stop controls, appropriate laser-rated viewing windows, correct warning labels, fire-resistant interior materials, reliable ventilation, and protective eyewear matched to the laser wavelength and optical density requirements. That last detail matters. Random tinted glasses from an online mystery box are not a safety plan; they are costume accessories with consequences.
Fume control is also essential. Cutting metal can create fine particulates and metal oxides. Stainless steel, galvanized materials, painted stock, plated parts, and unknown scrap can produce hazardous fumes. Good extraction and filtration are not just comfort features. They protect lungs, optics, electronics, and the general dignity of the workspace.
Fire risk deserves equal respect. Laser cutting produces hot sparks, molten metal, and heat-affected edges. A clean cutting bed, supervised operation, suitable extinguishing equipment, and a machine design that limits stray energy are all part of the safety picture. The best DIY projects are not the ones that barely work. They are the ones that work repeatedly without creating a dramatic story for the insurance company.
What Can a DIY Fiber Laser Actually Make?
The useful project list is surprisingly broad. A well-designed fiber laser setup can support hobby work, small business production, repair tasks, and prototype development. It can cut thin metal plates for electronics enclosures, instrument panels, decorative wall art, custom signage, model engineering parts, and brackets for machines that somehow always need one more bracket.
For example, a maker building a custom control box might cut a stainless front panel with accurate openings for switches, screens, and connectors. A motorcycle restorer could create thin shims or nameplates. A robotics builder might cut lightweight aluminum brackets for sensors. A jewelry designer may use thin sheet metal for pendants or layered decorative pieces. A small fabrication shop could prototype customer parts before committing to outsourced cutting.
The magic is not just that the laser cuts metal. The real advantage is digital repeatability. If the first part needs a hole moved two millimeters to the left, the fix happens in CAD. No hacksaw, no hand filing, no “close enough” that becomes “why does this not fit?” during assembly.
Common Challenges in DIY Fiber Laser Metal Cutting
As exciting as fiber laser cutting sounds, the learning curve is real. Beginners often underestimate how many variables influence the cut. Power, speed, focus, nozzle condition, gas pressure, material thickness, surface finish, and machine rigidity all interact. Change one variable and the result can go from crisp to crunchy.
Dross and Edge Quality
Dross is the unwanted solidified material that clings to the bottom edge of a cut. It can appear when molten metal is not fully expelled, when the speed is wrong, when the focus is off, or when gas flow is insufficient. Removing dross is possible, but the goal is always to reduce it at the process level.
Reflective Metals
Aluminum, copper, and brass can be more challenging than mild steel because reflectivity and thermal conductivity affect how energy is absorbed and spread. Fiber lasers are generally better suited to these materials than CO2 lasers, but that does not make them effortless.
Heat Distortion
Thin metal can warp if too much heat builds up. Good path planning, proper support, controlled parameters, and material choice all help. This is where experience turns into better parts. The laser may be digital, but the material still lives in the physical world and enjoys being difficult.
Why This Trend Matters for Makers and Small Shops
The rise of DIY fiber laser experimentation reflects a broader trend: advanced fabrication tools are becoming more accessible. Desktop CNC routers, 3D printers, vinyl cutters, and CO2 lasers already changed how people make things. Fiber lasers extend that digital workflow into metal, which is often the missing piece in serious hardware projects.
For a small business, this can mean faster iteration. Instead of waiting days for a supplier, a shop can test a panel, bracket, or label in-house. For a maker, it means fewer compromises. Projects that once had plastic placeholder parts can move into steel or aluminum. For educators and labs, it creates a chance to teach manufacturing concepts, optics, CAD/CAM workflow, safety systems, and materials science in one very bright package.
Still, accessibility should not be confused with casual use. Fiber laser cutting belongs in the category of powerful tools that demand training, planning, and respect. The point is not to scare people away. The point is to keep the excitement attached to good engineering instead of reckless improvisation.
Experience Notes: What Working Around DIY Fiber Laser Projects Teaches You
The first experience many people have with a DIY fiber laser project is not amazement. It is confusion. The machine may look simple from the outside: a beam, a head, a bed, and a file. Then reality taps you on the shoulder and introduces twenty variables you did not invite. Suddenly, the cut edge tells a story. A rough top edge suggests one problem. Dross underneath suggests another. A failed pierce says the material, focus, or timing is unhappy. It becomes less like pressing “print” and more like tuning a musical instrument that happens to melt steel.
One practical lesson is that preparation beats raw power. Clean material, flat stock, stable workholding, and good ventilation can matter as much as the laser source itself. People often imagine that more watts solve everything. They do not. More watts can sometimes create more smoke, more reflection risk, more heat distortion, and more expensive mistakes. A modest, controlled process often produces better results than an overpowered system used carelessly.
Another experience is the joy of digital correction. In traditional metalworking, a wrong hole can mean starting over or learning creative vocabulary. With laser cutting, the design file becomes the workshop’s command center. Need a wider slot? Adjust the vector. Need tabs for bending? Add them in CAD. Need five versions of the same bracket? Nest them efficiently and compare. This feedback loop is addictive in the best way. It encourages experimentation without wasting an entire afternoon on layout marks and center punches.
There is also a humbling safety lesson. Fiber lasers are quiet compared with many shop tools, and that can make them feel less dangerous than they are. A table saw announces itself. A grinder screams. A fiber laser may simply sit there while invisible energy does extremely serious work. That silence is exactly why enclosure design, interlocks, signage, training, and supervision matter. A safe setup feels almost boring during operation, and boring is wonderful when the alternative is “memorable for all the wrong reasons.”
Users also learn that fumes are part of the process, not an afterthought. Different metals smell different, smoke differently, and leave different residues. Unknown scrap is a gamble. Painted, plated, or galvanized material can introduce additional hazards. The experienced approach is to know the material before cutting it, use suitable extraction, and never treat the air in the shop like a free filter.
Finally, DIY fiber laser metal cutting teaches patience. The first successful cut is exciting, but the first clean, repeatable, accurate part is the real milestone. That is when the machine stops being a flashy experiment and becomes a fabrication tool. The best builders keep notes, test cautiously, improve the enclosure, refine the workflow, and respect the limits of their equipment. They do not chase internet heroics. They chase reliable parts, clean edges, safe operation, and the quiet satisfaction of turning a digital drawing into metal that fits perfectly.
Conclusion
A DIY fiber laser adds metal cutting to the mix by expanding what makers and small shops can produce from digital designs. It moves laser work beyond wood signs and acrylic ornaments into brackets, panels, thin sheet parts, metal art, and practical prototypes. The technology is powerful because it combines precision optics, motion control, assist gas, and repeatable software-driven workflows.
But the same power that makes fiber laser cutting exciting also makes safety non-negotiable. A serious setup needs enclosure design, interlocks, fume extraction, fire planning, correct eyewear, and a healthy respect for invisible laser energy. The most impressive DIY fiber laser is not the one that looks dramatic on video. It is the one that cuts cleanly, repeats accurately, and operates safely every time.
Note: This article is written for informational and editorial purposes. High-power fiber laser systems can be hazardous and should only be designed, evaluated, and operated with proper training, compliant safety controls, and appropriate professional guidance.