
Imagine a camera, a CNC router, a tiny LED, and a suspicious amount of patience walking into a dark room. The result is not a bad science-fiction joke. It is light painting with G-code: a strange, beautiful meeting point between photography, robotics, digital fabrication, and maker mischief.
When Photography Stops Freezing Time and Starts Collecting It
Most photographs are little time capsules measured in fractions of a second. The shutter opens, light hits the sensor, the shutter closes, and the moment is politely trapped forever. Long-exposure photography breaks that polite little rule. Instead of freezing time, it gathers time. A moving light becomes a glowing trail. A passing car becomes a ribbon. A flashlight becomes a paintbrush. A dark room becomes a canvas with terrible lighting but excellent creative potential.
That is the basic magic behind light painting photography. The camera sits still, usually on a tripod, while the photographer or a moving light source travels through the frame. Because the shutter remains open for several seconds or even minutes, every bright movement is recorded as a continuous mark. The result can look like handwriting, floating geometry, neon ghosts, or a tiny rave organized by engineers.
Now add G-code to the mix. G-code is the language that tells CNC machines, 3D printers, laser engravers, and other motion-control systems where to move, how fast to travel, and what action to perform along the way. In normal workshop life, it might guide a cutting bit through plywood or tell a printer nozzle where to lay down plastic. In a light-painting project, however, it can tell a machine where to move a light. Suddenly, the machine is no longer cutting material. It is drawing in midair using photons, which sounds much fancier than “I zip-tied an LED to a router.”
What “Painting With Light And A Little G-Code” Really Means
The phrase describes a clever maker-style approach to light painting: use computer-controlled motion to move an LED through space while a camera records the path with a long exposure. Instead of relying only on hand movement, the machine follows a programmed path. That means cleaner lines, repeatable shapes, bitmap-style images, and more precise patterns than most humans can manage while standing in a dark room trying not to kick the tripod.
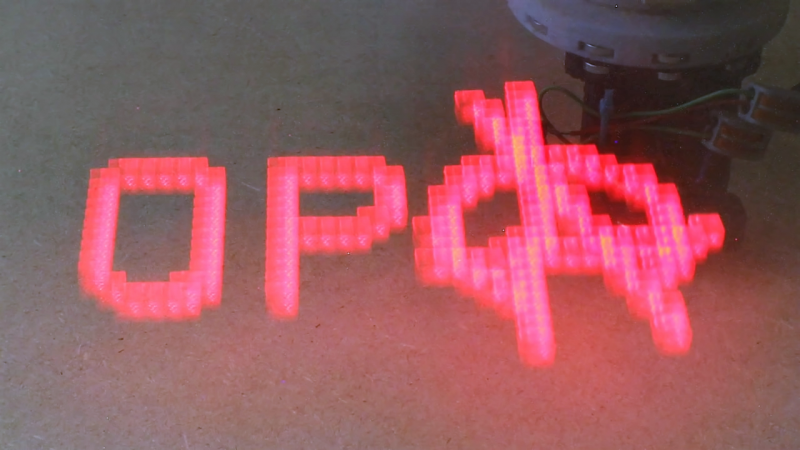
One well-known version of this idea involved adapting a CNC router into a kind of dot-matrix light printer. The concept was simple enough to explain and tricky enough to make interesting: mount a light to a machine head, generate motion instructions, open the camera shutter, and let the machine scan across the image area. As the LED turns on and off at carefully chosen moments, the camera records glowing dots or streaks that build into an image.
The first instinct might be to try this on a 3D printer, because 3D printers already understand motion commands and are usually sitting nearby looking underemployed. But not every machine is ideal for every motion path. A printer gantry may have limitations depending on its design, travel, access, and how easily a light source can be mounted. A CNC router often offers a more convenient work area, sturdier movement, and enough room to experiment without the machine looking offended.
The beauty of this project is not that it requires laboratory-grade equipment. It is that it recombines familiar maker parts in an unexpected way: a camera, a long exposure, a CNC motion system, an LED, a diffuser, a controller, and some code. It is part photography, part robotics, part digital art, and part “let’s see what happens if we press start.” That last category has produced half the best projects in human history and nearly all the confusing ones.
The Core Ingredients: Camera, Darkness, Motion, and Obedient Light
1. A Camera That Can Do Long Exposures
Light painting begins with exposure control. A DSLR, mirrorless camera, or advanced compact camera with manual mode works well because you can control shutter speed, aperture, and ISO. The camera needs to keep the shutter open long enough to capture the light’s movement. Many cameras allow exposures up to 30 seconds directly, and for longer captures, bulb mode keeps the shutter open as long as the remote release is held or programmed.
A tripod is not optional unless your artistic goal is “earthquake but make it neon.” The camera must stay still while the light moves. A remote shutter release, self-timer, or app-based trigger helps avoid camera shake at the start of the exposure. Manual focus is also important, because autofocus tends to panic in darkness like a raccoon in a flashlight beam.
2. A Dark Environment
The darker the space, the more control you have. A garage, workshop, studio, basement, or outdoor area at night can work. The goal is to let the LED become the dominant light source. Any stray reflection, shiny surface, or glowing power indicator can leave unwanted marks in the final image. Black backgrounds help, but truly controlling reflections can be harder than expected. Glossy CNC beds, metal clamps, polished dust shrouds, and even nearby walls can bounce light back into the lens.
3. A CNC Machine or Motion Platform
The CNC machine supplies repeatable motion. It can move an LED along the X, Y, and sometimes Z axes with much greater precision than a human hand. A router, plotter, gantry system, modified printer, or custom motion platform can all work. The machine does not need to cut anything. In fact, for this project, the quietest and least dusty setup is best. The spindle can stay off. The light does the drawing.
4. A Light Source
A simple LED is enough to begin. A battery-powered LED, a small flashlight, or a programmable RGB LED can create bright trails. Diffusion matters because bare LEDs often create harsh points or uneven brightness. A translucent PLA diffuser, frosted plastic, paper, acrylic, or other light-softening material can turn a sharp LED point into a smoother glowing pixel. Later, a programmable LED such as a NeoPixel can add color control, brightness changes, and more sophisticated image effects.
5. G-Code or Motion Instructions
G-code turns the artwork into machine movement. At its simplest, the machine moves to a coordinate, turns the light on, moves again, turns the light off, and repeats. A raster workflow can scan line by line, similar to how an inkjet printer builds an image. A vector workflow can trace outlines, curves, letters, or geometric shapes. The choice depends on whether the final image should look like glowing dots, smooth strokes, or a hybrid of both.
How G-Code Becomes a Paintbrush
G-code is built from short commands. A rapid move positions the machine. A linear move draws a line. Feed rate controls speed. Additional commands can trigger pins, lasers, spindles, or accessories depending on the firmware and controller. In ordinary CNC work, these commands remove material. In light painting, they choreograph motion and illumination.
For example, imagine a tiny LED attached to the CNC head. The machine starts at the lower-left corner of an invisible image. It moves horizontally across one row while the LED blinks on for bright pixels and off for dark pixels. Then it steps up slightly and scans the next row. Repeat this process enough times and the camera records a floating image made from light. It is basically a printer, except the paper is time, the ink is light, and the print disappears unless the camera catches it. Very dramatic. Very on-brand for photons.
The timing is critical. If the LED is too bright, the image blows out into blobs. If it is too dim, the camera barely sees it. If the machine moves too quickly, lines may look faint or broken. If it moves too slowly, the image becomes overexposed. The best results usually come from testing small patterns first: a grid, a square, a circle, a simple letter, or a grayscale ramp. Once those look good, more complex graphics become easier to tune.
There are two main creative styles. Raster light painting treats the LED like a moving pixel. It is great for bitmap images, icons, text, and low-resolution graphics. Vector light painting treats the LED like a pen. It is great for outlines, line art, abstract curves, technical diagrams, and animated-looking forms. Raster gives you the charm of glowing voxels. Vector gives you the elegance of clean neon paths. Both are valid. Both can look amazing. Both will make your first ten test shots look like a haunted barcode, and that is part of the journey.
Camera Settings That Make the Magic Work
There is no universal setting for every light-painting scene, but a practical starting point is manual mode, ISO 100 to 400, aperture around f/5.6 to f/11, and a shutter speed long enough for the machine to finish its movement. If the motion path takes 20 seconds, the exposure must be at least 20 seconds. If the machine takes two minutes, bulb mode or an external interval controller becomes useful.
Lower ISO helps reduce noise and preserve clean dark areas. A smaller aperture gives more depth of field and helps prevent bright LEDs from overexposing too quickly. Manual focus should be set before the lights go out. You can focus on the LED position using a work light, switch to manual focus, then begin the exposure. If the final light trails look too thick, reduce brightness, increase speed, stop down the aperture, or diffuse the LED differently. If they look too faint, do the opposite.
White balance can also change the mood. Daylight white balance keeps many LED colors predictable. Tungsten can cool the scene. Custom white balance offers more control. Shooting RAW gives the most flexibility for post-processing, especially when adjusting highlights, shadows, contrast, color, and noise reduction.
The camera should face the machine from a stable angle. A straight-on view gives a clean graphic look, while an angled view adds depth and makes the glowing pattern appear suspended in space. For more dimensional images, the Z-axis can move the light closer or farther from the camera, although this requires careful focus and exposure control.
Why Diffusion and Reflection Control Matter More Than You Think
Many first attempts at CNC light painting fail not because the code is wrong, but because the light behaves like a tiny overexcited sun. Bare LEDs create intense points. Shiny backgrounds reflect unexpected streaks. The machine itself may catch highlights. The camera records all of it with brutal honesty, because long exposure photography is basically a witness with excellent memory.
A diffuser softens the LED and makes each dot look less harsh. A black matte background reduces reflections. Black fabric, foam board, matte paint, or flocking material can help absorb stray light. Even the CNC bed may need covering if it reflects too much. The darker and less reflective the setup, the cleaner the floating light image becomes.
Reflection control is especially important when the light source passes close to surfaces. If the background reflects the LED, the final photo may show both the intended light trail and a ghost trail. Sometimes that looks cool. Sometimes it looks like the image brought a blurry cousin. Creative accidents are welcome, but repeatable results require controlling the scene.
From Simple LED to Programmable Color
A single-color LED can produce beautiful results, especially with clean motion and good exposure. But programmable LEDs open a larger playground. RGB LEDs can change color based on position, image data, layer, or time. Addressable LEDs such as NeoPixels can be controlled by small boards like an Arduino Nano, allowing brightness and hue changes during the machine path.
This turns the light-painting rig into a hybrid between a CNC plotter and a digital display. The machine controls where the light goes. The microcontroller controls what the light does. Together, they can create gradients, colored pixels, animated frames, depth cues, or multicolor line drawings. Add stop-motion techniques, and a series of long-exposure frames can become an animation that feels handmade and robotic at the same time.
There is also room for software creativity. A script can convert an image into coordinates and brightness values. A drawing program can export vector paths. A CAM tool can generate motion files. A custom post-processor can insert commands for LED control. The workflow can be as simple or as nerdy as desired, and yes, “as nerdy as desired” is a legally recognized maker measurement.
Practical Workflow: From Image to Glowing Result
Step 1: Choose a Simple Design
Start with a bold, high-contrast image. Icons, letters, logos, geometric shapes, and simple line drawings work better than detailed portraits. Fine detail can disappear if the LED is too large, the camera is out of focus, or the motion path is too coarse.
Step 2: Convert the Image Into Motion
For raster output, convert the image into rows of pixels. Each pixel becomes a location where the LED is either on, off, or set to a certain brightness. For vector output, convert the design into paths that the machine can trace. SVG files are often a useful starting point for vector artwork.
Step 3: Generate G-Code
The G-code should move the machine safely within its work envelope. Keep feed rates conservative at first. Include pauses if needed. Make sure the Z-axis does not crash into clamps, backgrounds, or the heroic little LED mount you printed at midnight.
Step 4: Mount the Light Securely
The LED should not wobble. Any vibration becomes a visible wiggle in the final image. A 3D-printed bracket, collar, or clamp can hold the light in a consistent position. If the light is battery-powered, make sure the battery is secure too. Nothing ruins a long exposure like a coin cell making a break for freedom.
Step 5: Test in Short Runs
Run the machine with the lights on and the spindle off to verify motion. Then run a small long-exposure test. Adjust brightness, speed, aperture, ISO, and diffusion before attempting a full image. Test shots are not failures. They are negotiations with reality.
Step 6: Capture, Review, Adjust, Repeat
After each exposure, check sharpness, brightness, framing, reflections, and alignment. Small changes can make a big difference. Move the camera slightly. Add a darker background. Lower the LED brightness. Change the feed rate. Try a different diffuser. The final image usually arrives after several rounds of polite frustration.
Why Makers Love This Kind of Project
CNC light painting sits in a sweet spot between art and engineering. It is visual enough to be exciting, technical enough to be satisfying, and accessible enough that a determined hobbyist can build a version with common tools. It also changes how we think about machines. A CNC router is usually associated with cutting, carving, drilling, and dust collection. Use it for light painting and it becomes a drawing robot for invisible ink that only a camera can see.
The project also demonstrates a valuable maker principle: tools are not limited to their official job descriptions. A 3D printer can become a plotter. A CNC router can become a light brush. A microcontroller can become a color conductor. A camera can become a time collector. Innovation often begins when someone asks, “What else can this thing do?” followed closely by, “Where did I put the tape?”
For educators, this kind of project is a fantastic teaching tool. It combines photography, electronics, coordinate systems, motion control, programming, optics, and design. Students can see the relationship between code and physical motion. They can change one variable and immediately see the result in a photograph. The feedback loop is visual, memorable, and much more exciting than staring at a spreadsheet of coordinates.
For artists, it offers repeatability without removing experimentation. A machine can trace the same path again and again, but the final image still depends on exposure, color, atmosphere, camera position, reflection, and timing. That blend of control and surprise is where the fun lives.
Common Problems and How to Fix Them
The Image Is Too Bright
Lower the LED brightness, move faster, use a smaller aperture, reduce ISO, or add diffusion. If the bright areas are clipped, post-processing cannot fully rescue them. Photons are generous, but they do not apologize.
The Image Is Too Dim
Increase LED brightness, slow the feed rate, open the aperture, or raise ISO slightly. Make sure the LED is facing the camera and not pointing heroically at the ceiling.
The Lines Look Wobbly
Check the mount, machine belts, stepper settings, and feed rates. A loose LED bracket can turn clean geometry into electric spaghetti.
The Background Shows Reflections
Use darker matte materials, change the camera angle, shield reflective machine parts, or increase distance between the light path and background.
The Image Is Out of Focus
Focus manually before shooting. Use a temporary light at the LED position, zoom in on live view if available, then lock focus. Stop down the aperture for more depth of field.
The Machine Finishes Before or After the Exposure
Match the exposure duration to the G-code run time. For longer paths, use bulb mode or a remote trigger. Some setups can automate camera triggering, but even manual timing works with practice.
Creative Ideas for CNC Light Painting
Once the basic setup works, the creative possibilities multiply quickly. Try a glowing signature, a pixel-art portrait, a wireframe cube, a fake hologram interface, a multicolor waveform, or a constellation map. Use multiple exposures to layer different colors. Move the camera between shots for a surreal perspective shift. Add a person standing still in the frame while the machine draws light around them. Suddenly your garage looks like a low-budget superhero origin story, which is honestly a strong aesthetic.
You can also use the Z-axis to create depth. Moving the LED closer to the camera makes trails appear larger and softer. Moving it farther away makes them smaller and sharper. With careful planning, the machine can draw shapes that seem to float at different distances. Combine that with color changes and you get images that feel sculptural rather than flat.
Another idea is to create stop-motion sequences. Capture one long-exposure frame, change the path slightly, capture another, and repeat. The final animation can show glowing forms assembling, rotating, dissolving, or transforming. It is slow work, but the result has a handmade quality that pure CGI often lacks. The camera is recording real light moving through real space, and that physical reality gives the images a special texture.
The Bigger Meaning: Digital Fabrication Meets Photographic Imagination
Painting with light and G-code is more than a clever weekend project. It points toward a larger creative shift: the boundary between digital design and physical image-making is getting thinner. A drawing can start as a bitmap or vector file, become machine instructions, move through a CNC system, appear as light in a dark space, and finally become a photograph. The artwork is not only the file, the machine path, or the final image. It is the entire chain.
This is why the project feels so satisfying. It gives code a visible body. It gives photography a mechanical performer. It gives a CNC machine something poetic to do after a long week of chewing MDF. The process is technical, but the result can be surprisingly soft and dreamlike. That contrast is the charm: rigid coordinates create floating light.
For modern makers, this kind of experiment also shows how accessible advanced creative tools have become. Affordable controllers, open-source firmware, addressable LEDs, consumer cameras, 3D-printed mounts, and free design software make it possible to build projects that once would have required specialized equipment. The limiting factor is less about access and more about curiosity, patience, and the willingness to spend an evening wondering why the LED only turns on when the machine is moving in the wrong direction.
Experience Notes: What It Feels Like to Build and Shoot a G-Code Light Painting Project
The first experience with CNC light painting is usually equal parts wonder and troubleshooting. You begin with a beautifully simple mental picture: the machine moves, the LED glows, the camera captures a perfect floating image, and everyone applauds. Reality arrives wearing safety glasses. The first photo may be too bright. The second may be too dark. The third may reveal that your “black” background reflects just enough light to look like a haunted cafeteria tray. At some point, you will take a long exposure of absolutely nothing because the LED wire came loose. This is normal. This is the hobby saying hello.
One of the biggest lessons is that light painting rewards slow thinking. In ordinary photography, you can shoot dozens of frames quickly. In CNC light painting, every image has a setup cost. You frame the camera, check the code, start the exposure, run the machine, close the shutter, review the result, and then decide what to change. The process forces you to pay attention. Brightness, speed, diffusion, focus, background, and angle all matter. A tiny adjustment can turn a messy blur into a clean image.
The second lesson is that machines are precise, but images are emotional. A perfect toolpath does not automatically create a beautiful photograph. The light may need softness. The composition may need breathing room. The colors may need restraint. The most technically accurate result can still feel cold, while a slightly imperfect image can feel alive. That is the wonderful tension in this project: the machine provides discipline, and the camera captures atmosphere.
Another memorable part is the silence. With the spindle off, a CNC router becomes a strangely graceful drawing machine. The stepper motors hum, the LED glides through darkness, and the camera quietly collects the path. It feels like watching a robot practice calligraphy in a room where electricity has learned to whisper. Then the exposure ends, the image appears on the camera screen, and suddenly the invisible motion becomes visible. That reveal never really gets old.
Good results also teach respect for preparation. Secure the LED mount. Tape down wires. Charge batteries. Clear the machine path. Turn off unnecessary lights. Use a remote shutter. Keep notes on settings. Label test files. These small habits prevent big headaches. They also make the project repeatable, which matters when you finally create one great image and immediately want a second version in blue.
The most enjoyable experiments often come after the basic setup is working. Try changing the camera angle. Try a warmer white balance. Try placing a person in the scene. Try using two exposures, one for the background and one for the light path. Try adding a faint fill light so the machine is barely visible behind the glowing pattern. The project starts as a technical challenge, but it becomes a playground. The best mindset is curious rather than perfectionist. In light painting, mistakes are not always mistakes. Sometimes they are new effects applying for a job.
In the end, painting with light and a little G-code is satisfying because it makes technology feel playful. It takes a machine designed for precision and gives it a poetic assignment. It takes photography, which already bends time, and lets code hold the brush. The final image may look futuristic, but the pleasure is very old-fashioned: make a tool, test an idea, learn from the mess, and enjoy the glow.
Conclusion
Painting with light and a little G-code is a brilliant example of maker creativity at its best. It does not require inventing a new universe. It simply asks familiar tools to collaborate in a strange way. A camera captures time. A CNC machine supplies motion. An LED provides the paint. G-code becomes choreography. The result is a glowing image that exists only because mechanics, optics, electronics, and imagination agreed to share the same dark room.
For photographers, this technique opens a new kind of precision. For CNC enthusiasts, it offers a dust-free artistic use for motion control. For educators, it is a hands-on lesson in code, light, and coordinates. For artists, it is a reminder that digital tools do not have to make creativity sterile. Sometimes they make it luminous.
Note: This article is original editorial content prepared for web publication and synthesized from real-world information about CNC light painting, long-exposure photography, G-code motion control, LED diffusion, and maker workflows without embedded source links.