
Addressing a postcard looks easy until you are standing there with a pen in one hand, a stamp in the other, and a tiny rectangle of vacation happiness judging your life choices. Where does the address go? Do you need a return address? Can your message spill into the address area? Is “Grandma, Florida” specific enough? Sadly, no. Grandma may be iconic, but the mail still needs a ZIP Code.
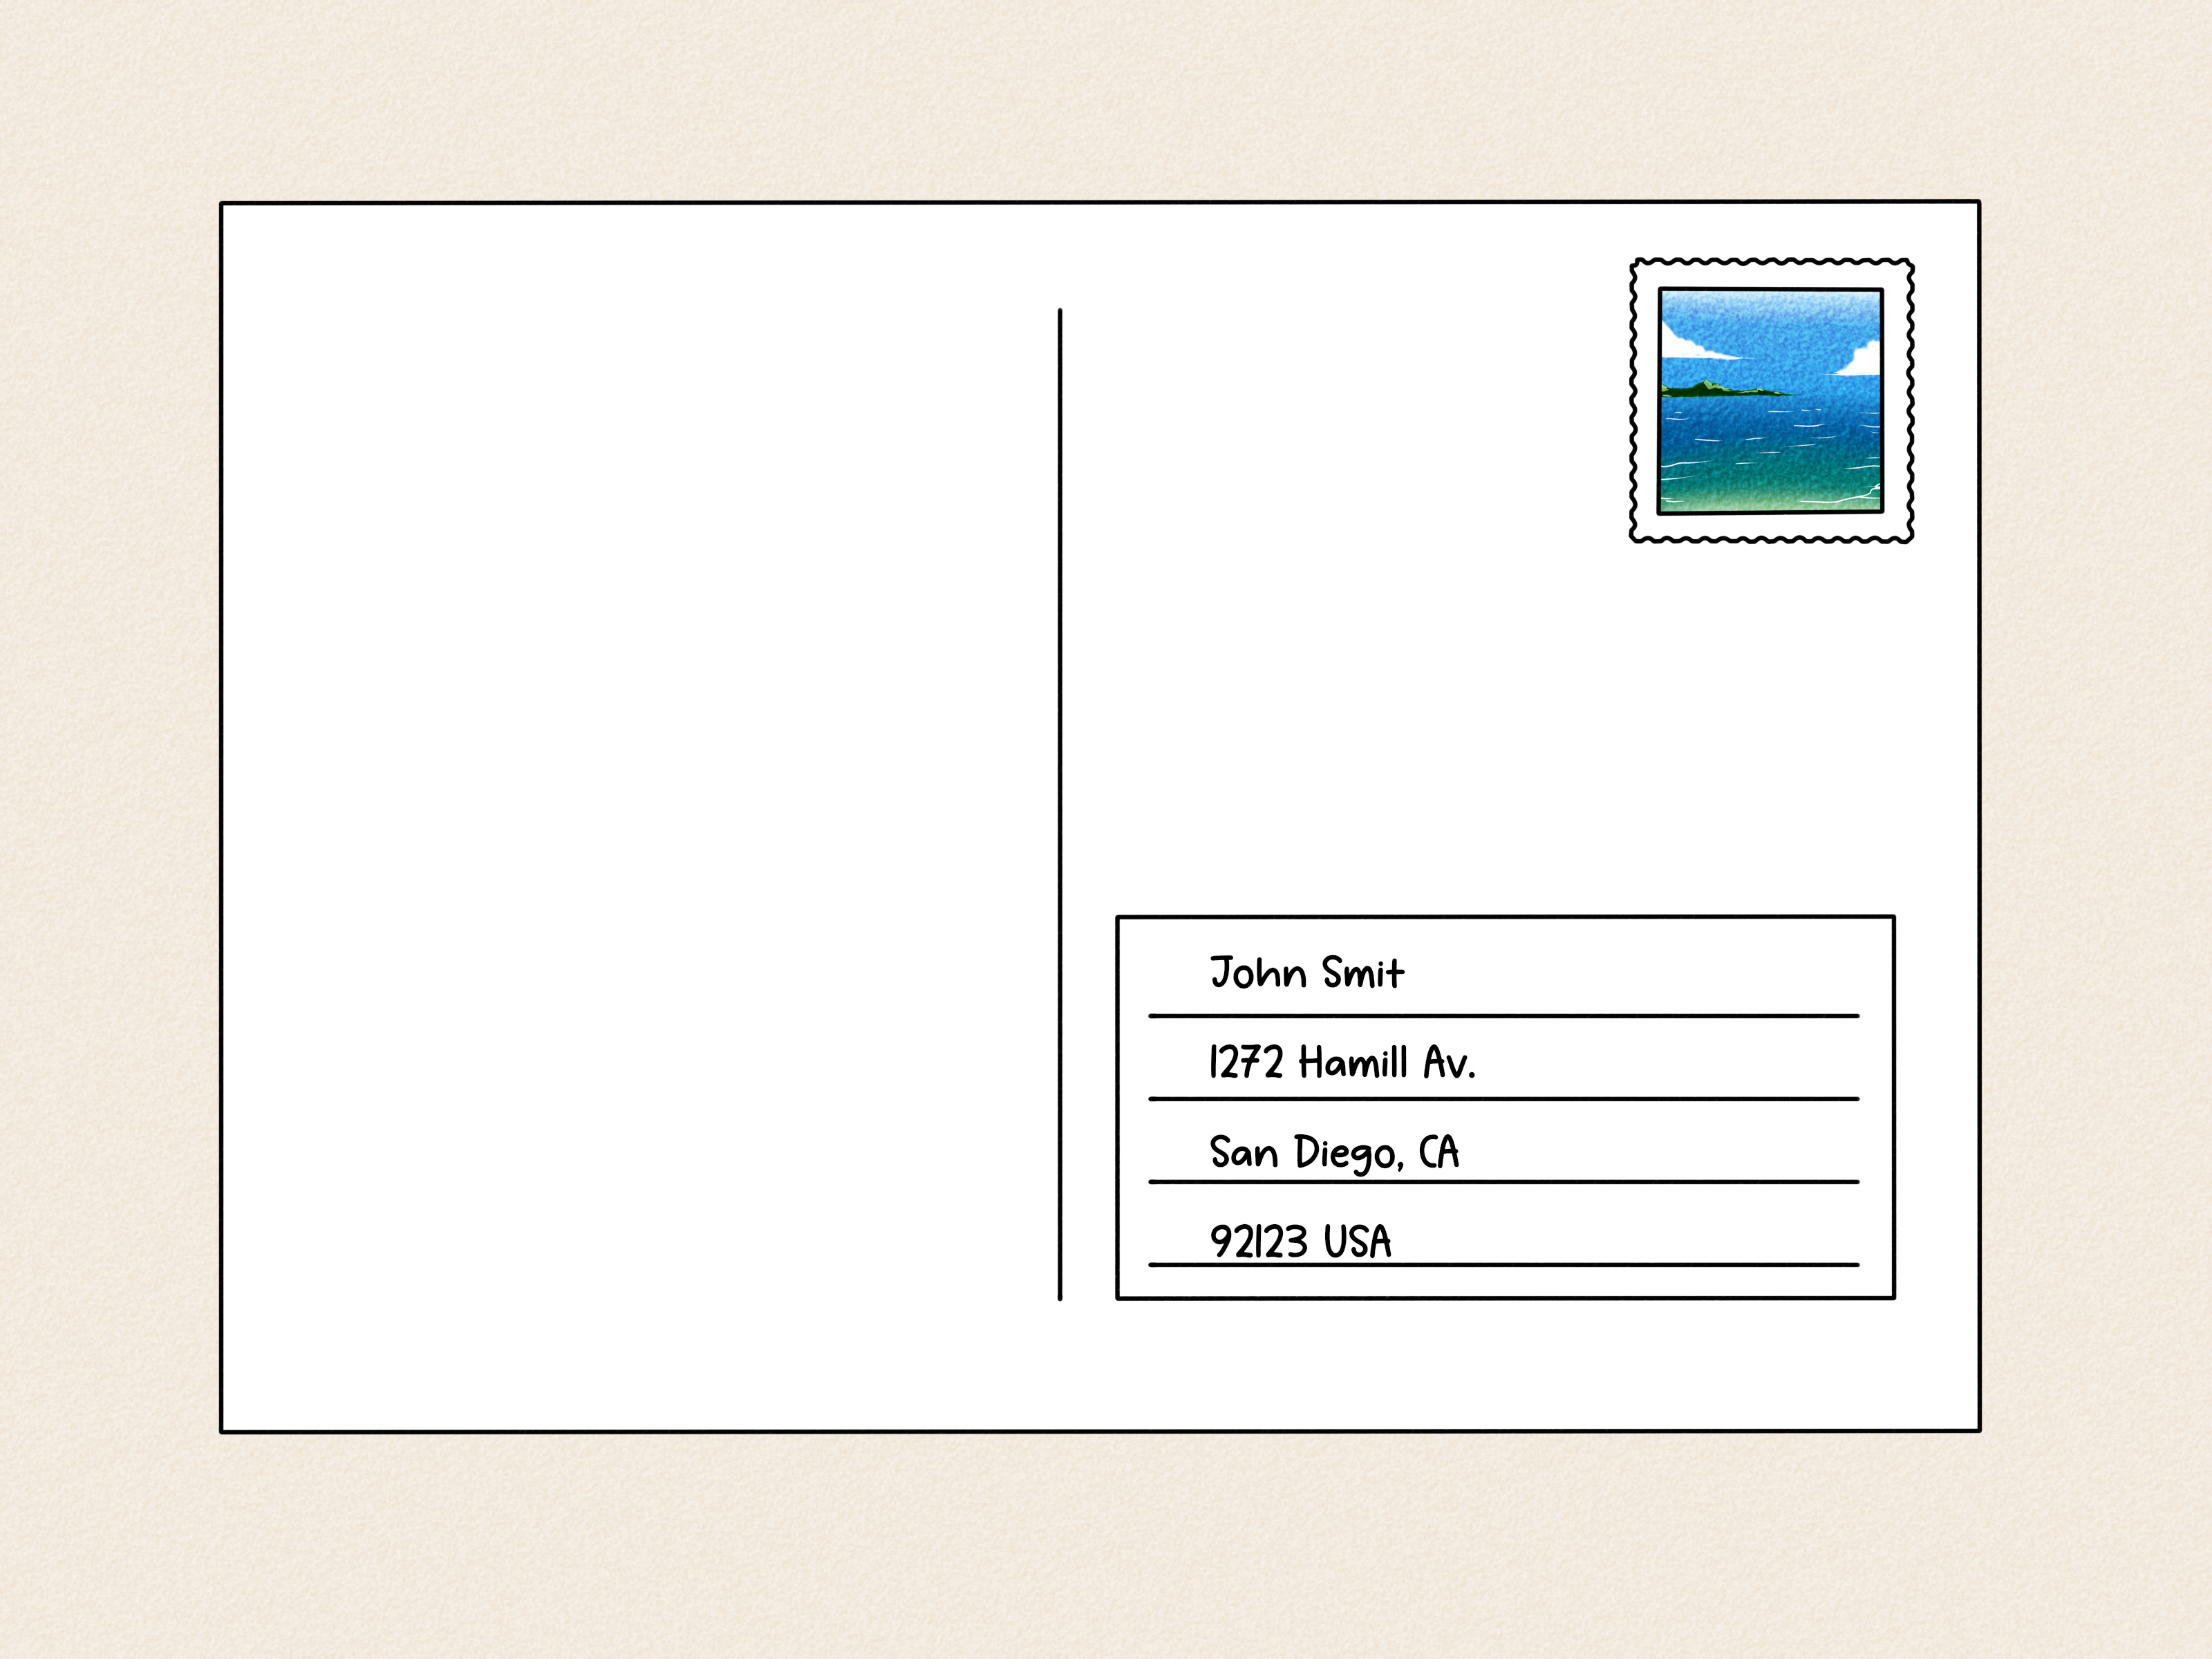
The good news is that learning how to address a postcard is simple once you understand the layout. A postcard has two personalities: one side shows the image or design, and the other side handles the practical business of mailing. On the mailing side, the recipient’s address belongs on the right, the stamp goes near the top right, and your message usually stays on the left. If you follow that basic structure, your postcard has a much better chance of reaching the refrigerator, bulletin board, scrapbook, or shoebox of memories it was born to join.
This guide explains how to address a postcard in six clear steps, with examples for U.S. and international mail, tips for neat formatting, common mistakes to avoid, and real-life experience from sending postcards that survived airports, beach bags, coffee spills, and handwriting that could only be described as “confident spaghetti.”
Why Proper Postcard Addressing Matters
A postcard is small, exposed, and usually processed by machines along the way. That means clarity matters. Postal equipment reads the address, routes the card, and helps move it through the system. If the address is too low, too messy, missing a ZIP Code, or hiding under decorative stickers, your postcard may be delayed or returned. Even worse, it may wander the postal universe like a tiny paper tourist with no hotel reservation.
Proper postcard formatting helps with three things: delivery speed, accuracy, and cost. Standard postcards must meet size and shape rules to qualify for postcard postage. Oversized, unusually shaped, square, thick, or heavily decorated cards may need letter-rate or additional postage. That adorable handmade card with glitter, buttons, and a tiny seashell glued to it may be beautiful, but the postal system may look at it and say, “That is not a postcard. That is a craft project with ambitions.”
How to Address a Postcard: 6 Steps
Step 1: Turn the Postcard to the Mailing Side
First, flip the postcard over to the side that is meant for writing. Most postcards have a picture on the front and a divided back. The left side is usually for your message, while the right side is for the recipient’s address and postage. Some postcards include printed guide lines, a vertical divider, or a stamp box. These are your friends. Trust them.
If the postcard does not have a divider, you can imagine one down the middle. Keep your note on the left half and reserve the right half for the address, postage, and postal markings. Postal scanners need open space to read and process the card, so do not crowd the address area with doodles, stickers, inspirational quotes, or a dramatic review of airport nachos.
For best results, write on a dry, flat surface. Glossy postcards can smear, especially if you use gel pens or markers. A ballpoint pen or fine-tip permanent pen usually works better. Before writing the final address, check that the ink does not smudge. Your postcard may be charming, but if the address turns into an abstract painting, delivery becomes a guessing game.
Step 2: Write the Recipient’s Name Clearly
The first line of the address should be the recipient’s full name. This tells the carrier who should receive the card and helps avoid confusion in households, apartments, dorms, and offices. Use the name the person normally receives mail under. For example:
You do not have to write in all capital letters for casual personal mail, but using clear uppercase letters can improve readability. The main rule is simple: make it easy to read. If your handwriting has ever been mistaken for a secret code, slow down and print each letter carefully.
If you are sending a postcard to a business, hotel, school, or workplace, add the company or organization name beneath the recipient’s name. For example:
If you are mailing to someone temporarily staying at another address, such as a hotel or friend’s home, you can use “C/O,” meaning “care of.” Example:
This small detail can make a big difference. Without it, the person receiving or sorting mail at that location may not know who the postcard belongs to.
Step 3: Add the Street Address or P.O. Box
The next line should include the street address, apartment number, suite number, room number, or P.O. Box. This is the line that does the heavy lifting. A correct street line usually includes the house number, street name, street suffix, and any secondary unit information.
Here is a clean domestic example:
If the recipient uses a P.O. Box, write it instead of a street address:
For apartments, suites, units, and rooms, the secondary unit information is important. “APT 4B” or “STE 200” helps the postcard reach the right mailbox instead of becoming lobby decoration. When possible, use standard abbreviations such as APT for apartment, STE for suite, FL for floor, and RM for room.
Avoid placing the apartment number on a random corner of the postcard or squeezing it into the message area like an afterthought. Keep the entire delivery address together on the right side. A scattered address is like giving directions by saying, “Turn near the thing, then go past the place.” Technically words, but not helpful.
Step 4: Write the City, State, and ZIP Code
The final line of a U.S. address should include the city, two-letter state abbreviation, and ZIP Code. The format looks like this:
When complete, the full address should look like this:
The ZIP Code is not optional. It helps route mail efficiently and can prevent delays. If you know the ZIP+4 Code, you may include it, but the five-digit ZIP Code is usually enough for personal postcards. A ZIP+4 version looks like this:
Use the official two-letter state abbreviation rather than spelling out the state when space is tight. For example, write CA instead of California, NY instead of New York, and TX instead of Texas. Postcards are not spacious. Every character is paying rent.
Before mailing, double-check the spelling of the city and the ZIP Code. One wrong digit can send your postcard on a detour. The card may still arrive eventually, but it might take the scenic route, and postcards are famously bad at texting updates.
Step 5: Place the Stamp in the Upper Right Corner
The stamp belongs in the upper right corner of the mailing side. Many postcards include a printed box showing where the stamp should go. If there is no box, place the stamp near the top right edge, leaving enough room so it is not hanging off the card or covering the address.
Use the correct postage for the postcard. In the United States, a standard domestic postcard usually has its own postcard rate, which is lower than the regular one-ounce letter rate. However, the price can change, and larger or nonstandard postcards may require more postage. Oversized cards, square cards, thick cards, rigid cards, or cards with attachments may not qualify for the standard postcard rate.
When in doubt, check the current USPS price or ask at the post office. It is better to spend a few extra cents than to have your postcard returned like a tiny unpaid invoice from your vacation.
For international postcards, use the correct international postage. A Global Forever stamp is commonly used from the United States to send a one-ounce letter or postcard to another country, but prices and requirements may change. Make sure your postcard meets the size and shape requirements, and remember that international mail needs the destination country written clearly on the last line.
Step 6: Write Your Message on the Left Side
Now comes the fun part: the message. Keep your note on the left side of the postcard, away from the address and postage area. A postcard message is not a novel, a diary entry, or the place to reveal a family secret in dramatic detail. It is short, cheerful, and public enough that you would not panic if a postal worker, hotel clerk, or curious roommate saw it.
A simple postcard message might look like this:
Keep the message friendly and readable. If space is limited, skip long explanations and focus on one vivid detail. Mention the weather, food, view, funny moment, or reason the card reminded you of the recipient. That personal touch is what makes postcards special.
Do not write below the address or too close to the bottom edge. The lower portion of the postcard may be used for postal barcodes or sorting marks. If your message wanders into that space, it may interfere with processing. Think of it as the postcard’s “do not disturb” zone.
Domestic Postcard Address Example
Here is a complete example for a postcard mailed within the United States:
If the recipient lives in an apartment, include it on the delivery address line:
If you want to include a return address, place it in the upper left area of the mailing side, keeping it smaller than the delivery address. A return address is not always required for a standard postcard, but it can help the card come back to you if it cannot be delivered. It is especially useful for invitations, business postcards, and handmade cards that may need correction.
International Postcard Address Example
International postcards need a little extra care. Write the recipient’s name and address according to the destination country’s format when possible. Then write the country name in English, in full, on the last line. It is best to use capital letters for the country line.
Example:
Do not abbreviate the country name. Write GERMANY, not DE. Write CANADA, not CA. Write UNITED KINGDOM, not UK if you want the clearest possible format. The country line tells the postal service where to send the card after it leaves the United States.
Also, do not put a U.S. ZIP Code on the country line. Foreign postal codes belong with the city or locality according to that country’s format. The final line should be the country name only.
Common Mistakes to Avoid When Addressing a Postcard
Writing the Address on the Wrong Side
The picture side is for the picture. The mailing side is for the address, message, and stamp. Writing the address across the scenic mountain view may feel artistic, but it can confuse postal processing and ruin the photo. Let the mountain remain majestic. Put the address on the back.
Using Tiny or Fancy Handwriting
Beautiful handwriting is wonderful, but readability wins. Avoid overly decorative script, pale ink, glitter pens, or letters so tiny they require a magnifying glass and emotional support. Use dark ink and clear printing.
Forgetting the Apartment or Unit Number
If someone lives in an apartment, suite, dorm, or office building, the unit number is essential. Without it, your postcard may reach the building but not the person. That is like getting to the right concert venue but forgetting which stage your favorite band is playing.
Covering the Address Area with Stickers
Stickers are fun. Postal confusion is not. Keep decorative stickers, washi tape, and doodles away from the address, postage, and barcode areas. A small sticker on the message side may be fine, but do not decorate over important mailing information.
Using the Wrong Postage
Postcard postage depends on size, shape, weight, and destination. A standard postcard mailed within the United States is different from an oversized postcard, a square card, or an international postcard. If the card looks unusual, check the postage before mailing.
Postcard Size and Design Tips
A standard postcard must be rectangular and within specific size limits to qualify for postcard pricing. In general, domestic postcards need to be large enough to mail safely but not so large that they become letter-size or flat-size mail. Typical postcard-friendly dimensions include common sizes around 4 inches by 6 inches, though not every card sold as a “postcard” automatically qualifies for the lowest rate.
Thickness also matters. Very thin paper can get damaged, while thick, rigid, or oddly shaped cards may require extra postage. If you are printing your own postcards, choose sturdy cardstock and leave enough blank space on the mailing side for the address, stamp, and postal markings.
For business postcards, invitations, save-the-date cards, real estate mailers, and promotional cards, design matters even more. Keep the address panel clean. Avoid dark backgrounds where the address will be printed. Use high contrast between text and background. Leave room for barcodes. Make the call-to-action noticeable, but do not let design elements crowd the mailing information. A postcard can be stylish and deliverable. It does not have to choose one personality.
Should You Include a Return Address on a Postcard?
A return address is optional for many personal postcards, but it is often a smart idea. If the postcard cannot be delivered because of a wrong address, missing apartment number, or insufficient postage, the return address gives it a way home. Without one, the postcard may not make it back to you.
Place the return address in the upper left corner of the mailing side. Keep it small and neat so it does not compete with the recipient’s address. The recipient’s address should always be the most obvious address on the postcard.
For personal vacation cards, you may skip the return address if space is tight. For wedding save-the-dates, business postcards, thank-you cards, school announcements, and customer mailers, include one. Businesses especially should use a return address because it supports trust, branding, and mail handling.
How to Make Your Postcard Message Memorable
A great postcard message does not need to be long. In fact, the best ones are often short and specific. Instead of writing, “Having a great time,” try adding one detail that paints a picture.
For example:
That sentence says more than a paragraph of generic travel updates. Mention a local food, a funny moment, a strange souvenir, a beautiful view, or something that reminded you of the recipient. The goal is to make the person smile before they even put the card on the fridge.
Here are a few easy postcard message starters:
- “Saw this card and immediately thought of you.”
- “Greetings from a place where the weather is showing off.”
- “Wish you were here, mostly because you would have ordered better dessert.”
- “This view is almost as dramatic as our group chat.”
- “Sending a little sunshine from the road.”
Extra Experience: What Sending Postcards Teaches You
After sending a lot of postcards, you begin to learn that the smallest details matter. The first lesson is that neatness is not about being fancy; it is about being kind to the journey. A postcard may pass through several hands and machines before it lands in the right mailbox. Clear handwriting, enough space around the address, and correct postage are small choices that give your card a fighting chance.
One experience that stands out is mailing postcards during a busy summer trip. The cards were bought in a little gift shop where the rack squeaked every time someone turned it. The pictures were perfect: a lighthouse, a sunset, a plate of local seafood, and one extremely judgmental seagull. The temptation was to write long messages on every card, but space quickly disappeared. The best cards ended up being the simplest ones: one funny detail, one warm sentence, and a clean address.
Another lesson is that address checking is worth the extra minute. A friend once moved apartments but stayed in the same city. The postcard had the correct street and ZIP Code but the old apartment number. It reached the building, but not the friend. Weeks later, the card appeared with markings and a little postal wear, looking like it had returned from a backpacking trip. Since then, confirming the full address before writing has become part of the ritual.
Postcards also teach you to respect ink. Glossy cards can be sneaky. You write a beautiful message, admire your work, stack the card under another one, and suddenly the words smear like they are trying to escape. Letting the ink dry before mailing is a tiny habit that saves the whole card. If you are writing several postcards at once, spread them out like cookies cooling on a tray. It looks dramatic, but it works.
There is also something satisfying about choosing the right stamp. A stamp is not just payment; it is part of the postcard’s personality. A flower stamp on a garden postcard, a space stamp on a museum postcard, or a colorful postcard stamp on a beach scene makes the whole thing feel more intentional. The recipient may not consciously analyze it, but they will feel the care.
The most surprising experience is how much people appreciate postcards. In a world of instant messages, a postcard feels delightfully unnecessary in the best way. It says, “I paused my day, found a card, wrote your address, bought postage, and trusted a national delivery network to carry this tiny rectangle to you.” That is oddly magical. A text message arrives in seconds, but a postcard arrives with a story.
Business postcards offer a different kind of lesson. When addressing postcards for announcements, invitations, or promotions, the cleanest designs usually perform best. A crowded postcard may look exciting on a computer screen, but in the real world, the address needs breathing room. If the recipient cannot quickly understand who it is from, what it says, and why it matters, the card loses impact. Good postcard design is not about filling every inch. It is about making every inch useful.
Handwritten postcards also carry charm because they are imperfect. A slightly crooked line, a quick doodle, or a casual sign-off makes the card feel human. Still, the address should be the most disciplined part. Be creative in the message area, not in the ZIP Code. The postal system enjoys accuracy more than whimsy.
One practical habit is to write the address first, then the message. This prevents the classic mistake of writing a message so enthusiastic that it invades the address space. Once the address and stamp are in place, you can see exactly how much room remains. It is like packing a suitcase: put in the important things first, then see if there is room for the novelty socks.
Finally, postcards remind us that communication does not always need to be efficient. Sometimes it can be slow, physical, funny, and a little old-fashioned. Addressing a postcard correctly is the practical side of that charm. It gives your message the best chance to arrive safely, whether it is traveling across town, across the country, or across the ocean.
Conclusion
Learning how to address a postcard takes only a few minutes, but doing it correctly can make the difference between a cheerful delivery and a confused piece of mail wandering around like it missed its connecting flight. Keep the recipient’s address on the right side, write the name and full delivery address clearly, include the city, state, and ZIP Code for U.S. mail, place the stamp in the upper right corner, and keep your message on the left. For international postcards, add the destination country in full on the last line.
A postcard is small, but it carries a lot: a memory, a joke, a view, a thank-you, an invitation, or proof that you survived the family road trip. Address it well, and it has everything it needs to make the journey.
Note: This article was created from current U.S. mailing best practices, USPS postcard addressing standards, domestic and international address formatting guidance, and practical postcard-writing experience. Always verify postage rates before mailing, because postal prices can change.