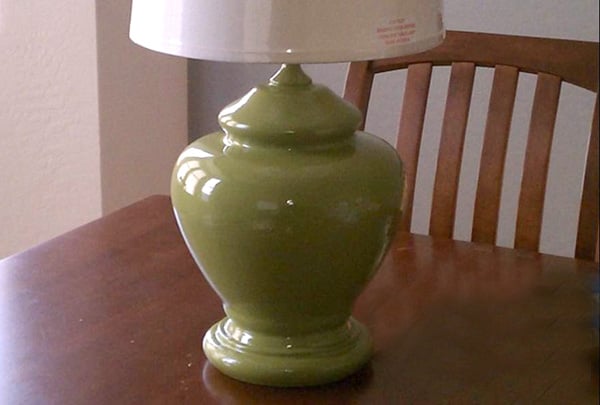

A lamp makeover sounds simple until the lamp looks back at you like it knows you skipped the primer. One minute you are confidently holding a spray can, imagining a magazine-worthy corner of your living room. The next minute, your thrift-store lamp has drips, fingerprints, a crooked shade, and the emotional energy of a science fair volcano. Welcome to the beautiful, humbling world of DIY lighting.
The good news is that almost every lamp makeover mistake can become a lesson. In fact, the best lamp transformations often come from projects that started with “Oops.” A dated brass lamp, a chipped ceramic base, or a boring bedside light can become a custom decor piece with the right prep, paint, shade, bulb, and a little patience. The key is learning what went wrong, fixing it properly, and resisting the urge to pretend the back side of the lamp does not exist.
This guide explores how to approach a lamp makeover with confidence, style, and a sense of humor. We will cover planning, cleaning, sanding, painting, shade selection, electrical safety, styling, and the common mistakes that turn a quick weekend project into a character-building event. Whether you are refreshing a flea-market find or rescuing a lamp from the “donate someday” pile, this article will help you create a finished piece that looks intentional, not accidental.
Why a Lamp Makeover Is Worth the Effort
Lamps are small enough to be manageable but important enough to change the mood of a room. A dated lamp can make a space feel tired, while a refreshed lamp can add warmth, color, texture, and personality. Unlike a full room renovation, a lamp makeover does not require tearing down walls, hiring contractors, or explaining to your family why the kitchen has no sink for three weeks.
A lamp makeover is also budget-friendly. Many attractive lamp bases can be found at thrift stores, estate sales, yard sales, and discount shops. Sometimes the shape is great but the color is wrong. Sometimes the base is beautiful but the shade looks like it has witnessed several decades of questionable design choices. With paint, fabric, a new lampshade, or updated hardware, you can create a piece that feels custom without paying custom prices.
The First Lesson: Do Not Start With Paint
The most common mistake in a lamp makeover is grabbing paint before making a plan. Paint is fun. Planning is less glamorous. But planning is what separates a polished DIY lamp from a sticky object you move to the garage “until it cures,” where it lives forever beside old holiday decorations.
Before touching the lamp, ask a few practical questions. Where will the lamp go? Is it for reading, ambient light, a bedside table, an entry console, or a dark corner that currently looks like a raccoon’s office? What colors already exist in the room? Should the lamp blend in, stand out, or add texture? Is the base metal, ceramic, glass, wood, resin, or plastic? Each surface may need a different cleaning method, primer, or paint.
Also check the lamp’s condition. Look at the cord, plug, socket, switch, harp, finial, and shade support. If the cord is cracked, the plug is loose, the socket flickers, or the switch feels unreliable, treat the makeover as both a cosmetic and safety project. A pretty lamp that sparks is not “vintage charm.” It is a tiny electrical drama.
Clean First, Admire Later
Another classic DIY mistake is painting over dust, oil, sticker residue, or mystery grime. Lamps collect more dirt than people realize, especially around the base, neck, and switch. Paint needs a clean surface to bond properly. If the surface is dirty, the new finish may bubble, peel, or look uneven.
Start by unplugging the lamp and removing the bulb and shade. Wipe the base with a soft cloth. For many surfaces, mild soap and water works well, but avoid soaking electrical parts. If the lamp has greasy residue, use a gentle degreasing cleaner appropriate for the material. Let everything dry completely before sanding or priming.
This step feels boring, but it is the hidden hero of a successful lamp makeover. Think of cleaning as the polite handshake between the old lamp and its new personality.
Sanding: The Step Everyone Wants to Skip
Sanding is not always dramatic, but it matters. A glossy ceramic, metal, or plastic base may be too slick for paint to grip. Light sanding creates a slightly rough surface, giving primer and paint something to hold onto. You do not need to attack the lamp like you are removing evidence. A light scuff with fine-grit sandpaper is usually enough.
After sanding, wipe away all dust with a tack cloth or microfiber cloth. Dust left behind can create bumps in the finish. If you have ever painted something and wondered why it suddenly had the texture of a stale cookie, leftover sanding dust may be the culprit.
Primer Is Not Optional When the Surface Is Difficult
Primer is one of the most valuable lessons in any lamp makeover. It improves adhesion, helps cover old colors, and creates a more even base for the final paint. Primer is especially important on metal, glass, glossy ceramic, laminate-like finishes, and plastic.
Use a primer designed for the lamp’s material. A metal lamp may need a metal-friendly primer. A glass base may need a bonding primer made for slick surfaces. If the lamp is dark and you want a light final color, primer can save you from applying endless coats of paint while questioning your life decisions.
Apply primer in thin, even coats. Heavy coats can drip, pool, or dry unevenly. Allow proper drying time according to the product instructions. Patience here prevents frustration later.
Spray Paint Mistakes and How to Avoid Them
Spray paint can create a smooth, professional-looking finish, but it is not magic in a can. It rewards patience and punishes impatience. The biggest spray paint mistake is trying to get full coverage in one coat. This usually leads to drips, sagging paint, tackiness, or a finish that looks like it melted during a heat wave.
Use several light coats instead. Shake the can thoroughly, test the spray pattern on cardboard, and hold the can at the recommended distance. Move in smooth, steady passes, beginning slightly before the lamp and ending slightly after it. This helps prevent heavy spots at the edges.
Ventilation is essential. Spray painting should be done outdoors or in a well-ventilated area with proper protection. Cover nearby surfaces, because overspray is sneaky. It travels farther than expected and has no respect for patio furniture, shoes, or innocent cardboard boxes.
Best Paint Finishes for Lamp Makeovers
The paint finish affects the lamp’s final mood. Matte paint can look modern, calm, and sculptural. Satin offers a soft glow and is forgiving on many surfaces. Gloss can feel bold and polished but may highlight imperfections. Metallic finishes can revive dated brass or add glamour, while textured finishes can create a stone, ceramic, or hammered-metal effect.
Choose a finish that matches both the lamp shape and the room. A chunky base may look sophisticated in matte black, creamy white, or warm taupe. A slim metal lamp may shine in aged brass, bronze, or satin nickel. A playful lamp can handle color: green, navy, terracotta, mustard, coral, or even a lacquered red if the room can support the drama.
The Lampshade Can Make or Break the Project
A lamp makeover is not finished until the shade looks right. Many DIY projects fail at the shade stage because the base is updated beautifully, but the original shade remains faded, dented, stained, or wildly out of proportion. The wrong shade can make a lamp look top-heavy, squat, cheap, or strangely nervous.
As a general design guideline, the shade should relate to the width and height of the base. Many decorators recommend a shade that is roughly twice as wide as the widest part of the base or visually balanced with the lamp’s overall height. The shade should cover the socket and bulb hardware without swallowing the entire lamp. The bottom of the shade should usually hide the socket area when viewed at eye level.
Shape matters too. A round base often works well with a round or drum shade. A square or angular base may look cleaner with a square or rectangular shade. That said, rules can be broken when the result looks intentional. The difference between “creative” and “confusing” is usually proportion.
Fabric, Paper, Metal, or Painted Shade?
Fabric shades create soft, diffused light and work well in bedrooms and living rooms. Linen, cotton, and pleated fabric shades can add texture. Paper shades are lightweight and casual. Metal shades direct light more sharply and can feel industrial, modern, or task-oriented. Dark shades create mood but reduce brightness. Light shades spread illumination more generously.
Painting a lampshade is possible, but it requires care. Fabric can stiffen, dark colors can block too much light, and uneven paint can become very visible once the lamp is turned on. If you paint a shade, apply light coats and test how the shade looks illuminated. A shade may look fine in daylight and then reveal every brush mark at night like it is presenting evidence in court.
Electrical Safety: The Non-Negotiable Part
A lamp makeover should never ignore electrical safety. Always unplug the lamp before working on it. Remove the bulb before painting or cleaning near the socket. Do not spray paint into the socket, switch, cord, or plug. Mask electrical areas carefully with painter’s tape and plastic if needed.
If the cord is brittle, cracked, frayed, or damaged, the lamp should be repaired before use. Rewiring a lamp can be a manageable project for people comfortable with basic electrical work, but it must be done correctly. A polarized plug, proper hot and neutral connections, and secure socket assembly all matter. If you are unsure, ask a qualified repair professional. A safe lamp is always better than a dramatic lamp.
Common Lamp Makeover Mistakes
Mistake 1: Choosing the Wrong Lamp
Not every lamp is worth saving. A makeover works best when the shape, scale, or material has potential. If the lamp is unstable, badly damaged, too small for the room, or made from poor-quality materials, paint may not solve the problem. Start with a base that has good bones.
Mistake 2: Ignoring Scale
A tiny lamp on a large console can look lost. A giant lamp on a narrow nightstand can feel like it is planning a takeover. Consider the size of the table, the height of nearby furniture, and the purpose of the light. The lamp should feel connected to the room, not randomly dropped from another dimension.
Mistake 3: Painting Hardware Accidentally
Paint on the socket, switch, harp, cord, or plug can make the project look sloppy and may affect function. Remove hardware when possible or mask it carefully. A little painter’s tape can save a lot of regret.
Mistake 4: Handling the Lamp Too Soon
Dry-to-touch does not always mean fully cured. Paint may feel dry but still be soft underneath. Moving the lamp too soon can create fingerprints, dents, or smudges. Let the finish cure according to the paint instructions before reassembling and styling.
Mistake 5: Forgetting the Bulb
The bulb changes everything. A cool, harsh bulb can make even a beautiful lamp feel like a dentist’s office. A warm white bulb often creates a softer, more inviting glow for living rooms and bedrooms. Use the wattage and bulb type recommended for the lamp and shade.
A Step-by-Step Lamp Makeover Plan
Step 1: Evaluate the Lamp
Check the base, wiring, socket, switch, harp, finial, and shade. Decide what can stay and what needs replacing. Take a “before” photo, partly for progress and partly so you can later say, “See? I had a vision.”
Step 2: Disassemble Carefully
Remove the shade, bulb, harp, finial, and any decorative pieces that can come off easily. Keep small parts in a bag or container. DIY confidence disappears quickly when the finial rolls under the refrigerator.
Step 3: Clean and Sand
Clean the surface thoroughly and allow it to dry. Lightly sand glossy areas and wipe away dust. This creates the best foundation for primer and paint.
Step 4: Mask Electrical Parts
Cover the socket, cord, switch, and plug. Protect any areas you do not want painted. Good masking makes the final result look crisp and professional.
Step 5: Prime
Apply thin coats of the correct primer. Let each coat dry properly. Do not rush this step, even if the lamp is sitting there looking boring and unfinished.
Step 6: Paint
Apply several light coats of paint. Rotate the lamp to reach all sides. Watch for drips and correct them early. Allow the paint to dry and cure before handling heavily.
Step 7: Update the Shade
Try different shade sizes and shapes before committing. A new shade can make an inexpensive lamp look high-end. If the old shade has a good shape but poor color, consider fabric, trim, paint, or replacement.
Step 8: Style the Lamp
Place the lamp where it supports the room’s function. Add books, a tray, a plant, or framed art nearby. A lamp looks best when it belongs to a small scene, not when it stands alone like it is waiting for instructions.
Style Ideas for a Fresh Lamp Makeover
For a modern look, paint the base matte black, soft white, charcoal, or warm beige and pair it with a clean drum shade. For a coastal style, try a sandy neutral, pale blue, or textured stone finish with a linen shade. For a vintage-inspired look, use aged brass, bronze, or deep green with a pleated shade. For a bold statement, choose a saturated color and keep the shade simple.
If the lamp has raised details, consider using glaze or wax to emphasize texture. If the base is plain, add interest through the shade, finial, or color. If the lamp is ceramic, a stone-look or chalky finish can make it feel more expensive. If it is metal, a hammered or satin finish can hide flaws and add depth.
Learning From Mistakes: The Real Value of the Project
The best thing about a lamp makeover is not just the finished lamp. It is the process of learning how materials behave. You learn that glossy surfaces need prep. You learn that paint drips when you get greedy. You learn that lampshades have proportions, bulbs have color temperatures, and “I’ll just eyeball it” is not always a strategy.
Every mistake teaches a useful DIY skill. A blotchy finish teaches surface preparation. A crooked shade teaches scale. A tacky surface teaches curing time. A color that looked great on the cap but strange in the room teaches testing. These lessons carry into furniture painting, fixture updates, thrift flips, and larger home projects.
Extra Experiences: What a Lamp Makeover Teaches You After the Paint Dries
The most memorable lamp makeover experiences usually begin with overconfidence. You find an old lamp with a wonderful shape and think, “This will take one afternoon.” Technically, it might. Emotionally, it may take three business days and a snack break. The first experience many DIYers share is discovering that preparation takes longer than painting. At first, that feels annoying. Later, it becomes the part you respect most.
One useful lesson is that color changes after context. A paint color that looks elegant in the garage may look too cold in a bedroom or too yellow in a living room. Lighting, wall color, furniture, and nearby finishes all influence the final result. That is why experienced DIYers often test paint on a small area or cardboard sample before committing. The goal is not perfection. The goal is fewer surprises.
Another experience involves learning when to stop. During a lamp makeover, it is tempting to keep adding details: trim on the shade, gold on the base, a new finial, decorative cord cover, maybe a stencil, perhaps a tiny tassel because apparently restraint has left the building. But the strongest makeovers often have one clear idea. A sculptural base with a quiet shade. A simple base with a dramatic shade. A bright color with minimal accessories. Editing is a design skill.
There is also a practical lesson about tools. Cheap brushes can shed bristles. Poor tape can bleed. The wrong primer can peel. A rushed spray job can become rough or sticky. You do not need a professional workshop, but using appropriate supplies makes a visible difference. A lamp makeover teaches that small projects still deserve proper tools.
Many people also learn to respect drying and curing time. This is difficult because a freshly painted lamp looks finished long before it is ready for real life. You want to reassemble it, place it on the table, turn it on, and admire your brilliance. But handling it too soon can leave marks. Letting paint cure fully is one of those quiet adult decisions that prevents loud regret.
The shade teaches its own lessons. Sometimes the original shade is the real problem. Sometimes a thrifted base looks expensive the moment it gets a clean white linen shade. Sometimes a patterned shade brings personality to a plain base. And sometimes the shade you wanted is the wrong size, proving once again that measuring is not a personal attack.
Finally, a lamp makeover teaches confidence. Once you rescue one lamp, you start seeing potential everywhere. A chipped base becomes an experiment. A dated finish becomes a weekend project. A forgotten corner becomes a design opportunity. Mistakes still happen, but they become less intimidating. You learn to sand, repaint, adjust, replace, and try again. That is the real makeover: not just the lamp, but the way you approach creative problems.
Conclusion
A successful lamp makeover is part design project, part patience test, and part comedy routine. The process rewards careful cleaning, thoughtful sanding, proper primer, light paint coats, safe handling of electrical parts, and smart lampshade selection. More importantly, it turns mistakes into useful experience. A drip teaches technique. A bad color teaches testing. A mismatched shade teaches proportion. A rushed finish teaches patience.
Learning from mistakes is what makes DIY satisfying. The goal is not to create a flawless lamp on the first try. The goal is to create something better than what you started with and to understand why it works. With the right approach, even a forgotten thrift-store lamp can become a stylish, personal, conversation-worthy piece. And if anyone asks where you bought it, you are allowed to pause dramatically before saying, “Oh, I made it over.”