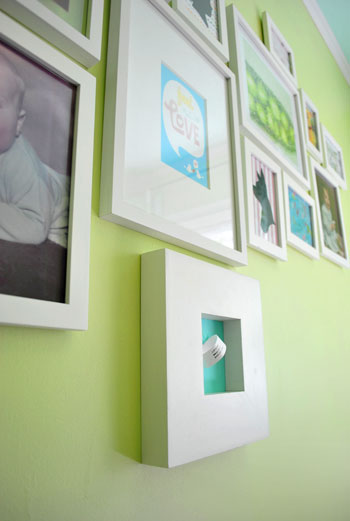

A nursery gallery wall is one of those projects that looks effortless online: a few sweet prints, a tiny moon, maybe a sleepy bear wearing a hat, and suddenly the room whispers, “A very stylish baby lives here.” In real life, however, hanging art in a nursery takes more thought than simply eyeballing a frame and hoping gravity chooses kindness. You are designing for beauty, yes, but also for safety, flexibility, and the fact that your adorable newborn will eventually become a small, determined wall inspector with surprisingly sticky fingers.
The good news? Learning how to hang a gallery wall of art in the nursery is completely doable, even if your current DIY skill level is “owns a hammer, fears the hammer.” The secret is to treat the gallery wall as one large design feature, plan the layout before making holes, use secure hanging hardware, and keep baby safety at the center of every decision. A nursery gallery wall should feel calm, personal, and magical without turning into a hazard zone above a crib or changing table.
This guide walks you through choosing nursery wall art, planning the layout, measuring spacing, selecting safe materials, and hanging frames securely. You will also find practical examples, common mistakes to avoid, and a longer experience-based section at the end for real-life lessons that make the whole process easier, less stressful, and a lot less likely to end with twelve crooked rabbits staring at you from the wall.
Why a Nursery Gallery Wall Works So Well
A gallery wall is perfect for a nursery because it lets you build a room around emotion instead of a single theme. You can mix baby animal prints, family photos, alphabet art, watercolor landscapes, heirloom pieces, tiny mirrors, fabric swatches, and framed quotes. The result feels collected rather than showroom-perfect, which is especially helpful when you want a nursery that can grow with your child.
Unlike a mural or wallpaper, a gallery wall is easy to update. When your baby becomes a toddler obsessed with dinosaurs, trucks, ballerinas, ocean creatures, or whatever very specific thing rules the household that week, you can swap a few prints without redoing the room. This flexibility makes nursery wall decor more practical and more budget-friendly.
A gallery wall can also solve design problems. It can fill an empty wall, balance a large dresser, create a cozy reading corner, or add personality to a neutral nursery. The key is to think of the display as a single composition rather than a random collection of frames. When the colors, spacing, and scale work together, the nursery looks intentional. When they do not, it can look like the wall sneezed art.
Start With Safety Before Style
Before picking prints or frames, decide where the gallery wall should go. In a nursery, placement matters more than it does in most rooms. The safest option is usually to hang the gallery wall on an open wall away from the crib, bassinet, or changing table. Heavy frames, glass, shelves, hooks, garlands, and decorative objects should not be placed where they could fall into a baby’s sleep space or where a child could pull them down.
If you love the look of art near the crib, consider lightweight alternatives such as fabric wall hangings secured well out of reach, decals, painted designs, or frameless prints mounted safely away from the sleeping area. Even then, keep the wall above the crib as simple and secure as possible. A nursery is one place where “adorable” should always lose a boxing match against “safe.”
Important Nursery Safety Rules
Use lightweight frames whenever possible. Replace glass with acrylic, plexiglass, or no glazing at all, especially in children’s rooms. Choose proper picture hooks, wall anchors, or screws based on the frame weight and wall type. Secure the bottom corners of frames with removable picture-hanging strips or frame stabilizers so they do not swing, tilt, or tempt little hands.
Also check nearby furniture. A dresser, glider, or bookcase can become a climbing tool once your baby enters the adventurous toddler era. Anchor furniture to the wall, keep cords out of reach, and avoid placing framed art where a child standing on furniture could grab it. The best nursery gallery wall is beautiful today and still safe when your baby starts moving like a tiny parkour athlete.
Choose the Right Wall for the Gallery
The best wall for nursery art is visible, calm, and safely positioned. Popular choices include the wall above a dresser if the art is high enough and firmly secured, the wall beside a glider, the reading nook wall, or the main wall opposite the crib. If the nursery is small, a vertical gallery wall can draw the eye upward and make the room feel taller. If the room is wide, a horizontal layout can create balance.
Look at the whole room before deciding. Where does your eye naturally go when you enter? Which wall needs warmth? Is there already a large focal point, such as wallpaper, a canopy, or a statement crib? A gallery wall should support the room, not fight every other design element for attention. Babies may enjoy contrast, but grown-ups still deserve visual peace at 3:12 a.m.
Pick a Theme Without Getting Too Matchy
A strong nursery gallery wall usually has a loose theme. “Loose” is the magic word. You do not need twelve identical woodland fox prints unless you are raising the future mayor of Fox Town. Instead, choose a guiding idea: soft nature, vintage storybook, celestial nursery, alphabet learning, family memories, garden animals, coastal calm, modern abstract, or heirloom-inspired.
Once you have a direction, select a color palette with three to five main colors. For example, a soft woodland nursery might include sage green, warm beige, dusty blue, cream, and natural wood. A modern rainbow nursery might use muted coral, ochre, sky blue, moss, and white. A celestial nursery could include navy, ivory, gold, soft gray, and pale lavender.
Color is what makes mixed art feel cohesive. You can combine photography, illustration, typography, embroidery, and paintings as long as the colors speak the same language. Think of the gallery wall as a choir. The pieces do not need to sing the exact same note, but they should probably be in the same concert.
Mix Art Types for a Personal Look
The most charming nursery gallery walls often include more than store-bought prints. Add a framed ultrasound photo, a birth announcement, a tiny handprint, a family photo, a favorite poem, a vintage postcard, a textile sample, or a page from a beloved children’s book. These personal pieces give the nursery depth and make the display feel like it belongs to your family, not just your shopping cart.
Try mixing large, medium, and small pieces. A gallery wall made only of tiny frames can look busy, while a wall made only of large frames can feel stiff. Start with one anchor piece, such as a 16-by-20-inch print, then build around it with smaller frames. This helps create hierarchy, which is designer-speak for “your eyeballs know where to go first.”
Select Frames That Are Nursery-Friendly
Frames shape the mood of the gallery wall. White frames feel clean and airy. Natural wood frames add warmth. Gold frames bring a classic, slightly whimsical look. Black frames can work beautifully in a modern nursery, especially when balanced with soft art and light walls.
For nursery safety, avoid very heavy frames, sharp decorative edges, and breakable glass whenever possible. Acrylic glazing is lighter and safer than glass. Canvas prints, wood-mounted prints, fabric banners, and lightweight poster frames can also be excellent options. If you use vintage frames, check that the backing is secure and that hanging hardware is strong enough for the frame’s weight.
Should Every Frame Match?
No. Matching frames create a clean, polished look, especially for a grid gallery wall. Mixed frames create a collected, cozy look. Both can work in a nursery. If you mix frames, repeat at least one element, such as color, finish, shape, or mat style. For example, you could use different frame sizes but keep them all natural wood, or mix white and brass frames while using similar white mats.
Plan the Layout Before You Touch the Hammer
This is the step that separates a lovely gallery wall from a wall with commitment issues. Before hanging anything, lay all the pieces on the floor and experiment. Start with the largest piece slightly off-center or in the middle, then arrange smaller pieces around it. Leave consistent spacing between frames, usually about two to three inches. For a more playful nursery wall, spacing can vary slightly, but it should still look deliberate.
Once you like the floor layout, take a photo. You will thank yourself later when you forget whether the bunny went above the moon or the moon went above the suspiciously elegant duck. Next, make paper templates by tracing each frame onto kraft paper, wrapping paper, or even taped-together printer paper. Mark the hanger location on each template. Tape the templates to the wall with painter’s tape and adjust until the arrangement feels right.
This paper-template method is especially useful because nursery gallery walls often need to work around furniture, windows, outlets, light switches, and awkward wall proportions. It lets you preview the final look without turning your drywall into Swiss cheese.
Use the Right Height and Spacing
For standard art hanging, designers often recommend placing the center of a single artwork or gallery grouping around eye level, roughly 57 to 60 inches from the floor. In a nursery, you can adjust this depending on the room and furniture. If the gallery wall is above a dresser, leave enough breathing room between the furniture and the lowest frame. A common range is about six to ten inches above the furniture, though larger pieces may need more space.
When hanging multiple pieces, treat the entire gallery as one big artwork. Find the center point of the overall arrangement, not each individual frame. This keeps the wall balanced and prevents the display from floating too high. A gallery wall hung near the ceiling can make the room feel awkward, as if the art is trying to escape.
Spacing Examples
For a clean grid of six frames, try two to three inches between each frame. For an eclectic nursery gallery wall, use two inches between smaller pieces and three to four inches around larger pieces. For a narrow vertical wall, stack three or four pieces with consistent spacing. For a wide wall above a low dresser, build a horizontal arrangement that spans about two-thirds the width of the furniture below it.
Gather the Right Tools
You do not need a professional workshop to hang nursery wall art, but a few basic tools make the project smoother. Gather a tape measure, pencil, painter’s tape, level, paper templates, picture hooks, screws or wall anchors, a stud finder, screwdriver, hammer, and removable picture-hanging strips for stabilizing corners. Keep frame bumpers on hand if you want to protect the wall and stop frames from shifting.
Do not guess the hanging hardware. Check the weight of each frame and choose hooks or anchors rated for more than that weight. If you are hanging into drywall without a stud, use appropriate drywall anchors. If a frame is heavy, locate a stud or use a secure anchor-and-screw method. Adhesive strips can be helpful for lightweight frames or stabilizing bottom corners, but they should not be the only support for heavier framed art in a nursery.
Step-by-Step: How To Hang A Gallery Wall Of Art In The Nursery
Step 1: Choose a Safe Location
Pick a wall that is away from the baby’s sleep space and out of future toddler reach. Avoid hanging heavy or breakable art above the crib. If the gallery is near a dresser or glider, make sure the frames are high enough and secured well enough that they cannot be easily pulled down.
Step 2: Select Art and Frames
Choose pieces that fit the room’s color palette and mood. Mix personal items with decorative prints for warmth. Use lightweight frames and acrylic instead of glass where possible. Check all frame backs, clips, wires, and hooks before hanging.
Step 3: Build the Layout on the Floor
Arrange the pieces on the floor in front of the wall. Start with the biggest piece, then add medium and small pieces. Keep spacing consistent. Take a photo of your final layout so you have a visual reference.
Step 4: Make Paper Templates
Trace each frame onto paper and cut out the shapes. Mark the hanging point on each template. Tape the templates to the wall with painter’s tape and adjust until the layout looks balanced from the doorway, the crib area, and the glider.
Step 5: Measure Twice, Hammer Once
Use a tape measure and level to confirm spacing. Mark the nail, hook, screw, or anchor spot through the paper template. This step may feel fussy, but it is faster than rehanging the same frame five times while muttering things the baby should not learn yet.
Step 6: Install Secure Hardware
Install picture hooks, screws, or anchors based on the wall type and frame weight. For heavier items, use studs or weight-rated wall anchors. Hang each piece carefully and check that it sits flat against the wall.
Step 7: Stabilize the Frames
Add removable picture-hanging strips, frame bumpers, or hook-and-loop fasteners to the bottom corners of each frame. This helps prevent tilting, rattling, and curious tugging. In a nursery, stable frames are not just prettier; they are smarter.
Step 8: Do a Final Safety Check
Gently test each frame. It should not wobble, slide, or lift off easily. Look for sharp corners, loose backing, dangling cords, or glass. Recheck the wall every few months, especially once your baby starts crawling, pulling up, and exploring.
Gallery Wall Layout Ideas for a Nursery
The Classic Grid
A grid layout uses frames of the same size arranged in rows. It is clean, calm, and ideal for modern nurseries. Try six matching frames over a dresser or four square frames in a reading corner. This layout works well with alphabet prints, animal portraits, botanical illustrations, or black-and-white family photos.
The Organic Cluster
An organic cluster mixes frame sizes and shapes. It feels relaxed and collected, making it perfect for vintage, boho, woodland, or storybook nurseries. Use one large anchor piece, then add smaller frames around it. Keep the colors connected so the wall does not look chaotic.
The Ledge-Free Look
Picture ledges are popular, but in a nursery they can become tempting shelves for toddlers. If you love the layered look, recreate it with securely hung frames instead of loose leaning art. You get the same visual depth without pieces that can slide or fall.
The Memory Wall
A memory wall includes family photos, hospital bracelets in a shadow box, a framed birth announcement, a tiny footprint, or a handwritten note from grandparents. Keep shadow boxes lightweight and securely anchored. This style is sentimental without being overly themed.
Common Mistakes To Avoid
The first mistake is hanging art too high. Nursery art should feel connected to the furniture and the people using the room. If it floats near the ceiling, it loses warmth. The second mistake is choosing pieces that are too small for the wall. A few tiny frames on a large blank wall can look lonely, like they are waiting for friends.
The third mistake is skipping the layout plan. Even if you like a casual look, plan it first. Casual should mean charming, not accidental. The fourth mistake is using weak hardware. Adhesive strips, tiny nails, or old frame wires may not be enough, especially in a room where safety matters. The fifth mistake is forgetting that babies grow. Anything within reach later should be extra secure now.
Budget-Friendly Nursery Gallery Wall Tips
You can create a beautiful nursery gallery wall without buying expensive art. Download printable art from independent artists, frame pages from damaged vintage children’s books, use family photos, create simple abstract paintings, or frame fabric remnants. A small piece of wallpaper or a pretty gift wrap pattern can look surprisingly high-end in the right frame.
Thrift stores are also useful for frames, but inspect them carefully. Replace glass with acrylic, tighten hardware, and repaint mismatched frames in one color for a cohesive look. If your budget is tight, spend more on secure hanging hardware and less on trendy prints. Safety is the part of the project that should never be bargain-bin energy.
How To Make the Gallery Wall Grow With Your Child
One of the smartest nursery design choices is planning for change. Choose a few pieces that feel baby-friendly and a few that can last for years. Animal art, nature prints, family photos, maps, abstract shapes, and simple typography transition well from nursery to toddler room. Avoid making every piece too infant-specific unless you are happy to update the entire wall later.
Leave room for future additions, such as your child’s first scribble masterpiece, a preschool photo, or a framed drawing of what may or may not be a cat. Gallery walls are wonderful because they can become living collections. The nursery starts the story, but the child gets to add chapters.
Real-Life Experiences: What Actually Helps When Hanging Nursery Art
In real nursery projects, the biggest lesson is that the wall rarely behaves exactly as planned. You may measure everything perfectly on the floor, then discover the light switch is in the worst possible spot, the dresser is taller than expected, or the wall has a stud precisely where your smallest frame absolutely does not need one. This is why paper templates are not optional; they are the calm adult in the room.
One helpful experience is to live with the template layout for a full day before hanging anything. Tape the paper shapes to the wall, then walk past them during different times of day. Sit in the glider. Stand at the doorway. Look at the wall while holding a laundry basket, because apparently parenthood comes with a permanent laundry basket. You may notice that one frame feels too low, the whole arrangement leans visually to one side, or the lowest piece would be too tempting for a toddler later.
Another practical lesson is to avoid rushing the art selection. Many parents feel pressure to finish the nursery before the baby arrives, but a meaningful gallery wall can develop slowly. Start with three to five strong pieces instead of filling every inch immediately. A framed family photo, a gentle animal print, and a soft abstract piece can be enough at first. After the baby arrives, you may want to add a birth announcement, a tiny footprint, or a photo from those sleepy early weeks. The wall becomes more personal when it has room to evolve.
Parents also learn quickly that matte finishes are kinder than glossy ones. Nursery lighting can create glare, especially near windows or lamps. If a print is hard to see because it reflects every beam of light in the county, it will not bring much joy. Acrylic glazing with a low-glare finish, canvas art, or unglazed prints can make the display easier to enjoy.
There is also the matter of emotional editing. It is tempting to include every cute print you find: the bunny, the bear, the rainbow, the alphabet, the quote, the moon, the personalized name sign, the giraffe who appears to know tax law. But a nursery gallery wall usually looks better when you remove one or two pieces before hanging. Negative space gives the art room to breathe. Babies come with enough visual clutter later; the wall does not need to begin at maximum chaos.
Another experience-based tip is to photograph the finished wall and check it through your phone camera. Odd spacing and crooked frames often show up more clearly in photos than in person. If something looks off, adjust it before calling the project done. A small tweak can make the difference between “professionally styled nursery” and “we hung this during a snack emergency.”
Finally, the most important real-life lesson is to recheck the gallery wall as the child grows. A newborn will not care about your frame hardware, but a toddler may treat the wall like a puzzle designed specifically for removal. Every few months, gently test the frames, inspect the strips or anchors, and make sure nothing has loosened. A nursery gallery wall is not a one-time task; it is a small, beautiful part of a room that changes with your family.
Conclusion
Learning how to hang a gallery wall of art in the nursery is really about balancing charm with common sense. Choose a safe wall, avoid heavy or breakable pieces near the crib, plan the layout with templates, use proper hardware, and stabilize every frame. Then have fun with the art itself. Mix personal memories with playful prints. Use colors that calm the room. Let the display grow as your child grows.
A nursery gallery wall does not have to be perfect to be beautiful. In fact, the best ones feel personal, warm, and slightly alive, like a visual love letter to the tiny person who will soon have strong opinions about bedtime. Plan carefully, hang securely, and give yourself permission to edit. The result will be a nursery wall that looks sweet, feels safe, and tells a story worth keeping.
Note: This article is written for general home decorating and nursery planning purposes. For safety-critical decisions, always follow current child-safety guidance, product instructions, and hardware weight limits.