
There are two kinds of people in this world: people who have seen the Northern Lights, and people who have stared at a cloudy sky at 2:17 a.m. while whispering, “Maybe that gray smudge is green?” I have proudly been both.
Capturing the aurora borealis sounds glamorous until you realize the job description includes frozen fingers, batteries that quit like overworked interns, and a camera tripod standing in snow like a tiny metal flamingo. But when the sky finally opens and those green ribbons start moving above you, all complaints disappear. The cold becomes background noise. The camera becomes an extension of your eyeballs. And the universe, apparently feeling dramatic, starts painting.
This is the story of how I captured the magic of the Northern Lights in five photos, plus the practical photography lessons I learned along the way. Whether you are planning an Alaska aurora trip, chasing a rare display in the northern United States, or simply wondering how to photograph the Northern Lights without turning your images into blurry green soup, this guide will help you prepare, shoot, and enjoy the moment.
What Makes The Northern Lights So Magical?
The Northern Lights, also called the aurora borealis, are not just pretty sky curtains put up for tourists with thermal socks. They are the visible result of charged particles from the Sun interacting with Earth’s magnetic field and upper atmosphere. When those particles collide with gases such as oxygen and nitrogen, they release light in colors that can include green, red, purple, blue, and pink.
Green is the classic aurora color because it is commonly produced by oxygen at certain altitudes. Red auroras can appear higher in the atmosphere and often feel more mysterious because they are dimmer to the human eye but surprisingly bold in long-exposure photos. Purple and pink tones may show up during stronger displays, especially along the lower edges of the aurora where nitrogen joins the party. Science explains it beautifully. My emotional explanation is simpler: the sky briefly becomes a lava lamp with better taste.
The magic also comes from unpredictability. You can check the aurora forecast, monitor the Kp index, study cloud cover, avoid the full moon, drive away from city lights, and still end up photographing exactly one enthusiastic streetlamp. Then, on another night, the forecast looks only “okay,” and the entire horizon suddenly glows like a secret door has opened.
How I Planned The Aurora Photo Chase
Before I took the five photos in this story, I treated aurora hunting like a tiny expedition. Not a heroic expedition with sled dogs and frost-covered beards, but the modern kind: weather apps, camera batteries, hand warmers, snacks, and a suspicious amount of optimism.
I Checked Space Weather First
The aurora starts with the Sun, so my first step was checking space weather resources for geomagnetic activity. The Kp index is one of the most useful numbers for beginners because it gives a general idea of how disturbed Earth’s magnetic field may be. A low Kp may still produce auroras at high latitudes, but stronger numbers increase the chance of seeing lights farther south.
I also looked for signs of solar wind speed, coronal mass ejections, and geomagnetic storm watches. This sounds fancy, but the practical takeaway is simple: when the Sun throws energetic material toward Earth, aurora photographers start charging batteries like squirrels hoarding acorns.
I Chose Darkness Over Convenience
Light pollution is the enemy of Northern Lights photography. City lights can wash out faint auroras, flatten contrast, and make the sky look like someone left a porch bulb on inside your lens. So I drove away from town, found a dark location with a clear view to the north, and avoided bright headlights as much as possible.
A great aurora location needs three things: dark skies, clear weather, and an interesting foreground. The aurora is the star, but a photo of green light over nothing can feel unfinished. Trees, mountains, lakes, cabins, roads, and silhouettes give the viewer a place to stand inside the image.
I Packed For A Long Night
Photographing the aurora is not a quick “pop outside and grab a shot” situation unless you happen to live inside a postcard. I packed a sturdy tripod, extra batteries, a wide-angle lens, a remote shutter or timer, a microfiber cloth, a red-light headlamp, gloves thin enough to operate buttons, and warmer gloves for when my fingers filed a formal complaint.
The red-light headlamp mattered more than I expected. White light can ruin night vision and annoy other photographers. Red light helps you adjust camera settings without turning the whole scene into a parking lot interrogation.
The Camera Settings That Finally Worked
My starting settings were simple: manual mode, RAW file format, wide aperture, high ISO, and a shutter speed long enough to collect light but short enough to preserve movement.
For many Northern Lights photos, a good starting point is:
- Aperture: f/2.8 or the widest your lens allows
- ISO: 1600 to 3200, adjusted based on brightness
- Shutter speed: 3 to 15 seconds, depending on how fast the aurora moves
- Focus: manual focus on a bright star or distant light
- White balance: around 3500K to 4500K, or adjust later in RAW
- Stability: tripod plus timer or remote shutter
The most important lesson? The aurora is not one subject. A faint glow and a fast-moving overhead corona require different settings. When the lights were soft and slow, I used longer exposures around 10 to 15 seconds. When the aurora became bright and active, I shortened the shutter speed to around 3 to 6 seconds so the ribbons kept their shape instead of turning into neon fog.
Manual focus was the part I least enjoyed and most needed. Autofocus does not love darkness. It hunts, panics, and sometimes gives up entirely. I focused manually on a bright star, zoomed in on live view, adjusted until the star was sharp, then avoided touching the focus ring as if it were a sleeping cat with legal representation.
The 5 Photos That Told The Story
I did not capture one perfect image. I captured five different moods. That is the real beauty of aurora photography: the Northern Lights are not a single pose. They dance, fade, flare, stretch, twist, and occasionally make you forget how pockets work.

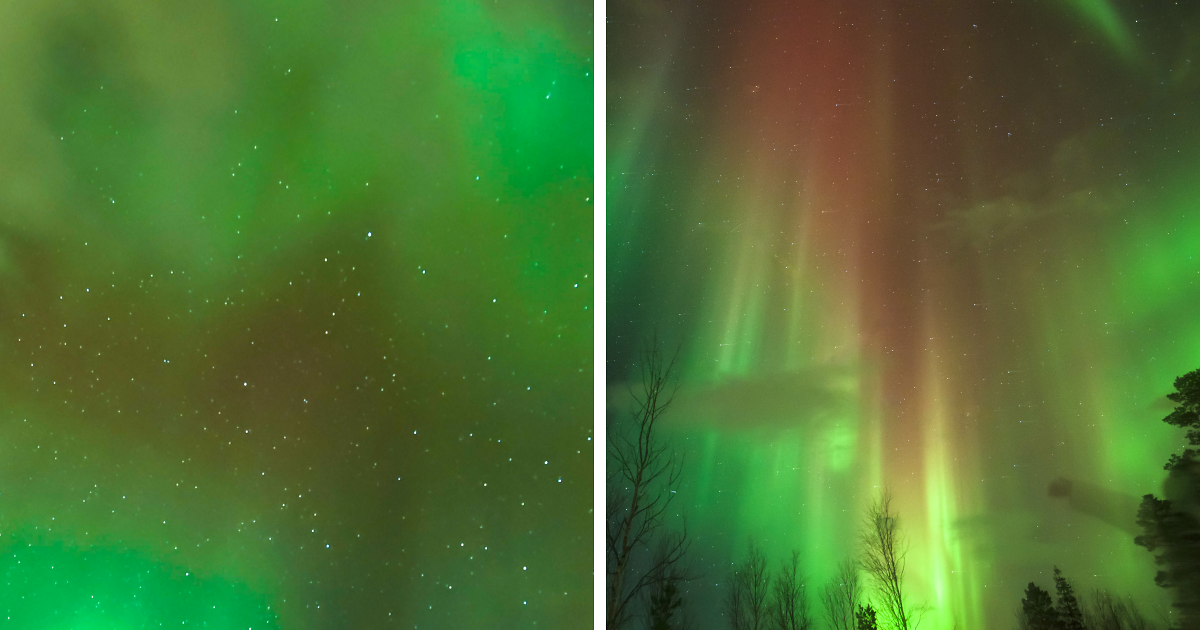
The first photo taught me to trust the camera without forgetting my own eyes. Sometimes the aurora begins as a pale band that looks more like mist than light. A long exposure can reveal color and structure before the display becomes obvious. For this shot, I used a longer shutter speed because the aurora was slow and dim. The result was gentle, quiet, and full of anticipation.

For the second image, I reduced the exposure time slightly because the lights started moving faster. The vertical rays looked like glowing curtains being pulled upward by invisible hands. Including the snowy foreground helped reflect some of the green light and gave the image a sense of place. Snow is basically nature’s bounce card, except colder and less cooperative.

The third photo worked because I moved. Many beginners, myself included, set up the tripod and then become emotionally attached to that exact square of ground. But the best composition was not where I started. I walked a short distance to include a lake reflection, and suddenly the photo had symmetry, depth, and a little extra drama. Reflections can turn a good aurora image into one that makes people say, “Wait, you took that?” which is the photographer’s version of applause.

The fourth image reminded me why shooting in RAW is worth it. RAW files preserve more information than standard JPEGs, giving you more flexibility when adjusting white balance, contrast, shadows, and highlights. The goal is not to fake the aurora or crank saturation until the sky looks radioactive. The goal is to recover what the camera captured while keeping the scene believable.

The fifth photo was pure chaos in the best possible way. The aurora moved overhead and spread in multiple directions. I shortened my shutter speed to preserve the structure of the rays, raised the ISO slightly, and pointed the camera almost straight up. Composition became difficult because, frankly, my brain had temporarily left the building. But this was the image that best captured the feeling of standing under a living sky.
What I Learned About Photographing The Northern Lights
1. The Forecast Is A Guide, Not A Promise
Aurora forecasts are incredibly useful, but they are not guarantees. Space weather is complex, local clouds can ruin everything, and timing matters. I learned to treat forecasts like a helpful friend, not a crystal ball. The best strategy is to stack the odds: dark location, clear sky, northern view, charged batteries, and enough patience to outlast disappointment.
2. Sharp Focus Beats Fancy Gear
A new camera can help, but sharp focus matters more than having the most expensive body in the parking lot. A blurry aurora photo is still magical to the person who took it, but less magical to everyone else. Practice manual focusing before the trip. Learn your lens. Tape the focus ring if needed. Future you, standing in the cold at midnight, will be grateful.
3. Shorter Exposures Can Be Better
Many people assume night photography always requires very long exposures. With the Northern Lights, that is not always true. Long exposures brighten faint auroras, but they can blur fast-moving ribbons. If the display is active, try shorter exposures between 1 and 6 seconds. You may capture more texture, movement, and shape.
4. Composition Still Matters In The Dark
It is tempting to point the camera at the brightest part of the sky and hope for glory. Sometimes that works. Often, it creates a photo that feels incomplete. Look for leading lines, silhouettes, reflections, cabins, trees, mountains, or a person standing still with a headlamp off. The aurora is the headline; the foreground is the story.
5. Cold Weather Is Part Of The Assignment
Cold drains batteries quickly, stiffens tripod locks, fogs lenses, and turns simple button presses into tiny endurance sports. Keep spare batteries close to your body, bring a lens cloth, avoid breathing directly onto the glass, and dress warmer than you think you need. If you are perfectly comfortable when you leave the car, you may be underdressed for hour three.
Can You Photograph The Northern Lights With A Phone?
Yes, and this is excellent news for anyone who does not travel with a camera bag large enough to qualify as checked luggage. Modern smartphones can capture impressive aurora images, especially when stabilized on a tripod or solid surface.
Use Night Mode or astrophotography mode if your phone has it. Turn off the flash, use a timer to prevent shake, and keep the phone as still as possible. Horizontal framing usually works best for landscapes, while vertical framing can be great when the aurora stretches overhead. The key is stability. Handholding a long exposure in the cold is a bold artistic choice, but usually not a successful one.
Phone photos may not offer the same control or detail as a mirrorless or DSLR camera, but they are more than capable of preserving the memory. And sometimes the best camera is the one you can operate while wearing gloves and questioning your life choices.
Editing Aurora Photos Without Overcooking Them
Editing Northern Lights photos is a balancing act. The camera often records more color than your eyes saw, especially during faint displays. That does not mean the color is fake, but it does mean restraint matters.
My basic editing workflow included adjusting white balance, lifting shadows slightly, reducing noise, protecting highlights, and adding modest contrast. I avoided pushing saturation too far because neon green skies can quickly move from “majestic natural phenomenon” to “alien smoothie commercial.”
The best aurora edits feel like memory sharpened, not reality replaced. Preserve the mood of the night: the cold, the darkness, the scale, the quiet, and the surprise.
Extra Experience: The Night The Sky Finally Showed Up
The most unforgettable part of capturing the Northern Lights was not actually pressing the shutter. It was everything around it. It was the waiting, the second-guessing, the sudden panic when the sky changed, and the strange silence that fell over everyone nearby when the aurora became bright enough to stop conversation.
I remember arriving too early, which is both a practical decision and a wonderful way to feel ridiculous. The sky was dark but empty. The stars were sharp. The air had that crisp winter smell that makes every breath feel expensive. I set up the tripod, checked focus, took test shots, and waited. For the first hour, nothing happened. Not “almost nothing.” Actual nothing. The kind of nothing that makes you wonder whether your hobby is just standing in cold places with equipment.
Then a faint gray band appeared low on the horizon. To the eye, it looked like a thin cloud. The camera saw green. That first test shot changed the entire mood. Suddenly I was not waiting for something imaginary. I was watching the beginning of a show. I adjusted the composition, checked the histogram, and tried to stay calm, which is hard when the sky starts behaving like it has a soundtrack.
The aurora strengthened in waves. It would brighten, fade, and then return with more structure. At one point, vertical pillars rose from the horizon, and I actually laughed. Not because anything was funny, but because my brain had no better response. The Northern Lights have a way of making adults sound like children who just saw fireworks for the first time.
The hardest part was remembering to enjoy it without the camera. Photography can turn beautiful experiences into technical chores if you let it. Settings, focus, framing, exposure, battery, lens fog, tripod positionthere is always something to manage. So I forced myself to step away for a few minutes. I put my hands in my pockets, looked up, and let the camera rest. That pause became one of my favorite memories of the night.
Later, when the aurora moved overhead, the entire sky seemed to rotate. Green rays stretched outward like spokes from a glowing wheel. I had seen photos of aurora coronas before, but standing under one felt different. It felt close, even though it was happening high above Earth. It felt personal, even though it was powered by solar particles and planetary magnetism, which is about as impersonal as an event can get.
By the end of the night, my toes were cold, my memory cards were full, and my sense of time had completely collapsed. I had five photos I loved, but more importantly, I had learned that photographing the Northern Lights is not about controlling the scene. It is about preparing carefully enough that when nature does something spectacular, you are ready to receive it.
That is the real magic. Not just the green light. Not just the science. Not just the final image. The magic is standing in the dark, waiting with hope, and watching the sky answer.
Conclusion
Capturing the Northern Lights is part photography, part planning, and part surrender. You can bring the right gear, study the aurora forecast, choose a dark location, dial in strong camera settings, and still need luck. But when the aurora appears, even briefly, all the effort becomes worth it.
My five photos were not just images of the sky. They were records of patience, cold air, quick decisions, imperfect settings, and one unforgettable night when the universe decided to show off. For anyone hoping to photograph the aurora borealis, my advice is simple: prepare well, stay flexible, shoot in RAW, use a tripod, keep your eyes open, and do not forget to simply stand there in awe.
Note: This article is a fully rewritten, publication-ready synthesis based on authoritative U.S. science, space weather, national park, and photography guidance, with no external source links inserted by request.