
If you’ve ever stared at a leggy rubber plant or an overgrown camellia and thought, “I love you, but you’re getting out of control,” air layering might be your new favorite garden trick. This time-tested plant propagation method lets you grow a brand-new plant while the branch is still attached to the parent. It sounds a little like magic, but it’s actually just smart horticultureand it’s easier than you might think.
In this guide, we’ll walk through exactly what air layering is, which plants respond best to it, the tools you’ll need, a clear step-by-step process, and plenty of pro tips to help you avoid common mistakes. By the end, you’ll be ready to turn one beloved plant into several, without relying on tricky cuttings or fussy seedlings.
What Is Air Layering?
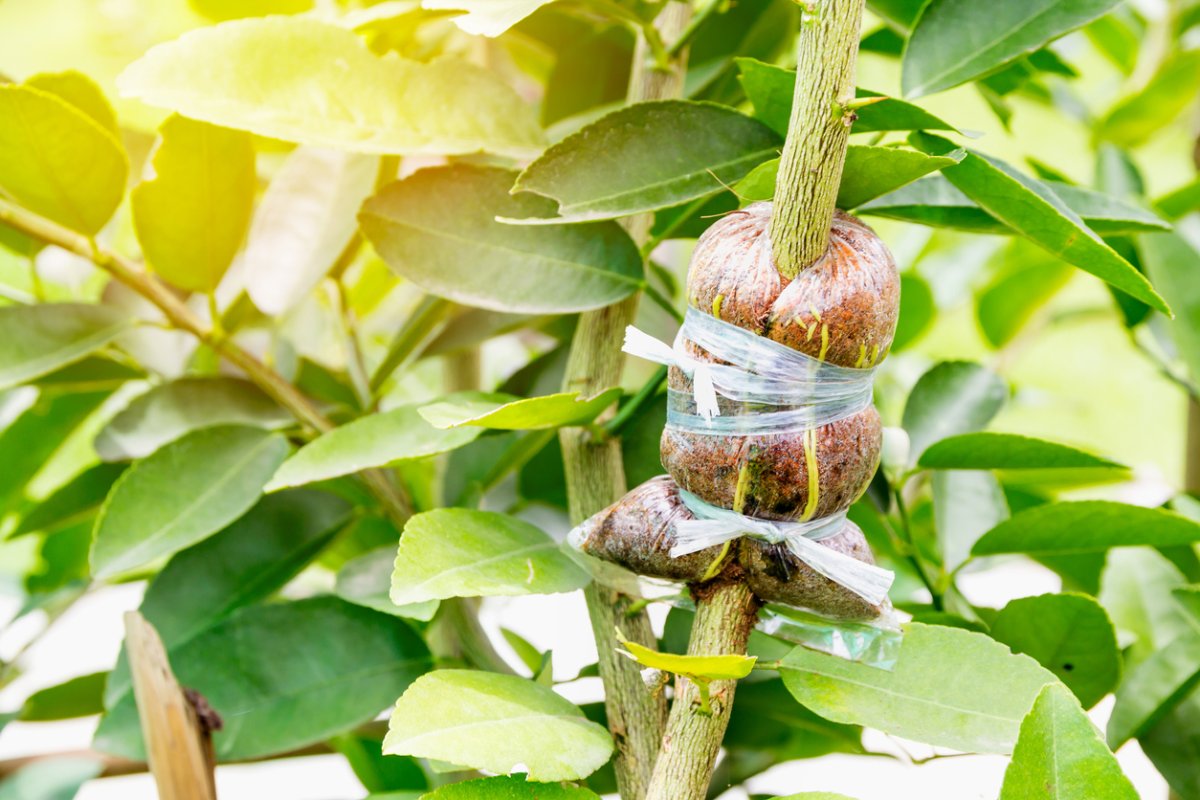
Air layering is a propagation method that encourages a stem or branch to form roots while it is still attached to the parent plant. Instead of taking a cutting and hoping it roots in water or soil, you wound a section of the stem, surround it with moist growing medium (usually sphagnum moss), wrap it up, and wait for roots to grow inside that little “moss bundle.” Once the roots are well developed, you cut below the rooted section and pot it up as a brand-new plant.
Think of it as bringing the soil up to the plant instead of bending the plant down to the soil. This is especially helpful when branches are too stiff or too high to layer into the ground, or when the plant doesn’t root easily from standard cuttings.
Because the branch remains attached, it continues to receive water and nutrients from the parent plant while roots are forming. That built-in life support system is why air layering often succeeds where basic cuttings fail.
Best Plants for Air Layering
Air layering is particularly useful for woody or semi-woody plants, and it shines with species that are tough to propagate by simple cuttings. Common candidates include:
Indoor plants
- Rubber plant (Ficus elastica)
- Weeping fig, fiddle-leaf fig, and other ornamental figs
- Croton
- Dieffenbachia
- Dracaena and schefflera
- Large philodendrons and other tall houseplants that have lost lower leaves
These tropical houseplants often become “all legs, no leaves” at the bottom. Air layering lets you create a fresh, well-proportioned plant and rejuvenate the old one at the same time.
Outdoor trees and shrubs
- Azalea and rhododendron
- Camellia and gardenia
- Dogwood, viburnum, and witch hazel
- Smoke tree, lilac, and magnolia
- Some roses and hollies
Air layering also works with certain fruit treeslike figs, citrus, and some apples and pearsthough grafted nursery trees are still preferred when you need predictable vigor and yield.
If a plant has woody stems and doesn’t root easily in a glass of water, put it on your “air layering candidates” list.
Why Choose Air Layering? Pros and Cons
Main advantages
- Higher success rate than cuttings: Because the stem stays attached and hydrated, it’s less likely to dry out or collapse before roots form.
- Larger new plants, faster: Instead of starting with a small cutting, you’re rooting a substantial piece of stem or branch, so the resulting plant looks fuller much sooner.
- Great for leggy or top-heavy plants: You can shorten an overgrown plant and create a new one in the process.
- Ideal for difficult-to-root species: Many woody ornamentals that resist water or soil propagation respond very well to air layering.
- No extra pots at first: The plant stays where it is while roots form. You only pot it once you know it has succeeded.
Potential downsides
- Slower than some cuttings: You may wait weeks to months for enough roots to develop.
- More fiddly than simply taking a cutting: There’s wrapping, tying, and checking moisture to manage.
- Not ideal for tiny stems: You need a reasonably thick stem or branch to make a proper wound and support the moss bundle.
Overall, air layering is a great “intermediate” propagation skillperfect if you’ve mastered basic cuttings and want more reliable results with larger, woody plants.
When to Use Air Layering
You can technically air layer at any time of year indoors, but your success rate is highest when the plant is actively growing. For most houseplants, that means spring through early fall. For outdoor shrubs and trees, late spring to early summer is usually ideal, when sap is flowing and the plant has enough growing season left to push new roots.
Air layering is especially useful when:
- A houseplant has grown too tall and lost leaves on its lower stem.
- A favorite shrub has one perfect branch you’d love as a stand-alone plant.
- You want a clone of a particular plant that you know performs well in your yard.
- The stem is too stiff to bend to the ground for traditional layering.
Tools and Materials You’ll Need
Part of air layering’s appeal is that it doesn’t require anything exotic. You’ll need:
- Sharp knife or pruning blade: Clean and disinfect it before use to avoid introducing disease.
- Sphagnum moss: The classic medium; it holds moisture well while still allowing air flow. Avoid over-compressed, soupy moss.
- Plastic wrap or a clear plastic bag: Holds the moss in place and keeps it moist.
- String, twist ties, or plant tape: To tie the plastic securely above and below the moss ball.
- Rooting hormone (optional but helpful): Encourages faster, more reliable root formation.
- Aluminum foil or dark plastic (optional): Wrap over the clear plastic to block light and prevent algae growth and overheating.
- Gloves and disinfectant wipes: To protect your hands and keep tools clean.
If you’re working outdoors or on large branches, you may also want a small stake or soft ties to support the partially cut branch so it doesn’t snap under its own weight.
Step-by-Step: How to Air Layer Plants
1. Choose the right stem
Select a healthy, vigorous stem or branch that is at least pencil-thick. On houseplants, choose a point about 12–18 inches below the growing tip; on shrubs and trees, choose a younger branch, not old, woody trunks. Avoid stems that are diseased, badly scarred, or shaded and weak.
Remove leaves in the area where you’ll work so you have 3–4 inches of bare stem to wrap.
2. Decide how you’ll wound the stem
There are two main wounding techniques, and which you use depends on the kind of plant you’re working with.
Girdling (ring-barking) for woody dicots
This method works well for most common shrubs and many houseplants like rubber trees and figs.
- Make a cut all the way around the stem, just through the bark, at your chosen point.
- About 1 inch below that, make a second ring cut around the stem.
- Connect the two cuts with a vertical slit and peel off the ring of bark.
- Gently scrape the exposed surface to remove any remaining soft green tissue, which prevents the plant from simply healing over instead of forming roots.
Slit method for monocots and soft stems
Plants like dracaena and dieffenbachia often respond better if you make a deep slit rather than removing a ring of bark.
- Make an upward-slanting cut into the stem, penetrating about one-third to one-half of the way through.
- Wedge a toothpick or small piece of plastic into the cut to hold it open.
In both methods, the goal is to interrupt the downward flow of carbohydrates enough to stimulate root formation at the wound, while keeping the stem attached and functional.
3. Apply rooting hormone (optional but recommended)
Dust the exposed area lightly with rooting hormone powder or brush on a gel formulation. You don’t need a thick coat; a little goes a long way. If you’re using the slit method, gently tap some hormone into the slit before inserting your toothpick.
4. Wrap with moist sphagnum moss
Soak a handful of sphagnum moss in water, then squeeze it so it’s evenly damp but not dripping. It should feel like a wrung-out sponge.
Press the moss around the wound, forming a firm, egg-shaped bundle that completely covers the injured area. Make sure there are no gaps where the stem is exposed; the wound should be fully surrounded by moist moss.
5. Seal the moss in plastic
Wrap clear plastic around the moss bundle. You can use plastic wrap from the kitchen or a cut-up sandwich bag. Overlap the edges so the moss is fully enclosed.
Secure the plastic tightly above and below the moss ball with string, twist ties, or plant tape. The goal is to keep the moss from drying out while still allowing a bit of air exchange. If you’re layering outdoors in hot or sunny conditions, wrap aluminum foil or dark plastic over the clear plastic to keep the root zone cool and shaded.
6. Wait, watch, and maintain moisture
Now comes the hardest part: patience. Depending on the plant species, temperature, and season, roots may appear in a few weeks or take several months.
Check the moss periodically by gently squeezing the bundle. If it feels dry and crunchy instead of soft and springy, carefully open the top of the plastic and mist the moss, then reseal it. Clear plastic lets you peek in to see whether roots are forming; opaque foil keeps roots happier but leaves you guessing. You can compromise by starting with clear plastic and adding a loose foil cover you can remove to check progress.
7. Cut and pot your new plant
When you see a good network of roots filling the moss (or it’s been several months and you can feel that the ball is firm and well-rooted), it’s time to release your new plant.
- Use clean, sharp pruners to cut the stem just below the moss bundle.
- Carefully remove the outer plastic wrap, but don’t disturb the moss or pull it away from the new roots.
- Plant the rooted ball into a pot slightly larger than the moss bundle, using a high-quality potting mix.
- Water thoroughly and keep the new plant in bright, indirect light until it re-establishes and pushes out fresh growth.
The original plant can often be pruned just below the old layering site to encourage new branches and fuller growth, essentially giving you two refreshed plants instead of one lanky one.
Troubleshooting Common Air Layering Problems
The moss keeps drying out
If the moss dries out repeatedly, root formation will stall. Wrap more tightly, use a slightly thicker layer of moss, and consider adding an outer foil layer to reduce evaporation. Indoor plants near heating vents or outdoor plants in hot, windy spots are especially prone to drying out.
No roots after several months
Some slow-growing woody plants simply take longer, but a total lack of roots may mean:
- The wound healed over instead of rooting (not enough bark/cambium removed).
- The plant was dormant or stressed when layered.
- The moss was either consistently too dry or waterlogged.
Try again during active growth and double-check your wounding technique. On woody stems, make sure you’ve fully removed the ring of bark and soft tissue between your two cuts.
The branch snapped below the moss bundle
This can happen when the stem is heavily cut and the top is large or windswept. In future attempts, support the branch with a stake or tie it to a sturdier neighboring stem. For thick branches, keep the wound shallow enough to maintain structural strength, or choose a smaller side branch.
The moss smells sour or looks slimy
That usually means it’s staying too wet and has poor air flow, which can encourage rot instead of roots. Use less water when moistening the moss next time, and avoid wrapping the plastic so tightly that it squeezes all the air out. If you’re layering outdoors during cool, rainy weather, consider a looser wrap and skip the foil.
Air Layering vs. Other Propagation Methods
If you’re wondering whether to use cuttings, ground layering, or air layering, a quick comparison helps:
- Softwood or stem cuttings: Quick and simple for many herbaceous plants, but some woody species refuse to cooperate, especially if they’ve grown large leaves or thick stems.
- Ground layering (bending a branch to the soil): Great for flexible shrubs and vines. Not so great when branches are stiff or too tall to bend.
- Air layering: Best when you want a sizable new plant from a woody or semi-woody stem that’s hard to bend or hard to root from cuttings.
In many gardens, the smartest approach is “all of the above.” Use quick cuttings for easy plants, ground layering for bendy shrubs, and reserve air layering for the divasthose larger, woody plants that need a little extra coaxing.
Frequently Asked Questions About Air Layering
How long does air layering take?
Most houseplants and fast-growing shrubs will form usable roots in 4–8 weeks under good conditions. Slower woody plants or outdoor trees may take several months. Always wait until you see a generous mass of roots (or feel that the moss ball is firm and full) before cutting the new plant free.
Do I have to use sphagnum moss?
Sphagnum moss is popular because it holds moisture well and resists decay, but you can mix in peat moss, perlite, or coco coir as long as the mixture stays moist yet airy. For beginners, plain sphagnum moss is easiest and most forgiving.
Can I air layer more than one stem on the same plant?
Yesbut don’t overdo it. Each air layer steals some energy from the parent plant. On a healthy, robust plant, two or three simultaneous layers are usually fine. On weaker plants, stick to one and allow the plant to recover between attempts.
Should I fertilize during air layering?
Light, balanced fertilizing during the active growing season can support root formation, but avoid heavy feeding, which may push too much top growth instead of roots. If in doubt, keep the plant on its normal feeding schedule rather than adding extra fertilizer just for the air layer.
Real-World Air Layering Experiences and Tips
Reading about air layering is helpful, but actually doing it a few times is when everything “clicks.” Here are some experience-based insights that gardeners often discover the hard way.
1. Label everything. Air layers can blend into the background once they’re wrapped, especially when you have several plants in the same corner. A simple tag with the plant name and start date saves you from constantly guessing how long each layer has been in place. You’ll also build a personal log of which species root quickly and which are slow.
2. Start with forgiving plants. Rubber plants, dracaenas, and scheffleras are almost made for air layering. They’re tall, often leggy, and usually bounce back well even if your first attempt isn’t perfect. Once you’ve had a few “wins” with these easier species, you’ll feel more confident tackling prized shrubs or small trees outdoors.
3. Don’t skimp on the moss bundle. One common beginner mistake is using too little moss. A thin layer dries out too quickly and doesn’t give roots much room to run. Aim for a generous, egg-sized bundle around the wound. It should feel firm but springy when you squeeze it, not flat or hard.
4. Adjust for your climate. In dry indoor air or windy outdoor conditions, moisture loss is the enemy. In those situations, wrapping the moss in clear plastic and then loosely in foil can be a game-changer. If you garden in a naturally humid area, you may find that a single plastic layer is plentyand that adding foil makes the moss too damp and cool.
5. Choose your plastic intentionally. Clear plastic is great for beginners because you can literally watch roots develop. Once you’re more comfortable, you might switch to opaque plastic or foil if your plants grow in bright sun and you’re worried about overheating. Some gardeners even cut a small “window” in the foil so they can peek at the roots without removing the entire cover.
6. Be realistic about timing. Air layering is not a quick fix if you need a new plant next week. It’s more like slow cooking than fast food. Many gardeners like to treat it as a background project: set up a layer or two at the beginning of the growing season and then check in every couple of weeks while you’re watering or pruning. When the roots finally fill the moss, it feels like a little surprise gift you planted months ago.
7. Think of it as plant “renovation.” A great way to use air layering is to renovate an old favorite plant. Suppose you have a rubber tree that’s all bare stem on the bottom and leafy only at the top. You can air layer midway down the stem, root that top, and cut it off as a fresh, compact plant. The original stump often sprouts new shoots, eventually giving you a fuller, bushier plant at the base as well.
8. Use it to clone plants you really love. Maybe you have one camellia that blooms more heavily than all the others, or a particular fig tree that thrives in your challenging soil. Instead of buying more unknowns, air layering lets you clone the exact performer you already know does well in your conditions. It’s like backing up your favorite plant to a second location, just in case.
9. Accept that not every layer will succeed. Even with good technique, the occasional layer will failmaybe the branch was too old, the weather shifted, or the moss silently dried out. Treat each attempt as part of the learning curve. When you do get a well-rooted bundle, take a moment to inspect it before potting up; you’ll start to recognize what “successful roots” look and feel like, which helps you judge future layers more confidently.
10. Enjoy the process. There’s something deeply satisfying about gently unwrapping a moss ball and seeing a mass of fresh, white roots where there used to be bare bark. Air layering connects the practical side of gardeningmore plants for freewith the quiet pleasure of watching how plants respond over time. Once you’ve tried it, you may catch yourself eyeing every leggy branch in your home or yard and thinking, “You’d make a great candidate for my next air-layering project.”
Whether you’re rehabbing one overgrown houseplant or planning a whole row of cloned shrubs for your landscape, air layering is a powerful, budget-friendly tool to add to your propagation toolkit. With a bit of patience, a handful of moss, and a roll of plastic wrap, you can multiply your favorite plants and reshape your indoor jungle or outdoor gardenone carefully wrapped branch at a time.