
Alphabetizing in Microsoft Word is one of those tiny skills that makes you feel wildly powerful. One minute your list is a chaotic soup of names, brands,
or book titles. The next minute? Clean, alphabetical orderlike you hired a librarian to live inside your document.
Word’s built-in Sort tool can alphabetize plain text, bulleted lists, numbered lists, and even tables. The trick is knowing how Word
“sees” your content (spoiler: it thinks in paragraphs, not vibes). Below is the fast, reliable methodplus practical examples and fixes for the most common
“why is Word doing this to me?” moments.
The 5 Steps to Alphabetize in Microsoft Word (Quick Method)
- Format your list so each item is on its own line (one item per paragraph).
- Select the text you want to alphabetize (only the items you want sorted).
- Open Sort (the A–Z button) from Home > Paragraph.
- Choose your settings (usually: Sort by Paragraphs, Type Text, Order Ascending).
- Click OK, then sanity-check the results (and use Undo if needed).
Step 1: Make Word Understand Your List
Before you click anything, make sure Word can tell where one item ends and the next begins. Word sorts by paragraphs, which usually means
each item ends when you press Enter.
What “one item per paragraph” looks like
- Good: Each item is on its own line (you pressed Enter after each one).
- Not ideal: Items separated by manual line breaks (Shift+Enter) inside one paragraph.
- Chaos: Items separated by commas in a single sentence.
If your “list” is actually a sentence like apples, oranges, bananas, Word won’t magically split it into separate items for sorting. Convert it into
one item per line first. (If you’re dealing with commas or tabs, you can still sort in clever ways later, but clean lines make everything easier.)
Step 2: Select Only What You Want Sorted
Highlight the list items you want to alphabetize. This is the part where people accidentally include a title, a blank line, or a “Notes” sectionand then
wonder why Word sorted their header into the middle like it’s trying to start drama.
Selection tips that save your future self
- If you have a heading (like “Attendees”), don’t include it in your selection unless you intend to sort it too.
- If your list contains sub-lists (multi-level bullets), consider sorting each level separately for best results.
- If you’re sorting a bibliography, select only the citation entriesnot the “References” title.
Step 3: Open the Sort Tool (A–Z Button)
Go to the Home tab. In the Paragraph group, find the button that looks like an A over a Z
with a little arrow. That’s the Sort button. Click it and Word opens the Sort Text dialog box.
If you don’t see it, your Word window might be narrow, the ribbon could be simplified, or the button may be tucked into an overflow menu. Expanding the
Word window (or switching to the full ribbon) usually brings it back into view.
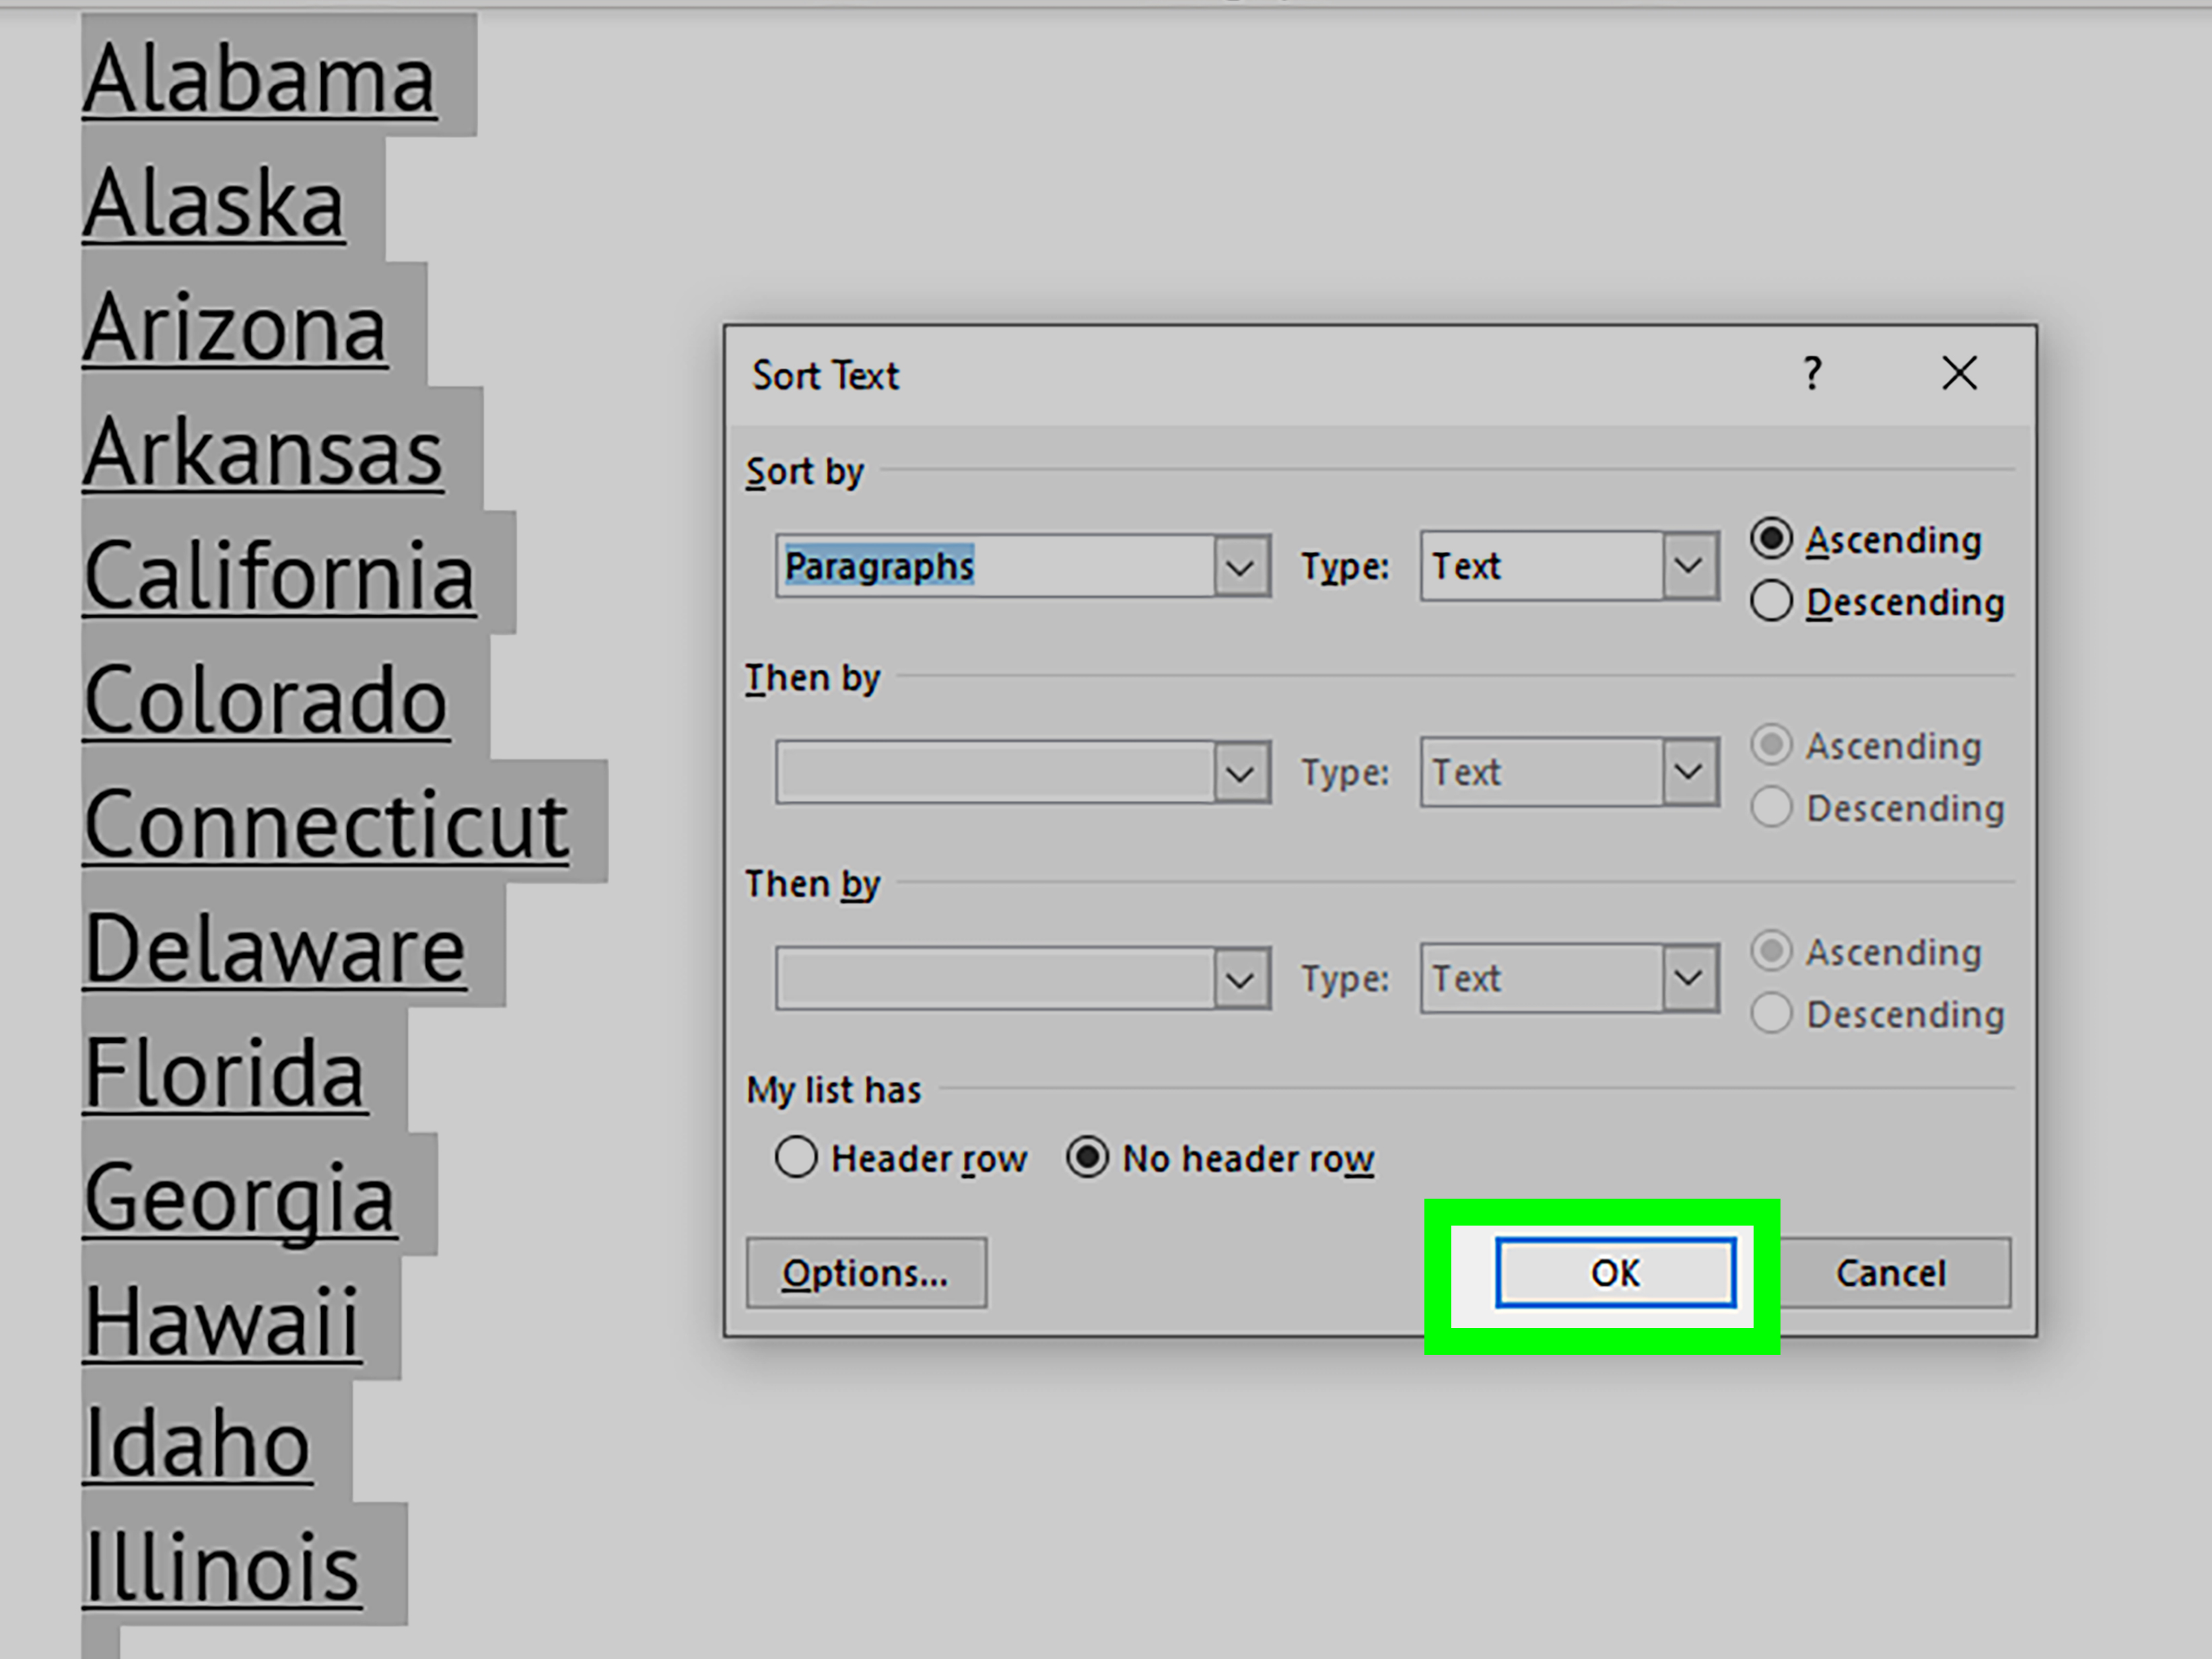
Step 4: Pick the Right Sort Settings (The “Sort Text” Dialog Box)
This dialog box is where Word asks, politely, how you’d like it to judge your text. Most of the time you’ll use the default settings, but it helps to know
what they mean so you don’t accidentally sort your grocery list by “Date” and end up blaming your computer for being smug.
The most common setup (for normal lists)
- Sort by: Paragraphs
- Type: Text
- Order: Ascending (A to Z)
When you should change “Type”
If your list contains numbers or dates and you want a true numeric/date sort (not alphabetical by the first character), switch Type:
- Text: “2” might come before “18” (because “1” is alphabetically before “2”).
- Number: 2 comes before 18 (because math still runs the world).
- Date: sorts by time instead of by month names or random vibes.
Sorting by last name (yes, Word can do that… if you help it)
If your items are formatted like Last, First (example: Nguyen, Taylor), Word sorts beautifully because the last name appears first.
If your list is First Last (example: Taylor Nguyen), Word will sort by first name unless you use multi-field sorting (more on that below).
Options that matter more than you think
Many versions of Word include extra Options in the Sort dialog. These can help when your text is separated by tabs, commas, or other
delimitersand they can also allow case-sensitive sorting if you need it.
Step 5: Click OK, Review, and Fix the Weird Stuff
Click OK to sort. Then do a quick scan. Alphabetizing is fast, but your document is still your documentmeaning it may contain:
extra spaces, inconsistent capitalization, hidden tabs, or that one item that starts with a quote mark because Past You was feeling artsy.
Common “why did it sort like that?” culprits
- Leading spaces: “ Banana” might sort before “Apple” because spaces can affect order.
- Punctuation: Items starting with quotes or parentheses may sort unexpectedly.
- Articles: “The Beatles” will sort under “T,” not “B,” unless you rewrite it as “Beatles, The.”
- Mixed formats: Some lines have tabs, others don’tWord sorts what it sees, not what you intended.
Good news: if the result looks wrong, press Ctrl+Z (Windows) or Command+Z (Mac) to undo, adjust your list, then sort again.
It’s not a moral failure. It’s just document hygiene.
Alphabetize a Table in Word (Without Sorting Your Header Into the Data)
Tables have their own sorting workflow. Instead of the Home tab’s sort button, you typically sort from the table layout tools. The key decision is whether
your table has a header row, because Word needs to know not to treat “Name” like it’s a real person competing for alphabetical glory.
How to alphabetize a table
- Click anywhere inside the table (or select the table).
- Open the table tools and choose Layout (often labeled Table Layout).
- Click Sort.
- Choose the column to sort by (e.g., “Last Name”), set Type to Text, and pick Ascending.
- If you have headers, select Header row so the titles stay at the top.
- Click OK.
Multi-level sorting (when you want “Department” then “Last Name”)
Word’s table sorting can handle multiple levels: sort first by Department, then by Last Name within each Department. This is perfect for staff directories,
class rosters, or any spreadsheet-ish thing you insisted on doing in Word because “it’s just a quick document.”
Alphabetize by Last Name (Three Practical Approaches)
If you’re sorting names, you usually want last names first. Here are three reliable methods, depending on how your list is formatted.
1) Best method: Store names as “Last, First”
Example list:
- Garcia, Elena
- Johnson, Avery
- Smith, Jordan
Now Word sorts perfectly with the basic 5-step method because the last name is the first chunk of text on each line.
2) If you must keep “First Last,” use a table
Create a two-column table: First Name | Last Name. Then sort the table by the Last Name column. This is clean, readable, and far less fragile than trying
to outsmart punctuation.
3) For advanced lists: Use multi-field sorting with separators
If your entries are structured with tabs or commas (for example: Jordan Smith<tab>Marketing), you can often sort by different “fields.”
That’s when Word feels less like a word processor and more like a tiny database wearing a tie.
Alphabetize a Bibliography or Reference List (Plus Hanging Indents)
Students and researchers, this one’s for you. Word can alphabetize your reference list as long as each citation is its own paragraph (one citation per line).
Once sorted, you can add hanging indents to make the formatting look professional.
Quick workflow for references
- Select all citations (but not the “References” heading).
- Use Home > Sort.
- Sort by Paragraphs, Type Text, Order Ascending.
- Click OK.
- Add hanging indents using paragraph settings (or keyboard shortcuts, depending on your setup).
One note: if you’re using Word’s built-in bibliography/citation tools, the “generated” bibliography can behave differently than plain text. If Word fights
you, a common workaround is to convert the bibliography to plain text (so it becomes editable paragraphs) and then sort. Only do this if you’re sure you
don’t need it to keep auto-updating from your citation manager.
Can You Alphabetize in Word for the Web?
Word for the web is great for quick edits, collaboration, and pretending you’ll “just fix formatting later.” But it may not include the same sorting feature
you get in the desktop Word app. If sorting isn’t available, the simplest solution is to open the document in the desktop app and sort there.
If you’re stuck on the web version, a practical workaround is to copy your list into a tool that sorts reliably (like a spreadsheet), sort it, then paste it
back into Word. Is it glamorous? No. Does it work? Yes.
Troubleshooting: Fixes for the Most Common Sorting Problems
Problem: My numbered list stayed numbered (is that good or bad?)
It’s usually good. Word can alphabetize the items while keeping numbering intactso you get alphabetical order without losing the list structure. If you want
the numbering to reflect a specific sequence instead, you’re asking Word to be both alphabetical and chronological at the same time, and it will quietly judge
you.
Problem: Multi-level lists didn’t sort the way I expected
Multi-level bullets can be tricky because Word may treat nested items differently. A reliable approach is to select and sort one level at a time.
Sort the sub-items under a heading first, then move to the next section.
Problem: It alphabetized, but the order still looks wrong
- Remove leading spaces and extra tabs.
- Standardize capitalization (or try case-sensitive sorting if available).
- Check for hidden punctuation at the beginning of lines (quotes, parentheses, em dashes).
- Make sure each item is truly its own paragraph (Enter, not Shift+Enter).
Problem: I need to sort “by last name,” but the list is “First Last”
The simplest fix is to use a table (First | Last) and sort by the last name column. If you can’t use a table, reformat entries to “Last, First” and sort
again. Yes, it’s extra work. But it’s still faster than manually dragging names around while muttering “I should’ve used Excel.”
Pro Tips to Alphabetize Faster (and With Fewer Regrets)
- Sort early: If you know a list will be alphabetical, sort it before it grows into a monster.
- Use consistent structure: Same format for each line (especially for names, titles, SKUs).
- Keep headers separate: Either exclude them or use header-row settings when sorting tables.
- Lean on Undo: Sorting is reversible. Your stress levels should be too.
- Save a clean copy: If the list is mission-critical, duplicate it before you start experimenting with advanced sort options.
Conclusion
Alphabetizing in Microsoft Word is basically “click Sort and look confident,” but the real secret is formatting. Once each item is its own paragraph (or your
table is structured properly), Word can organize lists, names, and tables in seconds. And if the results look weird, you’re not cursedyou probably just have
a stray space, a sneaky tab, or a header that accidentally joined the sorting party.
Use the five steps for everyday lists, switch to table sorting for columns and multi-level needs, and remember: Word is happy to helpas long as you speak its
language (Paragraphs).
Bonus: Real-World Experiences Using “Alphabetize” in Word ()
The first time I used Word’s alphabetize feature, it was on a volunteer sign-up sheet that had evolved into a “living document,” which is a polite way of
saying it had been edited by seventeen people with seventeen different formatting philosophies. Some names were all caps. Some had extra spaces. One person
apparently believed commas were optional. I highlighted the list, hit the Sort button, clicked OK… and watched the list rearrange itself with the speed and
confidence of a game show host revealing the final answer. It felt magicaluntil I noticed a few names were sitting at the top like they owned the place.
Turns out they started with spaces. That day taught me two things: sorting is amazing, and invisible characters are tiny gremlins with Wi-Fi.
Another time, a coworker asked for help “alphabetizing a table” that wasn’t technically a table. It was a bunch of text arranged to look like a
table using the spacebaraka the most fragile building material known to humanity. We converted it into a real Word table, sorted by the “Last Name” column,
and suddenly the document went from “mysterious formatting artifact” to “professional directory.” The best part? The header row stayed on top because we
checked the right box. The worst part? Realizing how many hours people spend manually reordering lists when the Sort feature has been sitting there quietly
the whole time, like a helpful coworker who never interrupts.
Students love this tool for bibliographies, and for good reason. I’ve seen people hand-alphabetize citations line by line like they’re doing penance for
procrastination. When you show them the Sort Text dialog box, it’s like watching someone discover fire. Highlight citations, sort by Paragraphs and Text,
click OKdone. Then you add hanging indents, and suddenly the reference list looks like it belongs in a real academic paper instead of a late-night panic
draft titled “final_final_reallyFINAL.docx.”
My favorite “everyday” use is sorting event planning listsguest names, vendors, supplies, you name it. Alphabetizing turns a messy brainstorm into something
searchable. If someone asks, “Did we invite Monica?” you don’t scroll like you’re reading ancient scripture. You jump straight to M. It also helps when
combining lists from multiple people: paste them together, remove duplicates if needed, and sort. Word won’t solve all planning chaos, but it will at least
keep your document from looking like it lost a fight with a sticky-note wall.
The biggest lesson from all these experiences is that alphabetizing isn’t just about making things pretty. It’s about making information usable.
When your list is sorted, you spend less time hunting and more time doing the actual workwhether that’s writing, organizing, studying, or trying to convince
your team that yes, you really can be productive in Word.