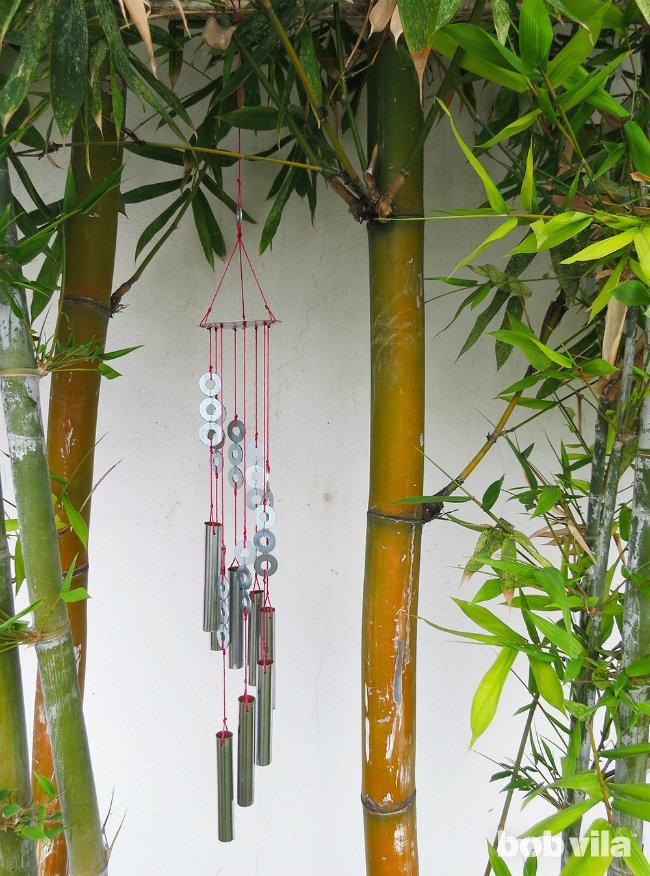

Some backyard improvements require concrete, contractors, and a suspicious number of trips to the hardware store. DIY wind chimes are not one of them. With a reclaimed metal curtain rod, a handful of washers, colorful cord, and an ordinary shower drain cover, you can create a musical outdoor accent in an afternoonor roughly the amount of time it takes to decide where you left your pliers.
This easy wind chime project combines upcycling, basic metalworking, and simple assembly. The finished chime looks modern enough for a contemporary patio but playful enough for a cottage garden, apartment balcony, or front porch. More importantly, it produces a pleasant mix of metallic ringing and gentle clinking whenever a breeze moves through the hanging pieces.
The design follows the clever DIY Lite spirit associated with Bob Vila projects: use familiar materials in an unexpected way, keep the tool list manageable, and create something that looks far more complicated than it actually is. No advanced woodworking, welding, or musical training is required. Your neighbors may assume you carefully tuned each piece in a secret artisan workshop. You are not required to correct them.
Why This DIY Wind Chime Design Works
A basic wind chime has four functional parts: a support, suspended chimes, striking elements, and a hanger. In this version, a perforated shower drain cover becomes the support. Metal tubing forms the primary chimes, while small groups of flat washers act as decorative strikers that add extra sound and movement.
The wind pushes the hanging components into one another. Each impact causes the metal to vibrate, and those vibrations move through the surrounding air as sound waves. Hard materials such as steel, copper, and aluminum tend to ring longer than soft materials because they continue vibrating after they are struck.
Material, thickness, diameter, and length all influence tone. Shorter tubes generally produce higher notes, while longer tubes produce lower notes. In this beginner-friendly version, equal-length tubes create a relatively consistent metallic voice, and the staggered cords produce a cascading shape. Makers who want a broader musical range can cut the tubing into several lengths instead.
Tools and Materials
Materials
- Twenty-five 1 1/2-inch flat metal washers
- Thin steel or galvanized craft wire
- One 56-inch hollow metal curtain rod or similar metal tube
- One round perforated shower drain cover
- Weather-resistant colored twine, braided nylon cord, or strong fishing line
- Exterior-rated clear adhesive or cyanoacrylate glue
- Optional exterior metal primer and spray paint
- Optional clear outdoor protective coating
Tools
- Pliers
- Wire cutters
- Measuring tape
- Permanent marker
- Metal-cutting saw or tubing cutter
- Power drill
- Small drill bit rated for metal
- Clamp or vise
- Metal file or fine-grit sandpaper
- Scissors
- Safety glasses and work gloves
Before You Begin: Choose Materials That Sound Good
Not every metal object produces a lovely tone. Some ring like a tiny bell; others sound like a spoon falling into a sink. Before cutting anything, suspend the curtain rod or tubing from a piece of string and tap it gently with a washer. Listen for a clear note with some resonance.
Thin hollow aluminum often creates a bright, clean tone. Copper tubing usually sounds warmer and slightly deeper. Steel may be louder and sharper, depending on its thickness. A hollow curtain rod is an excellent budget option, provided it is made from metal rather than plastic-coated cardboard.
Inspect reclaimed materials for corrosion, cracks, sharp edges, and old flaking finishes. Avoid using pieces that may have been coated with unknown industrial paint. Clean acceptable metal with mild soap and water, dry it thoroughly, and remove loose rust before assembly.
How to Make DIY Wind Chimes Step by Step
Step 1: Create Eight Washer Clusters
Place three flat washers in a straight row with their outer edges touching. Cut a short piece of thin wire and thread it through the openings of the first two washers. Use pliers to twist the wire securely, creating a small flexible connection. Trim the excess with wire cutters and press the sharp end inward.
Connect the third washer to the second in the same way. The result should be a loose chain of three washers that can move and clink against one another. Repeat the process until you have eight washer clusters. Set the twenty-fifth washer aside; it will become part of the top hanging assembly.
Do not wrap the wire so tightly that the washers become rigid. A little movement is desirable because those small collisions create much of the chime’s delicate background sound.
Step 2: Measure and Cut the Metal Tubes
Measure the metal rod and mark eight 7-inch sections. Wrap a strip of painter’s tape around each cutting line if the marker is difficult to see. The tape can also help keep a saw from wandering when the cut begins.
Secure the rod in a vise or clamp it firmly to a stable work surface. Never hold a round metal tube in one hand while sawing with the other. Round objects have an irritating habit of rolling at precisely the wrong moment.
Cut through each marked line with a tubing cutter or a fine-tooth metal saw. A tubing cutter usually produces straighter, cleaner results, while a hacksaw works well when paired with patience. You should finish with eight tubes of equal length.
Step 3: Smooth Every Cut Edge
Freshly cut tubing may have burrs sharp enough to damage the cordor your fingers. Run a metal file around the outside and inside of each cut end. Follow with fine-grit sandpaper until the edges feel smooth.
This step may seem minor, but it improves both safety and durability. Cord rubbing against a jagged metal edge can fail surprisingly quickly outdoors, especially when the wind moves it hundreds of times per day.
Step 4: Drill Suspension Holes
Make two marks opposite each other near the upper end of every tube, approximately 1/2 inch below the edge. The holes should align so that the suspension cord can pass straight through the tube.
Clamp the first tube securely. Wear safety glasses and use a drill bit designed for metal. Begin at a slow speed and apply steady pressure. A small dimple made with a center punch can prevent the bit from skating across the curved surface, although careful beginners can also start with a smaller pilot bit.
Drill through one side, rotate the tube, and drill the opposite hole. Repeat for all eight pieces. Remove any new burrs with a file.
Step 5: Attach a Tube to Each Washer Cluster
Cut eight short pieces of cord. Pass one piece through both drilled holes in a tube and tie the ends together above it, creating a secure hanging loop. Leave approximately 5 inches of cord between the tube and the washer cluster.
Tie the lower portion of the cord to the end washer in one cluster. Repeat until every tube has its own strand of three washers. Add a tiny drop of exterior-rated adhesive to each finished knot, but do not saturate the cord. A hard lump of glue can become brittle and crack as the assembly moves.
Step 6: Cut the Main Hanging Cords
To create a spiral or stair-step arrangement, cut eight main cords in graduated lengths. Begin with a 15-inch piece and shorten each following cord by approximately 1 1/2 inches. The final cord will be about 4 1/2 inches long.
Tie one main cord to the free end of each washer cluster. Lay all eight assemblies on a table from shortest to longest before attaching them to the support. This simple organizational step prevents the project from becoming a plate of metallic spaghetti.
Step 7: Use the Shower Drain Cover as the Support
Turn the shower drain cover so that its most attractive side faces downward. Its evenly distributed openings provide ready-made attachment points, eliminating the need to fabricate a wooden or metal ring.
Starting with the shortest strand, thread each main cord through a hole near the outer edge of the drain cover. Space the strands as evenly as possible around the circumference. Continue in order from shortest to longest to form a gentle spiral.
Tie firm double knots above the cover. Check that the tubes hang freely and do not press tightly against one another when the assembly is still. Secure each knot with a small amount of adhesive.
Step 8: Build the Top Hanger
Cut three or four equal lengths of cord, depending on the number and position of mounting holes in the drain cover. Tie the cords to evenly spaced openings or screw holes. Bring the upper ends together above the center and tie them around the remaining large washer.
The washer acts as a strong central connection point. Thread one final length of cord through it to create a hanging loop. Hold the chime a few inches above a soft surface and check its balance. Shorten or retie one support cord if the drain cover tilts noticeably.
Step 9: Test the Sound and Movement
Hang the finished chime from a temporary hook and move the lower pieces gently by hand. The tubes and washer clusters should touch without becoming tangled. If the chime barely makes a sound, bring the strands slightly closer together. If it sounds like a toolbox falling down the stairs, increase the spacing.
Test the chime outdoors in a moderate breeze before committing to its permanent location. Small adjustments to cord length and spacing can dramatically improve both sound and appearance.
Optional Ways to Customize the Design
Change the Tube Lengths
Cut the tubes into graduated lengths for a wider range of pitches. Try pairs measuring 5, 6, 7, and 8 inches. Longer pieces will generally provide deeper tones, although material thickness and diameter also affect the result.
Add Exterior Color
Clean and lightly sand the tubes before applying a metal-compatible primer and exterior spray paint. Several thin coats are better than one heavy coat. Keep paint out of the drilled holes and allow the finish to cure fully before stringing the chimes.
Try Alternative Striking Materials
Old keys, small bells, bottle caps, spoons, beads, shells, and short lengths of chain can replace or supplement the washers. Test each material first. Seashells produce a light coastal tinkle, bamboo creates a muted clack, and metal keys deliver a brighter sound.
Personalize the Wind Catcher
A flat wooden shape, piece of driftwood, metal ornament, or weather-resistant acrylic panel can be added below the center. This extra surface catches more air and encourages movement during light breezes. Keep it proportionate; an oversized sail can turn a peaceful chime into a small outdoor wrecking ball.
Where to Hang Homemade Wind Chimes
Choose a location with moving air and enough open space for the strands to swing. Porch corners, pergolas, sturdy tree branches, covered patios, and balcony ceilings are common choices. Keep the chime away from walls, windows, railings, and support posts that could muffle the sound or cause repeated impact damage.
Do not suspend it directly over seating, walkways, grills, or children’s play areas. Use a hook rated for more than the chime’s total weight and inspect the mounting surface before installation.
Consider the people living nearby as well. A gentle afternoon chime may sound charming from your chair and rather less charming through a neighbor’s bedroom window at 2 a.m. In exposed or densely populated areas, hang the chime from a removable hook so it can be brought inside during storms, high winds, or quiet hours.
Maintenance and Troubleshooting
- Tangled strands: Increase the spacing between attachment points or shorten overly long cords.
- Weak sound: Move the tubes closer together or add a lightweight central wind catcher.
- Harsh noise: Increase spacing, reduce the number of metal strikers, or replace some washers with wood beads.
- Fraying cord: Replace it with UV-resistant braided nylon or outdoor fishing line.
- Rust: Remove loose corrosion, apply a metal primer, and refinish with exterior paint.
- Loose knots: Retie them and secure them with a small amount of outdoor adhesive.
Inspect homemade wind chimes every few months. Look for weakened cord, cracked adhesive, bent wire, loose mounting hardware, and sharp metal edges. Bring the chime indoors during severe storms or freezing weather to extend its life.
From the Workbench: Real-World DIY Wind Chime Experience
The most useful lesson in a project like this is that sound cannot be judged by appearance. A beautifully polished tube may produce a disappointing click, while a scratched piece of discarded curtain rod may ring like it has been waiting its entire life for a second career. Test materials before investing time in cutting, painting, and drilling them.
Another common discovery is that preparation takes longer than assembly. Connecting washers and tying strands feels fast and satisfying. Cutting eight identical tubes, smoothing every edge, and drilling aligned holes requires more concentration. Rushing these early steps usually creates problems later: crooked tubes, frayed cord, or a support that hangs like a hat worn sideways.
A clamp is the quiet hero of the build. Trying to control round tubing without one is frustrating and unsafe. Once the tube is secured, cuts become straighter and drilling becomes dramatically easier. A scrap of wood placed beneath or beside the metal can also protect the work surface and reduce vibration.
The first sound test is rarely the final one. Wind chimes are small kinetic sculptures, and their behavior changes after they leave the workbench. Indoors, every strand may look perfectly spaced. Outside, one cross-breeze can reveal that two tubes are determined to become inseparable friends. Adjusting one or two cords usually fixes the problem.
It also helps to resist the temptation to add every decorative object in the craft drawer. More shells, beads, keys, chains, and charms do not automatically create richer music. Too many pieces can dampen vibration, add unnecessary weight, and produce constant cluttered noise. Start with a restrained design. Add one element at a time and listen before adding another.
Outdoor cord deserves special attention. Decorative cotton twine looks wonderful on day one but can absorb moisture, stretch, fade, and deteriorate. Braided nylon, waxed polyester, or heavy fishing line generally lasts longer. If natural twine is essential to the look, use it as a decorative wrap around a stronger synthetic core.
Weather also changes the personality of the project. Bare steel gradually develops rust, copper forms a patina, and painted surfaces fade in direct sun. These changes are not always defects. A little natural aging can make an upcycled wind chime more attractive. The key is deciding whether you want controlled weathering or a crisp finish and protecting the materials accordingly.
Placement matters as much as construction. A chime tucked tightly beside a wall may barely move, while the same piece placed under an open porch corner can become surprisingly active. Test several spots with a temporary hook. Listen from inside the house, from the nearest seating area, and from the property line. The ideal location provides occasional music rather than a nonstop percussion solo.
Finally, accept that handmade wind chimes are not supposed to sound like factory-tuned instruments unless you carefully calculate and tune each tube. Their charm comes from variation: a bright ring here, a washer clink there, and the occasional surprising chord when the wind arrives from a new direction. The project succeeds when it looks balanced, moves freely, survives the weather, and makes you pause for a moment when the breeze passes through.
Conclusion
DIY wind chimes prove that ordinary hardware can become attractive outdoor decor with a little imagination. The combination of metal tubes, washer chains, colorful cord, and a shower drain cover is inexpensive, adaptable, and friendly to beginners who are comfortable using a drill and metal-cutting tool.
Take time to smooth the cut edges, secure every knot, and test the chime before choosing its permanent location. Once those details are handled, the result is a distinctive backyard accent that supplies movement, personality, and a gentle soundtrack to breezy days.
Editorial note: This is an independently written DIY guide inspired by the practical, upcycling-focused concept associated with the referenced project title. It is not an official Bob Vila publication or a claim of affiliation.