
Building a kitchen cabinet from pallets sounds like the kind of project that starts with optimism, a cup of coffee, and one free pallet leaning suspiciously behind a store. The good news? It can become a real, useful, good-looking cabinet. The slightly less glamorous news? Pallet wood is not magical lumber delivered by rustic angels. It must be chosen carefully, cleaned properly, milled patiently, and built into a structure that is square, level, strong, and safe enough for daily kitchen life.
This guide walks you through how to make a kitchen cabinet from pallets DIY style, from selecting safe pallet wood to building the cabinet box, doors, shelves, face frame, finish, and installation. The project is budget-friendly, sustainable, and surprisingly satisfying. It also gives you the proud homeowner sentence everyone secretly wants to say: “Oh, that cabinet? I built it from reclaimed pallet wood.”
For best results, think of pallets as decorative reclaimed boards, not as the entire structural system. A smart DIY pallet kitchen cabinet often uses plywood for the hidden cabinet box and pallet boards for the face frame, doors, side panels, or rustic exterior. This gives you the charm of upcycled wood without asking a dozen mismatched boards to behave like factory-grade cabinet panels. Pallet boards have personality, and personality is wonderfuluntil your cabinet door twists like a potato chip.
Why Build a Kitchen Cabinet From Pallets?
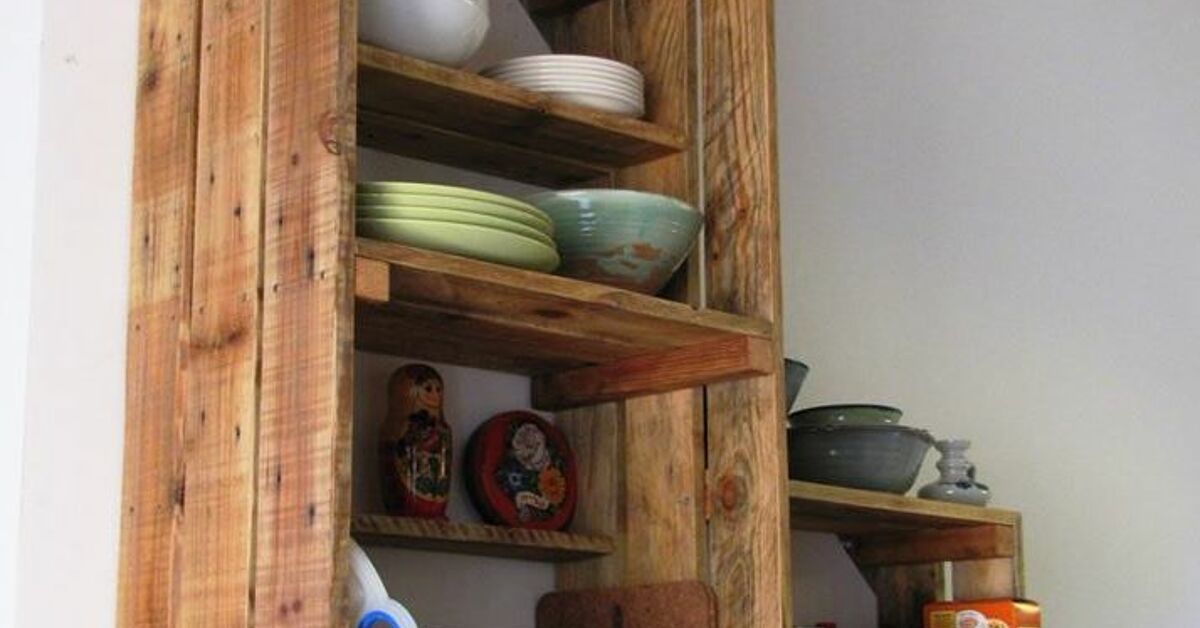
A pallet wood kitchen cabinet is attractive for three big reasons: cost, character, and sustainability. Pallets are often inexpensive or free, and reclaimed wood brings texture that new boards sometimes lack. The nail holes, grain variation, saw marks, and weathered edges create a warm farmhouse, industrial, or rustic look. In a kitchen full of smooth appliances and shiny countertops, pallet wood adds a bit of “I have a story” energy.
There is also the environmental benefit. Reusing wood keeps usable material out of the waste stream and reduces the need to buy new lumber for every visible surface. For DIYers, the project is a practical woodworking lesson: you learn how to break down pallets, remove nails, plane or sand rough boards, build square boxes, hang doors, and apply a durable finish. Basically, it is a cabinetmaking boot camp, but with fewer whistles and more splinters.
Important Safety First: Choose the Right Pallets
Before you bring pallet wood into a kitchen, inspect it like a suspicious detective in a hardware-store crime drama. Use only clean, dry pallets from a trusted source. Look for an IPPC stamp and prefer pallets marked HT, which means heat-treated. Avoid pallets marked MB, which indicates methyl bromide fumigation. Also avoid pallets with unknown stains, chemical smells, mold, oil marks, food spills, or heavy grime.
This step matters because a kitchen cabinet lives near dishes, food prep areas, moisture, hands, and sometimes snacks that somehow escape the plate. Pallet wood is porous and may have absorbed whatever it touched during shipping. If you cannot trace the pallet or it looks questionable, skip it. Free wood is not free if it brings mystery chemicals into your kitchen. That is not rustic charm; that is a plot twist.
Quick Pallet Safety Checklist
- Choose clean, dry, odor-free pallets.
- Look for HT, KD, or clearly safe markings.
- Avoid MB-marked pallets.
- Reject pallets with mold, oil, chemical stains, or unknown spills.
- Do not use pallet wood for direct food-contact surfaces.
- Wear gloves, eye protection, hearing protection, and a dust mask or respirator when cutting and sanding.
Best Design for a DIY Pallet Kitchen Cabinet
The strongest beginner-friendly design is a base cabinet with a plywood carcass and pallet wood cladding. Standard base cabinets are often about 34 1/2 inches high before the countertop and about 24 inches deep. For a simple standalone cabinet, a practical size is 30 inches wide, 24 inches deep, and 34 1/2 inches tall. You can adjust the width to fit your space, but try not to freestyle the height unless you enjoy countertops that feel like they were designed by a committee of giraffes.
For this tutorial, the cabinet includes a plywood box, a 2×4 or plywood toe-kick base, pallet wood face frame, two pallet-style doors, one adjustable shelf, and a sealed rustic finish. This hybrid approach gives the cabinet stability while letting the pallet wood shine where people can see it.
Tools and Materials You Will Need
Tools
- Circular saw or table saw
- Miter saw or handsaw with guide
- Drill and driver bits
- Pocket-hole jig, optional but helpful
- Clamps, because clamps are basically extra hands with better patience
- Hammer, pry bar, and nail punch
- Random orbital sander
- Level, tape measure, square, and pencil
- Stud finder for installation
- Safety glasses, gloves, hearing protection, and dust mask
Materials
- 2 to 4 safe heat-treated pallets, depending on cabinet size
- 3/4-inch plywood for cabinet sides, bottom, shelf, and top rails
- 1/4-inch plywood or hardboard for the cabinet back
- 2×4 lumber or plywood strips for the toe-kick base
- Wood glue
- 1 1/4-inch pocket screws or cabinet screws
- 1 1/4-inch brad nails or finish nails
- Cabinet hinges, preferably adjustable concealed or semi-concealed hinges
- Door pulls or knobs
- Wood filler
- Sandpaper in 80-, 120-, 180-, and 220-grit
- Water-based polyurethane, cabinet-grade paint, or durable clear finish
- Shims and 2 1/2- to 3-inch cabinet screws for installation
Step 1: Plan the Cabinet Size
Measure the space where the cabinet will go. Check width, height, depth, baseboards, outlets, plumbing, and nearby appliances. A common DIY base cabinet size is 30 inches wide by 24 inches deep by 34 1/2 inches high. If you are adding a countertop, the finished counter height will usually land around 36 inches.
Sketch the cabinet before cutting anything. Include the toe kick, cabinet sides, bottom, back, shelf, face frame, doors, and hardware. This does not need to be museum-quality drafting. A simple labeled drawing prevents the classic DIY disaster where you cut two left sides, no right side, and one mysterious rectangle that becomes “future scrap.”
Step 2: Break Down the Pallets
Disassemble pallets carefully. Use a pallet buster, pry bar, or reciprocating saw with a metal-cutting blade to cut through stubborn nails. Work slowly to avoid splitting boards. Once the boards are removed, pull or punch out every nail and staple. Run your hand near, not across, the surface to feel for hidden metal. Then use a magnet or metal detector if available. One hidden nail can ruin a saw blade faster than you can say, “That sounded expensive.”
Sort the boards by width, thickness, straightness, and appearance. Save the best boards for doors and visible face pieces. Use more imperfect boards for side cladding, trim, or decorative panels. Pallet wood varies, so expect to plane, rip, sand, or trim boards to create consistent pieces.
Step 3: Clean and Prepare the Wood
Brush dirt from the boards, then clean them with mild soap and water if needed. Do not soak the wood. Let the boards dry completely for several days in a well-ventilated area. Moisture trapped under finish can cause warping, mildew, or a cabinet that smells like a wet shed. Once dry, sand the boards with 80-grit to remove roughness, then move to 120- and 180-grit for a smoother surface.
If you want a rustic look, do not sand away every mark. Leave some saw texture, nail holes, and color variation. The goal is “reclaimed character,” not “brand-new board in witness protection.” For kitchen use, however, avoid deep grime-filled cracks. Surfaces should be cleanable and sealed.
Step 4: Build the Cabinet Box
Cut the plywood sides, bottom, and top stretchers. For a 30-inch-wide cabinet, you might cut two side panels at 34 1/2 inches tall by 23 1/4 inches deep, a bottom panel at 28 1/2 inches wide by 23 1/4 inches deep, and top support rails to tie the cabinet together. Adjust measurements based on your plywood thickness and face-frame design.
Assemble the box with wood glue and screws. Keep everything square by measuring diagonally from corner to corner. If both diagonal measurements match, the box is square. If not, nudge it gently before the glue sets. A square cabinet makes doors easier to hang, shelves easier to fit, and your future self less likely to mutter at the hinges.
Attach a 1/4-inch plywood back or use thicker plywood if the cabinet needs extra strength. The back helps keep the box square and gives you a surface for fastening the cabinet to wall studs. If the cabinet will hold heavy cookware, do not skimp on structure. Cast iron pans are not impressed by decorative optimism.
Step 5: Add the Toe-Kick Base
A toe kick lets your feet slide slightly under the cabinet so you can stand close to the countertop comfortably. Build a simple base from 2×4 lumber or plywood strips. A common toe-kick height is around 4 inches with a recess of about 3 inches. Make sure the base is level before attaching the cabinet box.
If your kitchen floor is uneven, use shims under the base during installation. Leveling from the bottom is easier than trying to correct a crooked cabinet after the doors are installed. Cabinet doors reveal every mistake with the honesty of a toddler holding a permanent marker.
Step 6: Create a Pallet Wood Face Frame
The face frame covers the front edges of the plywood box and gives the cabinet a finished look. Use straight pallet boards or clean new wood if your pallet boards are too twisted. Cut two vertical stiles and horizontal rails to fit the cabinet opening. Join the frame with pocket holes, dowels, biscuits, or simple glue and brad nails if it is decorative and supported by the cabinet box.
Dry-fit the frame first. Make sure the opening is even and the frame sits flat against the cabinet. Then glue and fasten it in place. Clamp it while the glue dries. If the pallet boards vary in thickness, sand or plane the back side so the frame mounts evenly.
Step 7: Build the Cabinet Doors
For rustic pallet cabinet doors, you have two beginner-friendly options. The first is a plank door: line up pallet boards vertically, attach horizontal battens across the back, and trim the door square. The second is a framed door: build a simple frame and insert pallet boards as the center panel. The framed version is more stable and usually looks more like real cabinetry.
Leave a small gap between doors and around the frame so they can open smoothly. Wood expands and contracts with humidity, especially in a kitchen. If the doors are too tight on day one, they may stage a rebellion during a humid week. Sand door edges smooth and test-fit before finishing.
Step 8: Add Shelves and Storage Features
Cut a plywood shelf to fit inside the cabinet. For adjustable shelves, drill shelf-pin holes evenly on both sides. A simple jig helps keep holes aligned. If you prefer a fixed shelf, screw cleats to the cabinet sides and rest the shelf on them. For heavy items, use thicker plywood and strong supports.
You can also add a pull-out trash bin, spice rack, vertical tray divider, or tip-out tray depending on the cabinet location. Just remember that every fancy feature needs clearance. Measure the hardware twice before installing it. Pull-outs are wonderful until they hit a plumbing pipe and become expensive modern art.
Step 9: Sand, Fill, and Finish
Fill large cracks or nail holes if you want a cleaner finish, or leave some small marks visible for rustic charm. Sand all touchable surfaces through 180- or 220-grit. Round sharp edges slightly. Kitchen cabinets get bumped by hands, hips, pets, pans, and people looking for snacks at midnight, so comfort matters.
Choose a durable finish. A water-based polyurethane keeps the wood tone lighter and provides a washable surface. Oil-based finishes add warmth but may amber the wood. Cabinet paint can look great if you want a cleaner farmhouse style, but pallet wood texture will still show. Apply thin coats, sand lightly between coats, and allow proper drying time.
Do not leave raw pallet wood exposed in a kitchen cabinet. Kitchens contain moisture, grease, steam, and mystery crumbs. A sealed surface is easier to wipe and less likely to absorb odors. The finish is not just decoration; it is the cabinet’s raincoat.
Step 10: Install Hinges and Hardware
Install hinges according to the manufacturer’s instructions. Concealed European-style hinges are adjustable and forgiving, which is helpful for DIY doors that may not be perfectly identical. Semi-concealed hinges also work well for face-frame cabinets and can suit a rustic design.
Mount the doors, then adjust the gaps. Add knobs or pulls after the doors are aligned. A hardware jig helps keep handles consistent. If you are using old pallet wood with lots of visual texture, simple black, brass, or brushed nickel hardware usually looks best. Avoid overly ornate pulls unless your design goal is “pirate ship pantry.”
Step 11: Install the Cabinet Securely
Place the cabinet in position and check it with a level from side to side and front to back. Use shims under the base where needed. Find the wall studs and drive cabinet screws through the back rail or reinforced back into the studs. If installing multiple cabinets, clamp face frames together, drill pilot holes, and fasten them to each other so the fronts stay flush.
Never rely on drywall alone to support a cabinet. Even a base cabinet should be properly secured, especially if it has doors, drawers, or a countertop. If you are installing a wall cabinet made with pallet wood accents, be extra cautious: wall cabinets must be anchored into studs or appropriate structural blocking.
Common Mistakes to Avoid
Using Unsafe Pallets
Do not use pallets that are stained, moldy, oily, chemically treated, or untraceable. Kitchen furniture demands higher standards than a garden planter or garage shelf.
Building the Entire Cabinet From Uneven Pallet Boards
Pallet boards are often warped or inconsistent. Use plywood for the structural box and pallet boards for visible surfaces. This gives you the rustic look without sacrificing strength.
Skipping the Leveling Step
A cabinet that is not level will make doors swing strangely, shelves sit unevenly, and countertops look wrong. Always level and shim before final fastening.
Under-Sanding Touch Points
Rustic should not mean splintery. Sand door edges, pulls, shelves, and any surface hands will touch.
Using the Wrong Finish
A kitchen cabinet needs a washable, durable finish. Decorative wax alone is usually not tough enough for daily kitchen use.
Cost Estimate for a DIY Pallet Kitchen Cabinet
The final cost depends on what you already own. If you have tools and can source safe pallets for free, the main expenses are plywood, screws, glue, finish, hinges, and hardware. A small cabinet may cost roughly $75 to $200 in materials. Larger cabinets, premium hinges, drawer slides, or a countertop can increase the budget.
The hidden cost is time. Pallet wood takes effort to dismantle, clean, de-nail, sort, sand, and finish. If you want fast and flawless, buy stock cabinets. If you want character, savings, and a weekend project that makes you feel like a woodworking wizard with sawdust in your shoes, pallet cabinets are worth considering.
Design Ideas for Pallet Kitchen Cabinets
A pallet cabinet does not have to look rough. Try a white-painted cabinet box with natural pallet doors for contrast. Or stain the pallet wood in a warm walnut tone and pair it with matte black hardware. For a modern rustic look, use pallet boards vertically on flat slab doors and keep the rest of the cabinet simple. For farmhouse style, build shaker-inspired door frames and use pallet boards as recessed panels.
You can also use pallet wood only as decorative side panels on an existing cabinet. This is a great beginner project because the structural cabinet already exists. Add pallet planks to the exposed side, trim the edges, seal everything, and suddenly your plain cabinet has a custom reclaimed-wood look.
Maintenance Tips
Clean the cabinet with a damp cloth and mild soap. Avoid soaking the wood. Wipe spills quickly, especially near the sink or dishwasher. Inspect the finish once or twice a year and touch up worn areas. If the cabinet doors shift with seasonal humidity, adjust the hinges. Real wood moves, and pallet wood sometimes moves like it is trying to remember its former life as a shipping platform.
Experience Notes: What This Project Teaches You in Real Life
The biggest lesson in making a kitchen cabinet from pallets is that reclaimed wood rewards patience more than brute force. At first, the project feels simple: grab pallet, remove boards, make cabinet. Then reality arrives wearing safety glasses. Some boards split during removal. Some are bowed. Some have nail heads hiding like tiny metal landmines. A few look beautiful until you sand them and discover they are more crack than board. This is normal. Plan for waste, and collect more pallet wood than your cut list suggests.
Another practical lesson is that consistency matters more than perfection. Pallet boards rarely match in thickness, color, or grain. Instead of fighting that variation, organize it. Put similar boards together on each door. Use the straightest pieces for frames and the most interesting pieces for panels. If one board is dramatically darker, make it look intentional by balancing it with another dark board on the opposite door. Design is sometimes just a mistake repeated confidently.
During assembly, clamps become your best friends. Pallet wood often wants to cup, twist, or spring out of alignment. Dry-fit everything before glue touches wood. Check the cabinet for square repeatedly. It is much easier to correct a frame while it is clamped on the bench than after it is attached to the cabinet and silently judging you from across the kitchen.
The finishing stage also takes longer than expected. Pallet wood can absorb finish unevenly, especially if some boards are softer or more weathered than others. A pre-stain conditioner can help if you are staining. If you are applying clear polyurethane, test it on scrap first. Some reclaimed wood turns golden, some turns gray-brown, and some becomes unexpectedly dramatic, like it just got cast in a home renovation show.
One of the best real-world tips is to build the cabinet in sections. Finish the box first. Then add the face frame. Then build the doors. Then test the hardware. Trying to do everything at once can turn a relaxing DIY project into a lumber-themed escape room. Keep the workflow simple and celebrate small wins: square box, smooth doors, even gaps, first coat of finish, final handle installed.
Finally, remember that a pallet kitchen cabinet does not need to imitate a factory cabinet. Its charm comes from the handmade details: slight color shifts, visible grain, small nail marks, and the knowledge that you transformed discarded shipping wood into useful storage. The cabinet should still be safe, sturdy, level, sealed, and functional. But it can also look like a person made it, not a robot with a laminate addiction. That is the beauty of DIY pallet furniture: it gives your kitchen storage, personality, and a story worth telling.
Conclusion
Learning how to make a kitchen cabinet from pallets DIY style is a rewarding way to combine budget-friendly building, sustainable materials, and custom design. The key is to treat pallet wood wisely: choose safe heat-treated pallets, clean and dry the boards, use plywood for the cabinet structure, and save pallet wood for the beautiful visible parts. Build square, sand thoroughly, seal properly, and install securely.
This project is not the fastest route to a new cabinet, but it may be one of the most satisfying. You get practical storage, rustic style, and the quiet joy of turning discarded wood into something useful. Plus, every time someone compliments it, you get to casually say, “Thanks, I made it from pallets,” which is basically the DIY version of a mic drop.