
A watermark is the quiet coworker of documeuch attention, and still manages to tell readers something important: Draft, Confidential, Sample, Do Not Copy, or perhaps, “Yes, this document belongs to our company, so please stop borrowing the logo.”
Microsoft Word makes it easy to add a text or picture watermark to a document. You can use one of Word’s built-in designs, create a custom message, insert a company logo, adjust its appearance, or limit it to a particular page or section. The basic process takes only a few clicks, although single-page watermarks and stubborn formatting problems require a little more finesse.
Note: The steps below primarily apply to the desktop versions of Word for Microsoft 365, Word 2024, Word 2021, Word 2019, and Word 2016. Menu names may differ slightly between Windows and macOS. Word for the web can display existing watermarks, but its watermark editing tools are more limited than those in the desktop application. t Is a Watermark in Microsoft Word?
A watermark is faint text or an image positioned behind the document’s regular content. Unlike text typed directly onto a page, a Word watermark is usually stored in the header layer. That is why it can appear in the middle of every page even though you never placed it there manually.
Organizations commonly use watermarks to indicate a document’s status, ownership, intended audience, or level of sensitivity. Typical examples include:
- DRAFT
- CONFIDENTIAL
- FOR REVIEW
- DO NOT COPY
- SAMPLE
- A company name or logo
- A recipient’s name or account number
A watermark can discourage casual misuse and make a document’s purpose obvious, but it is not a full security system. Anyone with sufficient editing access may be able to remove it. For sensitive files, combine the watermark with appropriate document permissions, restricted access, encryption, or a protected PDF.
How to Add a Built-In Watermark in Word
The fastest method is to choose one of Word’s preset watermarks. These ready-made options are useful when you need a familiar label such as Draft or Confidential and do not want to spend your afternoon debating whether the watermark should be light gray or slightly lighter gray.
Steps for Word on Windows
- Open the document in Microsoft Word.
- Select the Design tab on the ribbon.
- Locate the Page Background group.
- Click Watermark.
- Choose a preset option from the gallery, such as DRAFT, CONFIDENTIAL, or DO NOT COPY.
Word immediately places the selected watermark behind the document content. In a standard document, it normally appears on every page. Microsoft’s current instructions use the same basic Design > Watermark path for supported desktop editions. ps for Word on a Mac
In recent Mac versions of Word, open the Design tab and select Watermark. Depending on the exact edition and ribbon layout, Word may display the custom watermark dialog immediately rather than showing the same gallery used in Windows.
Select a text or picture watermark, configure the available options, and confirm the change. If you cannot find the command, expand the Word window or inspect the right side of the Design ribbon, where the Page Background controls are normally located.
How to Create a Custom Text Watermark
Built-in labels are convenient, but they are not especially imaginative. A custom text watermark lets you add wording such as “Internal Review Only,” “Prepared for Franklin & Co.,” or “Unapproved VersionPlease Do Not Build the Bridge Yet.”
- Open the Design tab.
- Select Watermark.
- Click Custom Watermark.
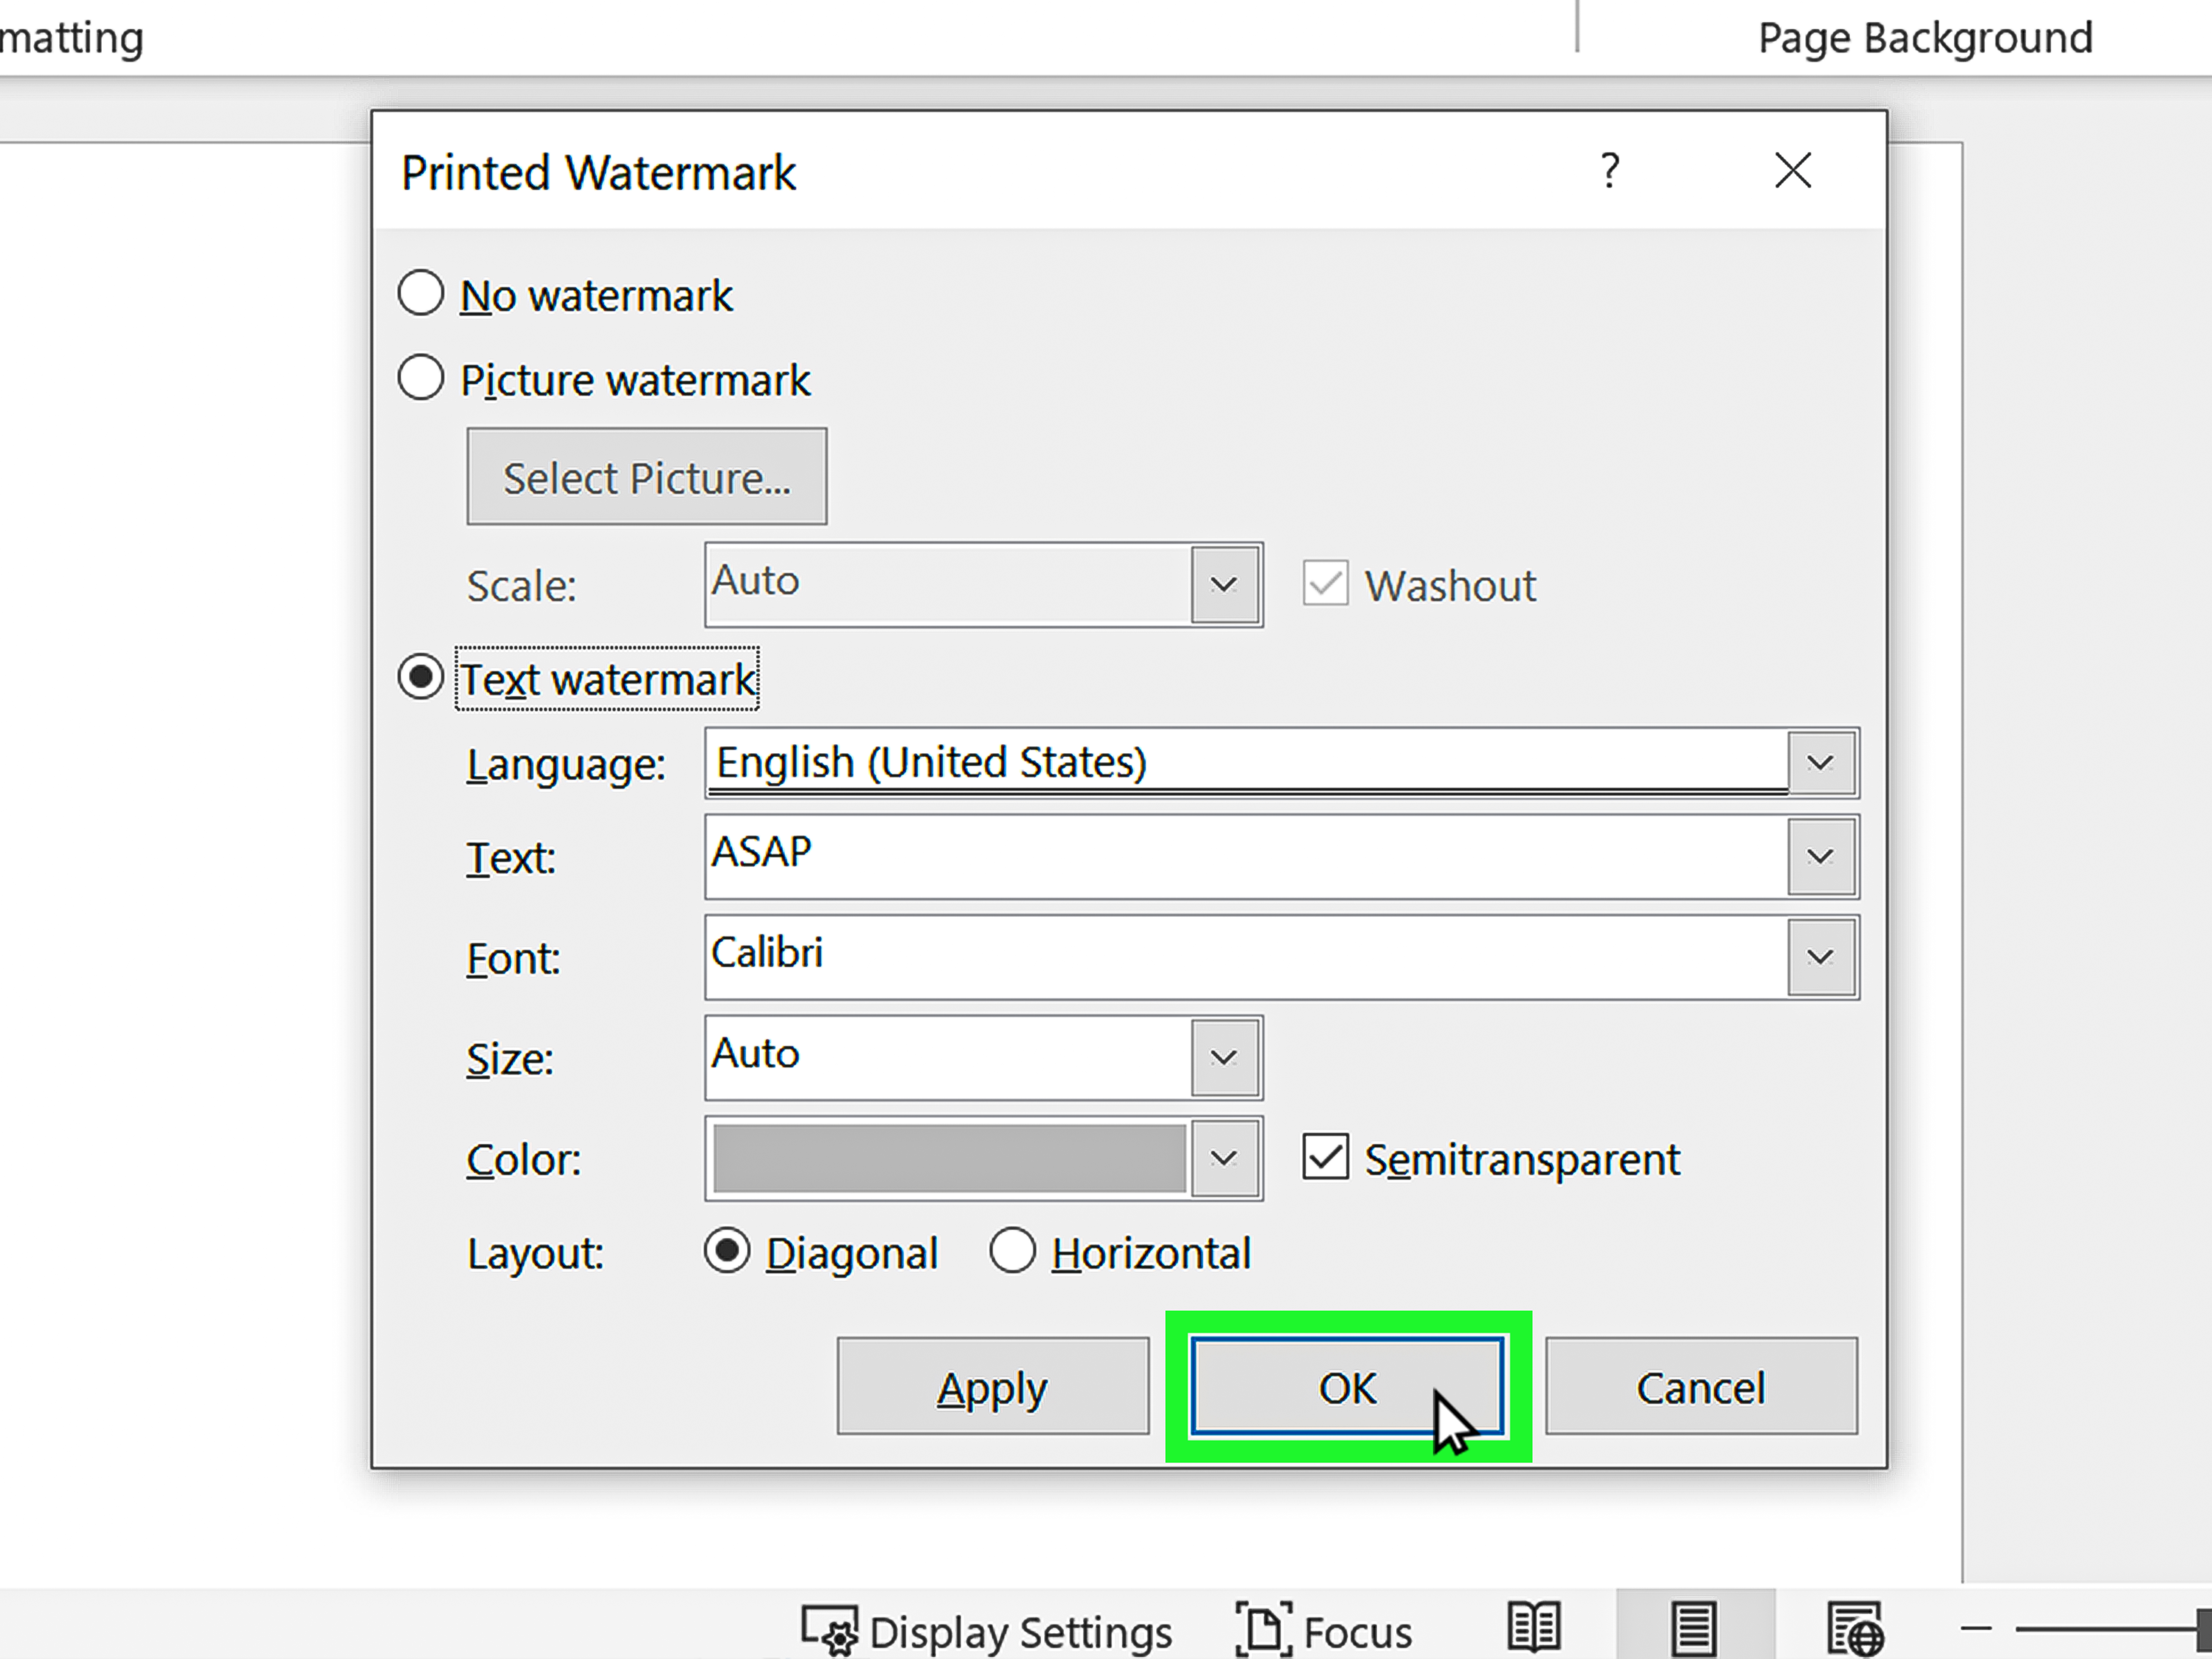
- Choose Text watermark.
- Enter the message you want to display.
- Select a font, size, and color.
- Choose a Diagonal or Horizontal layout.
- Enable the semitransparent option when available.
- Click OK or Apply.
For most business documents, short wording works best. A large sentence behind every paragraph quickly stops being a watermark and starts behaving like an overly enthusiastic billboard.
Choosing the Best Text Watermark Settings
Use a neutral, readable font such as Arial, Calibri, Aptos, or another clean sans-serif typeface. Light gray is usually safer than black, dark blue, or bright red because the watermark should remain visible without competing with the document.
A diagonal orientation is common for status labels because it covers more of the page while remaining visually separate from horizontal body text. Horizontal watermarks often work better for company names, department labels, or short notices that should feel less dramatic.
How to Add a Picture or Logo Watermark
A picture watermark is useful for branded reports, proposals, certificates, internal templates, and forms. Word can place a logo or another image behind the document text and lighten it with the Washout setting.
- Go to Design > Watermark.
- Select Custom Watermark.
- Choose Picture watermark.
- Click Select Picture.
- Choose the image from your computer or another available source.
- Select an appropriate scale.
- Keep Washout enabled for a light, background-style appearance.
- Click OK.
Microsoft recommends using the picture watermark controls to select the image, scale it, and apply or remove the Washout effect. s for a Better Logo Watermark
Start with a clean, high-resolution image. A transparent PNG is often the best choice because it avoids an unwanted white rectangle around the logo. Crop excessive empty space before inserting the file; otherwise, Word may scale the invisible margins along with the visible design.
If the logo looks too faint, clear the Washout option or edit the image after insertion. If it dominates the page, restore Washout, reduce the scale, or adjust its brightness and transparency. Always check a printed or exported PDF copy because screen brightness can make subtle graphics look different from their final output.
How to Add a Watermark to Only One Page
Word normally repeats a watermark because the object is associated with a header. There are two practical ways to limit it to one page.
Method 1: Insert a Built-In Watermark at the Current Position
For a preset watermark in supported Windows desktop versions:
- Click on the page where the watermark should appear.
- Open Design > Watermark.
- Right-click the desired watermark thumbnail.
- Select Insert at Current Document Position.
Word inserts the selected design as a text box at the current document position instead of automatically applying it throughout the document. This method is quick, although it may not be available for every custom design or Mac interface. hod 2: Isolate the Page With Section Breaks
Use section breaks when you need a custom text watermark, a picture watermark, or more reliable control over a page in the middle of a long document.
- Place the cursor at the beginning of the target page.
- Choose Layout > Breaks > Next Page.
- Place the cursor at the end of the target page and insert another Next Page section break.
- Double-click the header area on the target page.
- Turn off Link to Previous.
- Open the header in the following section and turn off Link to Previous there as well.
- Return to the target section and insert the watermark.
- Remove the watermark from neighboring sections if necessary.
The second section break is important. Without it, your “one-page” watermark may continue onto every page that follows, cheerfully ignoring your intentions.
How to Edit, Move, Rotate, or Resize a Watermark
Because a watermark is normally stored in the header, clicking it from the document body may accomplish nothing except making you question your relationship with Microsoft Word.
- Double-click near the top edge of the page to open the header.
- Move the pointer over the watermark until a four-headed arrow appears.
- Click the watermark to select it.
- Use the sizing handles to resize it.
- Drag it to a different location.
- Use the rotation handle to change its angle.
- Open the applicable Shape Format, WordArt Format, or Picture Format tab for additional controls.
Microsoft specifically notes that opening the header is the key to selecting and repositioning a watermark. Once selected, it behaves much like another text box, WordArt object, shape, or image. to Remove a Watermark
To remove a standard watermark:
- Open the Design tab.
- Select Watermark.
- Click Remove Watermark.
If that command does not work, double-click the header, select the watermark manually, and press Delete. Documents with multiple sections may contain separate watermark objects, so repeat the process in each affected section. Is My Watermark Not Showing?
You Are Using the Wrong View
Switch to View > Print Layout. Watermarks may not appear normally in Draft, Outline, or certain web-based editing views.
The Image Is Too Light
The Washout setting may make a pale logo nearly invisible. Edit the watermark through the header and increase its contrast, reduce its transparency, or disable Washout.
The Watermark Is Hidden Behind Another Object
A large shape, background image, or text box may cover the watermark. Select the competing object and inspect its wrapping and layering settings. Moving it behind the watermarkor bringing the watermark forwardmay solve the problem.
The Document Contains Multiple Sections
A watermark may appear in one section but not another, especially when headers are unlinked. Inspect the header in each section and confirm that the intended watermark is present.
The Watermark Does Not Print
Open Word’s display or printing settings and make sure background colors and images are allowed to print. Then preview the file through File > Print. Exporting a test PDF is another dependable way to confirm the final appearance.
Watermark Design Best Practices
- Keep the message short: One to four words are usually enough.
- Protect readability: The document text should remain the visual priority.
- Use consistent branding: Match approved company logos, fonts, and colors.
- Check every section: Complex documents may use different headers.
- Test the final format: Review both the Word file and exported PDF.
- Do not confuse labeling with security: A watermark warns readers but does not prevent determined editing.
- Save a clean master copy: Keep an unwatermarked version before applying recipient-specific labels.
Frequently Asked Questions
Can I add different watermarks to different pages?
Yes. Divide the document into sections, unlink their headers, and apply a different watermark to each section. For isolated preset labels, the Insert at Current Document Position command may be faster.
Can I put a watermark in front of the text?
Yes, although it is better described as an overlay. Open the header, select the watermark, and change its text-wrapping or layering setting to place it in front of text. Increase transparency so the underlying content remains readable.
Can I use a recipient’s name as a watermark?
Yes. Create a custom text watermark containing the recipient’s name, email address, customer number, or review status. Avoid exposing unnecessary personal information, especially when the document may be forwarded.
Will the watermark remain when I save the document as a PDF?
Normally, yes. Use Word’s built-in Save As or Export to PDF feature and inspect the finished file. The watermark should be included as part of the page design.
Can I add a watermark in Word for the web?
Word for the web can preserve and display watermarks already present in a document, but the desktop application provides the complete insertion and editing workflow. Open the file in the desktop version when the Watermark command is unavailable online. ctical Experience: Lessons From Real-World Word Watermark Workflows
The most common mistake in watermark projects is making the mark too dark. On a monitor, a medium-gray “CONFIDENTIAL” label may look professional and authoritative. After printing, it can resemble a storm cloud parked behind every sentence. A safer workflow is to begin with a very light shade, preview the document at 100 percent, and print one representative page. It is much easier to darken a subtle watermark than to explain why the quarterly report looks as though it was printed through a screen door.
Logo files create a second recurring challenge. People often insert a small JPEG copied from a website and then scale it to fill half the page. The result is blurry edges, compression artifacts, and sometimes an unexpected white rectangle around the image. A larger transparent PNG generally produces a cleaner result. Cropping empty margins before insertion also matters because Word scales the entire image canvas, including invisible or unused space. A logo that appears mysteriously tiny may simply be surrounded by a large transparent border.
Single-page watermarks are where otherwise calm Word users begin bargaining with the universe. The reason is structural: the watermark belongs to a header, and headers usually repeat. Section breaks solve the problem, but only when the header links are handled correctly. The reliable habit is to isolate the target page, unlink its header from the previous section, and also unlink the following section before deleting unwanted copies. Skipping that final step can make a watermark disappear from the target page when it is removed elsewhere.
Another useful lesson is to inspect the final delivery format rather than trusting the editing screen. A watermark that looks balanced in Word may shift slightly when fonts are substituted, page dimensions change, or the file is opened in another word processor. PDF export usually stabilizes the layout, making it the preferred format for finalized proposals, policies, proofs, and review copies. Still, the PDF should be opened and checked page by page. “It looked fine in Word” is not particularly comforting after a client receives a 60-page document with a logo covering every page number.
Recipient-specific watermarks can be especially helpful for controlled review copies. Adding a customer name, reviewer identity, or distribution label makes each copy easier to trace and may discourage casual forwarding. The wording should remain restrained, however. Including a full email address, phone number, account number, and mailing address creates visual clutter and may introduce privacy concerns. A short identifier such as “Review CopyJordan Lee” usually communicates enough information without turning the page into an identification badge.
Finally, it is wise to preserve three versions of important files: a clean master, an editable watermarked copy, and the final exported PDF. The clean master prevents permanent formatting headaches. The editable copy allows quick revisions. The PDF preserves the intended appearance for distribution. Clear filenames also help: Policy_Master.docx, Policy_Confidential.docx, and Policy_Confidential_Final.pdf are far more useful than final.docx, final2.docx, and the famously optimistic final_REAL_v7.docx.
Conclusion
To add a watermark in Microsoft Word, open the Design tab, select Watermark, and choose a built-in design or create a custom text or picture watermark. For a watermark on only one page, insert a preset design at the current document position or isolate the page with section breaks and unlinked headers. When a watermark refuses to cooperate, open the headerthe object is usually hiding there in plain sight.
A good watermark communicates status or ownership without damaging readability. Keep it light, simple, consistent, and tested in the final output format. Word supplies the tools; your main responsibility is preventing the company logo from becoming the largest character in the report.
Research note: This guide was synthesized from current Microsoft support documentation and additional established technology-training references covering preset watermarks, custom text and picture designs, one-page placement, header editing, washout settings, section behavior, removal, and Word platform differences. ode>