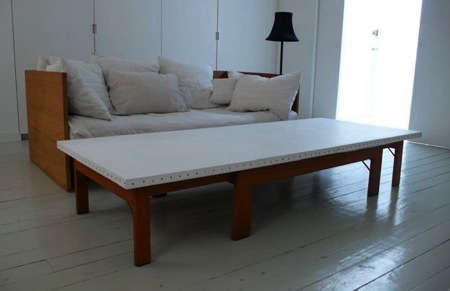

If your coffee table budget says “yard sale” but your taste says “gallery loft in Brooklyn,” this project is for you. A canvas table top inspired by Mc & Co. turns humble materials into something that feels tailored, textural, and quietly expensive. It is one of those rare DIY ideas that sounds slightly odd at firstcanvas on a tabletop? really?and then makes perfect sense the second you see it.
The original appeal is easy to understand. Instead of using a traditional wood, stone, or glass top, the design relies on a lightweight core wrapped in canvas, coated with gesso, and finished with upholstery tacks. The result lands somewhere between furniture, art object, and conversation starter. It has softness without being flimsy, structure without feeling bulky, and enough personality to keep a room from looking like it was assembled by a robot with a coupon code.
Even better, this is a forgiving DIY project. The surface is meant to feel handcrafted. Tiny irregularities add character. If the finish gets scuffed over time, that is not a disaster; it is practically built into the concept. A fresh coat of paint or gesso can revive the top without forcing you to start from scratch. In the age of disposable furniture, that is downright charming.
What Makes the Mc & Co. Canvas Table Top So Smart?
The genius of this project is in the material mix. A hollow-core door or similarly lightweight slab gives you a broad, flat surface without the weight of a thick solid-wood top. Canvas adds flexibility and visual warmth. Gesso creates the matte, chalky, artist-studio finish that makes the piece feel intentional rather than improvised. Upholstery tacks along the side give the whole thing a crisp edge and a little tailored swagger.
There is also a practical side to the design. Canvas has texture, which means the tabletop does not feel cold or overly slick. The finished surface can handle everyday styling beautifully: stacked books, a tray with candles, a ceramic bowl, even that one design magazine you keep on display mostly because the cover color matches your throw pillows. And when the top eventually picks up wear, repainting is part of the appeal rather than proof of failure.
That balance between beauty and maintainability is why this DIY project still feels relevant. It has the soul of a handmade piece, but it also understands real life. Kids lean on coffee tables. Pets investigate them. Guests put glasses down without coasters even when they absolutely should know better. A canvas table top accepts that reality and keeps going.
Materials You’ll Need
Main Materials
- One hollow-core door slab or another lightweight, flat tabletop base
- Heavy or medium-weight cotton canvas
- Acrylic gesso
- Primer, if your base needs extra prep
- Paint for the final color, if desired
- Upholstery tacks or nailhead trim
- Strong adhesive or staple gun, depending on your method
- Fine-grit sandpaper
- Measuring tape
- Scissors or utility knife
Helpful Extras
- Drop cloth
- Large brush or small roller for gesso
- Putty knife
- Clamps
- Painter’s tape
- Clear topcoat if you want added stain resistance
- Table base, legs, or an existing frame
A quick note on sizing: one reason this project works so well is that interior door slabs often come in convenient proportions for a coffee table or long bench-style table. If you want a more compact footprint, choose a slab close to your desired dimensions rather than aggressively reworking it. This project is stylish, yes, but it is not trying to win a medal in unnecessary difficulty.
Before You Start: Pick the Look
The same basic build can head in a few different design directions. If you want the classic Mc & Co. vibe, go for a matte white or soft ivory finish with visible texture and simple metal tacks along the sides. It feels sculptural, minimal, and a little European in that effortless “of course this old thing is fabulous” way.
If your style leans more modern rustic, try warm white, mushroom, flax, or soft gray. For something moodier, charcoal or black can look dramatic, especially with blackened hardware and a darker base. You can even tint the gesso or topcoat with paint for a custom shade. Just avoid anything too glossy if you want to preserve the artful, canvas-like feel.
This is also the moment to decide whether you want a rawer edge or a more polished one. Exposed tacks create a tailored, furniture-like finish. Hidden fasteners create a cleaner silhouette. Neither option is wrong. One is more “design shop,” and the other is more “gallery install.” Choose your personality.
How to Make a DIY Canvas Table Top
1. Prep the Base
Start with your tabletop base clean, dry, and smooth. If you are using a primed hollow-core slab, you already have a solid head start. Lightly sand the surface to remove any slickness and help adhesion. Wipe away dust thoroughly. If the slab has hardware cutouts, dents, or uneven spots, patch and smooth them before moving on. This is not the glamorous part, but it is the part that keeps your “handmade charm” from accidentally becoming “why is there a crater under my coffee mug?”
2. Cut the Canvas Generously
Lay your canvas flat and cut it several inches larger than the top on all sides. You want enough excess to wrap neatly around the edges and secure it without a wrestling match. Heavy cotton duck canvas works especially well because it has enough body to pull tight without feeling flimsy.
3. Attach and Stretch the Canvas
Center the tabletop base on the back side of the canvas. Apply adhesive or use staples on the underside and side edges, depending on your build method and how visible the edges will be. Work from the middle of each side outward, pulling the canvas taut as you go. The goal is smooth and firm, not so tight that you distort the weave or create strange tension wrinkles at the corners.
Corners deserve patience. Fold them as neatly as possible, like wrapping a gift for someone you actually like. Bulky corner folds can telegraph through the final shape, so trim excess fabric when needed. Once secured, run your hand across the top to check for ripples or slack areas before moving on.
4. Apply Gesso
This is where the project starts to look like something special. Brush or roll on your first coat of gesso in an even layer. Let it dry fully. Apply a second coat in the opposite direction. If you want a smoother finish, lightly sand between coats and add a third layer. If you prefer more texture, keep the brush marks subtle but visible.
Gesso is doing several jobs here. It primes the canvas, creates a paint-friendly surface, brightens the color, and adds that dry, velvety, studio-quality finish. Think of it as the difference between “I wrapped fabric over a board” and “I made a design object.”
5. Paint or Leave It Gesso-White
Once the gesso is dry and lightly sanded, decide whether to leave it as is or paint over it. A plain white gesso finish looks crisp and collected, especially in minimalist or layered-neutral interiors. If you want color, apply thin coats and build gradually. Soft mineral shades tend to suit the material best because they let the texture remain the star.
If you are worried about durability, add a compatible matte topcoat after the paint cures. Keep in mind that every protective layer slightly changes the hand-feel of the surface. Too much sealer and the tabletop can lose the quiet canvas character that made you fall for the idea in the first place.
6. Add Upholstery Tacks
Now for the finishing detail that gives the table its crisp outfit. Mark a consistent line around the side edge where the tacks will go. Attach them at even intervals for a classic look, or place them closer together if you want a more continuous trim effect. This step adds visual rhythm and hides the transition where the wrapped canvas meets the base.
If your foundation is soft enough to accept decorative tacks easily, great. If not, work carefully and test placement first. Precision matters here because the eye notices uneven spacing fast. A measuring tape is your friend. So is stepping back every few minutes to make sure the line looks balanced.
7. Mount the Top on a Base
The tabletop can rest on an existing coffee table base, a custom wood frame, trestles, or simple legs depending on the look you want. Just make sure the support is level and appropriate for the size of the top. The beauty of this project is that the top itself carries so much visual interest that the base can stay relatively simple.
Styling Ideas That Actually Work
A canvas table top looks best when you do not overcrowd it. The surface already has texture and tone, so let it breathe. Try a large tray, a stack of two or three books, a small vase, and one sculptural object. Done. Resist the urge to fill every inch unless your dream is for the table to disappear under a decorative traffic jam.
This kind of tabletop pairs especially well with linen sofas, vintage wood, iron, plaster lamps, woven baskets, and aged brass. It also helps soften rooms that have too many hard surfaces. If your living room already has a leather sofa, metal shelving, and glass lighting, a canvas top can act like a visual exhale.
For family rooms, use a tray under drinks and candles. For more formal spaces, keep the palette monochrome and let the texture carry the scene. For eclectic homes, the table can bridge old and new beautifully: imagine it beside a modern sectional, a flea-market stool, and a ridiculously expensive-looking lamp you found for twenty bucks. That is the energy.
Common Mistakes to Avoid
Skipping surface prep
If the base is dusty, slick, or uneven, the canvas and coating will make those problems more noticeable, not less. Prep is not optional.
Using flimsy fabric
Thin fabric may sag, wrinkle, or feel cheap once coated. Choose real canvas with enough body to stretch cleanly.
Applying gesso too heavily all at once
Several controlled coats beat one gloopy coat every time. Thick application can crack, blob, or obscure the refined woven texture that makes this finish interesting.
Ignoring edge details
The side profile matters. Messy folds or uneven tacks can make a clever idea look unfinished. Spend the extra time here.
Expecting it to behave like stone
This is a tactile, painted, handcrafted surface. It is durable enough for everyday living, but it is not a slab of quartz. Use trays, wipe spills promptly, and accept a little character over time.
Why This Project Is Worth Doing
Some DIY projects save money. Some create a custom look. A few do both while also giving you a story to tell when someone asks where you bought the table. This project is in that happy category. It turns accessible materials into something with depth, restraint, and personality. It is resourceful without looking crafty, elevated without acting precious, and flexible enough to fit modern, rustic, minimalist, or collected interiors.
Most importantly, it does not try too hard. That is what makes the Mc & Co. idea so memorable. It understands that great design often comes from surprising material choices handled with confidence. A canvas table top is not flashy. It is quietly smart. And sometimes quietly smart is the best kind of beautiful.
Experience: What It’s Actually Like to Build and Live With a Canvas Table Top
The first surprise with a project like this is how different it feels from building a regular wood tabletop. Wood projects often announce themselves with sawdust, measurements, and a mild identity crisis halfway through. A canvas tabletop feels more like a crossover between furniture making and studio art. You are stretching, wrapping, priming, painting, and editing the finish as you go. That process is part of the fun. It feels less like assembly and more like shaping a mood.
In practice, the biggest lesson is that texture reads stronger in person than it does in photos. Even when the top is painted a simple soft white, the canvas weave gives the surface dimension that flat painted wood just does not have. Morning light catches it. Side lighting makes the brushwork feel intentional. A room with lots of smooth finishes suddenly looks more layered. That subtle texture is probably the main reason people walk over, touch it, and ask questions. Fair warning: once guests realize it is canvas, they either think you are a genius or they stare for a second like you have broken a decorating law. Both reactions are fun.
Another real-life experience is that the top becomes more relaxed over time, not worse. Tiny scuffs, soft marks, and gentle wear can actually add character, especially if you embrace the chalky painted finish instead of trying to preserve some impossible showroom perfection. That said, daily living still benefits from common sense. A tray under drinks helps. So does not sliding ceramic planters across the top like you are testing sandpaper. This is a lived-in piece, but it still appreciates good manners.
There is also a practical satisfaction in how easy the top is to refresh. Traditional furniture finishes can make damage feel dramatic. A scratch in dark stain can ruin your mood for an entire afternoon. With a canvas table top, refreshing the surface is usually much simpler. Light sanding, a fresh coat of gesso or paint, and suddenly the table looks revived. That makes the piece feel flexible instead of fragile. For households with kids, pets, frequent guests, or just a realistic relationship with clutter, that flexibility is a huge advantage.
Styling the table is an experience of its own. Because the finish has a matte, almost artistic quality, everyday objects look better on it. Books feel more curated. Brass looks warmer. Pottery looks more expensive. Even a plain bowl of keys can start to feel like a still-life arrangement if you squint hard enough and believe in yourself. The table has a way of elevating ordinary objects without demanding a perfect room around it.
Perhaps the most satisfying part, though, is the story behind it. A lot of furniture today is designed to be invisible: functional, neutral, and quickly forgotten. A canvas table top is different. It has an idea behind it. It feels specific. It reflects taste rather than trend-chasing. Building one also changes how you look at materials. A door slab stops being just a door slab. Canvas stops being just for painting. Decorative tacks stop being a small hardware detail and start becoming part of the architecture of the piece. That shift in perspective is one of the best things DIY can offer. You do not just end up with a table. You end up seeing design differently.