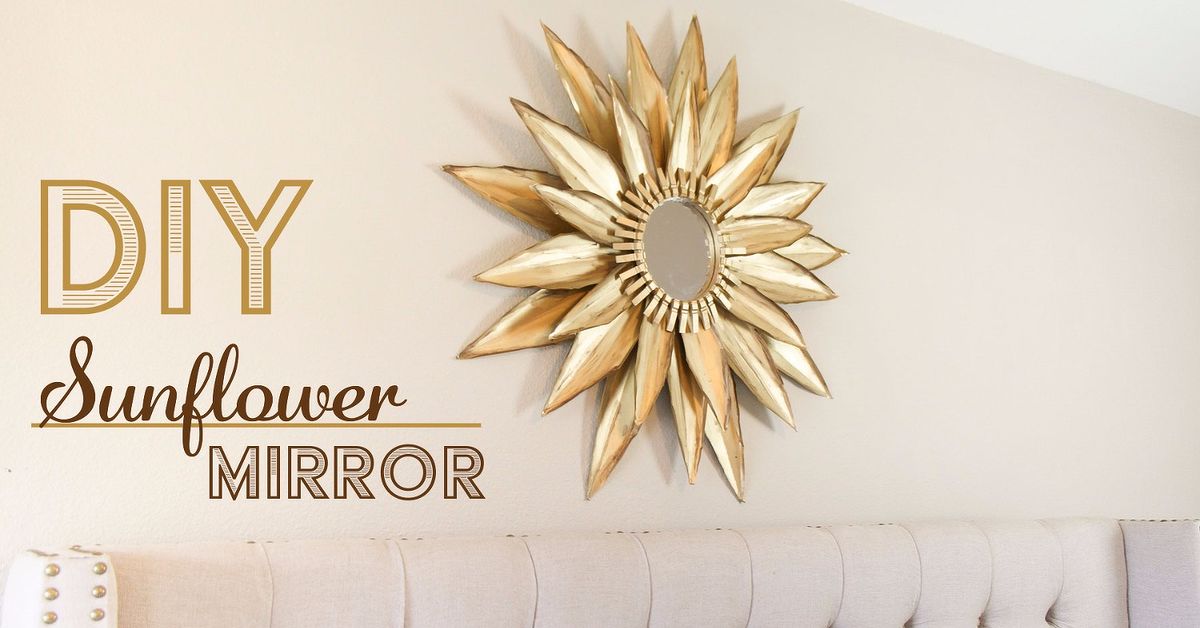

If your wall is looking a little too “landlord beige” and your craft drawer is quietly judging you, a sunflower/sunburst mirror made with cardstock is the perfect project. It looks dramatic, cheerful, and surprisingly expensive, yet the main ingredients are paper, a small mirror, glue, and a willingness to cut many petal shapes while pretending this is relaxing. Good news: it actually is relaxing once you get into the rhythm.
This DIY cardstock sunflower mirror combines two beloved home decor ideas: the classic sunburst mirror and the warm, happy look of sunflower petals. Instead of using wood shims, metal rods, bamboo skewers, or vintage spoons, this version uses cardstock to create layered petals around a round mirror. The result is lightweight, budget-friendly, customizable, and easy to hang compared with heavier wall decor.
In this guide, you will learn how to plan the design, choose the right cardstock, cut and shape the petals, assemble the mirror safely, and finish it so it looks polished instead of “third-grade art project that escaped the refrigerator.” We are aiming for handcrafted charm, not chaos with glue strings.
Why Make a Sunflower or Sunburst Mirror With Cardstock?
A sunflower mirror brings instant warmth to a room. It works beautifully in bedrooms, craft rooms, nurseries, entryways, dorm rooms, gallery walls, and small apartments where every inch of wall space needs to earn its rent. The sunburst shape also makes a round mirror feel larger and more decorative without requiring a heavy frame.
Cardstock is ideal because it is sturdier than regular printer paper but still flexible enough to curl, score, fold, and layer. It comes in endless colors, textures, metallic finishes, glitter finishes, and patterned sheets, so you can make your mirror look rustic, boho, glam, farmhouse, modern, or full-on sunshine explosion.
Another advantage is cost. A store-bought sunburst mirror can be pricey, especially if it has a large decorative frame. With cardstock, you can create a similar focal point for a fraction of the cost. Plus, when someone compliments it, you get to say, “Thanks, I made it,” which is one of the top five most satisfying sentences in the DIY universe.
Supplies You Will Need
Before you start cutting petals like a botanical confetti machine, gather your materials. Having everything ready will keep the project smooth and prevent the classic mid-project panic where you are holding hot glue in one hand and Googling “substitute for cardboard circle” with the other.
Basic Materials
- One round craft mirror, about 6 to 10 inches wide
- Cardstock in yellow, golden yellow, mustard, orange, brown, cream, or metallic tones
- Chipboard, cardboard, foam board, or a sturdy cake board for the backing
- Hot glue gun and glue sticks
- Craft glue or tacky glue for small details
- Scissors or a craft knife
- Pencil
- Ruler
- Compass, bowl, plate, or round template
- Bone folder, scoring stylus, butter knife, or the back of a spoon
- Hanging hardware, ribbon, picture hanger, or adhesive strips rated for the finished weight
Optional Materials
- Cutting machine such as a Cricut or Silhouette
- Gold paint, metallic marker, or ink pad for edging petals
- Small wooden dowel or pencil for curling petals
- Brown paper circles or faux sunflower center details
- Mod Podge or clear acrylic sealer for extra durability
- Felt or cork pads for the back
- Painter’s tape for temporary layout testing
Choosing the Best Cardstock for a Sunflower Mirror
For this project, medium-weight cardstock is usually the sweet spot. A 65 lb to 80 lb cover cardstock works well because it holds a petal shape without becoming too stiff to curve. If the paper is too thin, your petals may droop like they just heard bad news. If it is too thick, shaping becomes harder, and the finished mirror can look bulky.
For a realistic sunflower effect, use at least two or three shades of yellow. Try a bright yellow for the front petals, a golden yellow for the second layer, and a deeper orange or mustard for the back layer. This creates depth and keeps the flower from looking flat. For a classic sunburst mirror, use gold, champagne, white, black, navy, or terracotta cardstock.
Texture also matters. Smooth cardstock gives a clean modern finish. Linen or lightly textured cardstock adds a handmade, boutique-style look. Metallic cardstock makes the mirror more glamorous, but it can show glue mistakes more easily, so use a lighter hand with adhesive. Glitter cardstock is fun, but be warned: glitter is not a craft supply; it is a lifestyle commitment.
Step 1: Decide the Size and Layout
Start by choosing the finished diameter of your mirror. A 6-inch mirror can become a 16- to 20-inch sunflower mirror once petals are added. An 8-inch mirror can easily become 22 to 28 inches wide. The larger the petals, the more dramatic the final piece.
Place your mirror on the center of your backing board and trace around it. Then draw a larger circle around that, which will guide where your petals should extend. You do not need a mathematically perfect circle unless your soul demands it. A plate, bowl, or large tray works well as a template.
Think in layers. Most sunflower and sunburst designs look best with three petal rings: a long outer layer, a medium middle layer, and a shorter inner layer. This creates movement and dimension. If you want the mirror to look fuller, add a fourth layer of smaller petals tucked close to the mirror.
Step 2: Make Petal Templates
Draw three petal shapes on scrap paper: large, medium, and small. For a sunflower mirror, make the petals long and slightly pointed, like narrow teardrops. For a sharper sunburst mirror, make them more geometric, like elongated diamonds or rays.
A good starting size is:
- Large petals: 6 to 8 inches long
- Medium petals: 4 to 6 inches long
- Small petals: 3 to 4 inches long
Cut out the templates and place them around your backing board to test the look. This dry run saves time and prevents the dreaded realization that your flower has accidentally become a paper sea urchin.
Step 3: Cut the Cardstock Petals
Trace your templates onto the back side of the cardstock and cut them out. You can cut by hand or use a cutting machine. If cutting by hand, stack only two or three sheets at a time so the shapes stay neat. If using a craft knife, work on a cutting mat and keep your fingers out of the blade’s path.
For a medium-size sunflower mirror, you may need approximately:
- 24 to 30 large petals
- 24 to 30 medium petals
- 18 to 24 small petals
The exact number depends on your mirror size, petal width, and how full you want the design. It is better to cut a few extra petals than to run out near the end and start bargaining with the craft gods.
Step 4: Shape the Petals for Dimension
This is the step that makes cardstock look less like flat paper and more like a decorative flower. Use a bone folder, scoring stylus, dull butter knife, or the back of a spoon to score a gentle line down the center of each petal. Do not cut through the paper. You are creating a crease that helps the petal bend naturally.
After scoring, lightly fold each petal along the center line. Then curl the tip around a pencil, wooden dowel, or marker. Curl some petals upward and others slightly downward to create a natural, layered effect. Real flowers are not perfectly identical, and neither are people before coffee.
For extra realism, pinch the base of each petal before gluing. This gives the petal a subtle cupped shape and helps it stand away from the backing board. If you are making a sleek sunburst design, skip the curling and keep the rays crisp and angular.
Step 5: Prepare the Backing Board
Your backing board is the hidden skeleton of the mirror. It should be strong enough to support the mirror and petals without bending. Chipboard, foam board, recycled cardboard, or a sturdy round cake board all work well.
Cut the backing into a circle slightly smaller than the finished sunflower shape. If you want the petals to extend beyond the backing, keep the backing hidden behind them. Mark the center and trace the mirror again so you know exactly where it will sit.
Before gluing anything permanently, add your hanging method to the back. You can attach a sawtooth hanger, a loop of sturdy ribbon, D-ring hardware, or a picture-hanging tab. For a lightweight cardstock mirror, adhesive picture strips may work, but always check the weight rating and wall surface instructions.
Step 6: Glue the Outer Petal Layer
Turn the backing board face up. Arrange the large petals around the outer edge with the pointed ends facing outward. Overlap them slightly so there are no awkward gaps. Once you like the arrangement, glue them down one at a time.
Hot glue is useful here because it sets quickly and holds dimension well. Apply glue only to the base of each petal, not the entire length. Leaving the tips free allows the petals to lift and create shadow, which is what makes the mirror look expensive instead of flat.
Work in sections, like a clock. Glue petals at 12, 3, 6, and 9 first, then fill in between them. This helps keep the design balanced. Otherwise, you may end up with one side looking lush and the other side looking like it missed the meeting.
Step 7: Add the Middle and Inner Petal Layers
Next, add the medium petals between the gaps of the outer petals. This staggered placement creates fullness. Use a slightly different shade of cardstock if possible. Golden yellow over bright yellow creates a rich sunflower look, while champagne over gold creates a refined sunburst effect.
After the medium layer, add the small petals closer to the mirror opening. These petals hide the bases of the previous layers and create a clean transition from paper to glass. If your mirror has a plain edge, the small petals can overlap it slightly, but do not cover too much of the reflective surface.
Step back every few minutes and look at the whole design. It is easier to fix spacing while the glue is still warm than after everything has cooled and become a permanent monument to impatience.
Step 8: Attach the Mirror
Once the petals are secure, glue the mirror to the center of the backing board. Use a strong adhesive suitable for glass and the backing material. Hot glue may work for small lightweight craft mirrors, but for a more secure bond, a strong craft adhesive or mirror-safe adhesive is a better choice.
Apply adhesive to the backing board, not directly to the visible front edge of the mirror. Press the mirror gently into place and make sure it is centered. Wipe away any excess adhesive before it dries. Then let the mirror cure flat according to the adhesive instructions. This is the part where patience becomes a tool. Unfortunately, it is not sold in craft stores.
Step 9: Add a Sunflower Center Detail
For a sunflower-style mirror, you can add a decorative ring around the mirror to mimic the sunflower’s brown center. Cut small brown, bronze, or dark gold cardstock circles, scallops, or fringe strips and glue them around the mirror edge.
Another option is to create a braided paper ring. Cut thin strips of brown cardstock, twist them gently, and glue them in a circle around the mirror. This adds texture and makes the mirror look more floral. For a modern sunburst mirror, skip the brown center and use a clean metallic ring instead.
Step 10: Finish and Seal the Mirror
Check the entire mirror for loose petals, glue strings, uneven spacing, or edges that need trimming. A metallic marker or ink pad can be used to lightly edge the petals, giving them more depth. A tiny bit of orange or brown ink near the petal bases can make a sunflower mirror look warmer and more realistic.
If the mirror will hang in a humid area, apply a light coat of clear acrylic sealer or a paper-friendly finish to the cardstock. Avoid soaking the paper with liquid sealer, because too much moisture can warp cardstock. A few light coats are better than one heavy coat.
Let everything dry completely before hanging. Paper may be lightweight, but glue needs time to cure. Give the project several hours, or overnight if possible, before lifting it vertically.
How to Hang Your Cardstock Sunburst Mirror Safely
Even though this mirror is lighter than a wood or metal sunburst mirror, it still contains glass. Always hang it with hardware rated for the finished weight. Weigh the finished piece if you are not sure. Use a wall anchor if you are not drilling into a stud, and follow the instructions for your wall type.
For small mirrors, adhesive strips may be enough if the wall is smooth, clean, and dry. For larger mirrors, use a proper picture hanger, D-ring, sawtooth hanger, or wall anchor. Avoid hanging cardstock mirrors in bathrooms with heavy steam, above cribs, above beds where they could fall, or near heat sources that might soften glue.
When choosing placement, think about what the mirror reflects. A mirror across from a window can bounce light beautifully. A mirror reflecting a laundry pile will also bounce reality beautifully, but perhaps with less joy.
Design Ideas and Color Variations
Classic Sunflower
Use bright yellow, golden yellow, and orange cardstock with a brown textured center. This version is perfect for cheerful rooms, farmhouse decor, summer decorating, and handmade gifts.
Boho Neutral Sunburst
Choose cream, tan, kraft paper, soft gold, and warm brown cardstock. Keep the petals longer and slimmer for a relaxed bohemian look. This style pairs well with woven baskets, rattan furniture, and neutral bedding.
Glam Gold Mirror
Use metallic gold cardstock and champagne shimmer paper. Make the rays sharp and symmetrical. Add a thin gold trim around the mirror for a polished look that feels more boutique than bargain bin.
Modern Black Sunburst
Black cardstock creates a bold, graphic mirror that works well in modern, industrial, or minimalist spaces. Use matte black for elegance or black glitter cardstock if your wall needs a tiny disco moment.
Kids’ Room Rainbow Flower
Use different colors for each petal ring: yellow, pink, orange, teal, lavender, and green. This turns the project into playful wall art for a nursery, playroom, or creative corner.
Common Mistakes to Avoid
The first mistake is using paper that is too flimsy. Regular printer paper may curl nicely, but it usually will not hold a strong dimensional shape for long. Use cardstock for structure.
The second mistake is using too much glue. Excess glue can warp paper, create lumps, and leave shiny marks. Use small dots or thin lines of adhesive, especially on visible layers.
The third mistake is skipping the dry layout. Always arrange the petals before gluing. A five-minute test layout can save you from a 45-minute emotional negotiation with crooked petals.
The fourth mistake is attaching hanging hardware after the mirror is finished. It is much easier to add the hanger before the petals and mirror are in the way.
The fifth mistake is expecting perfect symmetry. Handmade decor has character. Aim for balance, not machine-level perfection. If one petal is slightly rebellious, call it “organic movement” and continue with confidence.
Care and Cleaning Tips
Dust the cardstock petals gently with a soft brush, microfiber cloth, or a cool-setting hair dryer held at a distance. Do not wipe the petals with a wet cloth. Moisture can soften, stain, or warp the paper.
Clean the mirror glass with a small amount of glass cleaner sprayed onto a cloth, not directly onto the mirror. Spraying directly can cause liquid to seep under the paper edge. Treat the cardstock like a fancy guest: keep it dry, avoid rough handling, and do not ask it to survive a bathroom sauna.
Creative Ways to Use This DIY Mirror
A cardstock sunflower mirror makes a lovely handmade housewarming gift, dorm room decoration, party backdrop, wedding shower accent, or seasonal wall piece. You can also make several smaller versions and arrange them as a gallery wall. Try mixing mirror sizes and petal colors for a more collected look.
If you sell handmade crafts, this project can also inspire a product line. Offer custom colors for nursery themes, boho bedrooms, farmhouse kitchens, or event decor. Just remember to package the petals carefully so they do not flatten during shipping.
Extra Experience Notes: What I Learned Making Cardstock Sunflower Mirrors
The first thing you learn when making a sunflower or sunburst mirror with cardstock is that the paper has opinions. Some cardstock curls beautifully, some creases sharply, and some behaves like it has been personally offended by your scissors. That is why testing one or two petals before cutting the full batch is so helpful. I like to cut three sample petals in different sizes, score them, curl them, and place them around the mirror before committing. This tiny experiment saves a surprising amount of time.
Another useful experience is to work in color groups instead of cutting everything from one shade. A real sunflower is not just “yellow.” It has golden highlights, orange shadows, brown centers, and sometimes pale tips. When you layer several shades, the finished mirror looks richer and more intentional. Even if you only have one yellow cardstock pack, you can add depth by lightly brushing the petal edges with orange ink, gold paint, or a brown marker. Go gently. The goal is natural shading, not “sunflower got into a fight with a highlighter.”
Spacing is also more important than it seems. When the first layer goes down, it may look too sparse. Do not panic. The second and third layers fill the gaps. Beginners often crowd the outer layer because they fear empty spaces, but overcrowding can make the flower bulky and uneven. A little breathing room between the first layer of petals helps the later layers sit nicely.
I have also learned that hot glue is both a best friend and a tiny molten villain. It holds petals quickly, which is wonderful, but it also creates strings that appear out of nowhere like craft-room spiderwebs. Keep a scrap piece of cardboard nearby to wipe the glue gun tip between petals. After the mirror is finished, use a cool hair dryer or your fingers to remove stray glue strings.
For hanging, do not underestimate the backing board. Thin cardboard may seem fine while the mirror is lying flat, but it can bend once hung. A stronger backing makes the entire project feel more professional. Foam board is lightweight and easy to cut, while chipboard feels sturdier. If the mirror itself is heavy, reinforce the center with an extra cardboard circle behind it.
Finally, the best part of this project is how forgiving it is. A slightly uneven petal can be hidden under the next layer. A glue mark can be covered with a small center detail. A color combination that feels too bright can be softened with darker inner petals. DIY decor does not need to look factory-made. It should look loved, clever, and proudly handmade. When the mirror is on the wall catching sunlight, nobody will know which petal made you question your life choices at 11:47 p.m.
Conclusion
Learning how to make a sunflower/sunburst mirror with cardstock is a satisfying way to turn simple craft supplies into eye-catching wall decor. With a round mirror, sturdy backing, layered cardstock petals, and careful shaping, you can create a bright focal point that looks custom without draining your decorating budget.
The key is to choose medium-weight cardstock, work in layers, shape each petal for dimension, and use secure hanging hardware. Whether you choose cheerful sunflower yellows, elegant metallic gold, soft boho neutrals, or bold modern black, the same basic method can be adapted to fit your personal style.
Best of all, this project proves that paper can do more than sit in a drawer waiting for tax season. With a little cutting, curling, and gluing, cardstock becomes sunshine for your wall. And unlike an actual sunflower, it will not wilt, drop pollen, or judge you for forgetting to water it.