
Italian rainbow cookies are the extroverts of the dessert tray: three bold stripes, shiny chocolate, and just enough almond-jam magic to make you “accidentally” eat four before anyone notices. They look like they require a culinary degree and a calm personality. Good news: you can absolutely make them at home with regular-human toolsplus one key secret ingredient: patience (and maybe a little parchment paper therapy).
This guide walks you through a bakery-style Italian rainbow cookies recipe with clear steps, smart shortcuts, and the “why” behind each moveso you get clean layers, bold color, and that signature almond flavor that makes store-bought versions taste… suspiciously like sadness.
What Are Italian Rainbow Cookies (And Why They’re Not Really Cookies)
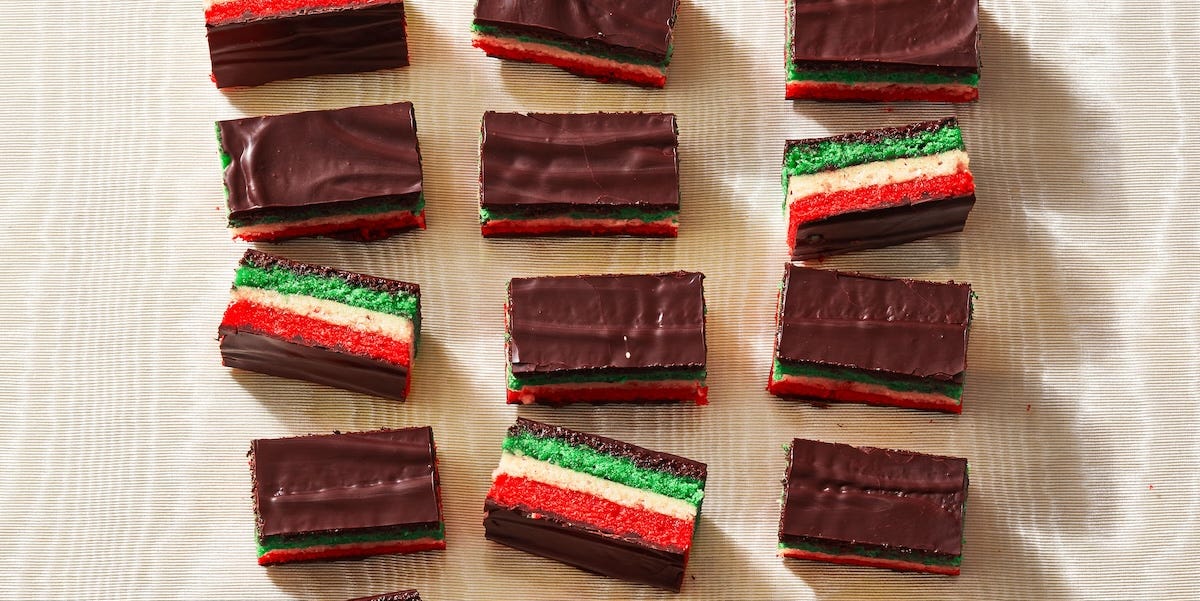
Despite the name, Italian rainbow cookies are closer to thin slices of almond sponge cake than a classic crunchy cookie. The “rainbow” part is also a bit of a fibtraditionally, the layers are red, white (or sometimes yellow), and green, inspired by the Italian flag. The layers are stacked with a thin smear of jam, then finished with a chocolate coating that snaps lightly when you bite in.
You’ll also hear them called tricolor cookies, tricolore, Venetian cookies, Napoleon cookies, or seven-layer cookies (the “seven” counts jam and chocolate as layers which is honestly fair, because they work hard).
Ingredients You’ll Need
Rainbow cookies are all about almond flavor and neat layers. That means the ingredient list is simple but the quality of a couple of items (almond paste and chocolate) really matters.
For the almond sponge layers
- Almond paste (not marzipan): the main flavor and the reason these taste like an Italian bakery
- Unsalted butter: richness + tender crumb
- Granulated sugar: sweetness and structure
- Eggs (separated): yolks build richness; whipped whites help the thin cakes rise evenly
- All-purpose flour: just enough to hold the cake together without turning it bready
- Salt: makes almond, chocolate, and jam taste louder (in a good way)
- Almond extract (optional, small amount): boosts aroma without turning “perfume-y”
- Red + green gel food coloring: gel gives bold color without thinning batter
For layering + finishing
- Jam: apricot, raspberry, or a combo (seedless is easiest for clean layers)
- Semisweet or bittersweet chocolate: for the classic snappy coating
- Neutral oil or shortening (optional): a teaspoon helps chocolate spread smoothly
Key Equipment (Nothing Fancy, Just Helpful)
- Three 9×13-inch pans or one pan baked in batches (parchment makes this painless)
- Parchment paper (your layer insurance policy)
- Stand mixer or hand mixer (almond paste is stubborn; you need persuasion)
- Offset spatula for spreading thin batter evenly
- Sheet pan + something heavy for pressing (a second pan + canned goods work great)
- Sharp knife (or serrated knife) for clean slicing
Best Italian Rainbow Cookies Recipe (Bakery-Style)
Yield: about 48–60 small cookies (depending on how you slice)
Time: active ~45–60 minutes, plus chilling/pressing (plan ahead for best results)
Ingredients
- 8 oz almond paste
- 1 cup (2 sticks) unsalted butter, room temperature
- 1 cup granulated sugar (divided: 3/4 cup + 1/4 cup)
- 4 large eggs, separated
- 1 tsp vanilla extract
- 1/2 tsp almond extract (optional)
- 2 cups all-purpose flour
- 1/4 tsp fine salt
- Red gel food coloring
- Green gel food coloring
- 3/4 cup jam total (apricot and/or raspberry), warmed and stirred until smooth
- 10 oz semisweet or bittersweet chocolate (bars or wafers)
- 1 tsp neutral oil (optional)
Step-by-Step: How to Make Italian Rainbow Cookies
1) Prep your pans (future-you will thank you)
Preheat oven to 350°F. Line your pan(s) with parchment, leaving a little overhang so you can lift the cake layers out. Lightly grease the parchment. You’re making thin cakes, so parchment isn’t optional it’s basically the whole plan.
2) Break down the almond paste (it’s clingybe patient)
In a large bowl (or stand mixer bowl), crumble almond paste into pieces. Add 3/4 cup sugar and beat until the mixture looks sandy and no giant almond paste boulders remain. This step is what prevents weird lumps later.
3) Cream in butter, then add yolks
Add butter and beat until well combined and a bit lighter. Add egg yolks one at a time, mixing until smooth. Mix in vanilla (and almond extract if using). You’re building a rich, almond-forward basethis is where the bakery flavor starts.
4) Add dry ingredients gently
Whisk flour and salt together, then mix into the batter just until combined. Don’t overmixovermixing can make the thin layers bake up tougher instead of tender.
5) Whip the egg whites for lift
In a clean bowl, whip egg whites until foamy, then gradually add the remaining 1/4 cup sugar. Beat to glossy, stiff peaks. This gives structure and keeps the layers from baking into dense almond bricks. (Delicious bricks, but still.)
6) Fold whites into the batter (keep it airy)
Fold in about one-third of the whipped whites to loosen the batter, then fold in the rest gently. You want a batter that spreads easily but still feels fluffy.
7) Divide and color the batter
Divide batter evenly into three bowls. Leave one plain. Tint one red and one green. Use gel coloring for vivid color without thinning the batter. Stir until the color is even.
8) Bake thin layers
Spread one color into the prepared pan in a thin, even layer. Bake until set and springyusually 8–12 minutes depending on your pan and how evenly you spread. Don’t wait for deep browning; you want soft layers that stack neatly.
Cool completely. Repeat with remaining batters (or bake in batches if using one pan).
9) Stack with jam (thin, even, and not gloppy)
Place the green layer on a cutting board or sheet pan. Spread a thin layer of jam over the top. Add the plain layer. Spread jam again. Add the red layer on top.
Tip: Warm jam slightly and stir until smooth so it spreads like a dream and doesn’t tear the cake. If your jam has chunks, you can strain it for cleaner layers.
10) Press and chill (this is the “clean slice” cheat code)
Wrap the stacked cake tightly in plastic wrap. Place a sheet pan on top and add a light weight (a few cans, a skillet, another pannothing dramatic). Refrigerate at least 4 hours, preferably overnight. Pressing helps the layers adhere, so they don’t slide around when you cut.
11) Add chocolate coating
Melt chocolate gently (microwave in short bursts or a double boiler). Stir in 1 tsp neutral oil if you want a slightly softer, easier-to-spread coating. Unwrap the chilled stack.
Spread a thin layer of chocolate over the top. Chill until set, then flip (use a board or sheet pan) and spread chocolate on the other side for the classic finish. Chill again until firm.
12) Slice like a pro
Use a sharp knife (wipe it clean between cuts). Trim edges for perfect rectangles, then slice into small piecesclassic rainbow cookies are petite. For extra clean cuts, score lightly through the chocolate first, then press down in confident slices.
Pro Tips for Bakery-Style Results
- Almond paste matters. It gives real nutty depth and moisture. Marzipan is sweeter and smoother and can throw off the texture.
- Spread batter evenly. Thin layers bake fast. Use an offset spatula and take your time.
- Don’t overbake. Dry layers crack and crumble when stacked.
- Go thin on jam. Too much jam makes layers slide and looks messy when sliced.
- Chill before slicing. Cold layers + set chocolate = sharp edges, clean stripes, less chaos.
Flavor Variations (Still “Italian Bakery,” Just With Personality)
Jam swaps
- Classic: apricot or raspberry
- Bright: cherry preserves
- Holiday: orange marmalade (thin layer only) for a citrusy twist
Color ideas
- Christmas: red + green + white
- Hanukkah: blue + white (skip the green/red)
- Birthday vibes: any three colors you wantyour cookies, your rules
Chocolate choices
Semisweet is the popular middle ground. Bittersweet gives a more grown-up finish that balances the sweet layers. Milk chocolate is fun, but it can make the whole cookie taste one-note sweet.
Make-Ahead, Storage, and Freezing
Rainbow cookies are a “better tomorrow” dessert. They slice cleaner after chilling, and many bakers prefer the texture after they’ve had time to set.
- Room temp: Store airtight for up to several days (cool room, away from heat).
- Refrigerator: Great for maintaining sharp layers and firm chocolate.
- Freezer: Freeze in layers between parchment, airtight. Thaw in the fridge so condensation doesn’t mess with the chocolate.
Common Problems (And How to Fix Them)
“My layers baked unevenly.”
Spread batter to the corners and smooth the top before baking. If your oven runs hot, rotate halfway through. Also: thinner batter means faster bake, so consistency is everything.
“My almond paste clumped.”
Break it up with sugar first, then cream with butter. If it’s very firm, let it sit at room temp briefly (still cool, not oily). A mixer helps, but the sugar step is the real hero.
“The layers slid when I sliced.”
Too much jam or not enough pressing time. Next batch: thinner jam layers + longer weighted chill.
“Chocolate cracked when I cut.”
Let the cookie stack sit a few minutes at room temp, then cut with a warm, dry knife. You can also add a teaspoon of oil to melted chocolate for a slightly less brittle set.
Italian Rainbow Cookies FAQs
Are Italian rainbow cookies actually Italian?
They’re best described as Italian-American bakery classics. You’ll see them everywhere in Italian-American neighborhoods and bakeries, especially around the holidays.
Why do some recipes use yellow instead of white?
Some versions keep the middle layer the natural cake color (cream/yellow). It still looks beautifuland honestly, it’s one less bottle of food coloring to chase down.
Do I need three pans?
Not required. One pan works finejust bake in batches and re-line with parchment each time. The layers are thin, so they cool quickly.
Printable Recipe Card
Italian Rainbow Cookies (Tricolor Cookies)
Ingredients: almond paste, butter, sugar, eggs (separated), flour, salt, vanilla, optional almond extract, red/green gel coloring, jam (apricot/raspberry), semisweet or bittersweet chocolate.
- Preheat oven to 350°F. Line pan(s) with parchment and lightly grease.
- Beat almond paste with 3/4 cup sugar until sandy. Cream in butter.
- Add yolks one at a time. Mix in vanilla (and almond extract if using).
- Mix in flour + salt just until combined.
- Whip whites; gradually add remaining 1/4 cup sugar; beat to stiff peaks.
- Fold whites into batter gently.
- Divide into thirds; tint red and green; leave one plain.
- Spread each layer thinly; bake 8–12 minutes; cool completely.
- Stack with thin jam layers between; wrap and press under light weight; chill 4 hours or overnight.
- Coat with melted chocolate (top and bottom). Chill until set. Slice into small rectangles.
Experience Notes: What It Feels Like to Make These (And Why It’s Worth It)
Making Italian rainbow cookies is a little like building a tiny, delicious layer-cake skyscraperexcept the architect is you, the building materials are almond paste and jam, and the entire project is judged by how cleanly it slices. No pressure.
The first “experience moment” usually hits when you open the almond paste. It’s firm, a bit crumbly, and has the energy of a toddler who doesn’t want to put on shoes. That’s why the sugar step matters: beating almond paste with sugar first turns it from stubborn chunks into sandy crumbs that behave in a mixer. Once it’s creamed with butter, it starts to smell like a bakery display casewarm almond, buttery sweetness, and the feeling that you should probably put on cozy music.
Next comes the oddly satisfying part: spreading paper-thin batter. This is where most bakers learn the difference between “even” and “I thought that was even.” The batter wants to mound in the middle, so you nudge it out to the corners, smooth it, then smooth it again because apparently you’ve become the Michelangelo of sponge cake. The good news is that thin layers are forgiving: if one layer is slightly thicker, pressing later helps everything settle into a neat stack.
Coloring the batter is pure fun, but it’s also a small lesson in restraint. A little gel coloring goes a long way. Too little and your green looks like “vaguely minty regret.” Too much and you risk adding extra moisture or a slightly bitter tint. The sweet spot is bold but not neonlike festive, not highlighter.
The chilling-and-pressing step feels like the least exciting partuntil you skip it once and discover why it exists. Pressing is basically the grown-up version of “hold it together.” It helps the jam settle into the sponge so layers don’t skate around when you cut. If you’re the kind of person who loves clean edges and satisfying stripes, this is your moment: wrap tightly, press gently, and let time do the work.
Then there’s chocolate. Spreading melted chocolate on top is instant gratificationyour messy stack suddenly looks like a legit bakery slab. Flipping to coat the bottom is the only slightly dramatic move, but if the stack is well-chilled, it’s more “confident pancake flip” than “kitchen disaster documentary.” And slicing? That’s the final reward. You trim the edges and suddenly the stripes popred, white, green, jam lines, glossy chocolatelike you made edible stained glass.
The best part is how these cookies fit real life: they’re make-ahead friendly, they travel well, and they look impressive even if you’re not a pastry pro. Bring them to a party and people will assume you have secret baking powers. You don’t have to correct them. Just smile, accept compliments, and quietly keep the last few pieces “for quality control.”
Conclusion
Italian rainbow cookies may look fancy, but they’re really a simple, smart process: bake thin almond sponge layers, stack with jam, press, coat in chocolate, and slice into tiny masterpieces. Once you do it once, you’ll realize the real challenge isn’t the techniqueit’s not eating the offcuts before the tray is “photo-ready.”