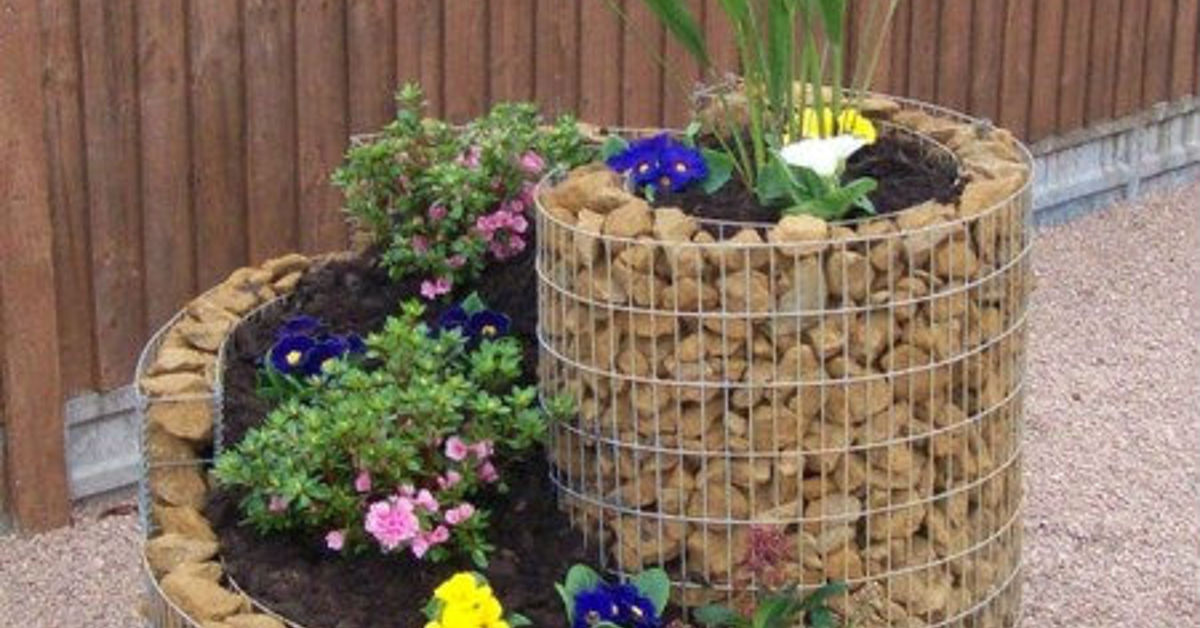

A herb spiral garden turns a small patch of ground into a compact, productive, and surprisingly attractive growing space. It is part raised bed, part garden sculpture, and part all-you-can-sniff buffet. By arranging the planting area in an ascending spiral, you can create sunny, dry zones near the top and cooler, moister zones near the bottom.
The design is especially useful for gardeners who want to grow several culinary herbs without devoting half the backyard to oregano. With a few basic tools, sturdy wall materials, good soil, and one reasonably energetic weekend, you can build a spiral that supplies fresh flavor for years.
What Is a Herb Spiral Garden?
A herb spiral is a circular raised bed that winds upward toward a high central point. Viewed from above, it resembles a snail shell. Viewed from the side, it looks like a tiny terraced hill that has decided to become useful.
The sloped design increases the amount of planting surface available within a relatively small footprint. A typical spiral is about five to six feet across, allowing most gardeners to reach the center without stepping into the soil. The middle may rise two to three feet, although the final height should reflect your materials, available soil, and ability to construct a stable wall.
Why the Spiral Shape Works
The structure creates several growing conditions within one bed. Water applied near the top moves gradually downward. The elevated center usually drains quickly and receives strong sunlight, while lower sections retain more moisture. The north-facing side may stay cooler, and the south- or west-facing portions often receive more heat.
These small environmental differences are often called microclimates. They let you place drought-tolerant Mediterranean herbs, such as rosemary and thyme, above herbs that appreciate more consistent moisture, such as parsley and chives.
A spiral will not produce tropical rain, Mediterranean sunshine, and an alpine breeze within six feet. It is clever garden design, not a weather machine. Nevertheless, the variation in drainage, exposure, and elevation can be genuinely useful.
Benefits of Building a Spiral Herb Garden
The most obvious benefit is efficient use of space. Because the planting surface rises vertically as well as spreading horizontally, a spiral can accommodate more plants than a flat circular bed of the same diameter.
Raised soil also tends to drain better than compacted ground. This is valuable for sage, lavender, oregano, rosemary, and other herbs that dislike sitting in wet soil. The walls absorb and release warmth, particularly when made from brick or stone, which may help heat-loving plants during cool nights.
The design improves accessibility as well. Herbs near the upper levels are easier to reach, and the concentrated layout makes watering, pruning, and harvesting more convenient. Locating the spiral near the kitchen can shorten the journey from plant to pasta sauce.
A well-planted herb spiral may also attract bees, butterflies, and other pollinators when herbs are allowed to flower. Basil, thyme, oregano, chives, dill, and lavender can all become valuable nectar sources. You may have to share the garden, but the bees rarely take more rosemary than they need.
Plan the Herb Spiral Before You Start
Choose a Sunny, Convenient Location
Select a level site that receives at least six hours of direct sunlight during the growing season. Many culinary herbs perform best in full sun, although parsley, cilantro, chives, and mint can tolerate some afternoon shade.
Observe the area before building. Note where shadows fall, where rainwater collects, and how far you will need to carry a watering can. A herb spiral hidden behind the garage may look charming in theory, but neglected basil does not care about theory.
Keep the bed away from buried utilities, septic components, aggressive tree roots, and roof runoff. The location should also provide enough surrounding room for construction and future harvesting.
Select the Right Diameter
A diameter of five to six feet works well for many home gardens. It provides useful planting space without making the center unreachable. Gardeners with short arms or limited mobility may prefer a four- or five-foot design.
Mark the proposed circle with stakes, string, landscape paint, or a garden hose. Stand around it and reach toward the center. This simple rehearsal can prevent the future discovery that harvesting thyme requires advanced yoga.
Consider Orientation
Use a compass or phone app to identify north, south, east, and west. In much of the Northern Hemisphere, placing the lowest end of the spiral toward the north can help create a cooler, moister pocket. Sun-loving plants can then occupy the upper southern and western sections.
Local conditions matter more than rigid rules. A fence, mature tree, house wall, or neighboring building can alter the pattern of light. Design according to the sunlight your garden actually receives rather than what a diagram promises.
Tools and Materials
Gather the materials before construction so the project does not pause halfway through while you conduct an emergency search for one more brick.
- Shovel or garden spade
- Rake
- Measuring tape
- String and several stakes
- Level or straight board with a level
- Plain, non-glossy cardboard
- Bricks, stones, concrete blocks, or pavers
- Small rocks or gravel for structural infill
- Screened topsoil or a raised-bed soil blend
- Finished compost
- Herb plants or seeds
- Mulch
- Optional drip-irrigation tubing
Choosing Safe Wall Materials
Stone, brick, concrete block, and landscape pavers are durable choices for an edible garden. Reclaimed materials can reduce costs, but their history matters. Avoid old railroad ties, creosote-treated wood, lumber with unknown chemical treatments, and materials contaminated by oil, industrial chemicals, or peeling paint.
Irregular fieldstones create a rustic appearance but require patient fitting. Uniform pavers and bricks are easier for beginners to stack. Dry-stacked walls usually work well for a modest spiral, provided the base is level and each course overlaps the joints below it.
How to Build a Herb Spiral Garden Step by Step
Step 1: Prepare the Ground
Mow or cut existing vegetation as low as possible. Remove woody weeds, large roots, rocks, and objects that would prevent the first wall course from sitting flat.
Cover the marked circle with overlapping sheets of plain cardboard. Remove tape, labels, staples, and glossy coatings first. Wet the cardboard thoroughly so it conforms to the ground. This layer suppresses grass and many annual weeds while gradually decomposing.
Persistent perennial weeds should be removed before construction. Cardboard is useful, but it is not a legally binding eviction notice for bindweed.
Step 2: Draw the Spiral
Place a stake in the center and mark the outer circle. Use a hose, rope, sand, or landscape paint to sketch a spiral that begins at the outside edge and curves inward toward the center.
Leave approximately 8 to 12 inches of planting space between adjacent wall sections. Wider planting bands accommodate larger herbs and make soil filling easier. Avoid creating a tight coil that leaves room for one thyme plant and three disappointed earthworms.
Walk around the design and make adjustments before stacking materials. Check that the low opening faces the preferred direction and that you can comfortably reach every planting zone.
Step 3: Install the First Course
Place the first layer of bricks, stones, or blocks directly along the marked line. This base course determines the stability of the entire structure, so take time to level it.
Excavate shallow pockets beneath high pieces or add compacted soil beneath low ones. Each unit should sit firmly rather than rocking. On sloped ground, it may be necessary to dig the high side into the soil and support the low side with compacted gravel.
Step 4: Build Up the Walls
Continue stacking along the spiral, gradually increasing the wall height as you approach the center. Overlap joints between courses as you would when building a brick wall. Leaning each course slightly inward can improve stability, especially when using irregular stone.
Add soil behind the wall as construction progresses. This supports the materials and reduces outward pressure. Do not build a tall empty shell and then dump soil into it with enthusiasm; that approach can push the walls outward.
The central section should be the highest point, but the transition must remain gradual. A finished height of roughly two to three feet is common for a five- or six-foot spiral. Shorter structures are perfectly functional and often easier to maintain.
Step 5: Create a Stable Center
The innermost core can contain small rocks, gravel, broken clean masonry, or other stable mineral fill. This reduces the amount of premium soil required and supports the highest wall section.
Keep enough depth above the fill for plant roots. Do not fill the entire center with rubble and cover it with two decorative inches of soil. Rosemary is drought-tolerant, not capable of photosynthesizing through a brick.
Use gravel as structural infill rather than spreading a thick gravel blanket beneath the entire bed. The finished spiral should allow excess water to move into the underlying ground or out through gaps at the base.
Step 6: Add the Soil Mixture
Fill the spiral with a blend of screened topsoil and mature compost. A roughly equal mixture is a practical starting point for many gardens, although a commercial raised-bed blend can also work. A six-foot spiral may require close to one cubic yard of material, depending on its height and the amount of structural fill used.
Adjust the mixture by zone. Add coarse composted bark, mineral grit, or extra well-drained soil near the top for Mediterranean herbs. Use a slightly more moisture-retentive blend with additional compost toward the bottom.
Avoid filling the bed with pure compost. Excessively rich soil may produce lush but weak growth, and some herbs develop better flavor in moderately fertile conditions.
Water the filled spiral thoroughly, wait several days for settling, and add more soil where necessary. It is much easier to correct the grade before planting than after the oregano has filed a permanent address change.
Step 7: Install Irrigation
Hand watering works for a small spiral, but drip tubing or a small soaker hose can improve consistency. Arrange the line along the planting path rather than placing a single emitter at the top and expecting gravity to distribute everything perfectly.
The upper section will usually dry faster than the lower section. Check soil moisture with a finger before watering. Apply water deeply enough to moisten the root zone, then allow the surface around drought-tolerant herbs to begin drying before watering again.
Where to Plant Herbs in the Spiral
Upper, Sunny, Fast-Draining Zone
Plant herbs that prefer warmth and excellent drainage near the top. Good candidates include:
- Rosemary
- Thyme
- Sage
- Oregano
- Winter savory
- Lavender, if the spiral is large enough
Check mature plant sizes before planting. Rosemary and lavender can become substantial shrubs in warm climates and may overwhelm a small spiral.
Middle Zone
The middle levels generally provide moderate drainage and moisture. Depending on local sunlight, this area can support basil, marjoram, tarragon, dill, cilantro, garlic chives, and compact varieties of oregano.
Place taller plants where they will not shade shorter herbs excessively. Dill may look delicate when young, but it can soon tower over its neighbors like a feathery green radio antenna.
Lower and Cooler Zone
The lower section is suitable for herbs that appreciate more regular moisture or tolerate some shade, including parsley, chives, cilantro, and certain types of mint.
Mint, lemon balm, and other enthusiastic spreaders should remain in buried containers with drainage holes. Leave the rim slightly above the soil line to discourage runners from escaping. Even then, inspect the plants periodically. Mint views garden boundaries as friendly suggestions.
Maintaining the Finished Herb Spiral
Apply a light mulch after planting. Fine gravel works well around dry-loving upper-zone herbs because it keeps foliage away from damp soil. Shredded leaves, clean straw, or composted bark can help conserve moisture in the lower section.
Harvest herbs regularly to encourage branching. Pinch flower buds from basil when leaf production is the priority, but consider allowing a few plants to bloom for pollinators. Never remove all the foliage from a plant at once; enough healthy growth must remain for recovery.
Most culinary herbs need only modest fertilization. Too much nitrogen can produce soft growth with diluted flavor. Base amendments on plant performance and, when possible, a soil test rather than feeding everything because the fertilizer bag looks lonely.
Inspect walls after heavy rain, freezing weather, or animal activity. Reset loose stones before a small shift becomes a dramatic collapse. Top up settled soil each spring and divide crowded perennial herbs when necessary.
Common Herb Spiral Mistakes
Building it too wide: A spiral that cannot be reached from the edge will eventually suffer from compacted soil because someone must step inside it.
Using unstable wall materials: Smooth, round rocks may roll or shift unless carefully fitted. A level base and overlapping courses are more important than artistic ambition.
Ignoring mature plant size: One large rosemary plant can shade several smaller herbs. Read plant labels and leave adequate spacing.
Overwatering every zone equally: The spiral is intended to provide different moisture levels. Water according to soil conditions and plant needs.
Planting mint without containment: This is less a gardening mistake and more an invitation to spend future weekends negotiating with roots.
Assuming the spiral is maintenance-free: It reduces some work, but herbs still need harvesting, pruning, watering, and occasional replacement.
Practical Experiences and Lessons From Building a Herb Spiral
A first herb spiral often begins as a tidy sketch with perfectly even walls, carefully labeled planting zones, and a heroic schedule that says the entire project will be finished before lunch. The real build usually introduces several educational details. Stones are heavier after the twentieth trip across the yard, the ground is never as level as it appeared, and the spiral shape may briefly resemble a confused cinnamon roll.
The most useful practical lesson is to spend extra time on the first course. Builders who rush the base often spend the afternoon correcting higher layers that lean outward. Builders who level each piece at the beginning may feel slow, but the remaining courses go up much more easily. Ten additional minutes with a level can save an hour of muttering at masonry.
Another common experience involves underestimating the amount of soil required. A spiral contains more volume than its compact footprint suggests, especially when the central section rises several feet. Ordering or mixing a little extra soil prevents an unfinished crater at the top. The remaining material can always be used to replace settling soil or refresh another garden bed.
Freshly filled beds also settle more than many gardeners expect. Watering before planting reveals low spots, air pockets, and unstable wall sections. Waiting a few days is even better. Plants installed immediately may end up sitting below grade after the soil drops, creating small basins that collect water around their crowns.
The first growing season teaches gardeners to treat the suggested planting map as a starting point, not a commandment carved into stone. A supposedly sunny section may receive afternoon shade from a nearby tree. A lower pocket may remain too wet after heavy storms, while an exposed upper ledge may dry out every day during a hot week. Moving a struggling herb is not admitting defeat; it is responding to evidence.
Plant spacing becomes another memorable lesson. Small nursery transplants create an understandable temptation to fill every open patch. By midsummer, basil may be leaning over chives, oregano may be exploring three postal codes, and sage may be blocking the path. Leaving visible soil between young plants can look unfinished in spring, but it usually produces a healthier spiral later.
Gardeners also discover that the most successful spiral is not necessarily the largest or most elaborate. A low, four-foot structure built from stable recycled bricks may outperform a towering stone monument that is difficult to water and harvest. The goal is not to impress passing landscape architects. The goal is to grow herbs that actually reach the kitchen.
Over time, the spiral becomes more personal. One gardener may dedicate the upper tier to pizza herbs, while another favors tea plants, pollinator flowers, or regional culinary varieties. Labels disappear, stones weather, and perennial herbs soften the original geometry. That gradual change is part of the appeal. A herb spiral begins as a construction project but develops into a living garden shaped by climate, cooking habits, and experience.
Conclusion
Learning how to build a herb spiral garden is mostly a matter of thoughtful planning, stable construction, and sensible plant placement. Choose a sunny site, keep the diameter within comfortable reach, level the first wall course, use a well-drained soil blend, and arrange herbs according to their mature size and moisture needs.
The result is a compact garden that combines practical food production with an eye-catching design. It will not eliminate every weed, water itself forever, or prevent mint from plotting an escape. It can, however, turn a modest patch of yard into a fragrant source of fresh basil, thyme, parsley, rosemary, and many other kitchen favorites.
Note: Herb choices, winter protection, planting dates, and watering frequency should be adjusted for your regional climate, USDA hardiness zone, rainfall, and local soil conditions.
SEO Metadata