
A fire breathing dragon cake sounds like something that should arrive on a velvet pillow while a wizard chants in the corner. In reality, you can make one at home with sturdy cake layers, buttercream, fondant or modeling chocolate, clever carving, and a safe special effect that suggests smoke or flame without turning the birthday party into a fire drill.
This guide walks you through how to make a fire breathing dragon cake that looks dramatic, tastes wonderful, and survives the journey from kitchen counter to party table. We will cover cake structure, carving, frosting, decorating, wings, scales, edible flames, and safe smoke-style effects. The goal is not just a cake shaped like a dragon. The goal is a centerpiece that makes guests say, “Wait, you made that?” while you casually pretend it was no big deal.
Important note: This cake uses a simulated fire-breathing effect. Avoid real flames, fireworks, sparklers, or anything that touches edible cake directly. If you use dry ice for fog, keep it completely separate from the edible portions, handle it only with gloves or tongs, use it in a ventilated area, and make sure no guest can touch, swallow, or drink from anything containing dry ice.
What Is a Fire Breathing Dragon Cake?
A fire breathing dragon cake is a sculpted cake designed to look like a dragon with flames, smoke, or glowing effects coming from its mouth. Some versions are simple sheet cakes decorated with a dragon face and candy flames. Others are full 3D cakes with carved cake bodies, fondant scales, raised wings, chocolate claws, and dramatic “breath” made from edible sugar flames, LED lights, or dry-ice fog placed in a separate hidden container.
For most home bakers, the best version is a medium-complexity sculpted cake: two or three cake layers for the body, cupcakes or cake scraps for the head and tail, buttercream for coverage, and fondant or modeling chocolate for details. It looks impressive without requiring professional bakery equipment or a dragon handler named Gary.
Supplies and Ingredients You Will Need
Cake and Filling
- Two 8-inch or 9-inch round cakes, chilled
- One 6-inch cake or 6 cupcakes for the head, neck, and tail
- Buttercream frosting, about 5 to 6 cups
- Jam, ganache, or buttercream filling
- Simple syrup, optional, for moisture
Decorating Materials
- Fondant or modeling chocolate in green, red, black, yellow, orange, and white
- Gel food coloring
- Edible dust or airbrush color, optional
- Black decorating gel or edible marker
- Candy melts or melted chocolate for horns, claws, and wing details
- Fruit leather, isomalt, hard candy, or fondant for flames
Tools
- Cake board, at least 14 inches wide
- Serrated knife
- Offset spatula
- Bench scraper
- Piping bags and star, round, and leaf tips
- Food-safe dowels or straws for support
- Toothpicks or skewers for non-edible support pieces
- Small food-safe cup or ramekin for optional fog effect
- Battery-powered LED tea light, optional
Choose the Right Cake Flavor and Texture
A sculpted dragon cake needs a cake that is moist but not too delicate. Super fluffy sponge cake can collapse when carved, especially around the neck and head. A sturdy chocolate cake, vanilla butter cake, red velvet cake, or pound-cake-style recipe works well. If you want a dramatic “dragon lair” vibe, chocolate cake with chocolate ganache filling is a fantastic choice. It tastes rich, carves neatly, and hides crumbs like a champion.
Chill the cakes before cutting. Cold cake is easier to level, stack, carve, and frost. A warm cake under buttercream is basically a landslide wearing frosting.
Step-by-Step Guide: How to Make a Fire Breathing Dragon Cake
Step 1: Bake and Cool the Cake Layers
Bake your cake layers one day ahead if possible. Let them cool completely, then wrap them tightly and refrigerate. If you are short on time, place the cooled layers in the freezer for 30 to 45 minutes before carving. The cake should feel firm, not frozen solid.
Level the domed tops with a serrated knife. Flat layers create a stable dragon body and prevent the cake from leaning like it just returned from a medieval tavern.
Step 2: Build the Dragon Body
Place one round cake on the cake board. Add a thin layer of filling, then stack the second cake on top. Cut the stacked round cake in half to make two half-moon pieces. Stand the two halves upright with the cut sides down, placing them back-to-back to form a curved dragon body. This simple trick gives the cake a raised, arched look without complicated sculpting.
Use buttercream between the two halves to glue them together. Add a few food-safe dowels or thick straws if the body feels wobbly. The dragon should look powerful, not nervous.
Step 3: Shape the Head, Neck, and Tail
Use the smaller cake, cupcakes, or cake scraps mixed with frosting to form the head, neck, and tail. Cake crumbs blended with buttercream create a moldable cake-clay mixture that works beautifully for sculpted details.
Form a tapered tail that curls around the body. Shape the head with a longer snout, raised brow, and slightly open mouth. The mouth is important because it will hold the “fire” effect. Keep the head proportional to the body; a giant head can look funny, but unless your dragon is going through an awkward cartoon phase, balance matters.
Step 4: Apply the Crumb Coat
Spread a thin layer of buttercream over the entire cake to trap crumbs. This is called the crumb coat, and it is the difference between a polished dragon and a lizard that rolled through a bakery floor. Chill the cake for 20 to 30 minutes, or until the frosting feels firm to the touch.
Once chilled, apply a second, smoother layer of buttercream. It does not need to be perfect if you are covering the cake with fondant scales or piped texture, but a neat base makes decorating much easier.
Step 5: Cover the Dragon With Scales
You have three main options for dragon skin: piped buttercream, fondant scales, or textured modeling chocolate. Buttercream is easiest and tastes great. Fondant creates a cleaner fantasy look. Modeling chocolate offers the best sculpting control and can be blended smoothly around the face and claws.
For buttercream scales, use a small round or star piping tip and pipe overlapping dots or shells across the body. Start at the tail and work toward the head so the scales layer naturally. For fondant scales, cut small circles, pinch one end, and press them onto the cake in rows. Use darker green or black shading along the spine and lighter green on the belly to create depth.
Step 6: Add Wings That Actually Stay Up
Dragon wings are where optimism sometimes goes to cry. Large edible wings can sag, tear, or flop backward if they are too heavy. For a home-friendly version, make smaller wings from fondant mixed with gum paste, modeling chocolate, or thin candy melts. Insert toothpicks, skewers, or food-safe supports into the wings, but clearly remove them before serving.
Let the wings dry in a curved position before attaching them. You can drape them over crumpled parchment paper or a rolling pin overnight. Attach them close to the body so they look strong and natural. Wings sticking straight out from the sides may look dramatic for three minutes, then choose gravity.
Step 7: Create the Face
The face gives your dragon personality. Use white fondant for eyes, black fondant or edible marker for pupils, and small cones of fondant or chocolate for horns. Add nostrils with a toothpick, press in brow ridges, and shape pointed ears or cheek spikes.
For a fierce dragon, angle the eyebrows downward and make the eyes narrow. For a kid-friendly dragon, use bigger eyes and a rounder snout. For a dragon that looks like it forgot its own birthday, place the pupils slightly off-center. This is not recommended, but it is hilarious.
How to Make the Fire Breathing Effect Safely
Option 1: Edible Sugar Flames
The safest and most practical flame effect is made with edible decorations. Use red, orange, and yellow fondant, fruit leather, melted hard candy, or isomalt to create flame shapes. Layer the colors from yellow in the center to orange and red on the outside. Insert the flames into the dragon’s mouth right before serving.
This method is fully edible, easy to control, and photogenic. It also avoids smoke, heat, and safety concerns. For most parties, edible flames are the best choice.
Option 2: LED Glow Flames
For a dramatic glow, place a small battery-powered LED tea light behind the edible flames or inside a hidden food-safe compartment near the dragon’s mouth. Do not bury electronics directly in cake. Wrap the light in a clean, food-safe barrier or place it in a small container that never touches the edible portion.
The effect is especially fun in a dim room. The dragon appears to glow from within, which is exactly the kind of theatrical nonsense birthday memories are made of.
Option 3: Dry-Ice Fog Effect
Dry ice can create a smoky fog effect, but it must be handled carefully. Dry ice is extremely cold and can injure skin or internal tissue if touched or swallowed. It also releases carbon dioxide gas, so it should never be used in a small, poorly ventilated room.
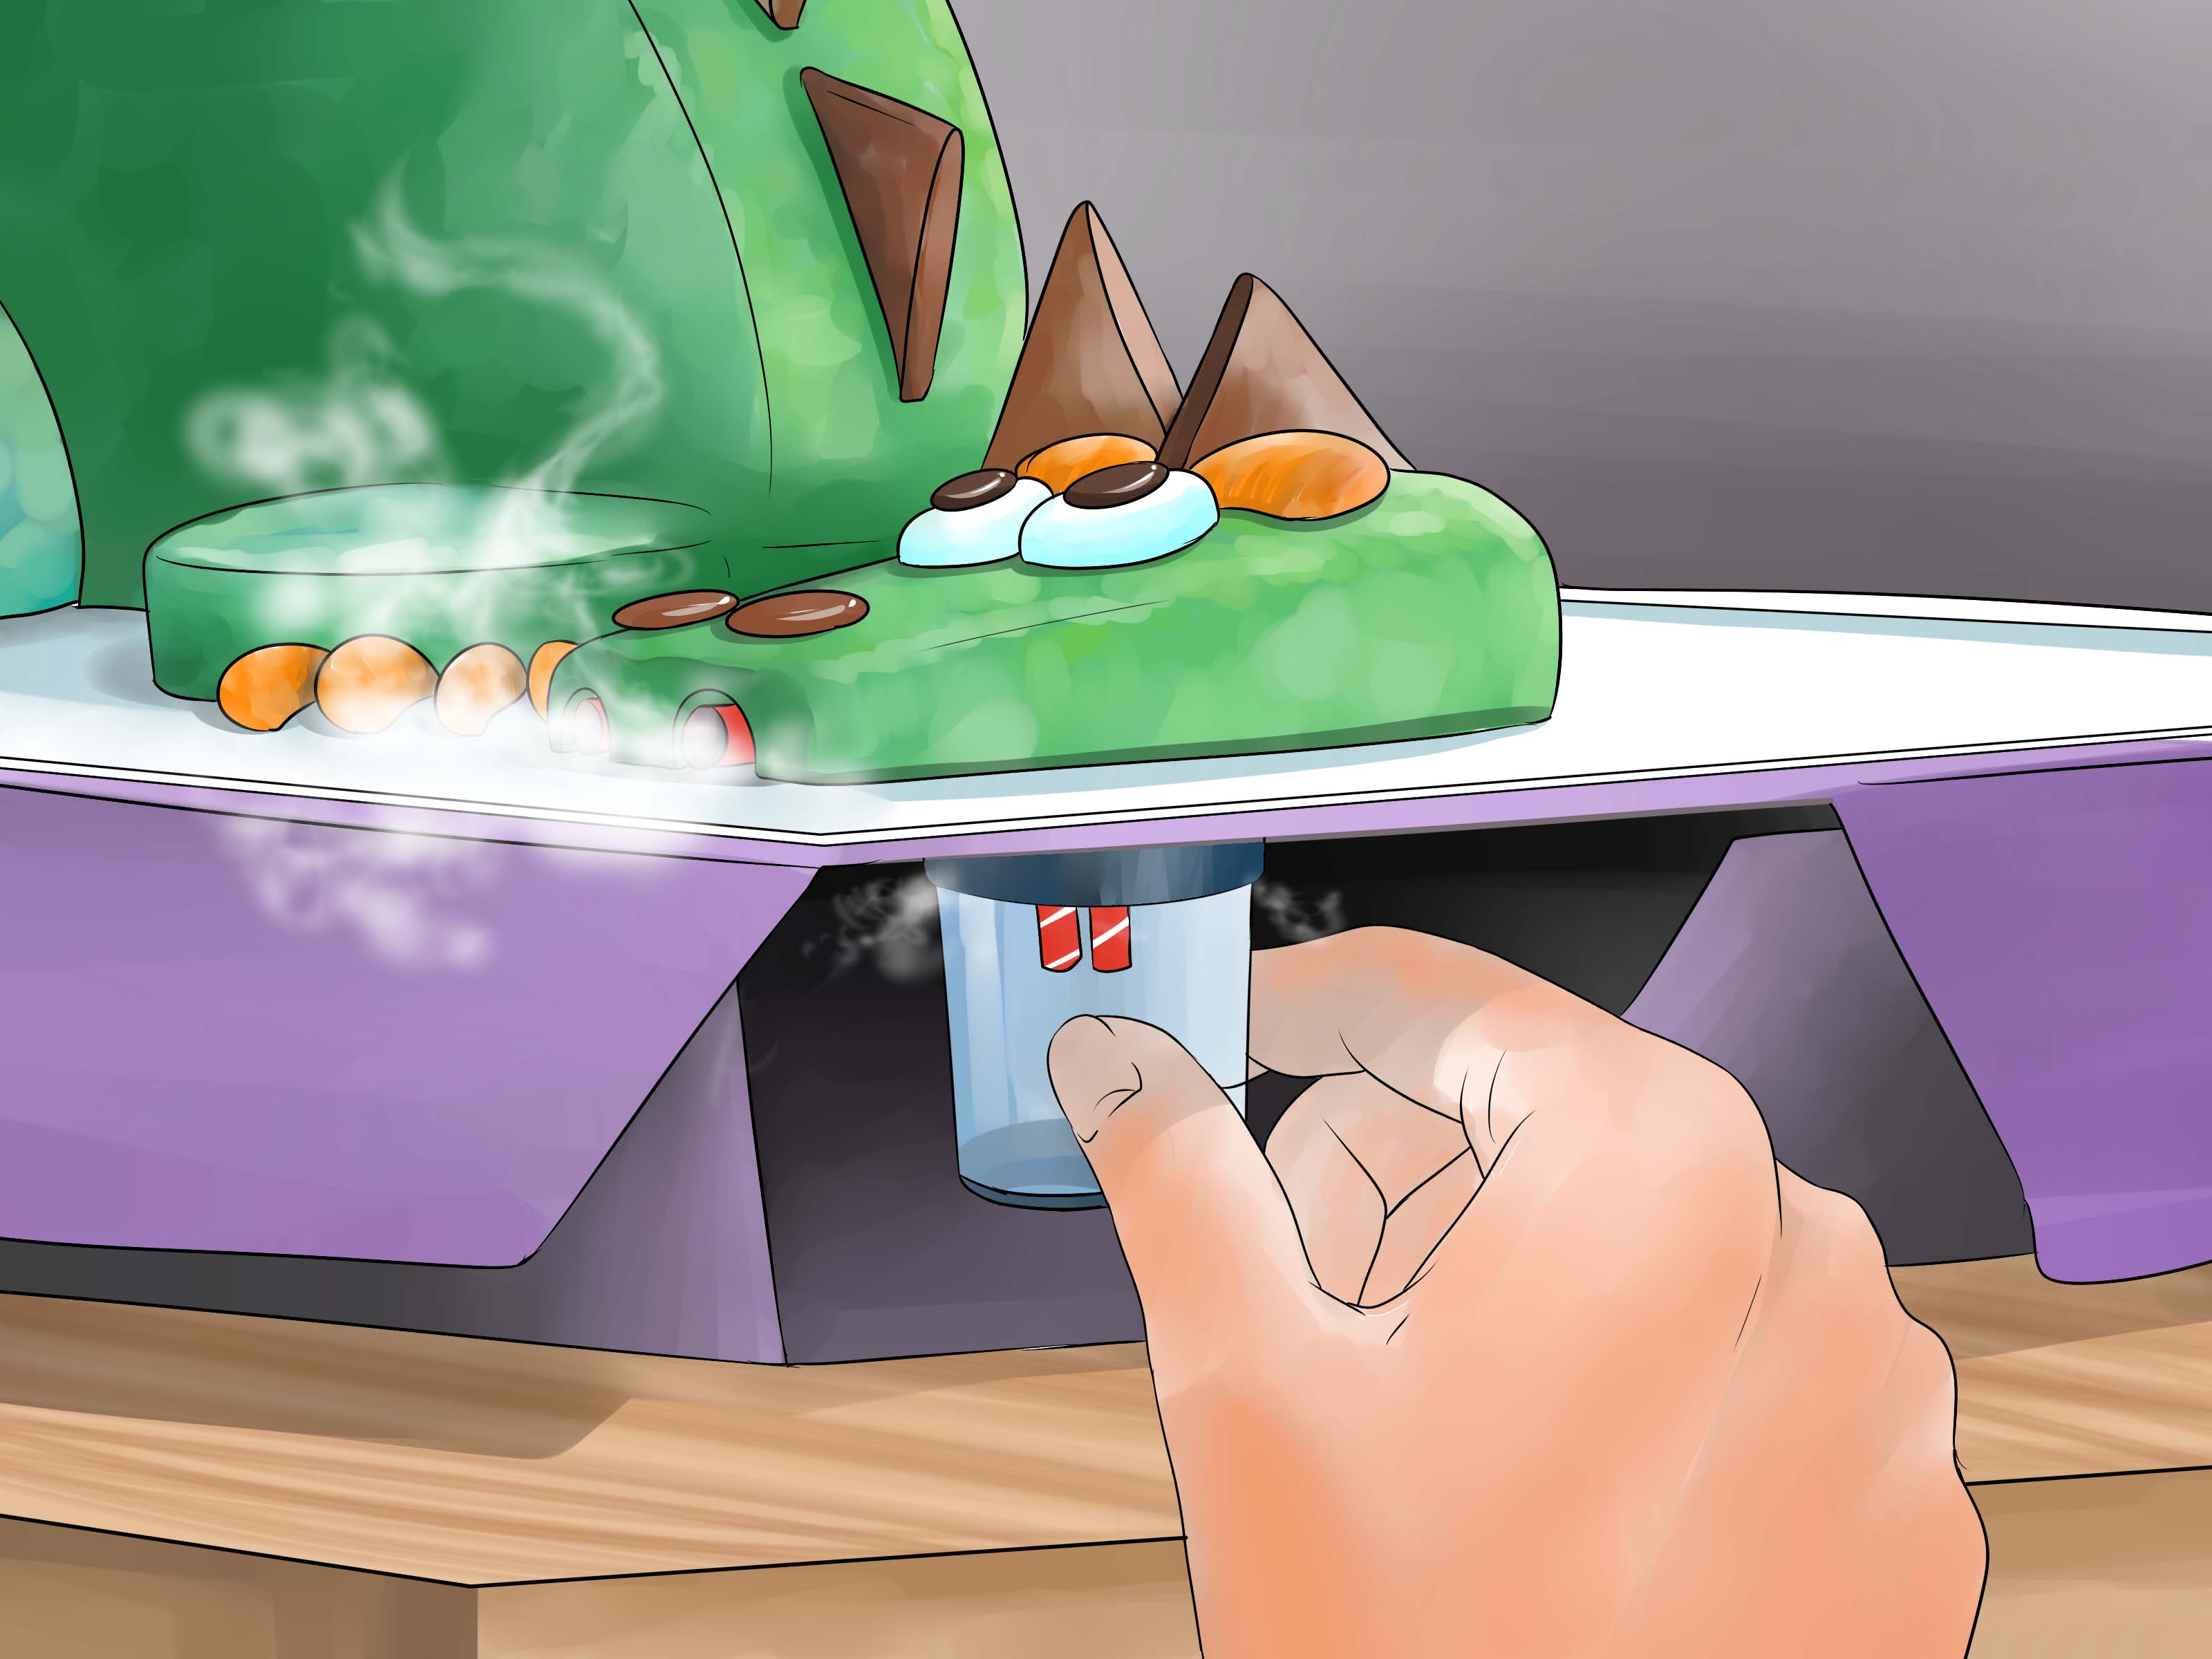
If you use dry ice, place a small food-safe cup or ramekin in front of the dragon’s mouth or hidden inside a non-edible display area. Add warm water to the cup, then use tongs to add a tiny piece of dry ice. The fog should roll outward like dragon breath. The dry ice must never be placed directly on the cake, inside a drink, or anywhere guests can touch it. Remove the container before cutting and serving.
For children’s parties, edible flames and LED lights are usually better than dry ice. They are simpler, safer, and nobody has to explain carbon dioxide sublimation while wearing a party hat.
Decorating Ideas for a Show-Stopping Dragon Cake
Add a Rocky Mountain Base
Turn the cake board into a dragon lair with crushed cookies, chocolate rocks, candy gems, and gray buttercream boulders. Chocolate sandwich cookie crumbs make excellent “volcanic dirt,” while rock candy looks like treasure. A few gold-wrapped chocolates around the tail instantly tell guests this dragon has a retirement plan.
Use Color Gradients
Dragons look more realistic when the color is not flat. Blend dark green, emerald, and lime tones along the body. Add bronze or gold highlights to scales. Dust the wing edges with black or brown for a smoky effect. Even simple shading makes the cake look more professional.
Pipe Spikes Along the Spine
Use fondant cones, candy corn, chocolate triangles, or piped buttercream spikes along the dragon’s back. Start with larger spikes near the head and gradually make them smaller toward the tail. This creates movement and helps guide the eye across the cake.
Common Mistakes to Avoid
Using Cake That Is Too Soft
Soft cake tastes lovely but may crumble when carved. Choose a sturdy recipe and chill it before shaping.
Skipping the Support
A 3D dragon cake needs structure. Use cake boards, dowels, and chilled frosting to keep the body steady.
Making the Wings Too Heavy
Oversized wings look amazing until they collapse. Keep them light, thin, and supported.
Adding Dry Ice Carelessly
Dry ice should be treated as a display effect, not an ingredient. Keep it separate, supervised, and away from guests.
Serving and Storing the Cake
Keep the finished cake refrigerated until one to two hours before serving, depending on your filling and room temperature. Buttercream-covered cakes can usually sit out for a short party window, but fillings with cream cheese, whipped cream, or custard need colder storage.
Remove all non-edible supports, skewers, lights, dry-ice containers, and decorative wires before slicing. Tell guests which decorations are edible. This is especially important if children are present, because kids see a shiny dragon horn and immediately think, “Snack.”
Experience Notes: What I Learned Making a Fire Breathing Dragon Cake
The first thing you learn when making a fire breathing dragon cake is that confidence and refrigeration are equally important. When the cake is warm, every detail feels like a negotiation with pudding. When the cake is chilled, suddenly you are a sculptor. The knife moves cleanly, the frosting behaves, and the dragon stops looking like a confused turtle.
Planning also matters more than artistic talent. Before decorating, sketch the dragon from the side. Mark where the body, head, tail, wings, and fire will go. Even a rough drawing helps prevent the classic problem of building a beautiful body and then realizing the head has nowhere to sit. A dragon cake needs a layout the way a road trip needs a map, unless you enjoy panic as a design strategy.
Another useful lesson is to work in stages. Bake one day, carve and crumb coat the next, then decorate after the cake has chilled. Trying to do everything in one afternoon can work, but it often turns into a race against soft frosting, messy counters, and your own dramatic sighing. Staging the project makes the cake more enjoyable and gives details like wings and horns time to firm up.
For the fire effect, edible flames are the most reliable. Thin pieces of red, orange, and yellow fondant can look surprisingly dynamic when layered and curled. If you want more sparkle, brush them with edible gold dust or place an LED tea light behind them. The glow creates a magical effect without smoke, heat, or nervous relatives hovering near the dessert table.
If you choose the dry-ice fog route, test it before the party. The fog looks best when the container is small, the water is warm, and the dragon’s mouth is angled toward the cup. Do not improvise this part in front of guests. A practice run helps you understand how much fog appears, how quickly it fades, and where the container should sit. It also gives you time to confirm that the effect is safely separated from the cake.
Finally, remember that personality beats perfection. A slightly crooked smile, uneven scales, or chunky tail can make the dragon more charming. Guests are not inspecting your cake with a pastry-school grading rubric. They are seeing a dragon that breathes fire. That is already a victory. Add candles around the base, dim the lights, bring out the cake, and enjoy the moment when everyone reaches for a phone before reaching for a fork.
Conclusion
Learning how to make a fire breathing dragon cake is part baking project, part sculpture session, and part tiny theatrical production. Start with sturdy chilled cake, shape the body with simple carving, lock crumbs in with a crumb coat, and decorate with scales, wings, horns, claws, and bold color. For the fire-breathing moment, choose safe edible flames, LED glow effects, or a carefully controlled dry-ice fog display kept completely separate from the cake.
The best dragon cake does not need to be flawless. It needs structure, imagination, and enough frosting to forgive small mistakes. Build it patiently, keep safety first, and your finished cake will look like it flew straight out of a fantasy story and landed on the dessert table with excellent timing.