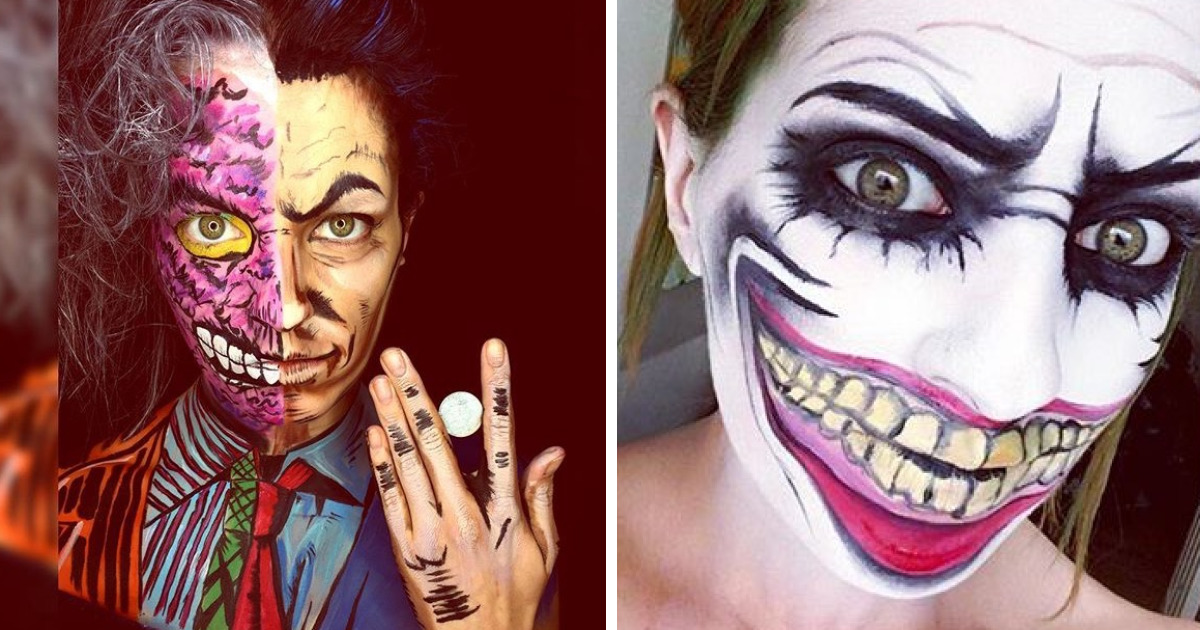

Superhero and villain facepaint creations have a special kind of magic. One minute, a kid is standing in line at a birthday party holding a juice box. Ten minutes later, they are a lightning-powered protector of the playground, a mysterious masked vigilante, or a dramatic villain with eyebrows so intense they could start a thunderstorm. Face painting turns imagination into something visible, colorful, and instantly exciting.
Whether you are planning a Halloween party, school carnival, comic-themed birthday, cosplay event, or weekend craft session, superhero face paint and villain face paint designs offer endless creative possibilities. The best part is that these looks do not require a Hollywood makeup trailer or a suitcase full of secret gadgets. With skin-safe face paint, a few brushes, sponges, clean water, and a little planning, you can create bold designs that look impressive without taking all day.
This guide explores popular superhero and villain facepaint ideas, safe application tips, design techniques, color choices, and real-world experience from painting faces at events. Think of it as your friendly headquarters for creating heroic masks, dramatic scars, glowing power effects, comic-book shadows, and villainous expressionsminus the evil laugh, unless you really want to practice one.
Why Superhero and Villain Face Paint Is So Popular
Superheroes and villains are easy for people to recognize because they rely on strong visual language: masks, sharp lines, bold colors, symbols, dramatic contrast, and memorable expressions. A red-and-blue web mask, a green monster brow, a black bat-inspired eye shape, or a purple villain design can tell a story before the person even says a word.
Face paint is also more flexible than a costume mask. Masks can block vision, feel hot, or slide around during play. A painted design stays on the face, allows better movement, and can be customized for each person. For children, that means they can run, laugh, snack, and dramatically announce that they are “saving the universe” without pushing plastic eyeholes back into place every thirty seconds.
Face Paint Safety Comes First
Before the glitter, lightning bolts, and villain eyebrows appear, safety needs to be the main character. Face paint should be cosmetic-grade and intended for use on skin. Craft paint, acrylic paint, markers, and ordinary glitter should not be used on the face. These products may say “non-toxic,” but that does not mean they are safe for skin, eyes, lips, or long wear.
Choose Skin-Safe Products
Use face paints labeled for cosmetic use and check the ingredient list, especially for children or anyone with sensitive skin. Water-based face paints are popular because they are generally easier to apply and remove. Professional face painters often prefer quality brands that are designed specifically for body art because they provide stronger color, smoother coverage, and better control.
Patch Test Before the Big Transformation
A small patch test is a smart step, especially for kids with allergies, eczema, or sensitive skin. Apply a little paint to the inside of the arm and wait to see whether redness, itching, swelling, or irritation appears. If the skin reacts, skip that product. No superhero origin story should begin with a rash.
Keep Paint Away From Eyes, Lips, and Broken Skin
Even when using cosmetic-grade paint, avoid applying product too close to the eyes unless the label says it is safe for that area. Do not paint over cuts, sunburn, acne flare-ups, or irritated skin. If a child keeps rubbing their face or seems uncomfortable, remove the design gently.
Clean Tools Between Faces
At events, hygiene matters. Use clean sponges, rinse brushes often, and avoid double-dipping into paint with dirty tools. A professional setup usually includes clean water, separate tools, paper towels, sanitizer, and a plan for keeping supplies organized. The goal is to spread joy, not germs in a cape.
Essential Tools for Superhero and Villain Facepaint Creations
You do not need an enormous kit to get started, but having the right tools makes a huge difference. A basic superhero and villain face painting kit should include:
- Cosmetic-grade face paints in primary colors, black, white, green, purple, silver, and gold
- Round brushes for line work and details
- Flat brushes for edges, masks, and block shapes
- Soft sponges for smooth base color
- Stencils for stars, lightning bolts, webs, scales, and comic dots
- Cosmetic glitter or shimmer powder approved for skin use
- Clean water cups and paper towels
- Gentle makeup remover or mild soap for cleanup
For beginners, black and white are the secret weapons. White creates highlights and shine. Black adds outlines, shadows, and drama. A simple red mask becomes instantly more professional when it has crisp black edges and a tiny white highlight that says, “Yes, I have watched tutorials and I am very powerful now.”
Best Superhero Face Paint Ideas
1. Classic Hero Mask
The classic hero mask is one of the easiest and most requested superhero face paint designs. Paint a bold mask shape around the eyes using red, blue, black, purple, or green. Add sharp points at the sides for energy, then outline the mask in black. Finish with white highlights along the top edge and near the corners of the eyes.
This design works for nearly any hero theme. Red and blue feel energetic and friendly. Black and gold look sleek and mysterious. Purple and silver give the design a futuristic style. For younger kids, keep the mask light and simple. For older kids or adults, add shadows, symbols, or metallic accents.
2. Web-Slinger Inspired Face Paint
A web-inspired superhero look is a party favorite because it is instantly recognizable and visually exciting. Start with a red mask or half-face base. Use black lines to create webbing that spreads from the center of the forehead or between the brows. Add large white eye shapes if you want a more comic-book look.
The trick is to make the web lines curved rather than perfectly straight. Curved lines follow the face better and look more dynamic. Add a few white highlights on the web strands to create dimension. This design is excellent for kids who want something heroic but not too scary.
3. Lightning Power Hero
Lightning designs are fast, bold, and great for busy events. Use yellow, blue, or white lightning bolts across one eye or down one cheek. Add a darker outline for contrast and small spark shapes around the edges. A little cosmetic shimmer can make the bolt look electric.
This is a strong choice when time is limited because it delivers big impact without covering the whole face. It also works well for children who do not like sitting still. In face painting language, a quick lightning bolt is the emergency snack of designs: simple, reliable, and saves the day.
4. Shield Hero Design
A shield-inspired face paint design can be painted on the cheek, forehead, or as a half-mask. Use circles, stars, stripes, or metallic colors to create a bold defender theme. This style is especially good for patriotic superhero looks or original characters invented on the spot.
For a cheek design, start with a circle or badge shape. Add a star in the center, outline it, and use white highlights to make it pop. For a full-face version, paint a strong mask and place the shield symbol on the forehead.
5. Futuristic Tech Hero
Tech-inspired heroes are perfect for metallic colors, circuit lines, robotic panels, and glowing effects. Use silver, black, blue, and white to build angular shapes across the cheekbones and forehead. Add thin lines that look like circuits, then place small dots at the ends to suggest energy nodes.
This look works especially well for older kids, teens, and adults who want something cooler than a standard mask. It also photographs beautifully because the lines create structure and shine.
Best Villain Face Paint Ideas
1. Dark Villain Mask
A dark villain mask uses dramatic shapes, sharp angles, and deeper colors. Black, purple, red, green, and silver are popular choices. Paint around the eyes in a pointed mask shape, then extend the edges upward or downward for a more sinister effect.
The eyebrows matter. A villain design with soft brows looks confused. A villain design with angled brows looks ready to monologue from a rooftop. Use black lines above the eyes to create expression, then add white highlights for contrast.
2. Green Monster Villain
Green is a classic villain and monster color because it feels unnatural, bold, and theatrical. Use a green base around the forehead, cheeks, or full face. Add dark shadows under the cheekbones and around the eyes. A few black cracks, stitches, or expression lines can make the design more intense without making it too scary for children.
For younger kids, keep the monster playful with rounded shapes and big brows. For teens or adults, increase the contrast and add more shadow. The same green paint can go from “friendly swamp buddy” to “laboratory experiment with unresolved issues” depending on the line work.
3. Comic Book Villain
A comic book villain design uses exaggerated features, graphic outlines, and bright color blocks. Try purple around one eye, red on the cheek, a black dramatic brow, and white shine marks. Add small dots or motion lines to imitate printed comic art.
This style is great for parties because it looks bold from a distance. It also allows plenty of creativity. You can create an original villain persona with a name like Captain Chaos, The Snack Thief, or Professor Homework. Terrifying, obviously.
4. Ice Villain
An ice villain face paint design feels elegant and sharp. Use pale blue, white, silver, and dark blue shadows. Paint icy spikes around the eyes or across the forehead. Add snowflake stencils, glitter, and white highlights to create a frozen effect.
This is a great alternative to darker villain designs because it feels dramatic without being too frightening. It works beautifully for winter events, fantasy parties, and anyone who wants to look like they could freeze a cupcake from across the room.
5. Fire Villain
A fire villain design uses red, orange, yellow, and black. Paint flame shapes rising from one side of the face or around the eyes. Keep the yellow near the center of the flames and blend outward into orange and red. Black outlines make the design sharper and more intense.
Fire designs are high-energy and excellent for action-themed events. They also work well as half-face designs, which are faster to paint and easier to wear than full-face coverage.
How to Build a Face Paint Design That Looks Professional
Start With a Clear Shape
Every strong face paint design begins with a readable shape. For superheroes, that might be a mask, shield, lightning bolt, or emblem. For villains, it might be a sharp eye shape, cracked texture, flame pattern, or dramatic brow. If the base shape is clear, the design will look intentional even before details are added.
Use Contrast Wisely
Contrast is what makes face paint visible in photos and from across a room. Light colors need dark outlines. Dark colors need white highlights. Without contrast, even a good design can look flat. A simple rule: outline the important parts and highlight the raised areas such as the brow, cheekbone, and bridge of the nose.
Blend, Then Define
Sponges are useful for soft gradients, especially around the eyes and forehead. Brushes are best for definition. Blend the base first, then add sharp lines. If you add line work too early, it may smear while you are still applying color.
Let the Face Guide the Design
A face is not a flat piece of paper. Cheeks move. Eyebrows lift. Noses exist and insist on being included. Follow the natural curves of the face rather than forcing straight lines everywhere. Designs that follow the cheekbones, brow line, and jaw usually look more comfortable and professional.
Superhero and Villain Face Paint for Different Events
Birthday Parties
For birthday parties, speed matters. Choose designs that can be completed in three to five minutes, such as hero masks, lightning bolts, cheek shields, and mini villain eyes. Offer a small menu of designs so children can choose quickly. Too many choices can turn the line into a dramatic council meeting.
Halloween
Halloween allows more detail because the face paint often completes the costume. Full-face heroes, monster villains, fire effects, skull-inspired villains, and comic-book designs all work well. Make sure the paint is removed before bedtime to reduce the chance of irritation.
School Carnivals and Community Events
For larger events, keep designs bold and efficient. Half-face masks, forehead symbols, and cheek art are practical. Use stencils for stars, webs, or bolts to save time. Always keep supplies clean and organized because event lines can grow faster than a superhero sequel announcement.
Cosplay and Photo Shoots
Cosplay face paint can be more detailed and layered. Add shading, contouring, metallic effects, prosthetic-safe adhesives if appropriate, and carefully placed highlights. Adults and teens may want more realistic shadows or character-inspired details. Always test products in advance, especially for long wear.
Common Mistakes to Avoid
- Using craft paint: It is not made for skin and should not be used as face paint.
- Skipping the outline: Without outlines, designs often look unfinished.
- Painting too close to the eyes: Keep sensitive areas safe and comfortable.
- Overloading the sponge: Too much water makes paint streaky; too little makes it patchy.
- Making every design full-face: Half-face and cheek designs are faster and often more comfortable.
- Forgetting removal: Face paint should be washed off gently at the end of the event.
Easy Step-by-Step Superhero Mask
- Use a sponge to apply the main color around both eyes in a mask shape.
- Extend the sides into points for a fast, heroic look.
- Outline the mask with black face paint using a round brush.
- Add a symbol, star, web, or lightning bolt on the forehead or cheek.
- Place white highlights along the upper edge and near the outer corners.
- Add cosmetic glitter if desired, but only if it is safe for skin.
Easy Step-by-Step Villain Eye Design
- Choose a dark or bold color such as purple, green, red, or black.
- Paint a sharp shape around one eye, extending upward at the brow.
- Add a dramatic black eyebrow line angled toward the center of the face.
- Blend a darker shadow under the eye or along the cheekbone.
- Add cracks, flames, ice spikes, or dots depending on the villain theme.
- Finish with white highlights for shine and depth.
Creative Color Combinations That Work
Color can instantly communicate personality. Red and blue feel classic, brave, and energetic. Black and gold feel sleek, rich, and mysterious. Green and purple are perfect for villains, monsters, and science-gone-wrong characters. Silver and blue create a tech or ice effect. Orange and red make fire designs look hot and powerful.
For kids, bright colors usually win. For adults, stronger contrast and darker shading can create a more dramatic look. When in doubt, choose three colors: one main color, one shadow color, and one highlight color. That simple formula keeps designs clean instead of turning the face into a tiny abstract painting with commitment issues.
Face Paint Removal and Aftercare
Removing face paint properly is just as important as applying it. Use mild soap, warm water, and a soft cloth. For stubborn areas, use a gentle makeup remover or cleansing balm. Avoid harsh scrubbing, especially around the eyes. After the paint is removed, apply a light moisturizer if the skin feels dry.
Never let children sleep in face paint. Even safe cosmetic paint can irritate skin if worn too long, and it can transfer to bedding or get into the eyes. A clean face before bed is the final heroic act of the day.
Experience Notes: What Real Face Painting Events Teach You
After working with superhero and villain facepaint creations in real event-style settings, one lesson becomes clear very quickly: the design is only half the job. The other half is managing excitement. Kids do not simply ask for a superhero mask. They arrive with a full cinematic universe in their heads. One child wants to be a spider hero, but also a dragon, but also “kind of a robot,” and can you add flames? Another wants to be a villain, but not too scary, because Grandma is taking pictures and Grandma has opinions.
The best approach is to listen first, then simplify the idea into a design that can actually fit on a face. A child may request five different powers, but you can translate that into a blue mask, yellow lightning, and silver tech lines. They still feel heard, and the final design looks clean. This is where face painting becomes a tiny negotiation between imagination and cheek space.
Another practical experience is that line work changes everything. Beginners often focus on filling in color, but professional-looking superhero face paint depends on clean outlines, confident brush strokes, and highlights. A red eye mask without black edges may look like a tomato had an emotional afternoon. Add crisp black lines and white shine marks, and suddenly it becomes a heroic comic-book design.
Villain designs teach a different lesson: expression is power. A simple purple mask can look friendly or fierce depending on the angle of the brows. Downward inward angles create intensity. Sharp cheek lines create mystery. Dark shadows make the face look more dramatic. Even a child who asks for a “bad guy face” usually does not need anything frightening. They want drama, confidence, and maybe permission to say “mwahaha” once or twice.
Speed also matters. At a busy party, the most successful designs are repeatable. A face painter who can offer five strong options will usually create a better experience than someone trying to invent a brand-new masterpiece for every guest. Hero mask, web mask, lightning bolt, villain eye, and fire cheek design can cover most requests. Small variations in color make each one feel personal.
Comfort is another big factor. Some children love full-face paint. Others start wiggling after the first brush stroke. For sensitive or younger kids, cheek designs are often better than full masks. A small shield, mini web, lightning bolt, or villain flame can feel exciting without overwhelming them. It is always better to finish a smaller design happily than to battle through a full-face look while the child slowly melts into the chair like a bored sidekick.
Parents usually appreciate safe choices and easy removal. Mentioning that the paint is cosmetic-grade, water-based, and should be washed off before bed builds trust. It also reminds everyone that face paint is makeup, not permanent membership in a secret league of heroes.
The most rewarding moment is the mirror reveal. Children often sit very still while being painted, then suddenly light up when they see the finished design. Some stand taller. Some strike poses. Some immediately run to show a sibling, which is both adorable and a warning that you are about to receive another customer with very specific creative demands.
Superhero and villain facepaint creations work because they give people permission to play. They turn an ordinary afternoon into a story. They let shy kids become bold, energetic kids become even more theatrical, and adults remember that a little paint can still make life feel fun. The tools are simple, but the effect is huge: color, confidence, imagination, and a face that says, “Yes, I am absolutely ready to save the partyor possibly take it over.”
Conclusion
Superhero and villain facepaint creations are more than party decorations. They are wearable stories. With safe products, clean tools, smart color choices, and a few reliable techniques, anyone can create designs that feel bold, imaginative, and memorable. Start with simple shapes, build contrast with outlines and highlights, and choose designs that match the event, age group, and comfort level of the person being painted.
Whether you are painting a classic hero mask, a web-slinger design, a lightning-powered protector, a green monster villain, or an icy mastermind, the key is balance. Make it fun, make it safe, and make it readable from across the room. Because when face paint is done well, it does not just sit on the skinit transforms the whole mood of the day.
Note: This article is written for web publishing and is based on current real-world face painting safety practices, cosmetic-use guidance, and common professional face painting techniques.