
Note: This article is written as an original, publication-ready synthesis based on real retro-computing knowledge, historical PC controller documentation, emulator behavior, and hands-on DIY controller practices.
There is a special kind of joy in playing old PC games on hardware that sounds like it is warming up for a small aircraft takeoff. The CRT hums, the Sound Blaster crackles, DOS asks you to remember commands you have not typed since dial-up internet, and thenright when the nostalgia is perfectyou try to play an arcade game with the arrow keys. Suddenly your retro paradise feels like doing surgery with oven mitts.
That is where an analog joypad for your retro PC becomes more than a cute weekend project. It becomes the missing bridge between the console-like comfort we remember and the wonderfully awkward reality of early PC gaming. Before USB controllers became boringly convenient, PC gamers relied on the classic 15-pin game port, analog joysticks, early gamepads, and a surprising amount of calibration patience. Building, buying, or adapting an analog joypad today can make DOS games, Windows 95 classics, flight sims, racing titles, platformers, and emulated setups feel far more natural.
This guide explores what an analog retro PC joypad is, how the old PC game port works, what makes analog controls different from digital pads, which parts matter, and how to get a reliable setup without turning your desk into an archaeological dig site.
What Is an Analog Joypad for a Retro PC?
An analog joypad for a retro PC is a handheld controller that uses variable electrical signals to represent direction or movement. Unlike a purely digital D-pad, where left is simply “on” or “off,” an analog stick can report a range of positions. Push it slightly and the signal changes a little. Push it fully and the signal reaches the far end of its range. This is especially useful for games that expect proportional input, such as flight simulators, racing games, space combat titles, and certain action games with joystick support.
On classic IBM PC-compatible systems, this usually means working with the 15-pin game port, commonly found on sound cards such as Sound Blaster-compatible cards, dedicated joystick cards, and some multifunction I/O cards. The port could support up to four analog axes and four buttons, which typically meant two basic joysticks with two buttons each, or one more capable controller if the software knew what to do with it.
The funny part is that PC gaming did not grow up like console gaming. Consoles standardized around controllers early. PCs were business machines first, gaming machines second, and “whatever is plugged into the back of the sound card” machines third. As a result, controller support in old games can vary wildly. One game may love your joystick. Another may need calibration. A third may behave as if your controller is possessed by a tiny goblin who only wants to move left.
Why Retro PC Controllers Feel So Different
Modern controllers hide almost everything from the player. Plug in a USB or Bluetooth gamepad, and the operating system usually identifies it instantly. With retro PC hardware, the controller often behaves more like a measuring device. The computer is not simply asking, “Is the player pressing left?” It may be timing how long a capacitor takes to charge through a potentiometer. That sounds like a physics homework problem wearing a gaming hat, because it kind of is.
Classic analog PC joysticks used potentiometers on the X and Y axes. As the stick moved, resistance changed. The game port hardware and software interpreted that change as position. This design was clever, affordable, and flexible, but it also meant that calibration mattered. Center position, maximum travel, noisy pots, cable quality, CPU speed, and software timing could all affect the result.
Analog vs. Digital Input
A digital controller sends simple states: pressed or not pressed. This is perfect for platformers, fighting games, menu navigation, and arcade-style action. An analog controller sends a range of values. This is better for steering, throttle-like control, aiming in certain old 3D titles, and smooth movement.
The complication is that many handheld joypads look digital but may be wired to behave like analog devices. For example, a D-pad can be connected through resistors or switches so that the PC sees directional input through analog axis lines. The classic Gravis GamePad helped popularize console-like control on PCs, but it still had to live within the limitations of the standard PC game port. That meant clever switches, compatibility modes, and support that depended on the game.
The Classic 15-Pin Game Port Explained
The old PC game port used a DA-15 connector, often casually called a DB-15 by users. It carried power, ground, button lines, and analog axis inputs. In the standard setup, the port could read four axes and four buttons. That was enough for two simple two-button joysticks or one controller using multiple axes and buttons.
Many sound cards included this connector not only for joysticks but also for MIDI breakout cables. This is why retro PC setups often have one port doing double duty: joystick in the afternoon, external MIDI module in the evening, and cable confusion at all hours.
Why Calibration Is Part of the Retro Charm
Old analog controllers are rarely perfect. Potentiometers wear out. Springs get tired. Center positions drift. Some games ask you to move the joystick to the upper-left corner, lower-right corner, center, and then press a button. Others silently calibrate on startup. Some do neither and simply assume the universe is kind.
When using an analog joypad, expect to adjust dead zones and sensitivity. In DOS games, this may happen inside the game’s setup utility. In Windows 95 or Windows 98, you may use the Game Controllers control panel. In DOSBox or DOSBox-X, joystick settings may need to be adjusted per game, especially when a title depends on timing-sensitive joystick routines.
Why Build an Analog Joypad Instead of Buying One?
You can still find vintage PC joysticks and gamepads online, but condition is a gamble. A controller may look beautiful in photos and still arrive with scratchy pots, sticky buttons, or a cable that has the emotional stability of wet spaghetti. Building your own analog joypad gives you control over the layout, parts, and feel.
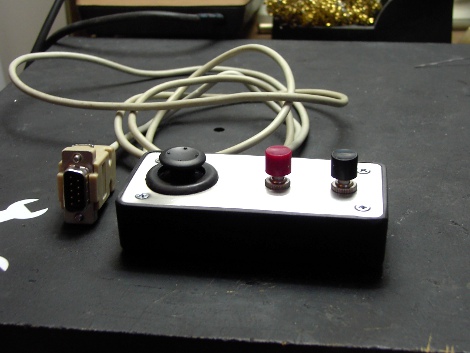
A DIY analog joypad can use a modern thumbstick module, arcade-style buttons, tactile switches, a custom enclosure, and a cable wired for the target machine. Builders have made analog joypads for IBM-compatible PCs, Apple II systems, Commodore machines with adapters, and modern USB translation projects. The concept is simple: create a comfortable handheld controller that outputs signals the old hardware can understand.
Benefits of a Custom Analog Joypad
A homemade controller lets you choose the ergonomics. Want a thumbstick on the left and four buttons on the right? Easy. Want bigger buttons for arcade games? Do it. Want a compact box that looks like it escaped from a 1980s electronics catalog? Even better. Retro computing rewards personality. Nobody is going to judge your project enclosure unless you use hot glue like cake frosting, and even then, half the hobby will quietly respect the hustle.
You can also make practical improvements. Add trim potentiometers for calibration. Use a sturdier cable. Install a removable connector. Add labels. Provide access holes for adjustment screws. Use quality buttons that can survive enthusiastic gameplay, because “just one more level” has destroyed many cheap switches.
Parts You Need for a DIY Analog Joypad
The exact parts depend on the target system, but a typical analog joypad project may include:
- An analog thumbstick module or small joystick with two potentiometer axes
- Two to four push buttons or microswitches
- A project enclosure, preferably comfortable enough to hold
- Perfboard or a small custom PCB
- Resistors, capacitors, or trim potentiometers for matching expected values
- A DA-15 cable or connector for classic PC game ports
- Basic tools such as a soldering iron, drill, file, multimeter, and patience
The multimeter deserves special mention. It is the truth-teller in the room. Before wiring a thumbstick, measure the resistance range of each axis. Many modern thumbsticks use 10K potentiometers, while older systems or controller circuits may expect different ranges. If the resistance range does not match, you may need extra circuitry, calibration adjustment, or a conversion approach.
Compatibility: DOS, Windows 9x, and Modern Emulation
Compatibility is where retro PC controllers get interesting. A simple two-axis, two-button analog controller is the safest option for broad DOS support. Many games recognize it because it matches the classic joystick model. Add more buttons and the situation becomes more game-dependent.
Some controllers used clever methods to work around the limitations of the game port. Microsoft SideWinder gamepads and certain advanced joysticks used digital protocols over the game port, allowing more buttons and features. However, those features often required specific drivers and were more at home in Windows 95 or Windows 98 than pure DOS. A basic analog joypad may be less flashy, but it is often more compatible with older software.
Best Game Types for an Analog Joypad
An analog joypad works well for many retro PC genres, especially when tuned correctly:
- Arcade racers: Smooth steering can feel better than keyboard tapping.
- Flight and space sims: Analog input is almost mandatory for proper control.
- Platformers: A gamepad layout is more comfortable than keyboard controls.
- Sports games: Directional movement and quick buttons suit handheld pads.
- Emulators: A retro-style pad makes console games feel closer to home.
For games like Commander Keen, Jazz Jackrabbit, Prince of Persia, Wing Commander, Descent, and old racing titles, the right controller can change the experience dramatically. Not every game will support every button, but even basic directional comfort can make long sessions more enjoyable.
Using a Retro Controller on a Modern PC
What if you have the opposite problem: an old analog controller and a modern computer with no game port? This is where USB adapters come in. Basic gameport-to-USB adapters can work with simple analog joysticks, but they may fail with digital gameport devices that used proprietary protocols. A controller that looks like a normal 15-pin joystick may not actually behave like one.
DIY USB adapters built around microcontrollers such as the Arduino Pro Micro can read old joystick signals and present them to a modern computer as USB HID devices. More advanced open-source projects support multiple controller types, auto-calibration, and low-lag input. For retro fans who use DOSBox, DOSBox Staging, DOSBox-X, PCem, 86Box, or real Windows 98 hardware, these adapters can keep vintage controllers useful without requiring a vintage motherboard.
Real Hardware vs. Emulation
Real hardware has the magic. It also has the inconvenience. You get authentic timing, original ports, period-correct sound, and the satisfaction of using the machine as intended. You also get IRQ conflicts, dusty cards, aging capacitors, and the occasional mystery beep that makes you question your life choices.
Emulation is easier. Modern USB controllers can be mapped to an emulated analog joystick, and settings can be changed per game. However, emulation sometimes needs careful tuning. CPU cycles, joystick type, dead zone, and axis mapping may affect how older games interpret input. The best experience often comes from creating separate configuration profiles for games that are picky.
Design Tips for a Comfortable Retro PC Joypad
When designing an analog joypad, do not start with the electronics. Start with your hands. A controller that works electrically but feels like holding a soap dish full of screws will not get much use.
Layout Matters
Place the thumbstick where your left thumb naturally rests. Put primary buttons under your right thumb, with enough spacing to avoid accidental presses. If you plan to use the controller for DOS games with only two-button support, make those two buttons the easiest to reach. Extra buttons are nice, but comfort beats quantity.
Enclosure Strength Matters More Than Looks
Thin plastic flexes. Thin aluminum bends. Cheap project boxes can work, but reinforce areas around buttons and the joystick. Button mashing is not theoretical. It is a lifestyle. If the top panel flexes every time you jump in a platformer, the controller will feel cheap even if the wiring is perfect.
Serviceability Is a Gift to Future You
Retro projects are rarely finished forever. Add screws instead of permanent glue where possible. Leave enough wire slack to open the enclosure. Label internal connections. If you install trim pots, consider small access holes so you can fine-tune calibration without disassembling the controller. Future you will appreciate this. Future you is already tired.
Common Problems and How to Fix Them
The Character Drifts Without Touching the Stick
This usually means the center point is off or the game needs a larger dead zone. Recalibrate in the game setup menu, Windows controller panel, or emulator settings. If using real hardware, check whether the potentiometers are worn or noisy.
The Controller Works in Windows but Not DOS
The device may rely on Windows drivers or a digital gameport protocol. For pure DOS, a standard analog two-axis controller is usually safer. Some advanced gamepads and joysticks need software that DOS games do not provide.
Only Two Buttons Work
Many classic PC games only supported two joystick buttons. Four-button pads may require specific game support, compatibility switches, or special drivers. When designing a DIY joypad, make sure the first two buttons are the most comfortable and responsive.
The Axis Range Feels Too Short
The potentiometer range may not match what the system expects. Measure the thumbstick, compare it with the expected resistance range, and adjust with trim pots or supporting components. In emulation, use calibration tools or axis scaling settings if available.
Should You Buy Vintage, Build DIY, or Use USB?
If you want the easiest setup for a real DOS PC, buy a known-good analog gameport joystick or a Gravis-style gamepad and test it with your specific games. If you enjoy electronics, build a custom analog joypad and tune it for your machine. If you mostly play on a modern PC, use a USB controller or a gameport-to-USB adapter with strong compatibility.
The best choice depends on your goal. Collectors may prefer original hardware. Players may prefer comfort. Tinkerers may prefer building something unique. The retro PC hobby has room for all three, plus the fourth group: people who start one “simple” controller project and wake up two weeks later researching pinouts at 2 a.m.
Extra Experience: Living With an Analog Joypad for Your Retro PC
The most surprising thing about using an analog joypad on a retro PC is how quickly it changes your relationship with old games. Keyboard control is historically accurate, but it is not always emotionally accurate. Many of us remember old games as fast, colorful, and playful. Then we return to them and realize our fingers are crowded around arrow keys, Ctrl, Alt, and Space like they are trying to solve a tiny office seating dispute.
A handheld analog joypad makes the experience feel more relaxed. In platformers, the benefit is immediate. Jumping, shooting, and moving from a couch or a comfortable chair feels closer to the console experience. Even if the game only reads the stick as directional movement, the physical layout helps. Your thumbs know what to do. They have been training for this since childhood.
In racing games, the difference can be even more noticeable. Keyboard steering is binary: tap, tap, tap, overcorrect, crash into wall, blame the game. Analog steering gives you a little more grace. Not every old racing title handles analog input beautifully, but when one does, the car feels less like a shopping cart with ambitions. Small corrections become possible, and long curves stop feeling like a wrestling match.
Flight and space games are where analog control earns its keep. A joypad is not always a replacement for a full flight stick, especially in serious simulators, but it is more compact and convenient. For casual sessions of space combat or arcade flight, an analog thumbstick can be enough. You can bank, pitch, and aim with smoother movement than a keyboard allows. Add two well-placed buttons for fire and secondary action, and the setup becomes simple, clean, and surprisingly satisfying.
The main lesson from hands-on use is that calibration is not optional. It is part of the ritual. A good analog joypad should be tested in multiple games because each title may interpret input differently. One game may feel perfect; another may drift slightly; another may treat the stick like it has consumed too much coffee. Keep notes. Make small adjustments. Do not assume the controller is bad just because one game behaves strangely.
Button feel also matters more than expected. Tiny clicky switches may work electrically, but they can feel unpleasant during fast gameplay. Larger tactile buttons or arcade-style microswitches make the controller feel more intentional. The sound of a good button press is also part of the fun. It says, “Yes, I meant to jump into that pit.”
Cable length is another underrated detail. Retro PC towers often sit under desks, and game ports are usually on the back. A cable that looked long enough on the workbench may become comically short once connected. Build or buy with extra length, but avoid messy coils that tug on the controller. A removable extension can make storage easier.
Finally, there is the satisfaction factor. A custom analog joypad turns retro gaming into a more personal experience. You are not just running old software; you are shaping the interface between your hands and the machine. That is the heart of retro computing. It is not only about preserving the past. It is about making old technology enjoyable enough to keep using today.
Conclusion: A Small Controller With a Big Nostalgia Upgrade
An analog joypad for your retro PC is one of those upgrades that seems small until you use it. Then it becomes obvious. Old PC games were creative, chaotic, and often brilliant, but their controls were not always graceful. A well-built or well-chosen joypad adds comfort without erasing the vintage feel. It respects the limitations of the classic game port while making the experience more playable for modern hands.
Whether you restore a Gravis GamePad, wire a custom thumbstick controller, adapt a 15-pin joystick to USB, or configure a modern pad in DOSBox, the goal is the same: bring back the fun without letting the keyboard steal the show. Retro gaming should feel like discovery, not finger yoga. With the right analog joypad, your old PC gets a little more personality, your games get a little more control, and your nostalgia gets a much better grip.
SEO Tags