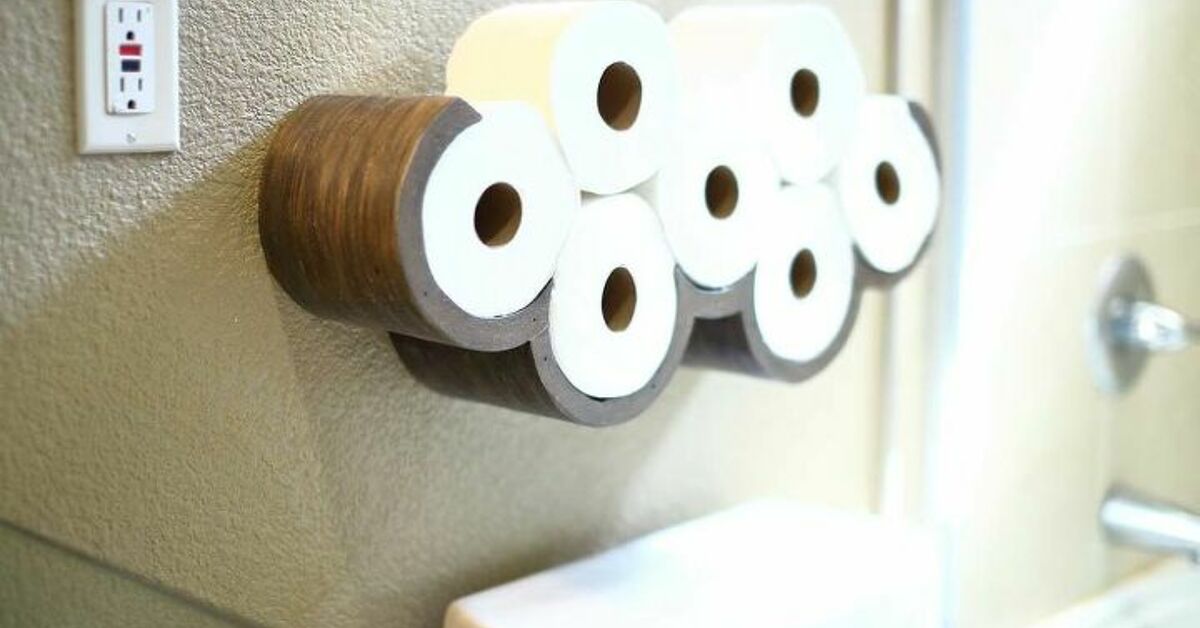

Some bathroom storage ideas are useful but boring. Others are cute but about as practical as putting a tiny chandelier inside your medicine cabinet. A DIY cloud toilet paper storage shelf sits in the sweet spot: it holds extra toilet paper, saves floor space, makes guests smile, and turns one of the least glamorous household supplies into actual bathroom decor. That is a small miracle, right up there with finding a matching sock on laundry day.
The idea is simple: stack several toilet paper rolls inside a cloud-shaped wall frame so the rolls become the fluffy white “puffs” of the cloud. The result looks playful, clean, and surprisingly stylish, especially in small bathrooms, powder rooms, kids’ bathrooms, guest baths, rentals, and homes where storage space is treated like a rare mineral.
This guide walks you through how to make a DIY cloud toilet paper storage unit from wood, plywood, foam board, or lightweight PVC board. You will learn how to plan the shape, choose materials, cut and finish the frame, mount it safely, and style it so it looks intentional instead of “I panicked at the craft store.”
Why a Cloud Toilet Paper Holder Works So Well
A cloud toilet paper holder is not just a novelty project. It solves a real bathroom problem: where do you keep extra rolls without leaving a plastic-wrapped tower of toilet paper sitting on the floor like a tiny warehouse?
Bathrooms are often short on cabinets, especially older homes, apartments, half baths, and narrow powder rooms. Wall-mounted storage is one of the smartest ways to use vertical space because it keeps the floor open and makes supplies easy to grab. A cloud-shaped toilet paper storage shelf does exactly that, but with personality.
It Uses Empty Wall Space
The wall above or beside the toilet is usually underused. A standard cabinet can feel bulky in that zone, but a shallow, open cloud frame adds storage without making the bathroom feel crowded. Since toilet paper rolls are lightweight, this project is also easier to mount than heavy shelving loaded with bottles, candles, or jars.
It Doubles as Decor
Most toilet paper storage tries to hide the rolls. This design leans into them. The rolls become part of the cloud, which makes the whole piece look playful instead of purely functional. In a white bathroom, the rolls blend in. In a colorful bathroom, the cloud becomes a bright, graphic accent.
It Is Budget-Friendly
You can make a DIY cloud toilet paper storage unit with scrap plywood, MDF, PVC trim board, foam board, or even sturdy cardboard for a temporary version. The project does not require complicated joinery. If you can trace curves, sand edges, and use basic mounting hardware, you can make a cloud that holds several rolls and looks charmingly custom.
Best Places to Install a DIY Cloud Toilet Paper Storage Shelf
Before cutting anything, decide where your cloud will live. The best placement depends on the size of the bathroom, the reach from the toilet, and the wall type.
Above the Toilet
This is the classic spot. It uses vertical space and keeps extra rolls close. Leave enough clearance above the tank so the cloud does not interfere with opening the toilet lid, cleaning the tank, or accessing plumbing. A good rule of thumb is to keep the bottom of the cloud at least 8 to 12 inches above the tank lid.
Beside the Toilet
If the wall above the toilet is tiled, occupied by art, or too narrow, the side wall may be better. This is especially useful in a powder room where a cloud shelf can act like a small feature wall. Make sure the cloud does not block the toilet paper dispenser or make the space feel cramped.
Near a Vanity or Linen Nook
In bathrooms with awkward corners, the cloud shelf can fill a small wall that would otherwise collect nothing but dust and regret. If the bathroom has a built-in nook, you can even size the cloud to fit inside it.
Materials You Will Need
The materials depend on how sturdy and permanent you want the project to be. For a long-lasting wall-mounted cloud, wood or PVC board is best. For a renter-friendly or temporary version, foam board can work if you keep it lightweight and avoid overloading it.
Recommended Materials
- 1/2-inch plywood, MDF, or PVC board for the cloud frame
- Wood glue or construction adhesive
- Small finishing nails, brad nails, or screws
- Sandpaper in medium and fine grits
- Primer and bathroom-friendly paint
- Painter’s tape
- Wall anchors or screws for studs
- Two D-ring hangers, keyhole brackets, or a French cleat
- Toilet paper rolls for measuring spacing
Tools You May Need
- Pencil and measuring tape
- Large piece of paper or cardboard for a template
- Jigsaw, scroll saw, or coping saw
- Drill and drill bits
- Stud finder
- Level
- Clamps
- Safety glasses and dust mask
If you do not own a saw, use a simpler construction method: buy pre-cut half-circle wood shapes, round plaques, or lightweight craft boards and assemble them into a cloud outline. Many home improvement stores can also cut boards into manageable rectangles, although they usually will not cut decorative curves.
Choosing the Right Size for Your Cloud
The size of your DIY cloud toilet paper storage should match both the wall and the number of rolls you want to store. Standard toilet paper rolls vary by brand, but most are around 4 to 5 inches wide and 4 to 5 inches in diameter. Mega rolls are larger, and yes, they will absolutely ruin your math if you pretend they are normal rolls.
Small Cloud: 4 to 5 Rolls
A small cloud is ideal for powder rooms and guest bathrooms. It can be about 18 to 22 inches wide and 10 to 14 inches tall. This size usually holds four or five rolls, depending on the shape and spacing.
Medium Cloud: 6 to 8 Rolls
A medium cloud is the most practical size for everyday bathrooms. Aim for about 24 to 30 inches wide and 14 to 18 inches tall. This version gives you enough storage to be useful while still looking cute and balanced.
Large Cloud: 9 to 12 Rolls
A large cloud makes a bold statement and works best over a toilet, above a towel rack, or on a larger blank wall. Plan for 32 to 40 inches wide and 18 to 24 inches tall. Use stronger mounting hardware if you choose this size.
Step-by-Step: How to Make a DIY Cloud Toilet Paper Storage
This tutorial uses a wood or PVC board frame with a shallow back support. It is sturdy enough for regular use, but still simple enough for a weekend project.
Step 1: Make a Cloud Template
Lay out several toilet paper rolls on a large piece of cardboard or kraft paper. Arrange them in a soft cloud shape: three rolls along the bottom, two or three in the middle, and one or two near the top. Move them around until the shape looks balanced.
Now trace a loose cloud outline around the rolls. Use rounded bumps rather than sharp curves. The goal is not a perfect cartoon cloud; it should look fluffy, relaxed, and slightly whimsical. Think “storybook bathroom,” not “meteorological diagram.”
Once you like the outline, draw an inner line about 1 1/2 to 2 inches inside the outer edge. This creates the frame thickness. The center stays open so the toilet paper rolls are visible.
Step 2: Transfer the Template to Your Board
Cut out the cardboard template and place it on your plywood, MDF, or PVC board. Trace the outer cloud shape first. Then trace the inner opening. Check that your toilet paper rolls still fit inside the frame before cutting.
If your cloud will store mega rolls, test with the actual brand you buy most often. A holder that fits standard rolls but rejects mega rolls is not storage; it is a judgmental wall sculpture.
Step 3: Cut the Cloud Frame
Use a jigsaw or scroll saw to cut the outer edge of the cloud. For the inner opening, drill a starter hole large enough for the jigsaw blade, then cut along the inner line. Move slowly around curves and let the saw do the work.
If the curves are not perfect, do not panic. Clouds are forgiving. That is their whole brand. You can smooth uneven spots during sanding.
Step 4: Sand the Edges Smooth
Sand the outer and inner edges with medium-grit sandpaper first, then finish with fine-grit sandpaper. Rounded edges make the cloud look softer and more polished. They also reduce the chance of snagging paper or scratching hands when someone grabs a roll.
For MDF, be extra careful with dust. Wear a dust mask and wipe the piece clean before priming. For plywood, sand any splintery areas until the surface feels smooth.
Step 5: Add a Back Support
A simple frame can hold toilet paper, but a back support makes it sturdier and easier to mount. Cut a narrow horizontal strip of wood or PVC board to attach across the back of the cloud. Place it near the upper third of the frame where mounting hardware will go.
Use wood glue and small screws or brad nails to secure the support. If you want the rolls to sit slightly away from the wall, add small spacer blocks near the lower back edge. This keeps the cloud level and prevents wobbling.
Step 6: Prime and Paint
Because bathrooms are humid, finish matters. Apply primer first, especially if you are using MDF or raw plywood. Then paint the cloud with a durable interior paint. Semi-gloss or satin finishes are easier to wipe clean than flat paint.
White is the obvious choice because it blends with toilet paper and gives the true cloud effect. But you can also use pale blue, soft gray, blush pink, sage green, or a bold color that matches your bathroom decor. For a kids’ bathroom, consider adding tiny painted raindrops, stars, or a sleepy moon nearby.
Step 7: Attach Mounting Hardware
Attach D-ring hangers, keyhole plates, or a French cleat to the back support. For small and medium clouds, two D-ring hangers are usually enough. For a larger cloud, a French cleat offers better stability and makes the piece easier to level.
Choose mounting hardware based on your wall type. Screwing into studs is strongest. If studs are not in the right spot, use quality wall anchors rated for more weight than the loaded cloud will carry. Toilet paper is light, but the frame still needs to stay secure through daily grabbing, refilling, and the occasional guest who pulls like they are starting a lawn mower.
Step 8: Mark the Wall and Install
Hold the cloud against the wall and use a level to make sure it sits straight. Mark the hanger positions with a pencil. Drill pilot holes, install anchors if needed, and drive in screws. Hang the cloud and check for wobble.
Before loading it fully, place one or two rolls inside and gently test the frame. If it shifts, remove it and adjust the hardware. A bathroom storage project should not create suspense every time someone reaches for toilet paper.
Step 9: Fill the Cloud With Toilet Paper Rolls
Stack the rolls inside the frame so they create a fluffy cloud effect. Place the first row along the bottom, then nest the next rolls above them. The curved frame should keep everything contained, while the rolls create the soft white texture.
If your cloud has a wide opening and rolls slide too easily, add a slim lip along the lower inside edge. A thin strip of wood, painted to match, can stop rolls from rolling forward.
Alternative DIY Cloud Toilet Paper Storage Ideas
Not every bathroom, budget, or tool collection is the same. Here are several variations you can use depending on your space and skill level.
No-Saw Cloud Using Wood Circles
Buy several unfinished round wood plaques or half-round craft pieces. Arrange them into a cloud outline and glue them to a simple rectangular back frame. Paint everything white. This version gives the cloud look without cutting curves from a single board.
Foam Board Cloud for Renters
For a very lightweight version, cut a cloud frame from thick foam board and reinforce the back with another layer. Use removable wall strips rated for the weight. This is best for decorative storage in a low-humidity powder room, not a steamy bathroom used for long showers.
Rope-Hung Cloud Shelf
Drill two holes near the top of a wood cloud frame and hang it from a decorative rope attached to a wall hook. This gives a handmade, coastal look. Make sure the hook is anchored securely and the cloud sits flat enough to prevent rolls from tumbling out.
Cloud Cabinet With a Back Panel
If you prefer hidden storage, add a thin back panel and a hinged cloud-shaped front. This turns the project into a small wall cabinet. It takes more work, but it keeps toilet paper out of sight while preserving the cloud shape.
Design Tips to Make It Look Store-Bought
The difference between “adorable DIY” and “craft project that escaped supervision” is usually in the finishing details. Take your time with sanding, painting, and placement.
Keep the Shape Simple
A cloud with five or six rounded bumps usually looks better than one with twelve tiny scallops. Too many curves make cutting harder and can look busy once the rolls are inside.
Match the Bathroom Style
For a modern bathroom, use a clean white finish and simple hidden mounting. For a farmhouse bathroom, try a slightly distressed edge or warm wood backer. For a kids’ bathroom, add playful painted accents. For a minimalist bathroom, keep the cloud small and crisp.
Use the Same Toilet Paper
This may sound fussy, but using the same brand and roll size makes the cloud look neater. Mixed roll sizes can make the storage look lumpy in a way that says “emergency supply closet” rather than “cute bathroom decor.”
Do Not Overfill It
Leave a little breathing room between rolls. A cloud that is crammed full loses its soft shape and starts looking like a toilet paper traffic jam.
Bathroom Storage and Safety Tips
Toilet paper should stay dry, clean, and easy to reach. That sounds obvious, but bathrooms are humid places where storage choices matter.
Protect Rolls From Moisture
A cloud holder works best away from direct splashes. Do not mount it where shower spray, sink splatter, or condensation will soak the rolls. In a very humid bathroom, keep only a few rolls in the cloud and store the rest in a linen closet or dry cabinet.
Mount It Securely
Even lightweight storage needs proper hardware. Use studs when possible. If you must use drywall anchors, choose anchors rated for the combined weight of the frame and rolls. When in doubt, go stronger than necessary. Nobody has ever regretted a secure shelf.
Keep It Clean
Dust the frame regularly and wipe painted surfaces with a damp cloth. Avoid harsh cleaners that can damage paint. If the cloud is near the toilet, cleaning the outer edge more often is a good idea because bathrooms are busy little ecosystems.
Common Mistakes to Avoid
Making the Opening Too Small
The most common mistake is designing a beautiful cloud that barely fits the rolls. Always measure with real toilet paper before cutting. Add extra space for easy grabbing.
Using the Wrong Paint
Flat paint can absorb moisture and show marks. A satin or semi-gloss finish is easier to clean and better suited to bathrooms.
Skipping the Template
Freehanding directly on wood can work, but a cardboard template lets you test the size on the wall first. Tape the template up, step back, and see how it looks. This tiny step prevents big “why is this cloud the size of a canoe?” regrets.
Mounting Too High
The cloud should be easy to refill and easy to reach. If guests need to stand on tiptoe to grab toilet paper, the storage has become a bathroom obstacle course.
How Much Does a DIY Cloud Toilet Paper Storage Cost?
The cost depends on materials. A basic foam board version may cost under $15. A sturdy plywood or MDF version usually lands around $25 to $60, especially if you already own tools and paint. PVC board may cost more, but it handles bathroom moisture well and is easy to wipe clean.
Compared with buying a novelty toilet paper holder or a small wall cabinet, the DIY version gives you more control over size, color, and style. You can make it fit your exact wall instead of trying to convince a store-bought shelf to behave.
Who Should Try This Project?
This DIY cloud toilet paper storage project is perfect for homeowners, renters with removable mounting options, parents decorating a kids’ bathroom, small-space dwellers, and anyone who believes practical items do not have to be dull. It is also a great beginner woodworking project because the shape is forgiving and the function is straightforward.
If you are new to DIY, start with a smaller cloud and a lighter material. If you are comfortable with tools, build a larger wood version with a French cleat and a polished paint finish. Either way, the final result is cheerful, useful, and just unusual enough to make people ask, “Wait, did you make that?”
of Real-Life Experience: What I Learned Making a DIY Cloud Toilet Paper Storage
The first thing you learn when making a DIY cloud toilet paper storage holder is that toilet paper rolls are not as innocent as they look. They seem simple. Round. White. Cooperative. Then you start arranging them into a cloud shape and suddenly they behave like tiny cylindrical divas. One brand is too tall. Another is too wide. A mega roll thinks it deserves its own ZIP code. That is why testing your design with the exact rolls you use at home is not optional; it is the secret handshake of this project.
When I made my first cloud-style toilet paper holder, I started with a cardboard template and taped it above the toilet. That one step saved the project. On the table, the cloud looked adorable. On the wall, the first version looked enormous, like a weather system had entered the bathroom and was preparing to rain two-ply. I trimmed the template down by several inches, softened the curves, and suddenly the design looked intentional instead of cartoonishly dramatic.
The second lesson is that sanding matters more than you think. A cloud shape only looks soft if the edges are smooth. Sharp, rough, splintery edges make it feel unfinished. Rounding the frame slightly with sandpaper gave the whole piece a cleaner, more professional look. It also made the paint go on better. If you are tempted to rush sanding, make a cup of coffee, put on music, and keep going. Future you will be smugly grateful.
Painting was another learning moment. Plain white paint looked fine, but white primer plus two coats of satin paint looked much better. The satin finish reflected a little light and made the cloud easier to wipe clean. In a bathroom, that wipe-clean detail is not glamorous, but it is important. Bathrooms create dust, moisture, and mystery particles no one wants to discuss at brunch.
Mounting the cloud was the part where I stopped being whimsical and became very serious with a level. A crooked cloud is funny for about four seconds, then it becomes the only thing you can see. I used two anchors and checked the piece several times before loading it. Because toilet paper is light, it is easy to underestimate the importance of stable mounting. But people pull rolls out, refill the holder, bump it while cleaning, and occasionally treat household objects with the tenderness of a raccoon opening a lunchbox. Secure mounting is worth it.
The final lesson is that this project gets more compliments than expected. Guests notice it because it is practical but playful. Kids like it because it looks like bathroom art. Adults like it because it solves the universal “where do we put the extra rolls?” problem without adding another basket to the floor. And honestly, any DIY project that makes toilet paper look cute deserves a tiny round of applause.
If I made it again, I would keep the shape simple, use moisture-resistant material, and design it for six rolls rather than trying to store an entire warehouse supply. The best version is not the biggest one. It is the one that fits the wall, keeps rolls dry, and makes the bathroom feel a little more charming. That is the real magic of DIY: not perfection, but turning an everyday annoyance into something useful, personal, and unexpectedly fun.
Conclusion
A DIY cloud toilet paper storage holder is one of those rare projects that is easy to love because it is useful, affordable, and delightfully silly in the best way. It turns blank wall space into vertical bathroom storage, keeps extra rolls within reach, and adds personality without requiring a full renovation. With a simple cloud template, the right material, smooth sanding, bathroom-friendly paint, and secure wall mounting, you can create a custom piece that looks charming and works hard.
Whether you make a small cloud for a powder room or a larger one for a family bathroom, the key is balance. Keep the shape soft, the installation sturdy, and the rolls protected from moisture. The result is a bathroom storage solution that proves even toilet paper can have a design moment. And frankly, after everything toilet paper has done for humanity, it deserves one.
Note: This article synthesizes practical DIY, bathroom organization, wall shelving, and small-space storage guidance from reputable U.S. home improvement and lifestyle sources. Source links are intentionally not included so the content remains clean for web publishing.