
If you have ever looked at a plain pinecone and thought, “Nice, but what if it had a little main-character energy?” then welcome. Glitter pinecones are one of the easiest holiday and winter crafts you can make, and they somehow manage to look rustic, fancy, festive, woodsy, and slightly dramatic all at once. Not bad for something that probably fell out of a tree and landed near your shoe.
Learning how to decorate pinecones with glitter is a smart little DIY skill because it works for almost every decorating style. Want farmhouse charm? Done. Want elegant metallic sparkle? Easy. Want to keep the kids busy for an afternoon without turning your living room into a full-scale craft explosion? Also possible, with a little planning and maybe one strategic trash bag.
In this guide, you’ll learn how to prep pinecones, choose the right glitter and glue, apply sparkle without making a mess worthy of a documentary, and style your finished pinecones for wreaths, centerpieces, garlands, gift toppers, and ornaments. Whether you want a snowy white look, a glam gold finish, or a colorful ombré effect, this glitter pinecone tutorial has you covered.
Why Glitter Pinecones Are Such a Great DIY Decor Idea
Pinecones are one of those magical craft supplies that feel both free and expensive. You can forage them outdoors, buy them in a bag, or rescue the forgotten ones sitting in a bin from last year’s decorations. Once you add glitter, they instantly feel intentional. Suddenly, your pinecone is no longer “yard debris.” It is “seasonal decor with texture and visual depth.” That sounds much classier, doesn’t it?
They are also incredibly versatile. Glittered pinecones can be used on Christmas trees, tucked into wreaths, arranged in bowls, tied onto gifts, scattered across mantels, or worked into winter centerpieces. They pair beautifully with greenery, ribbon, candles, ornaments, wood beads, and dried citrus. In other words, they are the overachievers of the craft world.
What You Need to Decorate Pinecones With Glitter
Basic Supplies
- Pinecones
- White craft glue, school glue, or decoupage glue
- Glitter in your favorite color or colors
- A small paintbrush or foam brush
- A bowl, tray, or sheet of paper to catch extra glitter
- Wax paper, parchment paper, or a protected work surface
Optional Supplies
- Ribbon or ornament hooks for hanging
- Floral wire or twine
- Acrylic paint for base color
- Spray adhesive for faster coverage
- Clear sealer, hairspray, or a finishing topcoat
- Disposable gloves if you prefer less sparkle on your hands for the next 72 hours
If you want a clean, elegant look, choose fine glitter. It hugs the scales of the pinecone more evenly and creates a softer shimmer. Chunky glitter can be fun, but it tends to look bolder and a bit more playful. Both work. It really depends on whether you want your pinecones to whisper “winter wonderland” or shout “craft party.”
Step 1: Prep Your Pinecones First
Before you start decorating pinecones with glitter, give them a little attention. If you found them outdoors, they may be carrying dust, tiny bits of debris, sap, or the occasional unwanted hitchhiker. Nobody wants to make a beautiful centerpiece and then discover it came with bonus wildlife.
Start by wiping the pinecones with a damp cloth or brushing off loose dirt. If they are very closed up, let them dry thoroughly. Some crafters also dry or gently heat pinecones beforehand so the scales open more fully. An open pinecone usually catches glitter better and gives you more texture to work with.
Make sure the cones are fully dry before adding glue. Moisture and glitter are not best friends. Damp pinecones can make glue slide around, slow drying time, and create a patchy finish. Patience here pays off later.
Step 2: Choose Your Glitter Style
One of the most fun parts of this project is deciding what kind of sparkle you want. There isn’t one correct answer, which is excellent news for creative people and terrible news for anyone who thought this would be a quick five-minute decision.
Classic Looks
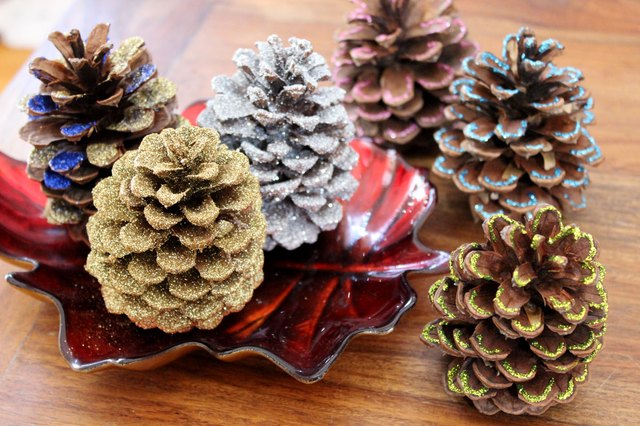
- Silver glitter pinecones: bright, icy, and perfect for winter decor
- Gold glitter pinecones: warm, elegant, and ideal for holiday centerpieces
- White glitter pinecones: great for a frosted or snowy look
- Champagne or copper glitter pinecones: cozy and upscale without trying too hard
Creative Variations
- Ombre pinecones: blend two or three glitter shades from top to bottom
- Dipped tips: glitter only the edges for a more natural finish
- Full coverage: cover the entire pinecone for maximum sparkle
- Multicolor glitter: fun for kids’ crafts or playful holiday themes
If you are decorating for a specific space, match your pinecone colors to your room. Gold and cream look lovely in traditional homes. Silver and white fit modern winter decor. Jewel tones can make a Christmas tree feel rich and dramatic. Pink, blue, or pastel glitter can create a whimsical look that feels fresh instead of expected.
Step 3: Apply the Glue the Smart Way
This is where the craft officially begins. Pour a little glue into a small dish and use a foam brush or paintbrush to apply it where you want glitter to stick. You can brush glue onto the tips of the scales, the outer edges, or the entire cone depending on your design.
For the prettiest result, work in sections. Pinecones have lots of texture, and glue can dry faster than you think. If you coat the whole cone at once and then stop to answer a text, sneeze, or wonder whether you should have chosen champagne glitter instead of gold, you may lose your sticky window.
If you want a light dusted look, brush glue only onto the edges of the scales. This highlights the shape of the pinecone and keeps some of the natural brown visible. If you want more drama, add glue more generously over the entire surface. Just do not drown the poor thing. A pinecone should sparkle, not look like it lost a fight with a bottle of glue.
Step 4: Add Glitter Without Covering Yourself in It
Now the fun part. Hold your pinecone over a bowl, tray, or folded sheet of paper and sprinkle glitter over the glued sections. Turn the cone as you go so the sparkle reaches all the sticky spots. Then gently tap or shake off the excess.
This catch-and-reuse method matters more than people think. It keeps the mess down, saves glitter, and stops your table from becoming a permanent disco surface. If you are using more than one color, apply one shade at a time and let sections dry a bit before adding the next. That will keep your colors from blending into a mystery tone no one asked for.
For extra shine, you can add a second layer. Some crafters top-coat a glittered surface with more glue and then add another pass of glitter. This can create a fuller, richer finish, especially on statement pieces meant for wreaths or centerpieces.
Step 5: Let Them Dry Properly
Do not rush this step. Freshly glittered pinecones may look ready after a few minutes, but moving them too soon can smear the glue, flatten the glitter, or leave a sparkly trail around your house that announces every bad decision.
Place the pinecones on wax paper or parchment paper and let them dry completely. Overnight is often the safest choice. Once dry, lightly shake off any loose glitter. If needed, touch up bare spots with more glue and another sprinkle of glitter.
Should You Seal Glitter Pinecones?
Sealing is optional, but it can be helpful. If your glittered pinecones will be handled often, hung on a tree, packed away for next season, or displayed in a high-traffic area, a light seal can reduce shedding.
You have a few options:
- Clear craft sealer: good for longer-lasting decor
- Decoupage topcoat: useful if you already have it on hand
- Light hairspray: a simple trick for reducing glitter fallout
Use a light hand. Too much sealer can dull the sparkle, and that defeats the entire point. You invited glitter to the party for a reason.
Easy Ways to Use Glitter Pinecones in Your Decor
1. Make Glitter Pinecone Ornaments
Add ribbon, twine, or ornament hooks to the top of each pinecone and hang them on your tree. They look especially charming mixed with glass ornaments, wooden beads, or simple white lights.
2. Fill a Bowl or Tray
Arrange glittered pinecones in a decorative bowl with greenery, ornaments, cinnamon sticks, or battery candles. This is one of the easiest winter centerpiece ideas and looks far more expensive than it is.
3. Tuck Them Into a Wreath
Glitter pinecones add texture and shimmer to wreaths. A few metallic cones on a greenery wreath can completely change the mood from rustic to festive.
4. Use Them as Gift Toppers
Tie a small glittered pinecone onto wrapped presents with velvet ribbon or twine. It turns a plain package into something that looks custom and thoughtful.
5. String a Garland
Attach several pinecones to twine or wire and drape them across a mantel, staircase, or window. Mix in beads or greenery if you want a fuller design.
Common Mistakes to Avoid
- Skipping prep: Dirty or damp pinecones do not decorate well.
- Using too much glue: Thick glue blobs can look clumpy and dry unevenly.
- Adding glitter too late: Once the glue skins over, the sparkle will not stick properly.
- Ignoring drying time: Moving them too soon leads to smudges and glitter loss.
- Choosing the wrong glitter texture: Super chunky glitter can overpower the natural detail of the cone.
How to Make Glitter Pinecones Look More Expensive
Yes, pinecones are humble. But with the right choices, they can look surprisingly upscale. The trick is restraint and color coordination.
Stick to two or three colors max. Metallic shades like gold, silver, copper, and champagne usually look refined. Pair glittered pinecones with velvet ribbon, ceramic bowls, wood accents, or soft greenery. Leave some natural surface showing instead of covering every inch. The contrast between rustic brown and a little shimmer is what makes the craft interesting.
You can also paint the tips before glittering them or brush only the outer edges for a frosted look. Layering paint, glue, and glitter creates more depth than simply dumping glitter over everything and hoping for holiday magic.
Kid-Friendly Tips for Decorating Pinecones With Glitter
This is a fun family craft, but it goes better when expectations are realistic. Small children are unlikely to produce “minimalist Scandinavian winter decor.” They are more likely to create “pinecone that fought bravely in a glitter storm.” That is okay.
Set out trays for each color, use washable glue when possible, and let kids decorate just the tips rather than the entire cone. Glitter glue can also be easier for younger crafters because it combines sparkle and adhesive in one step. If you are doing this as a classroom or party activity, pre-clean the pinecones in advance. Future you will be grateful.
Seasonal Styling Ideas Beyond Christmas
Despite their strong holiday reputation, glitter pinecones are not only for Christmas. Silver and white work beautifully through January for winter decor. Copper, bronze, and gold can transition into fall arrangements. Soft blush, sage, or ivory glitter can even fit weddings, baby showers, or woodland-themed parties.
That is the beauty of decorating pinecones with glitter: the technique is simple, but the final look can change with the season, your color palette, and your mood.
Final Thoughts
Once you know how to decorate pinecones with glitter, you have a go-to DIY project that is affordable, flexible, and honestly kind of addictive. One minute you are making “just a few” for the mantel, and the next thing you know, you are glittering pinecones for wreaths, gift toppers, centerpieces, and maybe that random shelf in the hallway that suddenly seems under-decorated.
The best part is that glitter pinecones strike a rare decorating balance: they feel handmade without looking homemade in the wrong way. With the right prep, a smart glue technique, and a little sparkle control, you can create decor that feels festive, personal, and polished. And if a tiny bit of glitter lingers in your house until spring, consider it a souvenir from your crafting success.
Experiences Decorating Pinecones With Glitter
The first time I made glitter pinecones, I was wildly overconfident. I assumed this was a five-minute craft, the kind you do while casually sipping coffee and pretending your house is naturally tidy. Ten minutes later, I had glitter on my sleeves, glitter on the table, glitter on the floor, and, somehow, glitter on the dog’s bed even though the dog had not been in the room. The pinecones looked adorable, though, which felt rude.
What I learned from that first attempt was simple: setup changes everything. Once I started working over a tray and using a bowl to catch excess glitter, the whole process became calmer, cleaner, and much more enjoyable. I also learned that pinecones have personality. Some are wide and open and take glitter beautifully right away. Others stay a little tight and stubborn, like they are not fully convinced they want to participate in your design vision.
One of my favorite experiences with glitter pinecones happened during a holiday decorating afternoon with family. Everyone started with roughly the same supplies, but the finished results were completely different. One person made elegant white-and-silver pinecones that looked like they belonged in a winter magazine spread. Another went full gold glam with enough sparkle to signal aircraft. A younger cousin created rainbow pinecones that looked like tiny festive dragons. All of them worked because the project is flexible enough to welcome both polished style and pure craft chaos.
I have also found that glitter pinecones are strangely forgiving. If you miss a spot, it often looks intentional because the natural texture still shows through. If too much glitter lands in one area, you can usually shake off the extra and call it dimensional sparkle. If a pinecone sheds a scale or dries a little unevenly, greenery and ribbon can solve almost anything. It is one of those crafts that gives a lot back without demanding perfection.
Another thing I appreciate is how useful the finished pinecones are. I have tucked them into gift wrap when a present looked a little plain. I have filled bowls with them when a table needed something seasonal but not fussy. I have wired them onto wreaths, hung them on trees, and scattered them along mantels. Every time, they make a space feel warmer and more finished. They carry that nice balance of natural texture and sparkle that makes a room feel cozy instead of cluttered.
Probably the best part of decorating pinecones with glitter is that the craft feels nostalgic without being outdated. It has that classic homemade holiday energy, but you can style it in a way that feels modern, minimal, rustic, or glamorous. That makes it easy to return to year after year. Even when trends change, a glittered pinecone still works. It is the rare DIY decoration that can be both charming and stylish, which is more than I can say for a lot of holiday crafts involving googly eyes.
If I had to sum up the experience, I would say this: glitter pinecones are simple, cheerful, and just messy enough to feel real. They invite creativity, forgive mistakes, and make your home look like you planned ahead even if you absolutely did not. And that, in the world of seasonal decorating, is a small miracle wrapped in sparkle.
SEO Tags