
There are two kinds of people in the world: people who gently blow out eggs for crafts, and people who do it once, get a face full of yolk vapor, and immediately start looking around the shop for a better idea. This article is for the second group.
The title Teach Your Air Compressor To Blow Eggs sounds like a joke somebody made while standing near a workbench covered in shell fragments, paper towels, and one very judgmental carton of Grade A large eggs. But the idea is real. If you want hollow eggshells for decorating, carving, painting, or making ornaments, a carefully controlled air source can turn a messy chore into a faster, cleaner process.
The trick, of course, is not to treat an eggshell like a truck tire. A hollowing setup works best when you understand two worlds at once: the delicate geometry of an egg and the not-so-delicate reality of compressed air. Get the balance right, and you can empty shells efficiently without crushing them, coating the ceiling in breakfast, or discovering that “full tank pressure” was not the artistic choice you thought it was.
What the Idea Actually Means
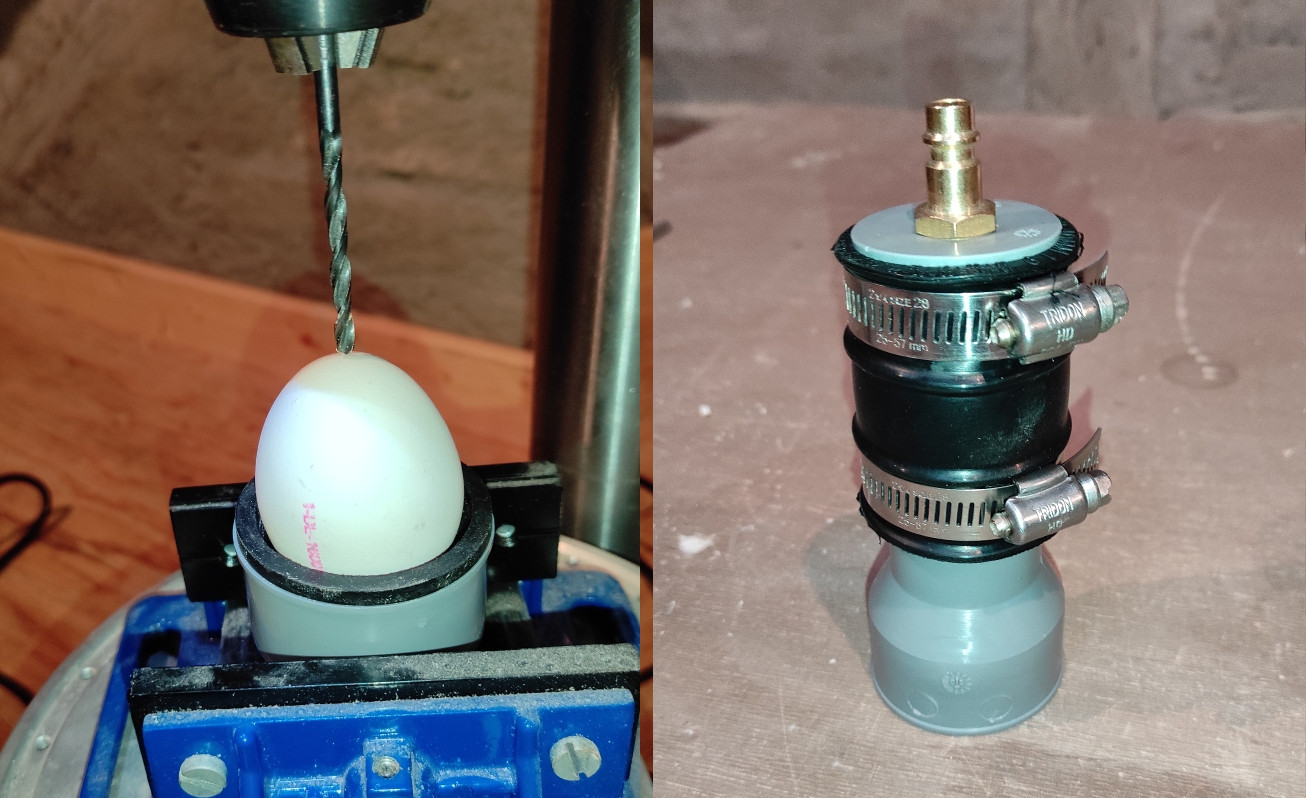
The modern version of this concept got extra attention after a Hackaday feature on a DIY build that used a simple jig and an air compressor to force egg contents out through a drilled hole. The appeal is obvious: instead of relying on lung power, a bulb syringe, or heroic optimism, you let regulated air do the work.
That sounds dramatic, but the underlying principle is beautifully boring in the best possible engineering way. You create a small opening, break up the yolk inside, seal the egg gently in a holder, and introduce a little pressure. The air displaces the liquid contents, which leave through the exit hole and land in a bowl instead of on your shirt. In other words, you are not building a chicken-powered rocket program. You are managing pressure differential with manners.
Traditional craft methods use a pin, small knife, paper clip, and either your breath or a bulb syringe. Those methods still work, and they are perfectly fine for a few eggs. But if you want a more repeatable setup, or you simply do not enjoy huffing into raw eggs like an unpaid Victorian scientist, a compressor-assisted system makes sense.
Why an Air Compressor Can Help
Air compressors are useful because they let one motor create stored energy that can be delivered through a hose in controlled bursts. That is why they power everything from nail guns to paint sprayers to airbrushes. For egg blowing, the real advantage is control. A regulated compressor can provide steady, repeatable pressure without requiring your cheeks to file a workplace complaint.
It also scales well. If you are emptying a dozen eggs for Easter decorating, carving practice, or holiday ornaments, the process gets old fast when done by mouth. A small compressor or regulated air source can speed up the repetitive part, especially once your jig, bowl, and cleanup routine are dialed in.
There is another practical benefit: cleanliness. When you use a purpose-built setup, the egg contents are more likely to go where you intend. That means fewer drips on your hands, less chance of contaminating nearby tools or surfaces, and less temptation to mutter things not fit for a family craft blog.
The Air Compressor Basics That Matter Here
PSI Is Not the Same Thing as “Turn It Up and Hope”
When people shop for air compressors, they usually hear about PSI and CFM. PSI tells you about pressure. CFM or SCFM tells you about airflow capacity. For egg blowing, you do not need industrial muscle. You need controlled, low, gentle pressure and a setup that lets you creep upward instead of blasting away like you are clearing a factory line.
That is why a regulator matters more than bragging rights. Many household and shop compressors can produce far more pressure than a fragile eggshell needs. A machine capable of powering pneumatic tools is almost comically overqualified for convincing scrambled yolk to leave a shell. In this project, finesse beats horsepower every time.
Tank Size Is Nice, but Control Is Better
Small portable compressors are often enough for light-duty jobs. A big tank is helpful for long tool runs, but egg blowing is a short-burst activity. You are not running a framing crew; you are persuading breakfast to relocate. A compact unit with a regulator, hose, and a way to meter output is usually more useful than a hulking beast that sounds like it wants its own parking spot.
Oil-Free vs. Oil-Lubricated
For a craft project that sits uncomfortably close to food handling, many DIYers prefer a cleaner, lower-maintenance setup. Oil-free compressors are popular in home use because they require less maintenance. Oil-lubricated models can be quieter and long-lasting, but they demand more upkeep. Either way, the egg itself is decorative once hollowed, not edible, so keep the process clean and keep your expectations realistic: this is a shell project, not a farm-to-table tasting menu.
Safety First, Because Compressed Air Deserves Respect
Compressed air feels harmless right up until it is not. OSHA’s workplace rules on compressed air used for cleaning require reduced pressure, protective equipment, and care around flying debris. That standard is not a craft recipe for eggshell art, but it is an excellent reminder that compressed air is not something to use recklessly just because the hose is easy to hold.
For this project, wear eye protection. Tiny shell fragments can pop loose when drilling, piercing, or when pressure finds a weak crack you did not notice. Keep your fingers off the line of fire, keep the egg aimed into a bowl, and never point an air nozzle at skin, clothing, or another person. If your setup looks like a cross between a dental tool and a potato cannon, step back and simplify.
Ventilation matters, too. Set the compressor on a stable surface in a well-ventilated area, give it breathing room, and use a grounded outlet if the unit is electric. Drain moisture from the tank as part of routine maintenance. Condensation is normal inside compressor tanks; rust and neglect should not be.
Food Safety Matters Even If the Finished Egg Is Decorative
Raw eggs can carry Salmonella on the shell and, in some cases, inside the egg. That means this project is half craft and half kitchen hygiene. Wash your hands before and after handling eggs. Clean tools, bowls, counters, and anything else that touches raw egg. Do not let the contents linger at room temperature if you plan to cook with them later.
If an egg is cracked before you start, discard it instead of trying to “save” it for shell art. A compromised shell is harder to hollow neatly and more likely to make cleanup annoying. If you want to use the expelled egg for baking or scrambling, work quickly, refrigerate promptly, and use common-sense food safety throughout. If the shell is your only goal, life gets easier: you can focus on cleanliness and structure rather than culinary destiny.
One more thing: avoid washing eggs in a way that splashes contamination around your sink and work area. Keep surfaces clean, use hot soapy water on utensils and counters, and treat the process like raw-food prep, because that is exactly what it is wearing a craft hat.
How To Build a Smarter Egg-Blowing Routine
1. Start With a Good Egg
Choose a clean, uncracked egg with a regular shape and sturdy shell. White eggs are often preferred for decorating because they take dye and paint predictably, but brown eggs have their own charm. The key is shell integrity. If it already has a hairline fracture, the compressor will find it like a gossip finds a secret.
2. Make Two Small Holes
Traditional methods usually call for a small hole on one end and a slightly larger one on the other. The larger opening gives the contents somewhere practical to escape. A pin, sharp craft tool, or fine drill bit can work. Go slowly. You are opening a shell, not renovating a bathroom.
3. Break Up the Yolk Inside
This step matters more than beginners expect. If you do not break the yolk membrane, the egg contents resist movement and the whole process becomes stubborn. A straightened paper clip, skewer, or other thin tool can be inserted gently to stir the interior. This is the difference between a smooth flow and a shell that sits there acting mysterious.
4. Use a Cradle or Jig
A soft support makes the job easier and safer. A foam holder, rubber cup, or custom jig helps keep the egg from slipping while you pierce, drill, or apply air. The more stable the egg, the less likely you are to crush it with your fingers at the exact moment you think you are being careful.
5. Regulate the Air
This is the whole game. Start with the lowest practical setting and increase gradually only if needed. A gentle, controllable push is what you want. Full shop pressure is unnecessary and usually ridiculous. The shell is thin, the contents are fluid, and brute force is not a personality trait you want in this project.
6. Aim Into a Bowl
Position the larger hole downward over a bowl. If your setup seals reasonably well and the yolk has been broken up, the contents should begin to flow out. Pause if the shell flexes, if nothing moves, or if you hear the ominous little crack that means the egg has chosen chaos.
7. Rinse and Dry
Once empty, rinse the shell thoroughly. Some large-scale decorative-egg producers use water and even soap in controlled cleaning steps, followed by a final air blast to remove moisture. For home use, a careful rinse and complete drying period usually do the job. Let the shell dry fully before painting, dyeing, carving, or storing it.
Common Mistakes That Turn This Into an Omelet Incident
Using too much pressure: The shell loses. It always loses.
Skipping the yolk-breaking step: Then you wonder why the egg behaves like a clogged ketchup bottle.
Making the exit hole too small: The contents need a realistic way out.
Poor support: Squeezing the egg while also operating a hose is a classic path to crunchy disappointment.
Bad hygiene: Raw egg on tools, counters, and hands is still raw egg, even when the project feels crafty and adorable.
When a Compressor Is Worth It, and When It Is Overkill
If you are making two sentimental Easter eggs with your kids, a bulb syringe is often simpler. If you are hollowing a dozen eggs for ornaments, trying multiple designs, or building a repeatable process for seasonal crafting, a regulated air source starts to shine. The sweet spot is somewhere between “one egg for grandma” and “small shell-based manufacturing empire.”
In other words, an air compressor is not mandatory, but it is a clever upgrade. It removes some of the gross factor, reduces the strain of blowing by mouth, and makes the process feel more like a proper DIY system instead of a dare.
Creative Uses for Hollow Eggs After the Messy Part
Once your eggs are clean and dry, the fun begins. Hollow eggshells can become dyed Easter decorations, hand-painted ornaments, carved shells, confetti eggs, miniature display pieces, or hanging garlands. Because the shell is empty, it is lighter and more durable in storage than many people expect, provided you cushion it well and do not store it under a box labeled “miscellaneous heavy holiday things.”
Artists and crafters love hollow eggs because they sit at a weirdly satisfying intersection of fragility and permanence. They are everyday objects transformed into tiny canvases. And yes, there is something deeply funny about using workshop hardware to help create delicate holiday decor. That contrast is half the charm.
Conclusion
So, can you teach your air compressor to blow eggs? Absolutely. You just have to teach yourself a few things first: respect pressure, regulate the output, support the shell, break the yolk, and keep the whole operation clean. The best version of this project is not the loudest or fastest one. It is the one that turns an awkward, messy craft step into a calm, repeatable routine.
That is the real lesson here. Good DIY is rarely about using the biggest tool in the shop. It is about matching the tool to the task with enough restraint to keep the project elegant. In this case, elegance just happens to look like an eggshell surviving a date with compressed air. Frankly, that is a win for everybody.
Extended Experience Notes: What This Project Feels Like in Real Life
The experience of using compressed air to hollow eggs is oddly memorable because it mixes tension, mess, precision, and tiny moments of triumph. At first, the whole thing feels absurd. You stand there holding an egg like it is a museum artifact while a machine designed for nail guns and tire filling waits in the background. It feels like you are about to either invent a brilliant new craft shortcut or accidentally season the workshop with yolk.
The first few attempts usually teach humility. You realize quickly that eggshells are strong in one sense and hilariously fragile in another. A hole that is too small makes nothing happen. A hole that is too large ruins the look of the finished shell. Pressure that is too gentle makes you wonder whether the hose is even connected. Pressure that is too aggressive gives the egg an exciting but brief career in structural failure. There is a narrow zone where everything clicks, and when you find it, the project suddenly becomes satisfying instead of suspicious.
In practice, one of the biggest surprises is how much the yolk-breaking step changes the experience. People tend to focus on the compressor, but the prep work is what makes the air assist feel magical. Once the inside is loosened up, the contents move with far less drama. That is the moment when the project stops feeling like a gimmick and starts feeling like a smart little system.
There is also a real difference between doing one egg and doing many. A single egg is an experiment. Six eggs become a process. A dozen eggs become a workflow. By then, you start arranging the bowl better, placing paper towels where they actually help, and appreciating small improvements like a steadier cradle or easier nozzle control. You begin to understand why even simple jigs matter. Repeatability is the secret ingredient in almost every good DIY setup.
Another part of the experience is psychological: once the egg empties cleanly, you immediately trust the method more. That first successful shell changes your attitude. Suddenly you are not just trying to avoid failure; you are thinking ahead to paint, dye, carving, hanging loops, or holiday decorations. The task shifts from “Please do not explode” to “This could actually look great on a tree.” That is a fun transition.
And yes, cleanup affects how you remember the project. If you keep the process sanitary and organized, it feels clever. If you skip the bowl placement, ignore the raw egg on the counter, and freehand everything with overconfidence, the memory becomes less “craft innovation” and more “why does the garage smell like breakfast?” The experience is much better when the food safety part is treated as seriously as the pressure-control part.
What makes the whole idea so enjoyable is the contrast. It is industrial logic applied to a fragile, almost whimsical object. You are using regulated air, maintenance-minded thinking, and shop habits to help create something delicate and decorative. That mismatch is what makes the project memorable. It is practical, a little ridiculous, and genuinely effective. In the crowded universe of DIY tricks, that is a pretty lovable combination.