
Note: This article is written for safe, practical PC repair publishing and synthesizes real-world guidance from processor, cooler, repair, and PC-building resources. It avoids source-link clutter so the HTML can be copied directly into a webpage.
A processor stuck to a heatsink can make even a calm PC builder suddenly negotiate with the motherboard like it owes them money. One minute you are doing a simple CPU cooler upgrade, and the next minute the processor comes out attached to the cooler like a stubborn refrigerator magnet. The good news is that a CPU “fused” to a heatsink is usually not truly fused. Most of the time, old thermal paste has dried, spread, or created suction between the processor’s integrated heat spreader and the cooler base.
This problem is especially common when removing older coolers, stock coolers with pre-applied thermal compound, or systems that have not been opened for years. AMD PGA processors, such as many AM4 Ryzen chips, are often discussed in this situation because the pins are on the processor and the socket retention is different from many Intel LGA designs. However, any processor and heatsink can become difficult to separate if the thermal paste has hardened enough to behave like tiny gray construction adhesive.
The goal is simple: separate the processor from the heatsink without bending pins, scratching the cooler plate, touching delicate contacts, or turning a quick repair into a dramatic hardware funeral. Below is a safe, step-by-step method for removing a processor fused to a heatsink, cleaning both surfaces, and preparing everything for reinstallation.
Why Does a Processor Get Stuck to a Heatsink?
Thermal paste, also called thermal compound or thermal interface material, fills microscopic gaps between the CPU heat spreader and the heatsink. It helps transfer heat away from the processor into the cooler. Fresh paste is soft and spreadable. Old paste can dry, thicken, and form a strong grip. In some cases, the cooler also creates a suction effect when pulled straight upward.
That is why the worst move is usually the most tempting one: yanking the cooler straight up like you are opening a jar of pickles. Pulling too hard can rip a PGA processor out of its locked socket, bend CPU pins, damage the socket, or smear thermal paste into places where paste has no business taking a vacation.
Tools You Need Before Starting
Gather your tools before you begin. You do not want to be holding a processor-covered heatsink in one hand while searching for alcohol wipes with the other. That is how small disasters learn to walk.
- 90% or higher isopropyl alcohol, or electronics-safe thermal paste remover
- Lint-free cloth, microfiber cloth, coffee filter, or thermal paste cleaning wipes
- Plastic spudger, plastic card, or dental floss
- Small container or anti-static surface for the CPU
- Nitrile gloves, optional but helpful
- Fresh thermal paste for reinstallation
- Good lighting and a flat workspace
Avoid metal screwdrivers, knives, razor blades, or anything that can gouge the heatsink, chip the CPU edge, or slip into your motherboard with the confidence of a tiny villain. Plastic tools are boring, and boring is exactly what we want during CPU repair.
Step 1: Shut Down, Unplug, and Discharge the System
Turn off the computer completely. Switch off the power supply if it has a rear switch, then unplug the power cable. Press the case power button for a few seconds after unplugging to help discharge leftover power. Disconnect nearby cables and move the case to a stable workspace.
If the computer was just running, the cooler may still be warm. That can actually help soften the thermal compound. If the system is cold and still assembled, some builders run the computer briefly before shutdown to warm the CPU. However, do not work inside the PC while it is powered. Warm paste is useful; live electronics are not.
Step 2: Loosen the Cooler Evenly
Remove the side panel and locate the CPU cooler. Disconnect the cooler fan cable or pump cable from the motherboard. If the cooler is mounted with screws, loosen them gradually in a cross pattern: a few turns on one screw, then the opposite screw, then the next. This reduces uneven pressure on the processor and motherboard.
For clip-style coolers, release the latch carefully according to the cooler design. Do not force the retention bracket. If it feels stuck, check for hidden screws, tabs, or mounting hardware. Many coolers look simple until they reveal their secret personality: “actually, there are two more screws under the fan.”
Step 3: Twist the Heatsink Gently Before Pulling
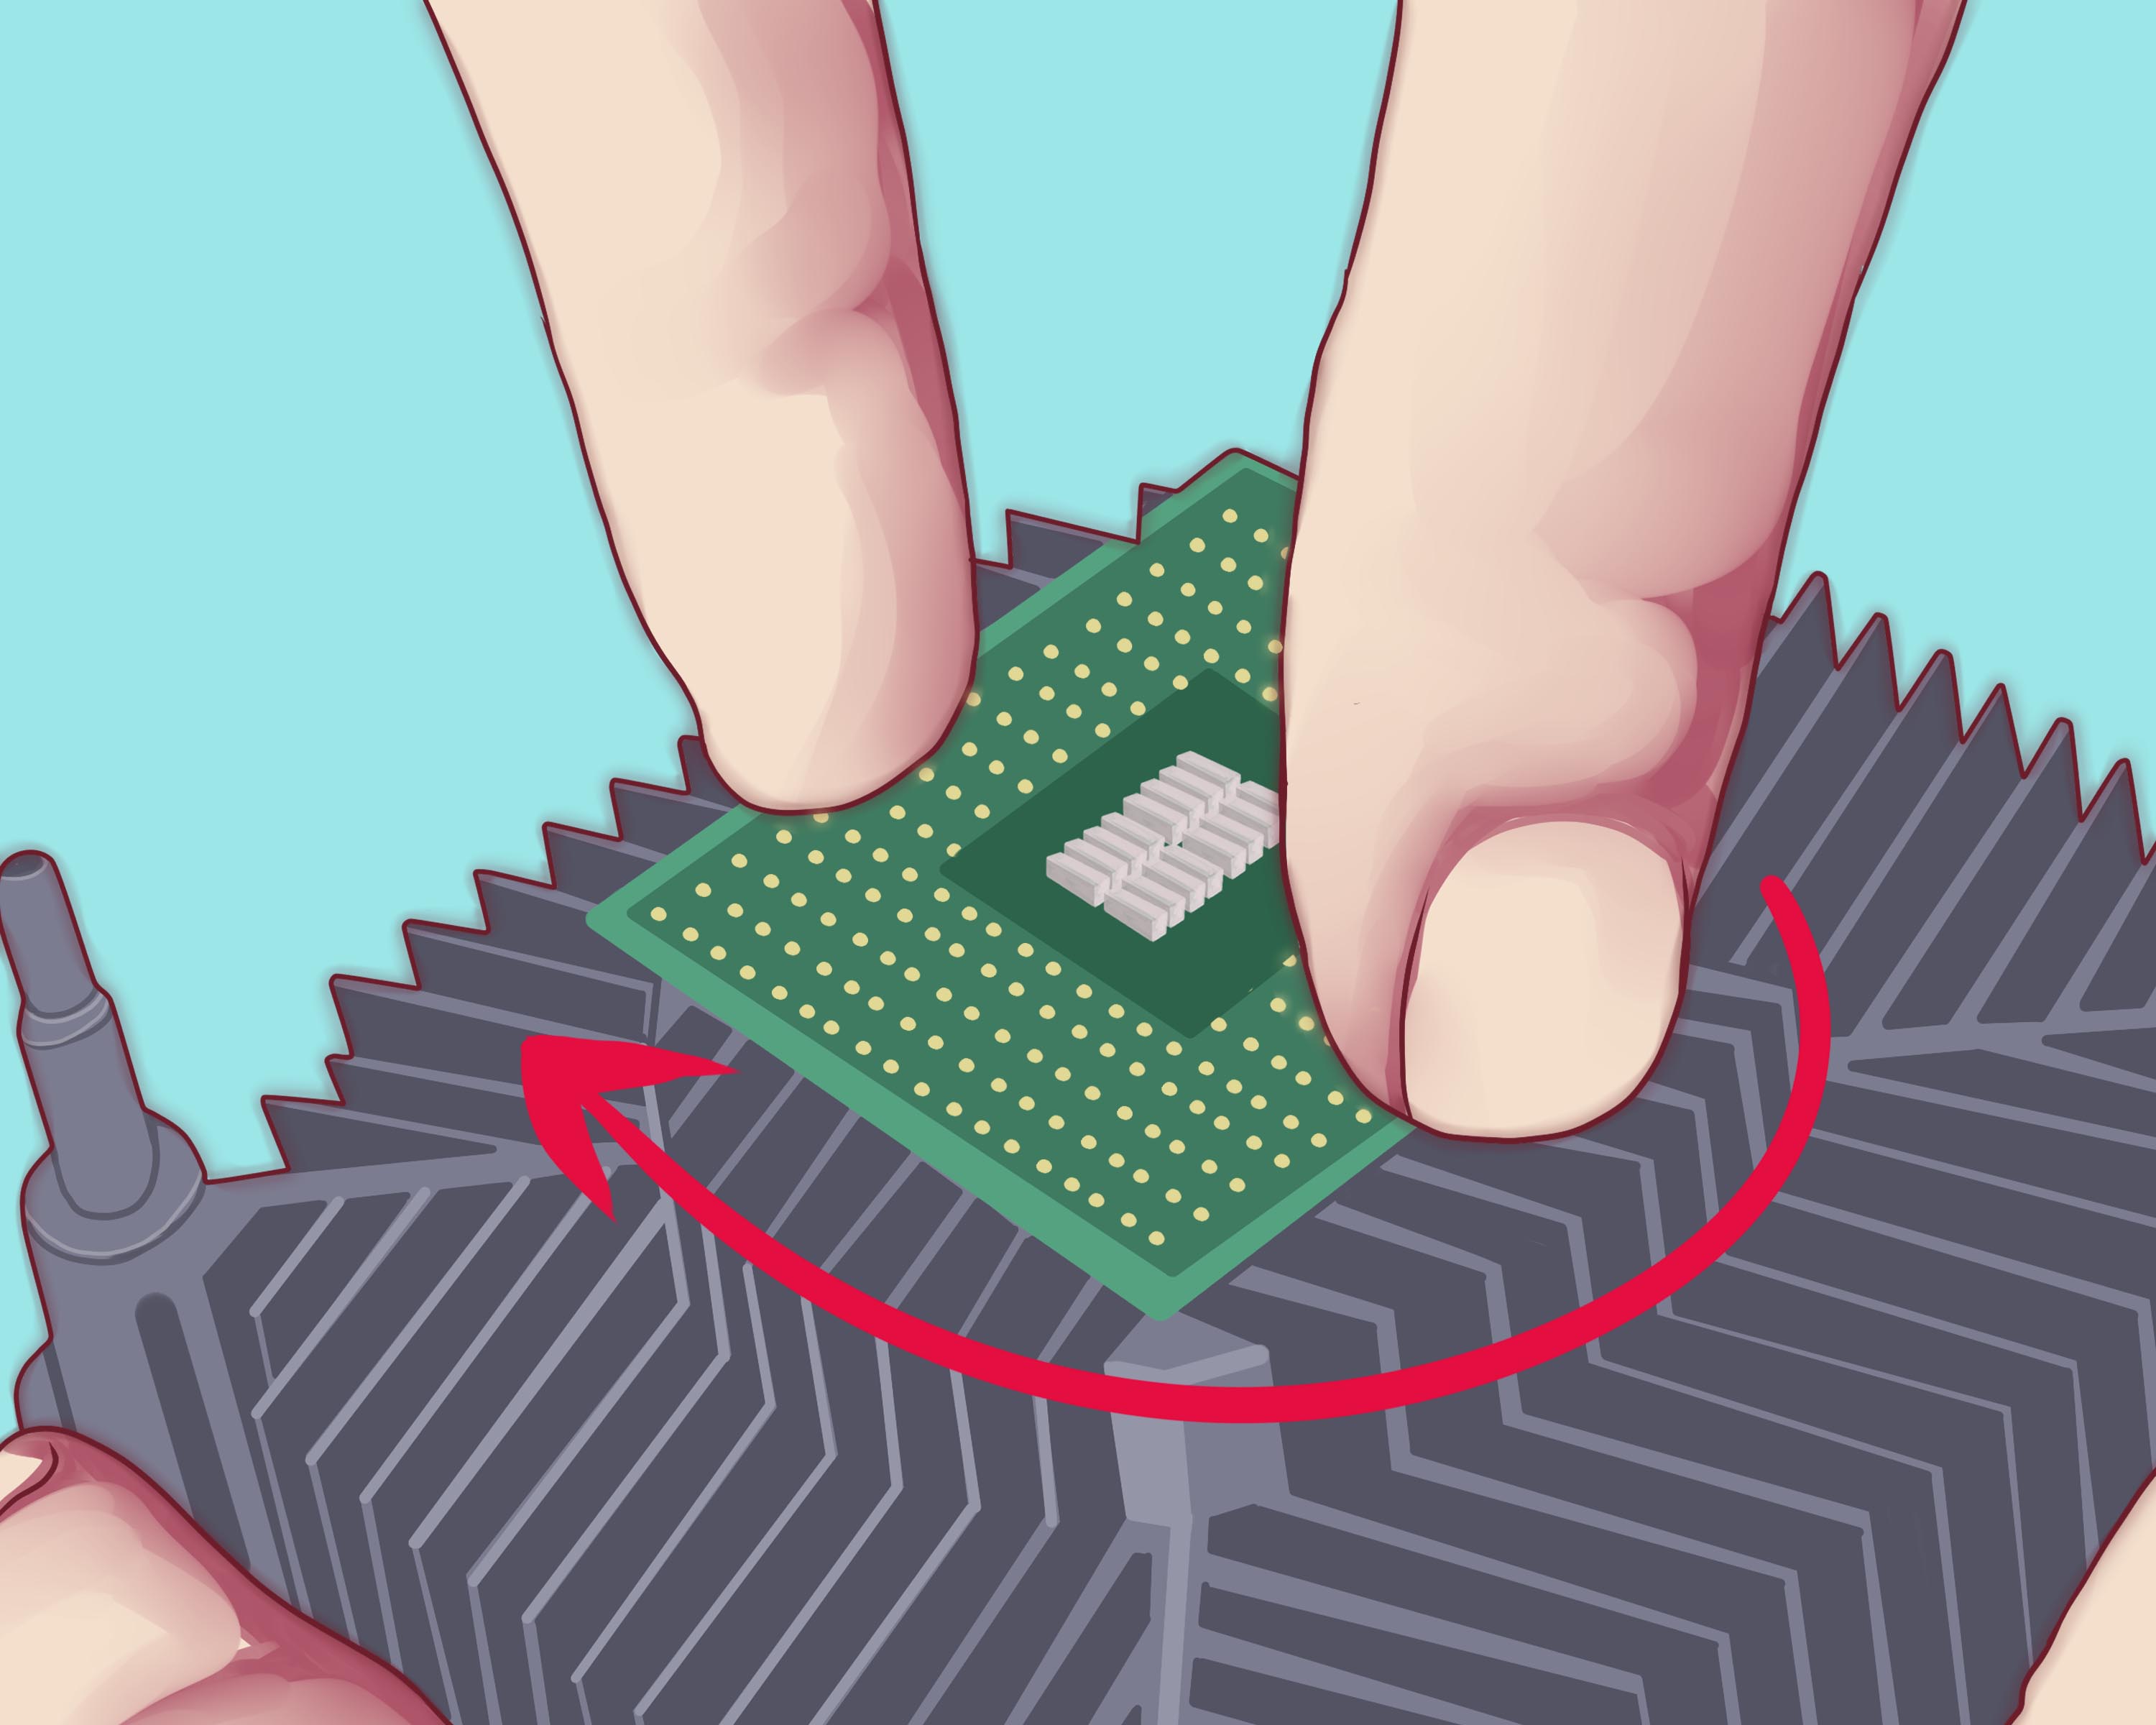
Once the mounting pressure is released, do not pull straight up. Instead, gently twist the heatsink clockwise and counterclockwise by a few degrees. Think of it as politely asking the thermal paste to let go. The twisting motion breaks the seal more safely than vertical force.
If the cooler moves slightly, keep twisting gently until the bond weakens. Then lift the cooler straight up with slow, even pressure. If the processor remains in the socket, excellent. Remove the cooler and place it flat on the workspace.
If the CPU comes out stuck to the cooler, do not panic. Also do not touch the pins or contacts. Hold the heatsink so the processor is facing upward, then move to the next step.
Step 4: Warm the Heatsink Surface Safely
If the processor is still stuck to the heatsink, controlled warmth can soften the thermal paste. The safest option is usually residual heat from normal computer operation before shutdown. If the cooler has already been removed and is cold, place the heatsink in a warm room for a while or use gentle, indirect warmth.
Do not blast the CPU with extreme heat. Avoid open flames, heat guns at high settings, ovens, or anything that sounds like it belongs in a questionable science fair. A hair dryer on a low or warm setting may be used cautiously, aimed at the metal heatsink rather than directly at the processor pins or socket side. Keep it moving and avoid overheating plastic parts, stickers, fan frames, or cables.
The goal is not to cook the processor. The goal is to make the old thermal compound slightly more cooperative.
Step 5: Slide, Do Not Pry
With the heatsink on a flat surface and the processor facing upward, try sliding the CPU sideways rather than pulling it away vertically. This motion reduces stress on the processor package and pins. If it does not move, add a small amount of isopropyl alcohol around the edge where the CPU heat spreader meets the heatsink. Let it sit briefly so it can work into the dried paste.
Dental floss can be surprisingly useful here. Hold the floss tight and work it gently between the CPU and heatsink, using a slow sawing motion. A thin plastic card or plastic spudger may also help, but be careful not to lever against the processor corners. Never jam a metal blade between the CPU and heatsink. That is not repair; that is hardware archaeology with casualties.
Once the CPU begins to slide, keep the motion slow and controlled. When it separates, lift the processor by the edges only. Do not touch the gold contacts or pins. Place the CPU on an anti-static surface or in a safe container.
Step 6: Inspect the Processor and Socket
Before cleaning, inspect the CPU carefully. If it is an AMD PGA processor, check for bent pins. Look from multiple angles under good light. Straight rows should look like a tiny golden city grid. If one pin looks like it tried to leave town, do not force the CPU back into the socket.
For Intel and newer AMD LGA-style platforms where the pins are in the socket, inspect the motherboard socket instead. Bent socket pins are delicate and harder to repair. If anything looks damaged, stop and consider professional help, especially if the system is expensive.
Also inspect the underside of the heatsink. Dried thermal paste may appear gray, chalky, rubbery, or uneven. That old paste needs to be removed before reinstallation. Reusing disturbed thermal paste is a classic beginner mistake. Once the cooler has been separated, the old paste may trap air pockets and reduce heat transfer.
Step 7: Clean, Reapply Thermal Paste, and Reinstall
Dampen a lint-free cloth, coffee filter, or cleaning wipe with isopropyl alcohol. Wipe old thermal paste from the CPU heat spreader and heatsink base. Use gentle pressure. For stubborn residue, apply a little more alcohol and let it loosen the paste before wiping again.
Do not soak the processor. Do not pour alcohol into the socket. Do not use household cleaners, window cleaner, cooking oil, or mystery liquid from the garage. Isopropyl alcohol is popular because it cleans well and evaporates quickly when used correctly.
When both surfaces are clean and dry, reinstall the CPU into the socket. Make sure it is aligned correctly. Most processors have a small triangle marker that matches a triangle on the socket. The CPU should drop into place without force. If you have to push hard, something is wrong.
Apply fresh thermal paste according to the cooler and CPU size. For many desktop processors, a pea-sized dot in the center works well. Larger chips may need a different pattern. Install the cooler evenly, tighten screws in a cross pattern, reconnect the fan or pump cable, and check temperatures after booting.
Common Mistakes to Avoid
Pulling Straight Up Too Hard
A straight upward pull can create exactly the disaster you are trying to avoid. Twisting is safer because it breaks the paste seal gradually.
Using Metal Tools
Metal tools can scratch the cooler plate, damage the processor, or slip into the motherboard. Use plastic tools or dental floss instead.
Reinstalling Without New Thermal Paste
Old thermal paste should be removed and replaced after separating the cooler. Fresh paste helps maintain proper contact and cooling performance.
Touching CPU Pins or Contacts
Oil from your fingers can contaminate contacts, and pins can bend easily. Always handle the processor by the edges.
Forgetting the Cooler Cable
After reinstalling, reconnect the CPU fan or pump cable. A beautiful cooler with an unplugged fan is just a decorative paperweight with RGB ambition.
What If the CPU Was Pulled Out of the Socket?
If the processor came out attached to the heatsink while the socket was locked, stay calm. This can happen, especially with older PGA-style processors and strong thermal paste adhesion. First, separate the CPU from the heatsink using the warming, alcohol, and sliding methods above. Then inspect the pins.
If no pins are bent, unlock the socket lever, align the CPU properly, and place it back into the socket. It should settle in without pressure. Lock the socket lever, apply fresh paste, and reinstall the cooler. If pins are bent, do not force installation. A slightly bent pin may sometimes be corrected with careful alignment, but severe pin damage can break the processor.
How to Prevent a Processor from Sticking Again
Prevention is easier than rescue. Before removing a cooler in the future, warm the system with a short workload, shut it down, unplug it, and twist the cooler gently before lifting. Use a reasonable amount of thermal paste. More paste does not mean better cooling. Too much paste can squeeze out, make cleanup messy, and increase the chance of sticky drama later.
Also choose quality thermal paste and avoid products that behave like glue unless the application specifically requires adhesive thermal pads or compounds. Standard CPU thermal paste should improve heat transfer, not permanently marry your cooler to your processor.
Extra Experience: Real-World Lessons from Removing a Processor Fused to a Heatsink
The first lesson from real PC repair experience is that patience saves hardware. Many people damage processors not because the CPU was impossible to remove, but because they rushed the moment when resistance appeared. When a heatsink refuses to move, your brain may say, “Just pull harder.” Your wallet, however, would prefer a second opinion.
A practical example: imagine removing an older Ryzen stock cooler after three years of daily use. The screws come out easily, the fan cable is disconnected, and the cooler looks ready to lift. You pull, and nothing happens. The beginner response is to yank. The experienced response is to stop, twist gently, and let the dried compound break its grip. That tiny pause can be the difference between a normal cleaning job and a bent-pin repair session under a desk lamp.
Another useful lesson is to control the workspace before touching the CPU. Put a towel or anti-static mat on the table, keep pets away, and avoid working over carpet if possible. A processor stuck to a cooler is awkward to hold. If it suddenly separates, you want it landing on a safe surface, not bouncing across the floor like the world’s most expensive cracker.
Isopropyl alcohol also works better when used with patience. A few drops around the edge of the heat spreader can help loosen stubborn paste, but it may need a little time. People often apply alcohol and immediately start prying. That is like spraying cleaner on a pan and scrubbing before it has a chance to do anything. Give it a moment, then try sliding again.
Dental floss is one of the most underrated tools for this job. It is thin, flexible, and less likely to scratch metal than a blade. The trick is to keep it flat and work slowly. If it catches, do not force it downward toward the CPU package. Reset the angle and continue gently. A plastic card can help too, but use it as a separator, not a crowbar.
Cleaning after separation is just as important as the rescue itself. Even if the processor looks mostly clean, old paste can leave a thin film that affects contact. Clean both the CPU heat spreader and cooler base until they look smooth and free of residue. Let the alcohol evaporate completely before applying new paste.
When reinstalling, resist the urge to add a giant blob of thermal paste “for safety.” Thermal paste is not cake frosting. A normal amount spreads under cooler pressure. Too much can squeeze out around the CPU edges, create a mess, and make the next removal more annoying. Too little can leave gaps. A centered pea-sized dot is a reliable method for many mainstream CPUs, while larger processors may benefit from a line, X-pattern, or manufacturer-recommended pattern.
Finally, check temperatures after the repair. Boot into BIOS or use reliable monitoring software in the operating system. Idle temperatures should be reasonable for your CPU and cooler, and load temperatures should not spike instantly to unsafe levels. If temperatures are unusually high, shut down and verify that the cooler is mounted evenly, the fan or pump is connected, and the thermal paste was applied correctly.
Removing a processor fused to a heatsink is not about strength. It is about technique. Warm the paste, twist instead of yank, slide instead of pry, clean thoroughly, and reinstall with fresh compound. Your CPU will appreciate the spa treatment, and your motherboard will appreciate not being treated like a wrestling mat.
Conclusion
A processor stuck to a heatsink can look scary, but it is usually a fixable thermal paste problem. The safest method is to shut down and unplug the system, loosen the cooler evenly, twist gently, warm the paste if necessary, slide the CPU free, clean both surfaces with isopropyl alcohol, and reinstall everything with fresh thermal paste. The key is avoiding sudden force. CPUs are powerful, but physically they still deserve gentle handling.
Whether you are upgrading a cooler, rebuilding an older PC, or rescuing a processor that came out attached to a stock heatsink, slow and careful work wins. Treat the CPU like a tiny expensive tile, not a bottle cap, and you will have a much better chance of finishing the job with your hardware intact.