
If you want a Halloween costume that is equal parts spooky, sweet, and instantly recognizable, Sally is a strong contender. She is one of the most beloved characters from The Nightmare Before Christmas, and for good reason: the patchwork dress is iconic, the red hair is dramatic, and the stitched details make the whole look feel handmade in the best possible way. In other words, she is a craft project and a costume rolled into one fabulous rag-doll package.
The beauty of a Sally costume is that you can make it in more than one way. Maybe you want the fast version because Halloween snuck up on you like a mischievous trick-or-treater. Maybe you want a no-sew solution because your relationship with a sewing machine is “it knows what it did.” Or maybe you want the full DIY experience with custom patches, neat hems, and a final result that makes people ask, “Wait, you made that?”
This guide breaks down three smart ways to make a Sally costume: a quick closet hack, a no-sew patchwork version, and a sewn costume for people who want a more polished finish. Along the way, you will also get tips for makeup, hair, accessories, and comfort, because looking like a stitched-together queen is great, but being able to walk, sit, and eat candy also matters.
What Makes a Sally Costume Instantly Recognizable?
Before you cut a single piece of fabric, it helps to understand the visual ingredients that make Sally look like Sally. Her costume works because several details come together at once. Miss too many of them, and people may think you are “abstract patchwork art student.” Nail the basics, and everyone gets it immediately.
The signature Sally details
- A patchwork dress: different prints and colors stitched together in an intentionally mismatched way.
- Long red hair: often recreated with a wig, yarn wig, or styled red hair.
- Blue or blue-green skin tone: usually done with face paint or makeup rather than a full mask.
- Stitches: black stitched lines on the face, neck, arms, and legs.
- A slightly eerie, handmade vibe: Sally should look charmingly imperfect, not overly polished like she just walked out of a luxury fashion campaign.
The good news is that you do not need movie-level costume construction to pull this off. You just need to focus on the dress, the color palette, and the stitched makeup details. That combination does most of the heavy lifting.
Way 1: Make a Quick Sally Costume with Clothes You Already Own
This is the fastest and easiest method, which makes it perfect for last-minute plans, school events, parties, or anyone who wants a cute Sally look without spending days at the craft table whispering “why did I start this?”
What you need
- A dress in muted or Halloween-friendly colors, preferably blue, purple, yellow, pink, or black
- Extra fabric scraps, scarves, old pillowcases, or patterned bandanas
- Fabric glue or safety pins
- Black ribbon, black fabric paint, or a black fabric marker
- Striped tights, solid tights, or bare legs with makeup stitches
- A red wig, red yarn wig, or temporary hair color
- Blue face paint or blue-toned makeup
How to do it
Start with a simple base dress. It does not have to match Sally’s movie design exactly. In fact, a plain thrifted dress often works better because it gives you a blank canvas. Then attach mismatched pieces of printed fabric across the dress in large blocks to mimic patchwork. Florals, stripes, swirls, polka dots, and abstract prints all help create that wonderfully stitched-together look.
Do not overthink the symmetry. Sally’s look is supposed to feel handmade and a little irregular. If one patch is larger than the others, congratulations, you are accidentally being accurate.
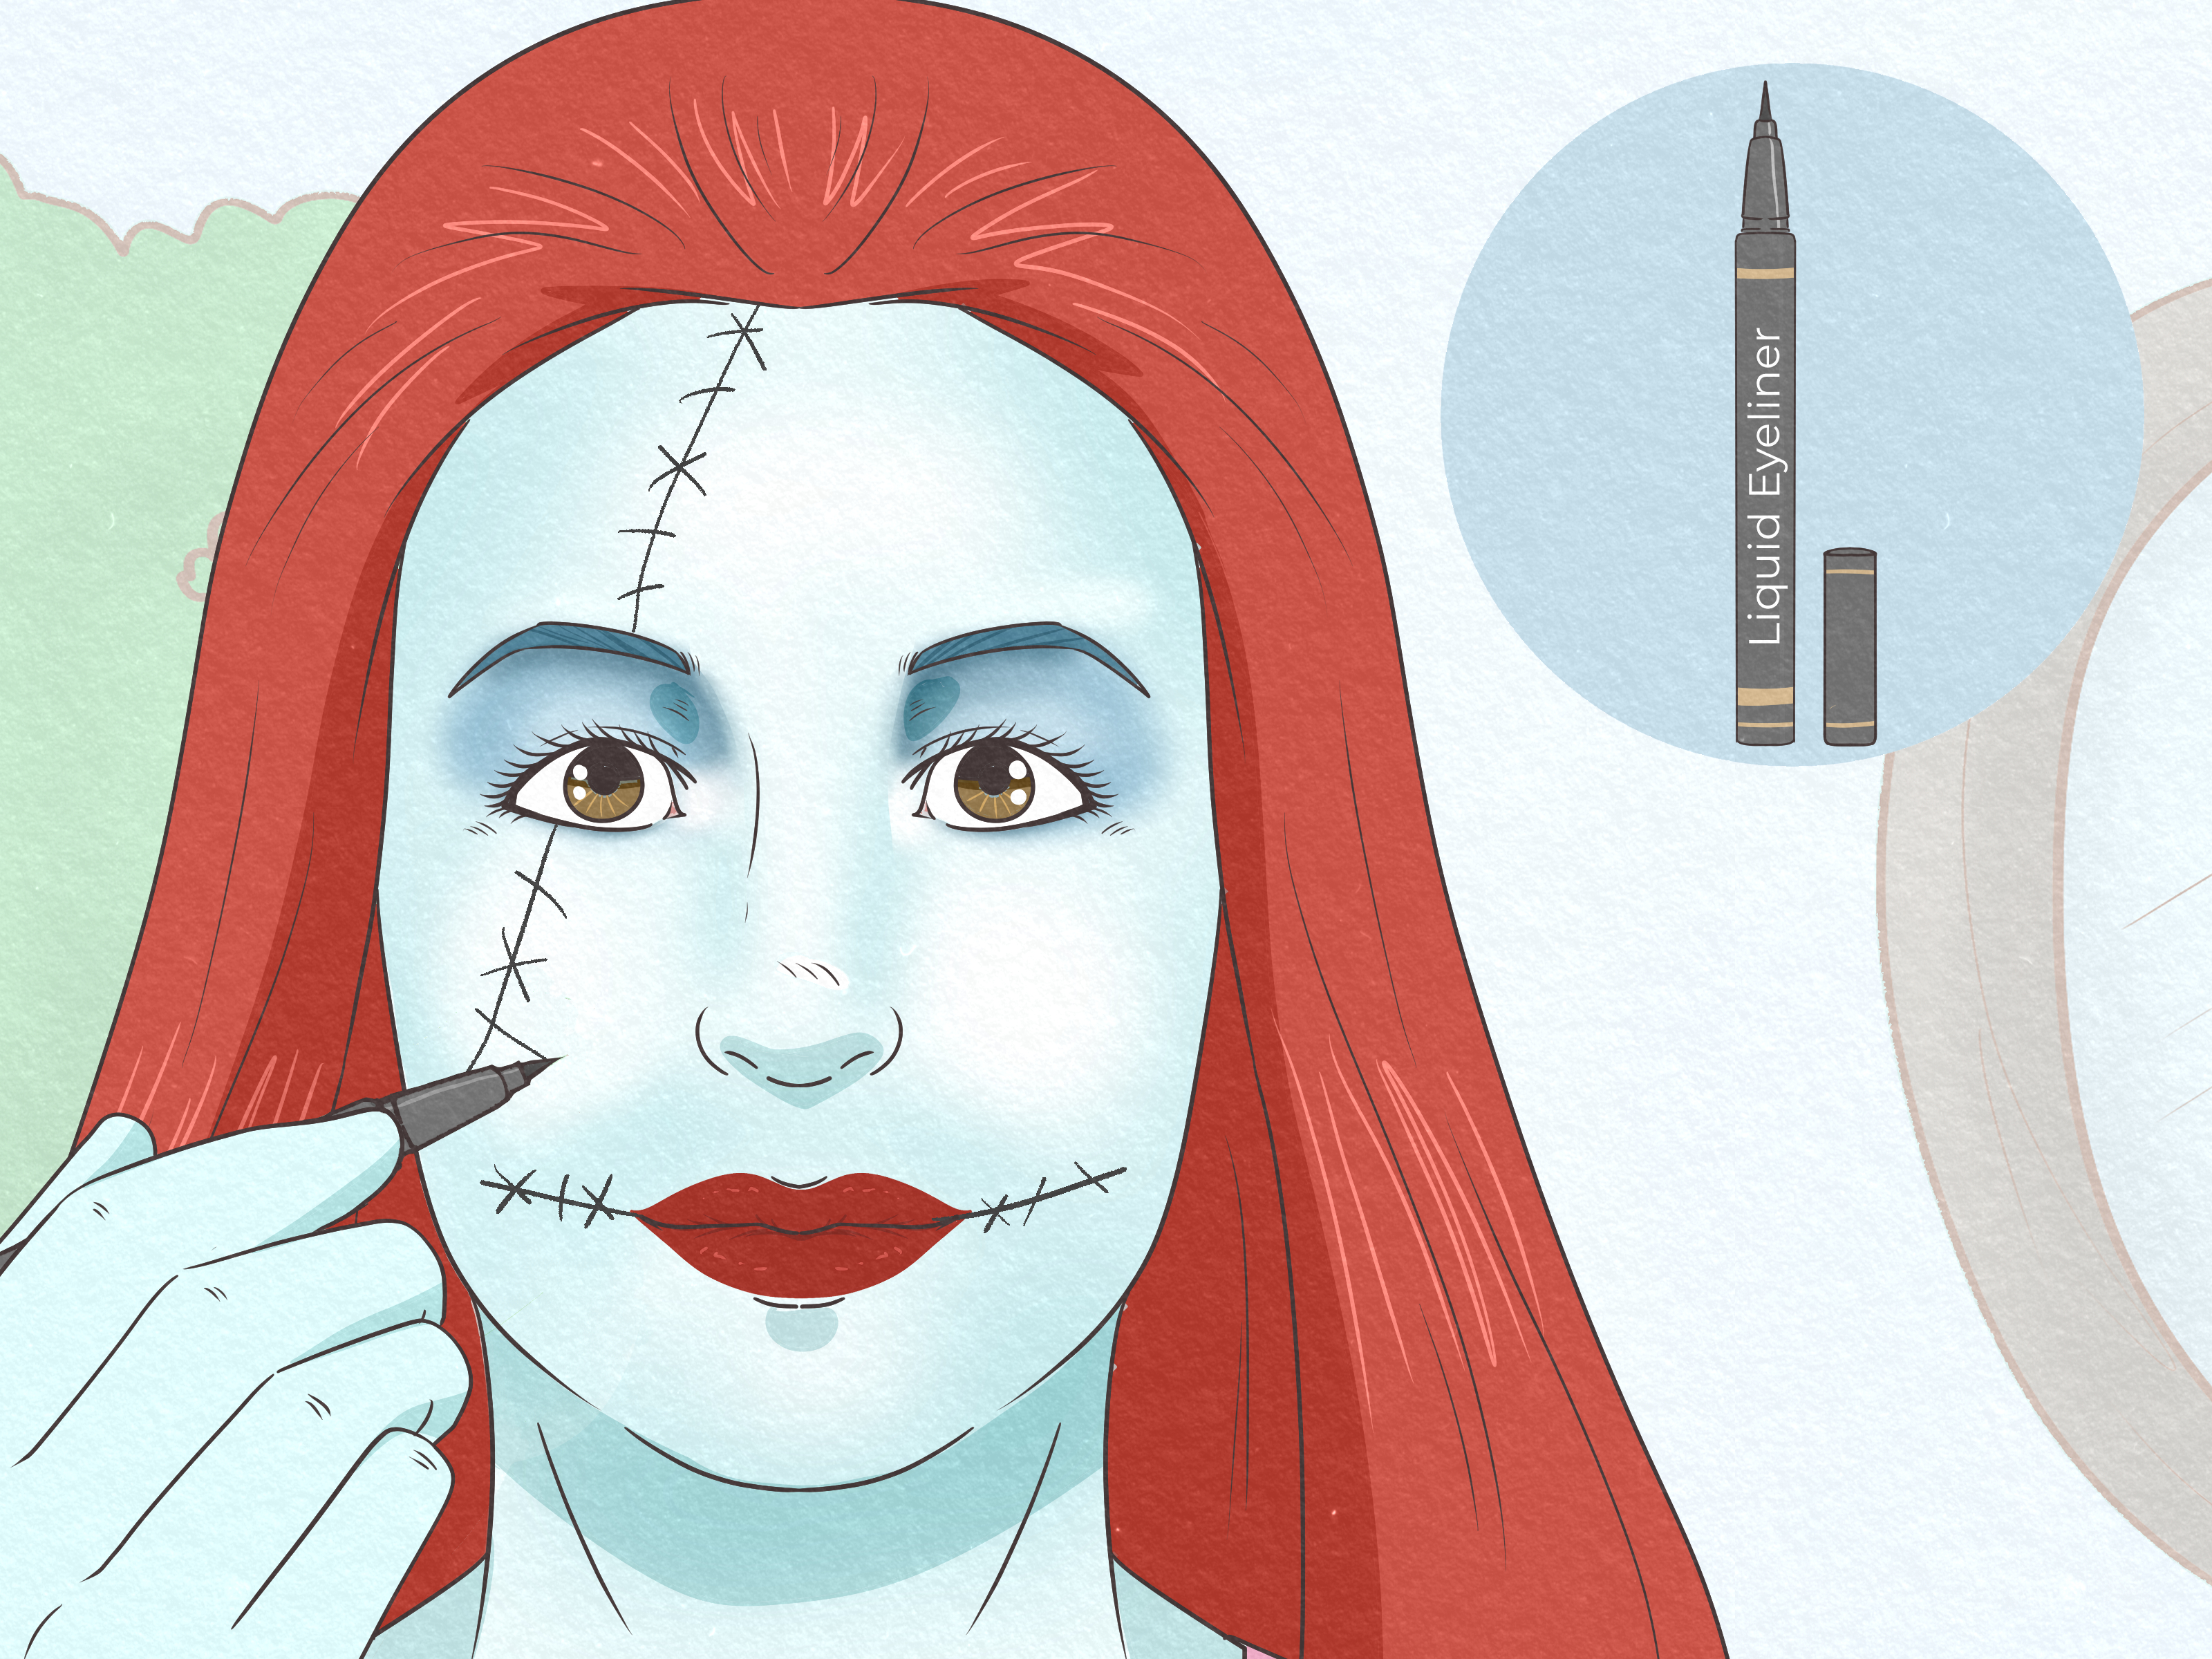
Next, use black ribbon or fabric paint to make fake seam lines where the patches meet. Add a few stitched X-shapes and dashed lines so the dress reads as “patched together,” not just “my laundry basket exploded.” Finish with a red wig and simple Sally makeup: blue face paint, darkened eyes, and stitched lines on the cheeks and mouth area.
Why this method works
This version is budget-friendly, beginner-friendly, and flexible. It is especially good if you care more about getting the overall look right than recreating every exact panel of Sally’s dress. It also makes moving around easier, since you are using real clothes rather than a rigid costume shell.
Best for
- Last-minute Halloween costumes
- Beginners
- Budget-conscious DIYers
- People who want comfort and speed
Way 2: Make a No-Sew Sally Costume with Patchwork Fabric Panels
If you want your Sally costume to look more intentional but still do not want to sew, this is your sweet spot. A no-sew Sally dress can look surprisingly detailed if you plan the fabric layout well and take your time with glue, hemming tape, or iron-on bonding material.
What you need
- A plain shift dress, tank dress, or oversized T-shirt dress as the base
- Six to ten fabric scraps in different colors and patterns
- Fabric scissors
- Fabric glue or fusible hemming tape
- Black trim, ribbon, or fabric paint for stitch lines
- Optional petticoat or slip if you want more shape
How to build the dress
Lay the base dress flat and plan the patchwork pattern before attaching anything. This step sounds boring, but it saves you from gluing a gorgeous yellow floral panel directly over the part where your arm needs to go. Arrange your fabric pieces diagonally and vertically in varied sizes. Sally’s dress does not follow strict rules, so the goal is visual balance rather than mathematical perfection.
Once you like the arrangement, trim the pieces and attach them one by one. If the edges start to fray, do not panic. A little fraying can actually help the handmade rag-doll effect. Just do not let it turn into full-on fabric chaos. Add black trim or stitched-looking paint lines along the borders so each panel stands out.
For the hem, you can leave it slightly uneven to make the costume more whimsical. Sally is not exactly known for sharp tailoring. Still, keep the dress short enough to walk safely and long enough to stay comfortable.
Make the no-sew version look more expensive
- Repeat one or two colors throughout the dress so it looks coordinated
- Mix large prints with small prints for depth
- Add subtle distressing instead of random messiness
- Use matte fabrics more than shiny ones for a storybook feel
Best for
- Intermediate crafters
- People who want a more detailed DIY Sally costume
- Anyone without a sewing machine
- Costume contests where effort matters
Way 3: Sew a Sally Costume for the Most Authentic DIY Look
If you enjoy sewing, or at least enjoy the fantasy version of yourself who calmly sews in perfect straight lines while sipping cider, this method gives you the most polished and customizable result. A sewn Sally costume lets you control the shape, fit, patch placement, and durability of the dress.
What you need
- A simple dress pattern, preferably sleeveless or short-sleeved
- Multiple cotton fabric prints in Sally-inspired colors
- Thread in black and coordinating colors
- Sewing machine or needle and thread
- Black bias tape, ribbon, or embroidery thread for stitches
- Zipper or elastic, depending on the dress style
How to sew it
Instead of cutting the dress from one fabric, cut each pattern piece from different prints. You can even divide large pieces, such as the front bodice or skirt panels, into smaller patchwork sections before assembling them. This creates a more authentic patchwork effect than adding patches on top of a finished dress.
After sewing the dress together, topstitch some of the seams with black thread so the patchwork stands out. You can also hand-embroider a few decorative stitch marks across the dress to mimic Sally’s rag-doll construction. The result should look artistic and handmade, not stiff and costume-store generic.
Because you are sewing from scratch, you can tailor the neckline, length, and fit to your preference. Want it more movie-inspired? Keep the silhouette simple and slightly fitted. Want it more wearable for a party? Add lining, soften the edges, and choose breathable fabrics that will not feel like wearing a decorative oven mitt.
Best for
- Experienced DIYers
- Sewers who want a long-lasting costume
- People aiming for a high-quality Sally cosplay
- Anyone who wants to rewear the costume over multiple years
How to Do Sally Makeup Without Overcomplicating It
A Sally costume is not complete without makeup. Luckily, the makeup is more about placement and contrast than advanced technique. You do not need to contour like a movie villain. You just need a clean base and clear stitched details.
Simple Sally makeup steps
- Start with clean, moisturized skin.
- Use a blue or blue-green face base on the face and visible skin.
- Add deeper blue around the eyes for dimension.
- Use black eyeliner or face paint to draw stitched lines on the cheeks, mouth, neck, arms, and legs.
- Add white highlights to some stitches so they pop more in photos.
- Finish with a red lip if you want a stronger Sally-inspired look.
Do a patch test before using novelty makeup, especially if you have sensitive skin. Use products intended for cosmetic use, avoid sketchy shortcuts, and remove makeup fully at the end of the night. Also skip non-prescription costume contact lenses. Sally’s look does not depend on them, and your eyeballs deserve peace.
Hair, Shoes, and Accessories That Pull the Whole Look Together
Hair
The easiest option is a long red wig. If you want a more handmade interpretation, create a yarn wig or braid yarn into your natural hair. Slight messiness works in your favor here. Sleek salon curls are pretty, but Sally’s vibe is more “beautifully haunted rag doll” than “pageant winner on a yacht.”
Shoes
Simple black flats, ankle boots, or low heels work well. If your dress is detailed and your makeup is strong, the shoes do not need to steal the spotlight. This is not the time for neon sneakers unless your goal is “Sally, but she has a 10K fun run at 8.”
Accessories
- A small basket or bag for candy
- A faux flower or leaf detail for a whimsical touch
- Striped socks or tights
- A Jack Skellington companion if you are doing a couple costume
How to Choose the Best Sally Costume Method for You
The best DIY Sally costume is not automatically the most elaborate one. It is the one that matches your time, budget, skill level, and patience. If you only have one evening, go with the closet hack. If you want creative control without sewing, choose the no-sew patchwork version. If you love making costumes and want the most polished finish, sew the dress from scratch.
Also think about where you are wearing it. A school event, party, theme park, family gathering, or cosplay convention all place different demands on comfort and durability. A gorgeous costume that starts shedding fabric panels by hour two may be memorable, but not in the way you were hoping.
Common Sally Costume Mistakes to Avoid
- Using too few patterns: the patchwork effect needs contrast.
- Making the makeup too faint: the stitches are part of the identity of the look.
- Choosing uncomfortable fabric: itchy costumes ruin good moods fast.
- Forgetting movement: make sure you can sit, walk, and raise your arms.
- Overloading accessories: Sally’s dress and makeup are the stars.
of Real-Life Experience: What Wearing a Sally Costume Actually Teaches You
One of the funniest things about making a Sally costume is that you begin by thinking about fabric, but you end by learning a surprising amount about confidence. On paper, Sally’s look seems chaotic. It is a patchwork dress with mismatched prints, stitched skin, and dramatic red hair. In real life, that “chaos” is exactly what makes the costume so satisfying to wear. It gives you permission to stop chasing perfection and start aiming for character.
People who make this costume often discover that the imperfect parts are the most charming ones. A slightly crooked patch, a hand-drawn stitch that is not fully symmetrical, or a wig that is a little wild can actually make the look more believable. Sally is not supposed to look airbrushed. She is supposed to look handmade, expressive, and wonderfully unusual. That means the costume tends to reward creativity more than technical perfection, which is refreshing if you are used to crafts that feel like pass-or-fail exams in disguise.
There is also a practical lesson that almost everyone learns the first time they wear a Sally costume: comfort is not optional. Many people spend hours making the dress and then realize five minutes into an event that they cannot sit comfortably, their wig is too hot, or their face paint transfers onto everything they touch. After that first trial run, most costume makers become much smarter. They line dresses, choose softer fabrics, carry blotting tissues, set makeup properly, and pack a small emergency kit with safety pins, glue, and lipstick. Experience turns a pretty costume into a wearable one.
Another common experience is how much people love recognizing Sally. Some costumes need a full explanation. Sally does not, especially when the patchwork dress, red hair, and stitched face come together. Even people who cannot name every character from the movie usually know they are looking at someone from Halloween Town. That instant recognition makes the costume more fun at parties, on social media, and in group photos. It also makes Sally a fantastic pair costume with Jack Skellington, because the two characters are visually iconic together without needing elaborate props.
Perhaps the best experience tied to this costume is that it can be deeply personal. No two DIY Sally dresses turn out exactly alike. One person might use thrifted florals and muted vintage tones. Another might go bold with brighter patchwork and exaggerated stitches. Someone else might create a glamorous version with dramatic lashes and a more fitted silhouette. All of those choices can still feel true to the character. That flexibility is part of the joy. You are not only copying a costume; you are interpreting it.
In the end, making a Sally costume is memorable because it blends nostalgia, craftsmanship, and self-expression. You start with scraps and makeup, and somehow end with a costume that feels artistic, playful, and unmistakably you. That is a pretty great result for a dress that is literally designed to look stitched together from leftovers.
Conclusion
A DIY Sally costume is one of the best Halloween projects for crafters, movie fans, and anyone who loves a costume with personality. Whether you go with a quick closet-based version, a no-sew patchwork dress, or a fully sewn costume, the same rule applies: focus on the signature details. Get the patchwork right, add the red hair and stitched makeup, and the look comes alive fast.
Best of all, Sally is flexible. She can be spooky, cute, elegant, theatrical, or wonderfully homemade depending on how you style her. So gather your scraps, queue up your favorite Halloween playlist, and start building a costume that looks like it stepped straight out of Halloween Town.