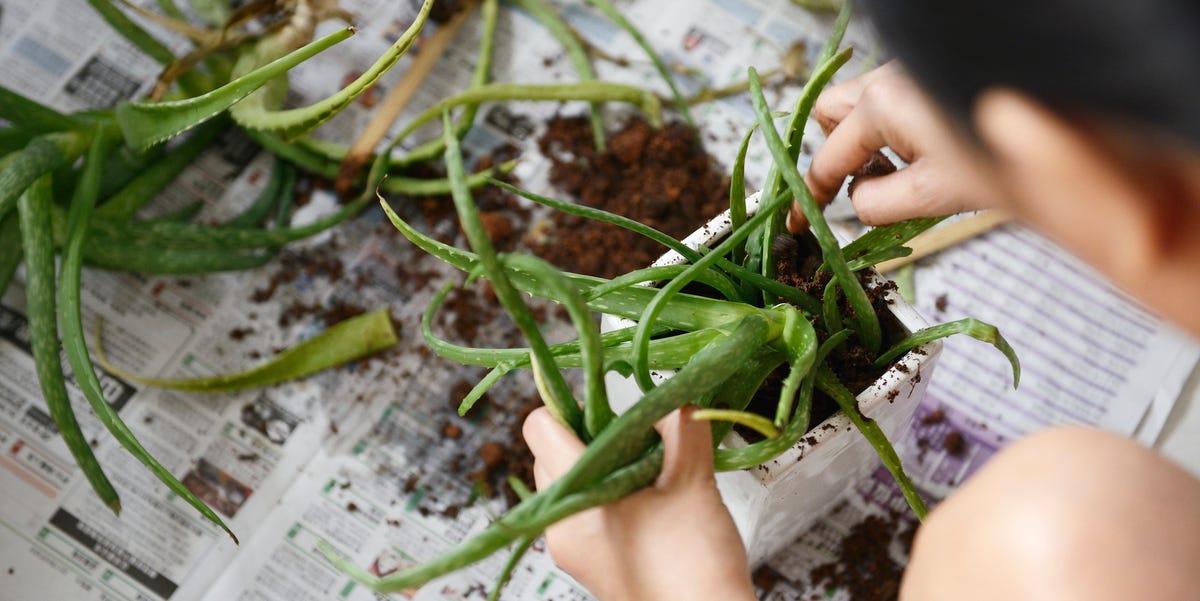

Aloe vera has the architectural confidence of a modern sculpture and the maintenance needs of a houseguest who brings their own snacks. Give it bright light, fast-draining soil, and the occasional deep drink, and this famously forgiving succulent can remain attractive for years.
Problems usually begin when an enthusiastic owner offers too much love in liquid form. Aloe vera stores moisture inside its thick leaves, so constantly wet soil is less a luxury spa and more a root-rot waiting room. Whether you are growing aloe on a sunny windowsill, summer patio, or warm-climate garden bed, the goal is to recreate the dry, bright conditions it prefers without turning care into a complicated science project.
This guide explains how to grow aloe vera indoors and outside, choose the right container, water it correctly, propagate offsets, solve common problems, and protect the plant when temperatures change.
Aloe Vera Care at a Glance
| Care Factor | Best Conditions |
|---|---|
| Light | Bright light, including several hours of gentle direct sun or very bright indirect light |
| Soil | Loose, gritty, fast-draining cactus or succulent mix |
| Water | Water thoroughly, then allow the soil to dry before watering again |
| Temperature | Approximately 55°F to 85°F indoors; protect from frost |
| Humidity | Average to dry household humidity |
| Fertilizer | Light feeding during active growth, if needed |
| Propagation | Separate and repot offsets, commonly called pups |
| Pet safety | Keep the plant away from cats, dogs, and horses |
How to Grow Aloe Vera Indoors
Choose a Container With a Drainage Hole
A drainage hole is not an optional decorative feature. It is one of the most important parts of an aloe vera pot. Water must be able to leave the container quickly after irrigation. A sealed cachepot may look elegant, but unless the inner nursery pot can be removed and drained, it can quietly collect enough water to damage the roots.
Terra-cotta is a particularly useful choice because its porous walls allow moisture to evaporate more quickly than it would from glazed ceramic or plastic. Plastic pots can still work, but the soil may remain damp longer, so check it carefully before watering.
Select a container only slightly wider than the plant’s root mass. An oversized pot holds extra wet soil around a relatively small root system. Aloe vera does not need a studio apartment when a well-drained one-bedroom will do.
Use Fast-Draining Succulent Soil
Standard indoor potting soil often holds more moisture than aloe needs. Use a commercial cactus or succulent mix, or improve a general potting mix with coarse mineral ingredients such as perlite, pumice, or coarse horticultural sand.
A suitable mixture should feel loose rather than dense. When moistened and squeezed, it should break apart instead of remaining in a muddy clump. Avoid garden soil in indoor containers because it may compact, drain slowly, and introduce pests or disease organisms.
Place the plant at approximately the same depth at which it was previously growing. Burying the central rosette or covering the lower leaves can trap moisture against the crown and encourage rot.
Provide Plenty of Bright Light
Aloe vera grows best near a bright south- or west-facing window in many homes. An unobstructed east-facing window can also provide useful morning sun. The ideal location depends on climate, season, window coatings, nearby buildings, and the intensity of the sun.
A plant receiving insufficient light may stretch, lean toward the window, develop weak leaves, or lose its compact rosette shape. Rotate the pot every week or two so that all sides receive light. If natural light is limited, a properly positioned grow light can supplement or replace window light.
Although aloe enjoys brightness, a plant accustomed to dim indoor conditions can scorch if abruptly moved into intense direct sun. Pale tan patches, bleached areas, or dry brown spots may indicate sunburn. Increase exposure gradually rather than moving the plant from a shadowy shelf directly into blazing afternoon sunshine.
Water Deeply but Infrequently
The safest aloe vera watering method is the soak-and-dry approach. Water the soil thoroughly until excess moisture flows from the drainage hole. Empty the saucer, then wait until the growing medium has dried before watering again.
Do not water according to a rigid calendar. An aloe may dry in a week during hot, bright summer weather but take several weeks during a cool, dark winter. Pot size, soil composition, air circulation, temperature, and container material all affect drying time.
Test the soil several inches below the surface with a finger, wooden skewer, or moisture probe used cautiously. The top may feel dry while the lower root zone remains wet. When uncertain, waiting a little longer is generally safer than adding another splash.
Avoid pouring water into the center of the rosette, especially in a cool room with limited airflow. Water the soil around the base instead. Aloe appreciates a proper drink, not a daily misting routine.
Manage Temperature and Humidity
Normal indoor temperatures are usually comfortable for aloe vera. Protect the plant from frost, freezing windows, cold drafts, and direct blasts from heating or air-conditioning vents. A leaf pressed against icy glass may be damaged even when the room itself feels comfortable.
Aloe does not require high humidity and generally performs well in average household air. Bathrooms with poor light are rarely ideal, despite their impressive steam-cloud atmosphere. Bright light and dry roots matter far more than tropical humidity.
Fertilize Lightly
Aloe vera naturally tolerates nutrient-poor conditions, so frequent feeding is unnecessary. If the plant is growing in fresh potting mix and looks healthy, fertilizer may not be needed at all.
For a plant that has occupied the same container for a long time, apply a diluted fertilizer formulated for succulents or houseplants during spring or early summer. Do not fertilize dry, stressed, newly repotted, diseased, or dormant plants. Excess fertilizer can burn roots and create weak growth.
Repot When the Plant Becomes Crowded
Repot aloe when roots fill the container, drainage slows, the soil has broken down, or offsets have crowded the parent plant. Spring and early summer are convenient times because the plant is entering active growth.
Choose a pot one size larger rather than making a dramatic jump. Remove old, compacted mix from around the roots, trim away clearly dead or rotting tissue with a sanitized tool, and replant in dry or barely moist succulent soil. Waiting several days before watering can allow damaged roots to begin healing.
How to Grow Aloe Vera Outside
Know Whether Your Climate Is Warm Enough
Aloe vera can remain outdoors year-round in warm, frost-free or nearly frost-free climates. It is commonly treated as a landscape perennial in roughly USDA hardiness zones 8 through 11, although local conditions, winter rainfall, elevation, and cold pockets can make a major difference.
Even in a generally warm region, a hard frost can injure leaves and roots. Gardeners in colder climates should grow aloe in a container that can be brought indoors before freezing weather arrives.
Acclimate Indoor Aloe Before Summer
Moving an indoor plant outside can improve light exposure and growth, but the change must be gradual. Begin in bright shade or a sheltered location. After several days, introduce a small amount of morning sun, then slowly increase exposure over one or two weeks.
Do not place a plant straight from a living-room shelf into full midday sun. Indoor-grown leaves have not developed the same protection as leaves formed outside, so sudden exposure can cause severe scorching.
Select a Sunny, Well-Drained Site
Outdoor aloe generally performs well in full sun to partial sun, with some protection from the harshest afternoon heat in extremely hot climates. Morning sun followed by light afternoon shade is often a useful compromise.
Drainage is especially important in garden beds. Avoid depressions where rainwater collects, heavily irrigated lawns, and clay soil that stays saturated. A raised bed, rocky slope, berm, or elevated planter can help excess water move away from the roots.
Leave enough room for the mature rosette and future offsets. Depending on growing conditions, outdoor plants can eventually reach several feet across. Crowding encourages trapped debris and makes maintenance more awkward.
Adjust Watering for Rain and Heat
Established outdoor aloe is drought tolerant, but newly planted specimens require occasional irrigation while their roots settle into the site. Water deeply, then allow the soil to dry.
During rainy periods, turn off nearby irrigation and check whether roof runoff or sprinklers are soaking the planting area. In desert heat, container-grown aloe may dry faster than plants rooted in the ground. A black plastic pot on a sun-baked patio can become much hotter and drier than the same plant in a garden bed.
The plant’s condition and the soil’s moisture are more useful than a preset schedule. Let the roots make the decision, not the day of the week.
Protect Aloe From Cold Weather
Bring potted aloe indoors before the first freeze. Inspect the leaves, undersides, soil surface, and drainage hole for insects before moving the plant into the house. A brief quarantine away from other houseplants can prevent unwanted hitchhikers from joining the indoor collection.
For aloe planted in the ground, frost cloth may provide limited protection during a short cold event, but it cannot make a tropical succulent fully winter-hardy. Keep protective fabric above the foliage when possible, secure it to the ground, and remove it once temperatures improve.
How to Propagate Aloe Vera Pups
Mature aloe plants commonly produce small offsets around their base. These pups are the easiest and most reliable way to produce new plants.
- Wait until an offset is several inches tall and ideally has developed some roots.
- Remove the parent plant from its pot if necessary so the connection is visible.
- Gently tease the pup away or cut the connecting tissue with a clean, sharp knife.
- Allow a fresh cut to dry and callus for a day or two in a shaded, airy place.
- Plant the offset in a small pot filled with dry, fast-draining succulent mix.
- Wait several days before watering, then irrigate lightly until roots become established.
A pot that is too large or soil that remains constantly damp can rot a young offset before it develops a strong root system. Start small and increase the container size later.
Trying to grow aloe from a single leaf is far less reliable. Detached leaves often rot before producing a viable new plant, so offsets are the sensible choice unless you enjoy horticultural disappointment as a hobby.
Pruning and Harvesting Aloe Leaves
Remove dead, badly damaged, or collapsed outer leaves with a sanitized knife. Make a clean cut near the base without injuring the central growing point. Do not remove healthy leaves merely to force a tidier shape; every green leaf helps the plant store water and produce energy.
When harvesting a leaf, choose a mature outer leaf and cut it near the base. Avoid removing multiple leaves from a small or stressed plant. The yellow latex layer beneath the outer skin contains compounds that should not be casually consumed. Keep fresh plant material away from children and pets, and consult an appropriate health professional before using home-grown aloe for medical purposes.
Common Aloe Vera Problems and Solutions
Soft, Mushy, or Translucent Leaves
This often signals excessive moisture, cold damage, or both. Remove the plant from its pot and inspect the roots. Healthy roots are firm; rotting roots may be brown, black, slimy, or foul-smelling. Trim damaged tissue, allow cuts to dry, and repot in fresh, fast-draining mix. Severe crown rot may be impossible to reverse.
Thin, Drooping, or Stretched Leaves
Weak, elongated growth usually indicates insufficient light. Move the plant gradually to a brighter location or add a grow light. Drooping can also occur when roots have rotted and can no longer absorb water, so inspect the soil before assuming the plant is thirsty.
Wrinkled or Flattened Leaves
Wrinkling may indicate that the plant has used much of its stored moisture. If the soil is completely dry and the roots appear healthy, provide a thorough watering. Leaves may not become perfectly smooth immediately, but new growth should improve.
Brown, Red, or Bronze Coloration
Reddish or bronze pigmentation can develop under strong sun, drought stress, cold, or abrupt environmental change. A small color shift is not always dangerous. Bleached, crispy, or sharply defined patches are more consistent with sunburn.
Brown Leaf Tips
Brown tips can result from physical damage, irregular watering, salt buildup, heat, or natural aging. Flush the soil occasionally with clean water and allow it to drain completely. Avoid allowing the leaf tips to rub against windows, walls, or busy walkways.
Mealybugs and Scale Insects
Mealybugs resemble small cottony clusters, while scale insects may look like attached brown or tan bumps. Isolate the plant, remove visible pests with a cotton swab lightly moistened with rubbing alcohol, and repeat inspections. Insecticidal soap labeled for succulents may help, but test it on a small area and follow the product directions carefully.
Is Aloe Vera Safe for Pets?
Aloe vera is considered toxic to dogs, cats, and horses because parts of the plant contain saponins and anthraquinones. Ingestion may cause vomiting, diarrhea, and lethargy. Although the clear inner gel is treated differently in some references, pets can bite through the entire leaf and consume the outer tissues as well.
Place aloe plants where curious animals cannot chew them or knock the pot over. Contact a veterinarian or animal poison-control service promptly if a pet eats the plant or develops symptoms.
Final Thoughts on Growing Healthy Aloe Vera
Successful aloe vera care comes down to three priorities: bright light, excellent drainage, and restraint with the watering can. Indoor plants need a sunny window or grow light, while outdoor plants need gradual acclimation, protection from frost, and a site where rainwater drains quickly.
Watch the plant instead of blindly following a calendar. Firm upright leaves usually indicate that conditions are working. Mushy tissue, stretching, or persistent wrinkling provides clues that light, water, temperature, or root health needs attention.
Aloe vera is forgiving, but it is not indestructible. Treat it more like a desert traveler carrying its own water bottle and less like a thirsty fern, and it will reward you with sculptural foliage, new pups, and surprisingly little drama.
Experience-Based Lessons From Growing Aloe Vera Indoors and Outside
The following practical lessons reflect common experiences reported by home gardeners and are presented as composite examples rather than one person’s private gardening diary.
The Sunny Window That Was Not Actually Sunny
One of the most common indoor aloe experiences begins with a plant sitting near a window and slowly becoming loose, floppy, and lopsided. The owner insists that the room is bright because people can comfortably read there. Unfortunately, human eyes are excellent at adjusting to low light, while plants are less willing to participate in the illusion.
Moving the aloe directly beside an unobstructed window often improves the firmness and spacing of new leaves. The old stretched growth does not magically shrink back into shape, but the center begins producing sturdier foliage. Rotating the pot regularly prevents the new growth from leaning strongly toward the glass.
The Weekly Watering Habit That Nearly Ended Everything
Another familiar story involves an aloe watered every Saturday alongside tropical houseplants. For several months, nothing appears wrong. Then the lower leaves become soft, the plant loosens in the soil, and an unpleasant smell emerges from the pot. The problem was not one enormous watering mistake; it was a polite series of small ones.
The successful correction usually involves removing wet soil, cutting away rotted roots, and repotting the surviving plant in gritty mix. More importantly, the watering rule changes from “every Saturday” to “only after the root zone has dried.” The calendar remains useful for birthdays and dentist appointments, but it loses custody of the watering can.
The First Outdoor Vacation
An indoor aloe moved onto a patio can respond with faster growth and stronger leaves, but only when introduced gradually. Gardeners who begin with bright shade and slowly add morning sun often see good results. Those who place the plant immediately in an exposed west-facing location may discover pale, crispy patches within days.
The burned leaves remain marked, yet the plant can recover if moved to gentler light. New leaves adapted to outdoor conditions tend to tolerate stronger sun. This experience teaches an important lesson: sunlight is beneficial, but sudden sunlight is a different product entirely.
The Rainy Summer Surprise
Outdoor growers sometimes stop hand-watering but forget that the plant remains beneath a roof edge, sprinkler, or overflowing gutter. After repeated storms, an aloe that previously tolerated neglect can decline quickly. Container soil may appear dry on top while remaining saturated around the roots.
Moving the pot under a covered porch, elevating it on pot feet, or tipping excess water from an outer cachepot can prevent further damage. In humid, rainy climates, protection from excess moisture may matter more than supplemental irrigation.
The Pot Full of Pups
A healthy mature aloe often produces so many offsets that the container begins to resemble a crowded family reunion. Some gardeners enjoy the dense cluster and leave it alone. Others separate the pups and suddenly own twelve aloe plants instead of one, which is how neighbors and coworkers become involved.
The best results usually come from waiting until pups have a few roots of their own, using small containers, and resisting the urge to soak them immediately after separation. Young offsets are vulnerable to rot, especially when planted in oversized pots.
The Vacation Test
Aloe often performs better during a two-week vacation than under the daily supervision of an anxious new owner. A thoroughly watered plant in a bright location can usually tolerate a reasonable period without attention. Returning gardeners are frequently surprised to find the aloe unchanged while thirstier houseplants are staging a theatrical collapse.
This does not mean aloe should be permanently ignored. It means the plant’s storage strategy works. Healthy roots, appropriate light, and well-drained soil allow it to handle short dry periods far better than continuous dampness.
The Most Useful Long-Term Habit
Experienced growers eventually stop asking, “How often should I water aloe?” and begin asking, “How quickly is this particular plant drying under its current conditions?” That shift makes care more accurate across seasons, homes, and climates.
Aloe care becomes easier when observation replaces routine. Feel the soil, notice leaf firmness, watch how the sun moves through the room, and adjust when the seasons change. The plant is constantly offering information. Fortunately, it communicates through leaves instead of sending passive-aggressive text messages.