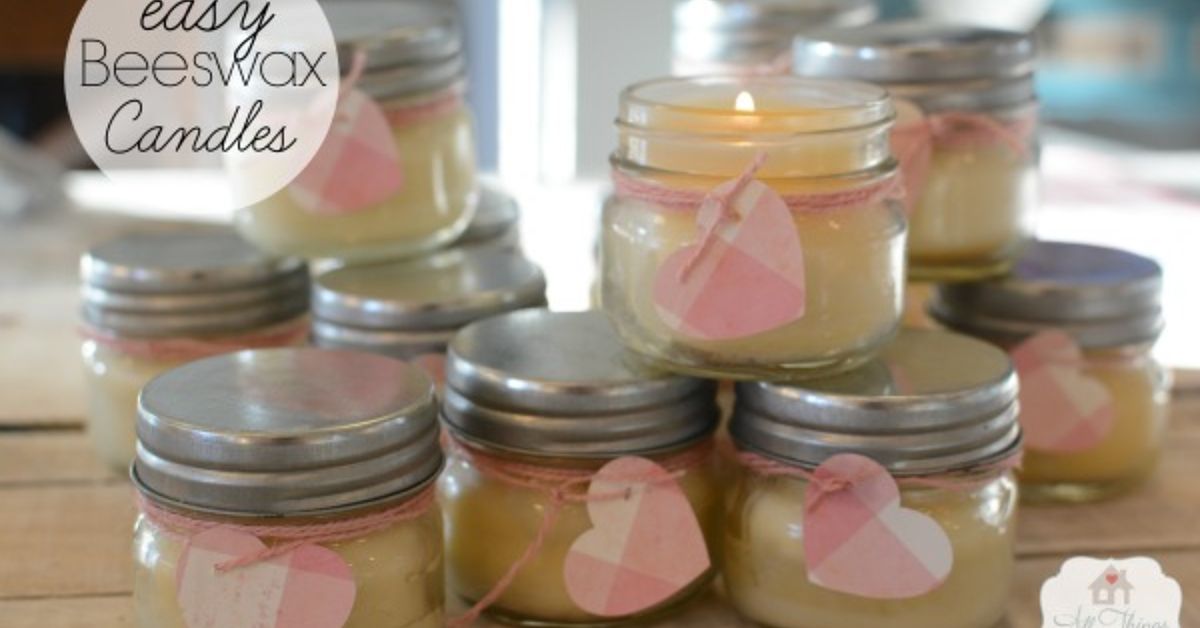

There are two kinds of people in this world: people who buy candles and people who make candles once, then suddenly start saving every empty glass jar like it might become heirloom kitchenware. If you are in the second groupor you are about to bewelcome. These easy beeswax lavender candles are simple, cozy, giftable, and just fancy enough to make your home smell like you have your life together, even if there is laundry in the chair giving you side-eye.
Beeswax candles are beloved because they burn beautifully, have a naturally warm honey scent, and feel a little more special than a regular store-bought candle. Add lavender essential oil, and you get a soft floral aroma that works well in bedrooms, bathrooms, reading corners, entryways, and anywhere else that could use a small “please calm down” button.
This guide walks you through how to make beeswax lavender candles at home using beginner-friendly tools, safe techniques, and practical tips that help prevent tunneling, drowned wicks, weak scent, and other candle drama. The process is not complicated, but candle making does reward patience. Think of it as baking, except you do not get to lick the spoon. Please do not lick the spoon.
Why Make Beeswax Lavender Candles at Home?
Homemade beeswax candles are popular for a reason. Beeswax is a natural wax produced by honey bees, and it has been used for candles for centuries. It has a higher melting point than many other waxes, which often helps beeswax candles burn longer and hold their shape well. It also carries a subtle natural scent that pairs beautifully with lavender.
Making your own candles gives you control over the ingredients. You choose the wax, the container, the wick, and the fragrance level. That means you can skip overly strong artificial scents and create something softer and more personal. A beeswax lavender candle does not need to smell like a perfume counter got into a fistfight with a flower garden. A gentle scent is usually better.
These candles also make excellent handmade gifts. A small jar candle with a handwritten label feels thoughtful without requiring you to knit a sweater, build a table, or learn calligraphy overnight. Add a ribbon and suddenly you are the charming person who gives homemade gifts. Congratulations on your new personality trait.
What Makes Beeswax Different from Other Candle Waxes?
Beeswax is firmer than soy wax and usually melts at a higher temperature, generally above 140°F. This firmness is one reason beeswax can create long-lasting candles, but it also means it needs the right wick. If the wick is too small, the flame may struggle and create a tunnel down the middle. If the wick is too large, the candle may burn too hot. The goal is a steady flame, an even melt pool, and a candle that behaves like a polite guest.
Pure beeswax can sometimes be tricky in container candles because it is dense. Many DIY candle makers add a small amount of coconut oil to soften the wax slightly. This can help the candle melt more evenly and may improve scent release. You do not need much. A little coconut oil is helpful; a lot can make the candle too soft, and then your elegant candle starts acting like a lotion with a wick.
Lavender and Beeswax: A Natural Pairing
Lavender is one of the most popular scents for homemade candles because it smells fresh, herbal, floral, and peaceful without being too sugary. It blends well with beeswax because beeswax already has a mild honey-like aroma. Together, the result is warm, clean, and relaxing.
However, essential oils behave differently from synthetic candle fragrance oils. Lavender essential oil can work in candles, but it usually creates a softer scent throw. If you want a candle that fills a large living room with fragrance from across the house, lavender essential oil alone may not do that. If you want a gentle candle for a nightstand, bath shelf, desk, or reading nook, it is a lovely choice.
The key is to add the oil when the wax is hot enough to blend but not so hot that the delicate aroma disappears before the candle even sets. This is where a thermometer becomes your tiny kitchen scientist.
Supplies You Will Need
Ingredients
- 1 pound beeswax pellets or chopped beeswax
- 2 tablespoons coconut oil
- 0.5 to 1 ounce lavender essential oil, depending on scent preference
- Pre-tabbed cotton or wooden candle wicks sized for your container
- Heat-safe glass jars, tins, or ceramic candle containers
Tools
- Double boiler or a heat-safe pouring pitcher set inside a pot of simmering water
- Kitchen scale
- Thermometer
- Wick stickers or a dab of melted wax
- Wick centering bars, clothespins, pencils, or chopsticks
- Stirring utensil
- Paper towels or newspaper for protecting your work surface
A scale is strongly recommended because candle making works best by weight, not by “eh, that looks about right.” Measuring wax like a soup recipe can lead to inconsistent candles. Measuring by weight makes your results much more predictable.
Choosing the Right Container
For beginners, small jars are easiest. A 4-ounce or 8-ounce heat-safe glass jar gives you a manageable candle size and makes wick testing less intimidating. Wide containers are more difficult because beeswax needs enough heat to melt across the surface. If the container is too wide and the wick is too small, the wax near the edges may never melt, creating the dreaded candle tunnel. Candle tunnels are not cute. They are just potholes with fragrance.
Choose containers made for candles or heat-safe use. Avoid thin glass, random decorative bowls, cracked jars, or anything that looks charming but suspicious. Candle containers must handle heat safely. A cute jar is not worth a countertop disaster.
Choosing the Right Wick
Wick choice is one of the most important parts of making beeswax candles. Beeswax is dense, so it often needs a slightly larger wick than softer waxes. Wick size depends on container diameter, wax type, fragrance load, and whether you add coconut oil.
For small jars, start with a wick recommended by the wick supplier for beeswax and your container diameter. If you are using a wooden wick, choose one designed for natural waxes and test it before making a large batch. A good wick creates a steady flame, melts wax evenly, and does not produce excessive smoke.
After the candle cures, test burn it. If the flame is tiny and wax clings stubbornly to the sides, the wick may be too small. If the flame is huge, flickering wildly, or smoking, the wick may be too large. Candle testing sounds technical, but really you are just asking, “Is this flame being normal?”
Step-by-Step: How to Make Easy Beeswax Lavender Candles
Step 1: Prepare Your Work Area
Cover your counter with newspaper, parchment paper, or an old towel. Beeswax is not impossible to clean, but it is very committed once it lands somewhere. Set out your jars, wicks, tools, and ingredients before you start melting wax. Candle making goes more smoothly when you are not digging through a drawer for a thermometer while holding a pot of hot wax.
Step 2: Secure the Wicks
Place one wick in the center of each candle container. Use a wick sticker, a glue dot designed for candle making, or a small dab of melted wax to hold it in place. Then use a wick centering tool, clothespin, pencil, or chopsticks to keep the wick upright.
Centering matters. A crooked wick can cause uneven burning, hot spots, and wax left on one side of the jar. It is a small detail, but it makes the finished candle look and burn much better.
Step 3: Melt the Beeswax Slowly
Add the beeswax to the top of a double boiler. Heat gently over medium-low heat, stirring occasionally. Do not melt beeswax directly in a pot over high heat. Beeswax can scorch, and overheated wax can become dangerous. Slow, steady heat is the candle maker’s best friend.
Once the wax is fully melted, stir in the coconut oil. The coconut oil helps soften the beeswax slightly, which can improve the melt pool and make the candle easier to burn evenly.
Step 4: Cool Slightly Before Adding Lavender
Remove the melted wax from the heat and let it cool slightly. Add lavender essential oil when the wax is still liquid but not blazing hot. A common working range is around 160°F or slightly lower, depending on the essential oil and wax supplier’s guidance. Stir slowly for one to two minutes so the scent disperses evenly.
Do not whip the wax like cake batter. Stirring too aggressively can introduce air bubbles. Your candle does not need cardio.
Step 5: Pour Carefully
Slowly pour the scented wax into the prepared containers, leaving about half an inch of headspace at the top. Pouring slowly helps reduce air pockets and messy splashes. Keep the wick centered while the wax begins to set.
If you notice the wick drifting, adjust it before the wax hardens. This is your window of opportunity. Once the wax sets, that wick has chosen its lifestyle.
Step 6: Let the Candles Cool and Cure
Allow the candles to cool at room temperature away from drafts. Do not place them in the refrigerator to speed things up. Rapid cooling can cause cracks, sinkholes, or poor adhesion to the jar.
Once the candles are firm, trim the wick to about 1/4 inch. Let the candles cure for at least 24 hours before burning. A few days of curing is even better because it gives the wax and fragrance time to settle together.
Best Fragrance Ratio for Beeswax Lavender Candles
For a gentle lavender scent, use about 0.5 ounce of lavender essential oil per pound of beeswax. For a stronger scent, try up to 1 ounce per pound. Many candle makers consider 6% fragrance load a practical starting point, but beeswax has its own natural scent and may not release essential oils as strongly as soy wax.
If you are new to candle making, start lighter. You can always adjust in the next batch. Too much essential oil can affect burn quality, create sweating on the candle surface, or make the wax behave strangely. A candle should smell lovely, not like it is trying to season the entire house.
Common Mistakes and How to Avoid Them
Mistake 1: Using the Wrong Wick
The wrong wick is the number one reason homemade beeswax candles misbehave. Always match your wick to your container diameter and wax type. When possible, buy wicks from a supplier that provides wick charts.
Mistake 2: Adding Essential Oil When the Wax Is Too Hot
If the wax is too hot, some of the lavender aroma may evaporate quickly. Let the wax cool slightly before adding the essential oil, then stir well. This small step can make a big difference in scent quality.
Mistake 3: Burning the Candle Too Briefly the First Time
The first burn matters. Let the candle burn long enough for the melt pool to reach close to the edges of the container. This helps prevent tunneling later. For many small container candles, this may take one to three hours. Never leave it unattended while it burns.
Mistake 4: Skipping Safety Basics
Candles are beautiful, but they are still open flames. Burn them on a stable, heat-resistant surface. Keep them away from curtains, books, bedding, dried flowers, children, and pets. Extinguish the candle before leaving the room or going to sleep.
How to Decorate Beeswax Lavender Candles
Simple decoration works best. A kraft paper label, cotton ribbon, or small gift tag gives the candle a clean handmade look. You can write the scent name, pour date, and burn instructions on the label.
Avoid placing dried lavender buds on top of the candle near the wick. They may look gorgeous in photos, but dried botanicals can become a fire hazard when the candle burns. If you want a lavender look, decorate the outside of the jar instead. Tie a small dried lavender sprig to the container with twine, keeping it far away from the flame. Pretty and sensible: the rare craft combo.
How to Burn Beeswax Lavender Candles Correctly
Trim the wick to about 1/4 inch before each burn. A trimmed wick helps control flame size and reduces smoking. Burn the candle long enough to create an even melt pool, but avoid marathon burn sessions. For most container candles, a few hours at a time is enough.
Stop using the candle when about 1/2 inch of wax remains at the bottom of the container. This helps prevent the jar from overheating. Also, keep the wax pool clean. Wick trimmings, matches, and decorative debris do not belong in melted wax. Your candle is not a junk drawer.
Gift Ideas for Easy Beeswax Lavender Candles
These candles are perfect for birthdays, Mother’s Day, teacher gifts, housewarming baskets, bridesmaid boxes, holiday stocking stuffers, and “I forgot to buy a gift but I am still thoughtful” emergencies. Pair one candle with a jar of honey, a linen tea towel, handmade soap, or a packet of lavender seeds for a charming themed gift.
For a spa-style gift, place the candle in a small basket with bath salts, herbal tea, and a soft washcloth. For a cozy reading gift, pair it with a bookmark and a paperback novel. For a kitchen gift, combine it with local honey and a wooden honey dipper. Small touches make homemade candles feel polished rather than last-minute.
Creative Variations
Lavender Vanilla Beeswax Candles
Add a candle-safe vanilla fragrance oil or vanilla oleoresin approved for candle use. The result is warm, sweet, and soft. Be careful with vanilla-like oils because some can discolor wax or behave differently when heated.
Lavender Rosemary Beeswax Candles
Blend lavender essential oil with a small amount of rosemary essential oil for a garden-fresh scent. This combination works well in kitchens, offices, and entryways.
Lavender Cedar Beeswax Candles
For a more grounded scent, pair lavender with cedarwood essential oil. The result is calming but less floral, perfect for people who like cozy cabin energy without actually camping.
Troubleshooting Your Homemade Candles
If your candle tunnels, the wick may be too small or the first burn may have been too short. If the flame is too high, trim the wick and check whether the wick size is too large. If the scent is too faint, increase the lavender slightly in the next batch or try a candle-safe lavender fragrance oil instead of essential oil. If the top cracks, the candle may have cooled too quickly.
Candle making is part recipe, part testing. Even experienced candle makers test wicks, wax blends, containers, and fragrance ratios. Do not be discouraged if your first batch is not boutique-perfect. Handmade does not mean flawless. It means you made something useful, beautiful, and probably more impressive than whatever your oven is doing with frozen pizza.
Personal Experiences and Practical Lessons from Making Easy Beeswax Lavender Candles
The first thing most people learn when making beeswax lavender candles is that beeswax has a personality. Soy wax melts like it is ready to cooperate. Beeswax takes its time. It softens, glows, and eventually melts into a golden pool, but it will not be rushed. That slower pace is actually part of the charm. Making these candles feels less like a quick craft and more like a small ritual.
One of the best experiences is the moment lavender essential oil meets warm beeswax. The scent is gentle, not loud. It smells like honey, herbs, clean linens, and a sunny windowsill. It is not the same as opening a heavily scented store candle. It is quieter and more natural. That makes it especially nice for people who prefer subtle fragrance or get tired of candles that announce themselves from three rooms away.
A helpful lesson is to make a small test batch before preparing gifts. One or two candles can teach you a lot. You may discover that your jar needs a larger wick, your lavender oil is too mild, or your pouring temperature creates a slightly textured top. These are not failures. They are candle notes. Keep a simple record of the wax amount, oil amount, wick type, jar size, and burn results. It sounds nerdy, but future-you will be grateful. Future-you is very organized in this fantasy, so let us support that.
Another experience worth mentioning is the satisfaction of reusing clean jars. Small jam jars, candle tins, and heat-safe glass containers can become beautiful candles when properly prepared. The key is to use containers that are safe for heat and free of cracks. A reused jar with a simple label can look rustic and expensive, which is a delightful combination.
Beeswax lavender candles also teach patience during curing. It is tempting to light the candle the minute it hardens, but waiting improves the final result. After a day or two, the scent feels more settled, and the candle burns more predictably. This waiting period is a tiny exercise in self-control, which is rude but useful.
The most practical experience is learning how much the first burn matters. If you burn the candle for only 15 minutes the first time, it may begin tunneling. Letting the wax melt close to the edge helps set the candle up for better future burns. This is one of those small details that makes you feel like a candle expert after learning it. Suddenly you will see tunneled candles in other people’s houses and have to resist giving a TED Talk.
Finally, handmade beeswax lavender candles feel personal. They are not just wax in a jar. They are something you measured, melted, scented, poured, trimmed, tested, and labeled. They turn simple ingredients into atmosphere. Whether you keep them by your bed, give them to friends, or make a batch for holiday gifts, these candles bring a warm handmade touch to everyday spaces.
Conclusion
Easy beeswax lavender candles are a wonderful beginner-friendly DIY project with a beautiful payoff. With beeswax, lavender essential oil, the right wick, and a little patience, you can create candles that look charming, smell calming, and make excellent gifts. The process is simple enough for beginners but satisfying enough to repeat, especially once you start experimenting with scent blends and jar styles.
The secret is balance: melt the beeswax gently, choose a suitable wick, avoid overheating the lavender oil, pour slowly, cure patiently, and burn safely. Do that, and your homemade candles will reward you with a warm glow, a soft floral scent, and the quiet pride of saying, “Yes, I made that.” Try not to say it too smugly. Or do. You earned it.