
Easter egg dyeing looks simple from across the kitchen: boil eggs, drop them into colorful cups, pull out tiny masterpieces, accept applause. Then real life walks in wearing bunny ears. One egg comes out the color of sad oatmeal. Another cracks like it just heard bad news. Someone forgets which cup is blue and which cup is “mystery swamp.” And the dog, naturally, develops a suspicious interest in the drying rack.
The good news? Beautiful Easter eggs are not about expensive kits, professional craft supplies, or having a pantry that looks like a lifestyle magazine sneezed rainbows. The best results come from a few reliable basics: clean eggs, food-safe dye, the right amount of vinegar, patient soaking, and smart storage. Whether you want soft pastels, bold jewel tones, natural plant-based colors, or kid-friendly kitchen-table fun, these egg dyeing basics will help you create your best Easter eggs ever.
This guide covers five practical tips for better color, smoother finishes, safer handling, and less holiday chaos. We will also walk through common mistakes, easy decorating ideas, and real-life experience notes that make the process more fun and less “why is there blue dye on the ceiling?”
Why Easter Egg Dyeing Still Deserves a Spot at the Table
In a world of digital everything, dyeing Easter eggs remains wonderfully hands-on. It is part craft project, part science experiment, part family tradition, and part controlled mess. Children get to see color mixing happen in real time. Adults get a low-pressure creative outlet. Everyone gets to pretend that one oddly speckled egg was completely intentional.
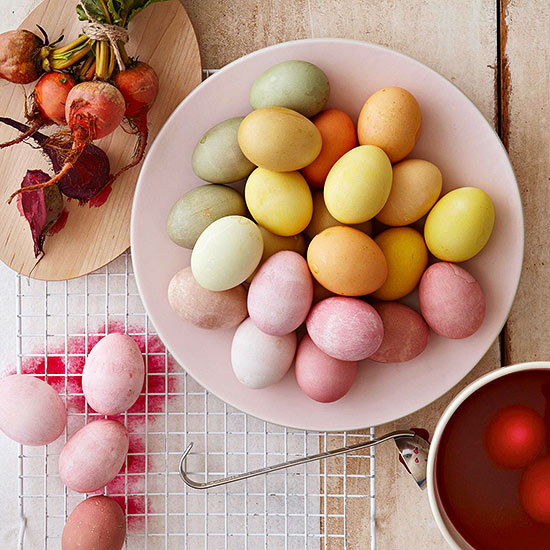
Egg dyeing is also flexible. You can use a classic store-bought Easter egg dye kit, liquid food coloring, gel food coloring, or natural dyes made from kitchen ingredients like red cabbage, turmeric, onion skins, blueberries, coffee, and beets. White eggs usually produce brighter, clearer shades, while brown eggs create moodier, earthier tones that look surprisingly elegant on a spring table.
The key is to treat eggs as both craft material and food. If you plan to eat the dyed eggs, use food-safe dyes, keep everything clean, refrigerate the eggs promptly, and avoid eating eggs that have been sitting out too long. Pretty eggs are great. Pretty eggs that are also safe to eat are even better.
Tip 1: Start With Properly Cooked, Cooled, and Clean Eggs
Your dye job begins before the dye cups appear. Smooth, sturdy, properly cooked eggs are easier to color and less likely to crack during decorating. Start with clean eggs and inspect each one before boiling. Skip any egg with a crack, because dye can seep inside and bacteria can enter more easily.
Choose the right eggs
White eggs are the classic choice for bright Easter colors. They show pinks, yellows, blues, and greens clearly, almost like a blank canvas. Brown eggs, however, are not second-best. They produce rich, vintage-looking colors: deep teal, brick red, olive green, warm gold, and smoky lavender. If your Easter style leans rustic, farmhouse, or “I casually arranged this centerpiece but actually spent 47 minutes on it,” brown eggs are excellent.
Cook gently to reduce cracking
Place eggs in a single layer in a saucepan and cover them with water. Bring the water to a boil, then remove the pot from heat, cover it, and let the eggs stand until fully cooked. After cooking, cool the eggs quickly in cold water or an ice bath. Rapid cooling helps stop carryover cooking and makes the eggs easier to handle.
Do not dye eggs while they are piping hot. Warm eggs may absorb color unevenly, and hot eggs are harder for kids to handle safely. Cooled hard-boiled eggs are more predictable, less fussy, and less likely to turn your Easter craft into a tiny kitchen emergency.
Wipe before dyeing
Before placing eggs in dye, gently wipe the shells with a damp paper towel. Oils from hands, bits of shell residue, or cooking film can block dye and create patchy spots. Sometimes that speckled look is charming. Sometimes it looks like the egg has been through a weather event. A quick wipe gives you a cleaner surface and better color.
Tip 2: Use Vinegar the Smart Way for Brighter Color
Vinegar is the tiny ingredient that does a surprisingly big job. Eggshells are made mostly of calcium carbonate, and the mild acid in vinegar helps food coloring bond to the shell. Without vinegar, many dyes look pale, slow, or uneven. With too much vinegar, the shell can become rough, chalky, or blotchy. The goal is balance.
The basic dye formula
For a simple homemade Easter egg dye, mix:
- 1/2 cup hot water
- 1 teaspoon white vinegar
- 10 to 20 drops liquid food coloring
Use small bowls, mugs, or glass jars deep enough to cover the egg. Stir well before dipping. For lighter colors, use fewer drops or a shorter soak. For richer colors, use more drops and give the egg more time in the dye bath.
Gel food coloring can also work, but stir it thoroughly so it dissolves evenly. Nobody wants one side of an egg to look like spring and the other side to look like it fell into a marker factory.
When to use more vinegar
Some decorating methods, such as tie-dye eggs or whipped topping marble eggs, call for a brief vinegar soak before color is added. This preps the shell and helps the dye cling. A two- to three-minute vinegar dip can improve color, especially when you are using a method where dye touches the shell indirectly.
For natural dyes, vinegar is usually added to the dye liquid after simmering and straining plant ingredients. A common ratio is about 1 tablespoon vinegar per cup of dye liquid, though recipes vary depending on the ingredient and color intensity desired.
Tip 3: Control Color With Time, Temperature, and Patience
The secret to beautiful Easter eggs is not frantic dipping. It is patience. The longer an egg sits in dye, the deeper the color becomes. A quick dip gives you pale pastels. A longer soak gives you bold, saturated shades. Overnight soaking in the refrigerator can create dramatic natural-dye results.
How long should eggs soak?
For classic food-coloring dye, start checking the eggs after 3 to 5 minutes. Pastels often appear quickly. For stronger color, let eggs soak for 10 minutes or longer. Turn the egg occasionally with a spoon so the color develops evenly on all sides.
For natural dyes, expect a slower process. Turmeric may produce yellow quickly, while red cabbage, onion skins, blueberries, and beets often need more time to build depth. Natural colors tend to be softer and more organic than commercial dye. That is not a flaw; it is the charm. Think “handmade spring market,” not “neon traffic cone.”
Layer colors for custom shades
Once an egg is dry, dip it into a second color to create layered effects. Yellow followed by blue can create green. Pink followed by blue can become purple. A brown egg dipped in blue may turn smoky teal. Layering is one of the easiest ways to make eggs look more sophisticated without needing advanced craft skills.
Use rubber bands, stickers, tape, or wax crayons to create resist patterns. Areas covered before dyeing stay lighter, creating stripes, dots, initials, zigzags, or tiny abstract art that relatives will politely interpret for you.
Tip 4: Dry Eggs Carefully for a Smooth Finish
Many Easter eggs are ruined not in the dye cup but during drying. Wet dye smears easily. Fingerprints show. Eggs roll. Someone grabs one too soon and suddenly has festive purple fingertips for church brunch. A good drying setup makes a big difference.
Best drying methods
An empty egg carton works in a pinch, but it can leave small marks where the wet shell touches the cardboard. For cleaner results, try a wire cooling rack set over paper towels. You can also use bottle caps, upside-down pushpins stuck into foam board, or a dedicated egg drying tray from a dye kit.
After lifting an egg from the dye, let excess liquid drip back into the cup. Gently blot the bottom with a paper towel if needed, but avoid rubbing the shell. Rubbing can remove color before it sets.
Add shine after drying
For a subtle glossy finish, rub completely dry eggs with a tiny amount of vegetable oil on a paper towel. The keyword is tiny. You are polishing eggs, not marinating them. A light buff can make colors look richer and give the eggs a finished look for baskets, centerpieces, or photos.
If you plan to eat the eggs, keep decorative add-ons food-safe. Stickers and paper wraps are usually fine if removed before peeling. Avoid using glue, paint, glitter, shaving cream, or craft supplies on eggs that will be eaten unless the product is clearly food-safe. When in doubt, make one batch for display and one batch for eating.
Tip 5: Keep Dyed Easter Eggs Safe to Eat
Food safety may not be as cute as bunny napkins, but it matters. Hard-boiled eggs are perishable. If you plan to eat dyed Easter eggs, handle them like food from the beginning.
Follow the two-hour rule
Hard-boiled eggs should not sit at room temperature for more than two hours. If the temperature is very warm, the safe window becomes shorter. After dyeing, return eggs to the refrigerator promptly. Store them in a clean carton or covered container and use them within one week.
If eggs are used for an outdoor hunt, inspect them carefully. Do not eat eggs that are cracked, dirty, hidden near pets, placed in soil, exposed to lawn chemicals, or left outside too long. For large hunts, plastic eggs are often the safer choice. You can still dye real eggs for the table and use plastic eggs for the backyard treasure hunt. Nobody loses. Except maybe the family member who wanted to hide a real egg under a shrub and forget about it until July.
Use food-safe dyes only
Commercial egg dye kits, food coloring, and natural food-based dyes are appropriate for eggs you plan to eat. Avoid non-food craft paints, permanent markers, glitter glue, shaving cream, or household chemicals on edible eggs. Even if decoration stays mostly on the shell, eggshells are porous, and cracks can allow unwanted substances inside.
Wash hands before and after handling eggs, especially when kids are helping. Clean the table, cups, spoons, and drying area. A washable tablecloth or layers of newspaper can save your kitchen from looking like a rainbow sneezed.
Easy Easter Egg Dyeing Ideas for Beginners
Once the basics are handled, you can play. Here are beginner-friendly decorating ideas that look impressive without requiring a fine arts degree or a second mortgage at the craft store.
Classic solid-color eggs
Mix several dye cups in bright colors. Dip each egg until it reaches the desired shade. This is the easiest method and still one of the prettiest, especially when eggs are arranged by color in a basket.
Two-tone dip eggs
Hold one half of the egg in one color, dry it, then dip the other half in another color. Try yellow and pink, blue and green, lavender and teal, or orange and red. Use a spoon or egg dipper to reduce splashing.
Rubber band stripes
Wrap rubber bands around the egg before dyeing. After the egg dries, remove the bands to reveal clean stripe patterns. Dip again in a lighter or darker shade for layered stripes.
Wax crayon designs
Draw names, flowers, dots, stars, or silly faces on dry eggs with a white crayon before dyeing. The wax resists the dye, leaving the drawing visible. Kids love this because the design appears like a magic trick.
Natural dye sampler
Simmer separate dye baths using turmeric for yellow, red cabbage for blue, onion skins for orange-brown, beets for pink, coffee for tan, and blueberries for purple-blue. Strain, cool, add vinegar, and soak the eggs. Natural dyes are less predictable, which is part of the fun. Every egg comes out with personality.
Common Egg Dyeing Mistakes and How to Fix Them
Mistake: The colors look too pale
Use more food coloring, increase soaking time, and make sure vinegar is included. Also check that the eggs are not greasy or wet before dyeing. For natural dyes, expect longer soaking times and consider refrigerating eggs in the dye overnight.
Mistake: The eggs are blotchy
Blotchy eggs can come from oil on the shell, uneven stirring, too much vinegar, or eggs touching the side of the cup for too long. Wipe eggs before dyeing, stir the dye bath, and rotate eggs occasionally.
Mistake: The shells crack
Cook eggs gently, avoid crowding the pan, and cool them carefully. Do not drop eggs into dye cups. Lower them with a spoon like precious cargo, because in this situation, they are.
Mistake: The drying rack leaves marks
Let eggs drip longer before setting them down. Use a wire rack or small supports that touch less of the shell. If marks happen, embrace them as “artisan texture.” It sounds much better than “I got impatient.”
Experience Notes: What Actually Makes Egg Dyeing More Fun
After years of dyeing Easter eggs with kids, cousins, friends, and at least one adult who took the color chart far too seriously, the biggest lesson is simple: prepare the space before you prepare the dye. Egg dyeing is joyful, but it is not tidy by nature. The difference between “sweet holiday memory” and “why is there green vinegar in my sock?” is usually five minutes of setup.
Cover the table before anyone sits down. Put paper towels within reach. Give each child a spoon, not just one shared spoon that immediately disappears into the darkest dye cup. Use mugs or jars that are sturdy and not too wide. Short, wide bowls may look convenient, but they invite spills. Tall mugs keep the dye deeper and make it easier to submerge the egg fully.
Another experience-tested trick is to create a “test egg.” This is the egg everyone uses to see how colors behave. It helps kids understand that a quick dip makes a soft color while a longer soak creates a bold one. It also prevents disappointment when the first egg does not match the imaginary egg in someone’s head. Easter expectations can be intense when you are seven.
For families with young children, set up stations. One area for dyeing, one area for drying, and one area for decorating with stickers or crayons. This keeps wet eggs away from finished eggs and gives kids a natural order to follow. If everyone crowds around the dye cups at once, elbows happen. When elbows happen, purple happens everywhere.
It also helps to let go of perfection. The most memorable eggs are rarely the flawless ones. They are the egg with three colors because someone changed their mind halfway through. The egg with a thumbprint that became a “cloud.” The brown egg that unexpectedly turned the perfect shade of stormy blue. The egg labeled “Dad” in wax crayon that looks more like “Dab” after dyeing. These are the eggs people remember.
Natural dyes are especially good for a slower, more curious experience. They invite kids to ask why cabbage turns blue, why turmeric stains everything it loves, and why onion skins make such beautiful color despite looking like compost confetti. Natural dyeing takes longer, but it feels calmer. It is ideal for families who want the activity to stretch through an afternoon instead of racing through a kit in 15 minutes.
For big gatherings, make two batches: one beautiful batch for display and one clearly labeled batch for eating. This avoids confusion after the egg hunt and keeps food safety simple. If eggs have been handled by many people, hidden outdoors, or left unrefrigerated too long, admire them and move on. Deviled eggs should come from the safe refrigerated batch, not from the egg that spent an hour behind a flowerpot having an adventure.
Finally, take photos before the eggs go into the refrigerator. Dyed eggs are surprisingly photogenic in natural light. Place them in a plain carton, a white bowl, a woven basket, or on a linen napkin. You do not need professional styling. A dozen colorful eggs already know how to pose. Just wipe the table first, unless your creative direction is “Easter crime scene.”
Conclusion: Your Best Easter Eggs Start With the Basics
The best Easter eggs are not complicated. Start with clean, properly cooked eggs. Use food-safe dye. Add vinegar in the right amount. Give the color time to develop. Dry the eggs carefully. Store edible eggs safely. Once those basics are in place, you can get creative with stripes, layers, natural dyes, wax designs, stickers, and glossy finishes.
Egg dyeing is one of those rare traditions that can be simple enough for toddlers, nostalgic enough for grandparents, and creative enough for adults who secretly want to win Easter. With these five egg dyeing tips, your eggs can be brighter, smoother, safer, and much more fun to make. And if one egg still turns out weird? Give it a name, put it in the front row, and call it modern art.
Note: This article synthesizes established U.S. food-safety, cooking, and home-decorating guidance on Easter egg dyeing, including best practices for food-safe dyes, vinegar-based dye baths, natural color ingredients, refrigeration, and safe handling.