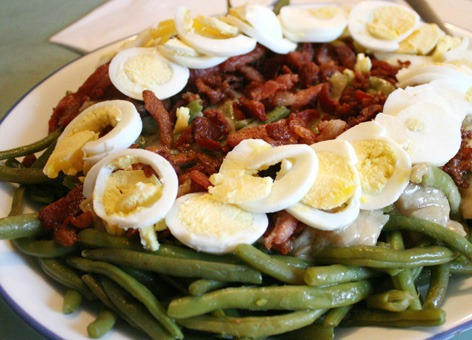

Green beans are perfectly respectable on their own. They are crisp, fresh, colorful, and dependable. Then bacon walks into the skillet wearing a smhe main course.
Green beans with bacon is a classic American side dish built on a simple contrast: fresh, slightly sweet beans meet salty, smoky bacon. Add onion, garlic, black pepper, and a splash of something acidic, and the result is far more interesting than the short ingredient list suggests. This version uses one skillet, keeps the beans tender without turning them into green mush, and gives you plenty of options for adjusting the texture from crisp-tender to slow-cooked Southern-style.
It works for weeknight chicken, Sunday pot roast, Thanksgiving turkey, Christmas ham, summer cookouts, and those dinners when you suddenly realize the plate could use something green. Yes, the green thing contains bacon. We are calling that teamwork.
Why Green Beans and Bacon Work So Well Together
The appeal of this dish comes down to balance. Fresh green beans have a mild vegetal sweetness and a firm texture. Bacon contributes salt, smoke, richness, and crisp edges. Onion adds sweetness, garlic adds savory depth, and a little lemon juice or vinegar cuts through the fat at the end.
There are several established ways to cook this combination. Some recipes blanch the beans before quickly sautéing them for a brighter color and firmer bite. Others simmer green beans with bacon, onion, and broth until deeply seasoned and very tender. Both approaches are legitimate; they simply produce different dishes. Quick cooking emphasizes freshness and snap, while longer cooking emphasizes comfort and rich bacon flavor. below lands in the middle. The beans cook in a covered skillet with a small amount of liquid, then finish uncovered in the rendered bacon drippings. You get tenderness, concentrated flavor, and enough structure that the beans still remember they were once vegetables.
Ingredients for Green Beans with Bacon
This recipe makes about six side-dish servings.
- 1 1/2 pounds fresh green beans, trimmed
- 6 slices thick-cut bacon, cut into small pieces
- 1 small yellow onion, finely diced
- 2 cloves garlic, minced
- 1/3 cup low-sodium chicken broth or water
- 1 tablespoon apple cider vinegar or fresh lemon juice
- 1/4 teaspoon freshly ground black pepper, plus more to taste
- 1/8 teaspoon crushed red pepper flakes, optional
- Kosher salt, only as needed
Choosing the Best Green Beans
Look for fresh green beans that feel firm and snap cleanly when bent. They should have a lively green color without major soft spots or shriveled areas. Very thick beans may need a little more cooking time, while slender beans and haricots verts cook faster.
Fresh beans give this recipe the most noticeable contrast between tender vegetables and crisp bacon. Frozen green beans can also work, although they should be thawed and dried well before cooking. Canned beans create a softer, more old-fashioned result and are better suited to a longer simmer than a quick skillet method.
What Kind of Bacon Is Best?
Thick-cut bacon is especially useful because the pieces remain substantial after cooking. Regular sliced bacon works too and becomes crisp more quickly. Hickory-smoked bacon adds a bold campfire-style flavor, while applewood-smoked bacon can taste slightly sweeter.
Avoid automatically adding a large amount of salt at the beginning. Bacon varies considerably in saltiness, and broth may contribute additional sodium. Taste near the end and season from there. Your salt shaker should be a supporting actor, not the surprise villain of dinner.
How to Make Green Beans with Bacon
Step 1: Prepare the Green Beans
Rinse the green beans and dry them. Trim off the stem ends. Leave smaller beans whole or cut longer beans in half for easier serving.
Drying the beans matters because excess water can cool the skillet and encourage steaming before you are ready for it. A little moisture later is useful; a small indoor rainstorm in the bacon pan is not.
Step 2: Cook the Bacon
Place the chopped bacon in a large skillet while the skillet is still cool. Set it over medium heat and cook, stirring occasionally, until the bacon is browned and crisp, about 7 to 10 minutes depending on thickness.
Transfer the bacon to a paper-towel-lined plate with a slotted spoon. Leave about 2 tablespoons of rendered bacon fat in the skillet. If your bacon produced much more, spoon out the excess and save it for another use.
Step 3: Cook the Onion
Add the diced onion to the skillet and cook over medium heat for 3 to 4 minutes, stirring occasionally, until softened and beginning to turn golden.
Add the garlic and optional red pepper flakes. Cook for about 30 seconds, just until fragrant. Garlic can go from “wonderful” to “tiny bitter pebbles” surprisingly fast, so do not wander away to reorganize the refrigerator.
Step 4: Add the Green Beans
Add the trimmed green beans and black pepper. Toss them thoroughly so they are lightly coated with the bacon drippings and mixed with the onion.
Pour in the chicken broth or water. Cover the skillet and cook over medium heat for about 5 to 7 minutes. Start checking earlier if the beans are very thin. They should become tender but still have some bite.
Step 5: Finish Uncovered
Remove the lid and raise the heat slightly. Cook for another 2 to 4 minutes, tossing occasionally, until most of the liquid evaporates and a few beans develop browned spots.
Return most of the bacon to the skillet and toss everything together. Reserve a small handful of bacon for the top if presentation mattersor if you simply enjoy making everyone at the table wonder who gets the crispiest pieces.
Step 6: Add Acidity and Taste
Remove the skillet from the heat. Stir in the apple cider vinegar or lemon juice. Taste before adding salt.
The acid should not make the dish taste sour. Its job is to brighten the beans and balance the richness of the bacon. Several popular approaches to bacon-seasoned green beans use lemon juice, cider vinegar, red wine vinegar, or another acidic finish for exactly this kind of balance. a serving dish and scatter the reserved bacon over the top. Serve warm.
For Brighter, Crisper Green Beans: Use the Blanch-and-Sauté Method
For a restaurant-style texture and especially vivid color, blanch the green beans before adding them to the bacon skillet.
- Bring a pot of water to a boil.
- Add the trimmed green beans and cook for about 3 to 5 minutes, depending on thickness.
- Transfer them promptly to ice water to stop the cooking.
- Drain and dry the beans thoroughly.
- Toss them with the cooked onion and garlic in the bacon skillet for 2 to 3 minutes.
- Add the bacon and acidic finish just before serving.
Blanching followed by rapid cooling is widely used when the goal is a bright appearance and controlled crisp-tender texture. Timing remains important: the beans should leave the boiling water before they become fully soft because they will cook again in the skillet. ts to Better Bacon Green Beans
1. Render the Bacon Slowly Enough
Starting bacon in a cool or moderately heated skillet allows the fat to render while the meat gradually crisps. Very high heat can brown the outside before enough fat has melted into the pan.
That rendered fat is one of the main flavor-building ingredients in the recipe, but more is not always better. About 2 tablespoons is usually enough for 1 1/2 pounds of beans. The goal is glossy and savory, not vegetable confit.
2. Add Garlic Late
Onion needs several minutes to soften. Garlic usually needs less than a minute before the green beans and liquid enter the pan. Adding both at exactly the same time can leave the onion undercooked or the garlic overbrowned.
3. Match the Cooking Time to the Experience You Want
There is no universal definition of the “perfect” green bean. Crisp-tender beans work beautifully beside grilled chicken or steak. Very tender beans make sense in a Southern-style meal with cornbread, pork, or roast meat.
Traditional and modern U.S. recipes demonstrate this range clearly: some cook green beans only a few minutes, while slow-cooked versions simmer them with bacon, onion, and broth for considerably longer. me Bacon for the Finish
If every piece of cooked bacon returns to a moist skillet too early, it can lose its crisp texture. Stir most of it into the beans for flavor, but reserve some for the top. This gives each serving a better mix of tender beans and crunchy bacon.
5. Taste Before Adding Salt
Bacon, chicken broth, and other optional additions can all contribute salt. Seasoning only after the dish has reduced gives you much more control.
Easy Green Beans with Bacon Variations
Southern-Style Green Beans with Bacon
Use the same bacon and onion base, but increase the chicken broth to about 1 1/2 cups. Simmer the green beans gently until very tender, adding more liquid if necessary. Garlic, cracked black pepper, and a pinch of red pepper flakes work especially well.
This style is softer and more deeply seasoned than the quick skillet version. The cooking liquid carries smoky bacon flavor throughout the beans rather than leaving the bacon primarily as a crisp topping.
Green Beans with Bacon and Brown Sugar
For a sweet-savory holiday variation, stir 1 to 2 teaspoons of brown sugar into the liquid. Keep the quantity modest. Green beans do not need to become dessert wearing a vegetable costume.
A dash of cider vinegar or Dijon mustard helps prevent the sweetness from becoming heavy.
Garlic Lemon Bacon Green Beans
Increase the garlic to three cloves and finish the dish with fresh lemon juice and a little finely grated lemon zest. This variation tastes lighter and works especially well with roasted chicken, salmon, or pork tenderloin.
Spicy Green Beans with Bacon
Add 1/4 teaspoon crushed red pepper flakes with the garlic. For more heat, finish with sliced fresh jalapeño or a few drops of hot sauce.
Green Beans with Bacon and Pecans
Add about 1/3 cup toasted chopped pecans immediately before serving. The nuts echo the bacon’s crunch while adding a rich, buttery flavor. Bacon, nuts, onion, garlic, and lemon are all established flavor partners for green beans in American recipe traditions. rve with Green Beans and Bacon
This side dish is remarkably flexible because it combines a fresh vegetable with savory, smoky richness. Serve it with:
- Roast chicken or turkey
- Glazed or baked ham
- Grilled pork chops
- Meatloaf
- Pot roast
- Grilled steak
- Roasted salmon
- Mashed potatoes
- Macaroni and cheese
- Cornbread or dinner rolls
For a holiday menu, bacon green beans are particularly useful because they provide a fresher alternative to a creamy green bean casserole while still feeling indulgent enough for a celebration.
Are Green Beans with Bacon Healthy?
Green beans contribute fiber and a range of micronutrients, while bacon adds concentrated flavor along with fat and sodium. The overall nutritional profile depends heavily on portion size, the amount and type of bacon, and how much rendered fat is retained in the finished dish. Using bacon as a flavoring ingredient rather than making it equal in volume to the vegetables keeps the green beans at the center of the plate. USDA FoodData Central provides nutrient data for individual ingredients, and nutritional values for a complete homemade recipe will vary according to the exact products and quantities used. er variation, use four slices of bacon instead of six, drain most of the rendered fat, and finish the beans with lemon juice. You can also use water instead of broth if sodium is a concern.
Storage and Reheating
Allow leftovers to cool and refrigerate them in an airtight container. For the best texture, reheat the green beans in a skillet over medium heat rather than cooking them for a long time in the microwave.
Add a teaspoon or two of water to the skillet if the beans seem dry. Heat only until warmed through. The bacon will soften somewhat during storage, so a small amount of freshly cooked bacon can be added after reheating when crispness is important.
Green beans with bacon can also be prepared partly in advance. Trim the beans and cook the bacon ahead of time, then refrigerate them separately. Complete the vegetable cooking shortly before serving. This approach is especially useful for holiday dinners when every burner on the stove appears to have filed a formal request to be occupied at the same time.
Frequently Asked Questions
Can I Use Frozen Green Beans?
Yes. Thaw them first and pat them dry. Because frozen beans have already undergone processing that changes their texture, they usually need less cooking time than raw fresh beans.
Can I Use Canned Green Beans?
Yes, but use a different approach. Drain the canned beans and add them after the onion and garlic have cooked. Simmer gently with a little broth or reserved canning liquid and bacon until the flavors combine. Canned green beans are already soft, so long high-heat sautéing is unnecessary. Bacon is commonly used to add savory depth to canned green beans as well as fresh ones. oil Green Beans Before Frying Them with Bacon?
You do not have to. Blanching is useful when you want especially bright, crisp-tender beans. The covered-skillet method in this recipe cooks the beans with a small amount of liquid and eliminates the need for a separate pot.
Why Are My Green Beans Tough?
They may simply need more cooking time. Older, thicker beans can take longer to become tender. Add a splash of water or broth, cover the skillet, and cook for a few additional minutes.
Why Did My Bacon Become Soft?
Bacon softens when it sits in cooking liquid. Keep some bacon out of the skillet until just before serving if you want a crisp topping.
Kitchen Experience: What Making Green Beans with Bacon Teaches You
The First Lesson Is That Simple Recipes Expose Every Decision
A dish with only a handful of ingredients can look almost impossible to mess up, yet green beans with bacon quickly shows how much small decisions matter. Cook the bacon too aggressively, and it becomes dark before enough fat has rendered. Add the garlic too early, and its warm aroma turns bitter. Cook the beans for three minutes too little, and dinner becomes an unexpected jaw workout. Cook them twenty minutes too long when you wanted a crisp side dish, and they surrender completely.
That is not a reason to fear the recipe. It is exactly why the dish becomes useful. After making it a few times, a cook starts paying attention to sound, color, aroma, and texture instead of staring nervously at a timer. The bacon changes from soft and pale to bubbling and crisp. The onion loses its raw sharpness. The beans brighten, soften, and become flexible. Cooking becomes less about obeying a number and more about noticing what is happening in the skillet.
The Second Lesson Is That Bacon Should Support the Beans
A common temptation is to assume that if six slices of bacon are good, twelve slices must be twice as good. That theory works beautifully until the finished bowl tastes mostly like bacon grease with a few green beans searching for an exit.
The most satisfying version keeps the vegetable recognizable. Each forkful should contain a bean with a little smoky richness, not require excavation equipment to locate the produce. Using a measured amount of rendered fat makes a major difference. Two tablespoons can coat a large quantity of beans and carry the flavor of the bacon, onion, and garlic throughout the dish. The extra bacon fat can be saved instead of forcing the green beans to absorb all of it.
This balance is also why acidity matters. The first taste before adding vinegar or lemon may seem rich but slightly heavy. The second taste, after a small acidic finish, often seems sharper and more complete. Nothing dramatic has happened. The dish simply has better contrast.
The Third Lesson Is That Families Can Disagree About Green Bean Texture Forever
Ask several people how green beans should be cooked and you may accidentally start a regional debate. One person wants them bright green with a definite snap. Another wants them slowly simmered until soft, savory, and thoroughly seasoned with bacon. Both may describe the other version as a serious kitchen malfunction.
The practical solution is to cook for the table in front of you. For a fresh summer dinner with grilled meat, crisp-tender beans often feel right. For a comfort-food meal with cornbread and roast pork, a longer simmer may be exactly what everyone wants.
This recipe is easy to adjust because tenderness is not a mysterious ingredient. Check the beans. Taste one. Keep cooking if needed. A recipe can suggest a destination, but the cook still decides where to park.
The Fourth Lesson Is That This Dish Is Surprisingly Good for Hosting
Green beans with bacon look impressive without demanding complicated equipment, unusual ingredients, or last-minute decoration. The bacon can be cooked ahead. The, unusual ingredients, or last-minute decoration. The bacon can be cooked ahead. The beans can be trimmed earlier in the day. The finished side fits beside turkey, ham, chicken, beef, or pork, which makes menu planning considerably easier.
It also has the useful quality of smelling like dinner before dinner is ready. Bacon and onion cooking together create the kind of aroma that causes people to wander into the kitchen and ask whether they can help. Usually they cannot. They can, however, steal one piece of bacon and disappear.
For serving a crowd, the best practical trick is to reserve the crisp bacon separately and scatter it over the beans at the last moment. The dish looks fresher, and the texture remains more interesting.
The Final Lesson Is That a Good Side Dish Does Not Need to Be Complicated
There is a tendency to treat memorable food as though it must contain an ingredient list the length of a grocery receipt. Green beans with bacon argues otherwise. The pleasure comes from contrast: green and smoky, crisp and tender, rich and bright.
Once the basic method is comfortable, the recipe becomes a template rather than a rule. Add pecans for crunch. Use shallots instead of onion. Finish with lemon. Add red pepper flakes. Simmer the beans longer. Keep them crisp. Serve them at Thanksgiving or beside hamburgers on a Tuesday night.
The best experience with this dish is realizing that it does not require perfection. Bacon slightly crispier than planned? Probably still delicious. Beans a little softer than expected? Call them Southern-inspired. Added too much black pepper? Suddenly they are “boldly seasoned.” Home cooking has always benefited from a good sense of humor.
Conclusion
Green beans with bacon proves that a dependable side dish does not need complicated ingredients or hours of preparation. Render the bacon, build flavor with onion and garlic, cook the beans to the texture you actually enjoy, and finish with a little acid to keep the richness balanced.
The one-skillet method is fast enough for a weeknight, while the many possible variations make the recipe comfortable at Thanksgiving, Christmas, Sunday dinner, or a backyard cookout. Keep the beans crisp-tender for a fresher style or simmer them longer for a softer Southern-inspired version. Either way, the combination of smoky bacon and green beans has earned its popularity for a very simple reason: it tastes good, smells even better, and rarely comes home from a potluck with leftovers.
Note: This article and recipe are an original synthesis of cooking techniques and flavor patterns reviewed across reputable U.S. food and culinary resources, including Serious Eats, Food Network, Southern Living, EatingWell, Allrecipes, Delish, Taste of Home,0 citeturn654225search2turn654225search6turn654225search17