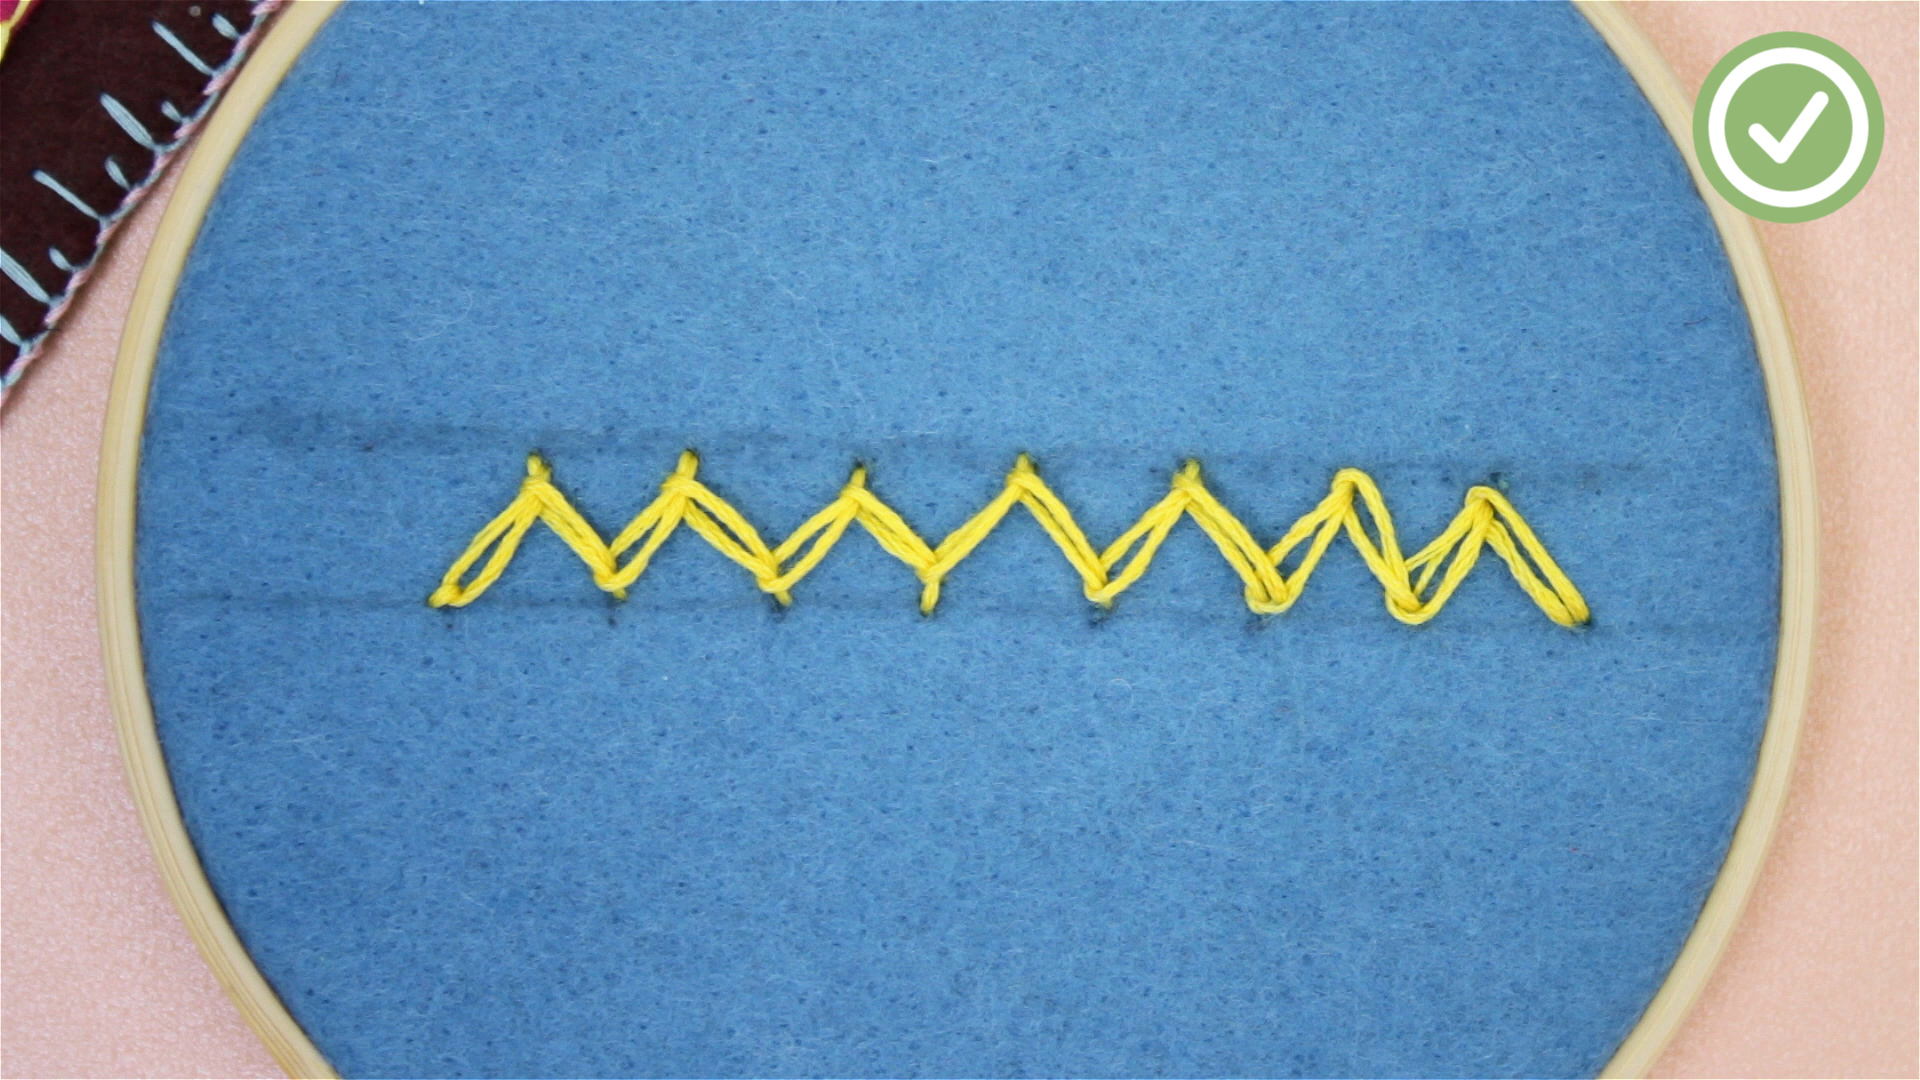

A zigzag stitch by hand is one of those tiny sewing skills that looks simple, behaves politely most of the time, and then saves your project from turning into a fringe festival. Whether you are mending a napkin, finishing the raw edge of a seam, decorating a patch, or repairing a small area where a machine cannot reach, the hand zigzag stitch is a useful, beginner-friendly technique worth learning.
In machine sewing, a zigzag stitch is made when the needle swings from side to side. By hand, we create the same visual idea using diagonal stitches that move back and forth across an edge or between two guide lines. The most practical hand version is often called an overcast stitch or whip stitch. It wraps thread around the raw edge of fabric to help prevent fraying. A more decorative version resembles a herringbone stitch or catch stitch, where slanted stitches cross in a neat zigzag pattern.
Translation: if your fabric edge is looking wild, the hand zigzag stitch is the responsible adult in the room.
What Is a Hand Zigzag Stitch?
A hand zigzag stitch is a series of angled stitches sewn in alternating directions to create a zigzag pattern. It can be functional, decorative, or both. On raw fabric edges, it keeps threads from unraveling. On visible projects, it can add texture, contrast, and a handmade finish.
The Three Main Uses
First, seam finishing. When fabric is cut, the woven threads at the edge can loosen. A hand zigzag stitch wraps or crosses the edge, helping hold those threads in place.
Second, mending. A small zigzag can reinforce a weak spot, close a tiny tear, or secure a patch without needing to drag out your sewing machine.
Third, decoration. With embroidery floss or contrast thread, a zigzag stitch can become a design element on felt, denim, linen, canvas, and handmade accessories.
Tools and Materials You Need
You do not need a sewing studio, a giant basket of mystery notions, or a sewing machine that sounds like a lawn mower. For a hand zigzag stitch, gather a few basic supplies:
- Fabric or a garment that needs stitching
- Hand sewing needle
- Thread that matches or complements the fabric
- Small scissors or thread snips
- Pins, clips, or a fabric marker
- Thimble, especially for thick fabric
- Iron, optional but helpful for pressing seams flat
Choosing the Right Needle
Needle choice matters more than beginners expect. If the needle is too thick, it can leave visible holes. If it is too fine, it may bend, break, or refuse to cooperate like a tiny metal diva.
For medium cotton, linen, or general sewing, a sharps needle in a middle size usually works well. For fine fabrics such as silk, lawn, voile, or lightweight lining, choose a finer needle. For denim, canvas, wool, or upholstery-weight fabric, use a stronger needle and consider a thimble.
Hand sewing needle numbers can feel backward at first: a higher number usually means a finer needle. If you are unsure, test on a scrap. The needle should pass through smoothly without stretching the weave or leaving obvious holes.
Choosing Thread
For everyday mending and seam finishing, all-purpose polyester thread is a reliable choice. Cotton thread works nicely with cotton fabric, while silk thread is beautiful for delicate garments. If the zigzag stitch will show, choose a thread color intentionally. Matching thread hides the work; contrast thread turns it into a design feature.
Keep the thread length manageable. A piece around 18 to 24 inches is usually easier to control. Very long thread sounds efficient until it tangles, knots, and starts auditioning for a drama series.
Before You Start: Prepare the Fabric
Preparation makes your hand stitching smoother and neater. Trim loose threads from the fabric edge. If the edge is extremely frayed, cut it cleanly with sharp scissors. Press the fabric flat if possible. If you are finishing a seam allowance, press the seam open first so each raw edge can be stitched separately.
If you want perfectly even stitches, mark a light guide line about 1/8 to 1/4 inch from the raw edge. On decorative work, draw two parallel guide lines so your zigzag points stay even. Use tailor’s chalk, a washable fabric marker, or a disappearing ink pen, depending on the fabric.
How to Do a Basic Zigzag Stitch by Hand
This version is best for finishing a raw fabric edge. It is similar to an overcast stitch and is one of the most useful hand sewing stitches for beginners.
Step 1: Thread the Needle and Knot the End
Cut a manageable length of thread and pass it through the needle eye. For most seam finishing, use a single thread. Tie a small knot at the end. If the fabric is very delicate, make the knot tiny or secure the thread with two small backstitches inside the seam allowance instead.
Step 2: Anchor the Stitch
Bring the needle up from the wrong side of the fabric near the raw edge. Pull the thread through until the knot rests against the back. Make one tiny straight stitch to anchor the thread. This prevents the first zigzag from slipping out before you get going.
Step 3: Wrap the Thread Over the Edge
Move slightly forward along the edge. Insert the needle from the back of the fabric to the front, about 1/8 inch from the raw edge. As you pull the needle through, let the thread wrap over the fabric edge. You have just made your first diagonal stitch.
Step 4: Repeat at an Even Spacing
Continue moving along the edge in small, even increments. Each stitch should slant in the same direction and wrap around the raw edge. Keep the stitches close enough to control fraying but not so close that the edge becomes stiff or bulky.
Step 5: Create a True Zigzag Look
To make the stitch look more like a classic zigzag, you can work back in the opposite direction. After finishing one row of overcast stitches, turn and stitch back through or near the same holes, angling the stitches in the opposite direction. The crossing lines create a visible zigzag pattern.
Step 6: Secure the End
When you reach the end, make two or three tiny stitches in the seam allowance or on the wrong side of the fabric. Knot the thread close to the fabric and trim the tail. Avoid making a giant knot that feels like a pebble inside the garment.
How to Sew a Decorative Zigzag Stitch by Hand
If you want a decorative zigzag instead of an edge finish, use two guide lines. This method works well for embroidery, visible mending, felt crafts, hand-stitched patches, and decorative borders.
Step 1: Draw Two Parallel Lines
Mark two light lines where the top and bottom points of the zigzag should land. The distance between the lines determines the height of the zigzag. For a subtle stitch, keep the lines close. For a bold border, space them farther apart.
Step 2: Bring the Needle Up on the Lower Line
Start at the left side if you are right-handed, or from the opposite side if that feels better. Bring the needle up on the lower guide line.
Step 3: Stitch Diagonally to the Upper Line
Take the needle down on the upper line a short distance ahead. Then bring it back up very close to that point, creating a tiny bite of fabric. This keeps the stitch secure while forming the first slant.
Step 4: Cross Back to the Lower Line
Move diagonally back down to the lower guide line. Take another tiny stitch, then cross back upward. Continue alternating from top to bottom. The result is a neat row of slanted stitches that forms a zigzag.
Step 5: Keep the Tension Gentle
The decorative zigzag should lie flat. Pull the thread just enough to remove slack, but not so tightly that the fabric puckers. If the fabric starts to ripple, loosen your tension. Your goal is “smooth handmade charm,” not “accordion folder.”
How Close Should the Stitches Be?
Stitch spacing depends on the fabric and purpose. For fabric that frays easily, make the stitches closer together. For firm cotton, felt, fleece, or stable wool, wider spacing may be enough. A good beginner range is about 1/8 to 1/4 inch between stitches.
Lightweight fabric needs smaller, finer stitches. Heavy fabric can handle larger stitches, but do not make them so wide that loose threads can escape between them. If you are unsure, sew one inch on a scrap, rub the edge gently, and see whether it holds.
Best Fabrics for a Hand Zigzag Stitch
A hand zigzag stitch works on many fabrics, but the technique changes slightly depending on weight and weave.
Cotton and Linen
Cotton and linen are excellent for practice because they are stable and easy to handle. Linen can fray quickly, so use smaller stitches near the edge.
Denim and Canvas
These sturdy fabrics need a stronger needle and sometimes a thimble. Use firm, even stitches, but avoid pulling too hard. Heavy fabric can become bulky if overworked.
Silk and Lightweight Fabric
Delicate fabrics require patience. Use a fine needle, fine thread, and small stitches. Test first because some lightweight fabrics show needle marks.
Knits and Stretch Fabric
A hand zigzag can offer a little give, which makes it useful for small knit repairs. Do not pull the thread tight. Let the stitch float slightly so the fabric can stretch without snapping the thread.
Common Mistakes and How to Fix Them
Problem: The Fabric Is Puckering
Your tension is too tight. Gently stretch the stitched area flat with your fingers. If the puckering remains, remove a few stitches and resew with a lighter hand.
Problem: The Edge Still Frays
Your stitches may be too far apart or too shallow. Place each stitch slightly deeper into the fabric and reduce the spacing. For very ravelly fabric, use a closer overcast stitch or consider folding the edge under before stitching.
Problem: The Stitches Look Uneven
Mark a guide line. Uneven stitches are normal when learning, but a simple chalk line helps train your eye. Also, slow down. Sewing is not a race, unless your opponent is a loose button and you have five minutes before leaving the house.
Problem: The Thread Keeps Knotting
Use a shorter thread length and let the needle dangle occasionally so the thread can untwist. You can also condition the thread with beeswax or thread conditioner, especially for hand sewing longer edges.
When Should You Use a Hand Zigzag Stitch Instead of a Machine?
Use a hand zigzag stitch when the area is too small, awkward, delicate, or precious for machine sewing. It is ideal for quick repairs, couture-style seam finishes, historical sewing, embroidery, craft projects, and garments where you want better control.
A machine zigzag is faster and more consistent, but hand stitching gives you precision. You can place every stitch exactly where you want it. That makes it especially helpful near corners, curves, appliqué edges, vintage fabric, or fragile seams.
Hand Zigzag Stitch vs. Blanket Stitch vs. Catch Stitch
These stitches look related, but they are not identical.
A hand zigzag stitch creates diagonal lines that move back and forth. It may be used for edge finishing or decoration.
A blanket stitch wraps the edge and creates a little line or loop along the border. It is common on felt, fleece blankets, appliqué, and decorative edges.
A catch stitch or herringbone stitch crosses between two lines and is often used for hems, facings, and decorative embroidery. It forms a flexible zigzag that can hold fabric without showing much on the right side.
If your goal is to stop fraying, choose the overcast-style hand zigzag. If your goal is decoration, choose a herringbone-style zigzag. If your goal is a pretty edge with loops, choose blanket stitch.
Practical Examples
Example 1: Finishing a Napkin Edge
Suppose you cut a square of cotton fabric for a reusable napkin. The edges begin to shed little threads. Fold the edge once, press it, then use a close hand zigzag along the fold. The stitch secures the edge and adds a handmade look.
Example 2: Repairing a Fraying Seam Allowance
Inside a jacket, one seam allowance starts unraveling. Press the seam open, trim stray threads, and hand zigzag along the raw edge. Keep the stitches loose enough that the seam lies flat.
Example 3: Decorating a Patch
Cut a small heart, star, or rectangle from felt. Pin it to a tote bag and stitch around the edge with a contrasting zigzag. The stitch holds the patch and turns the repair into a design choice. Congratulations: you are now “creative,” not “covering a hole.”
Tips for a Cleaner, More Professional Finish
- Practice on scrap fabric before stitching the real project.
- Use matching thread for invisible repairs and contrast thread for decoration.
- Keep stitches consistent in height and spacing.
- Do not pull the thread too tightly.
- Press the fabric before and after stitching when the material allows it.
- Use smaller stitches on fabric that frays easily.
- Secure the beginning and end with tiny stitches rather than bulky knots.
Safety and Comfort Tips
Hand sewing is gentle, but needles are still sharp. Work in good light, keep your needle in a pincushion when not in use, and use a thimble when sewing thick fabric. If your hands get tired, take a break. The fabric can wait. It is not going anywhere unless the cat steals it.
Conclusion: Small Stitch, Big Sewing Power
Learning how to do a zigzag stitch by hand gives you a flexible skill for mending, seam finishing, decorative borders, and fabric control. It is simple enough for beginners but useful enough that experienced sewists still rely on it. The key is to choose the right needle and thread, keep your stitches even, and control your tension so the fabric stays flat.
Start with a scrap of cotton, sew a few inches, and do not worry if your first row looks like it took a scenic route. With a little practice, your hand zigzag stitch will become neat, strong, and surprisingly satisfying. It may not make you a sewing wizard overnight, but it will absolutely make your fabric edges behave.
Extra Experience: What Sewing a Hand Zigzag Stitch Teaches You Over Time
The first time many people try a hand zigzag stitch, they expect it to behave like the machine version: perfectly even, sharp, and obedient. Then reality arrives with a slightly crooked first row and one stitch that looks like it tried to escape. That is normal. Hand sewing is not about instant perfection. It is about rhythm, control, and learning how fabric responds under your fingers.
One of the best experiences with this stitch is discovering how much tension matters. Beginners often pull the thread tightly because they assume tighter means stronger. In practice, too much tension can curl the edge, pucker the fabric, or make the seam feel stiff. A good hand zigzag stitch should sit securely but calmly. Think of it as holding the fabric’s hand, not putting it in a wrestling grip.
Another lesson comes from fabric choice. On medium cotton, the stitch feels friendly and predictable. On linen, you may notice that the edge frays faster, so closer stitches work better. On denim, the needle needs more pressure, and a thimble suddenly becomes less of an old-fashioned accessory and more of a tiny superhero helmet for your finger. On silk or delicate fabric, every stitch must be small and thoughtful because the fabric records mistakes like a very elegant detective.
The stitch also teaches patience with spacing. At first, it is tempting to watch only the needle. Over time, you start watching the distance between stitches, the angle of each diagonal, and the line of the fabric edge. That is when the work improves. A simple trick is to imagine tiny triangles along the edge. Each stitch forms one side of the triangle. When the triangles are similar, the zigzag looks balanced.
In real projects, this stitch becomes especially useful for repairs. A fraying seam inside a garment, the edge of a handmade cloth napkin, a patch on a tote bag, or a small area near a zipper can all be handled by hand. You do not need to set up a machine for every small job. Sometimes five quiet minutes with a needle and thread solves the problem neatly.
Decorative use is where the stitch becomes fun. Try a navy thread on natural linen, red thread on denim, or white cotton floss on felt. Suddenly the stitch is not hiding; it is showing off. A visible zigzag around a patch can make a repair look intentional. This is the magic of hand sewing: the same technique that prevents fraying can also add personality.
The biggest takeaway is that a hand zigzag stitch rewards practice. Your tenth inch will look better than your first. Your second project will feel easier than your first. Eventually, your hands learn the motion, and the stitch becomes almost relaxing. You will know how much thread to pull, how far to space each stitch, and when to stop before the thread tangles. That quiet confidence is the real skill behind the stitch.
SEO Tags