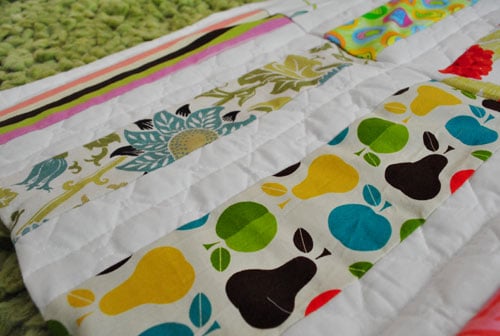

A modern patchwork quilt is proof that squares do not have to behave predictably. Give them bold colors, generous breathing room, an off-center layout, and a few unexpected prints, and suddenly an old-fashioned sewing technique looks ready for a contemporary design magazine.
Better still, a simple patchwork quilt is one of the most approachable projects for a beginning quilter. You do not need hundreds of specialty templates, a computerized longarm machine, or the patience of a saint trapped in a fabric store. With accurate cutting, a consistent quarter-inch seam, and a sensible plan, you can turn ordinary quilting cotton into a useful piece of textile art.
This guide explains how to make a modern patchwork quilt from the first color decision to the final binding stitch. The sample project uses straightforward squares, but the same process can be adapted to rectangles, strips, oversized blocks, scraps, or improvisational designs.
What Makes a Patchwork Quilt Look Modern?
Patchwork describes the construction method: smaller pieces of fabric are sewn together to create a larger quilt top. “Modern” describes the design choices. Modern quilting often includes strong color contrast, graphic shapes, minimalism, asymmetry, alternate grid arrangements, improvisational piecing, and expansive negative space.
You do not need to use every modern design feature at once. In fact, cramming all of them into one quilt may produce something less “modern masterpiece” and more “fabric arguing loudly at brunch.” Choose two or three ideas and let them lead the design.
Simple Ways to Create a Modern Look
- Use mostly solid fabrics with one or two restrained prints.
- Choose a limited palette of three to six colors.
- Add white, cream, charcoal, or another neutral for negative space.
- Arrange colors asymmetrically instead of repeating a rigid pattern.
- Mix a few oversized squares into a field of smaller pieces.
- Use high contrast, such as black with coral, navy with mustard, or white with saturated jewel tones.
- Finish with simple straight-line quilting that echoes the patchwork grid.
Plan the Quilt Before Cutting Fabric
A little planning protects you from discovering halfway through the project that you have created a quilt suitable only for a very narrow giraffe.
Choose a Manageable Size
For a first modern patchwork quilt, a throw measuring approximately 54 by 66 inches is practical. It is large enough for a sofa or reading chair but still manageable on a domestic sewing machine.
For this example, use squares that finish at 6 inches. Because each square loses a quarter inch on all four sides when sewn, cut each piece at 6 1/2 inches. Arrange nine squares across and eleven squares down. You will need 99 squares total.
The layout math looks like this:
- 9 columns × 6 inches finished = 54 inches wide
- 11 rows × 6 inches finished = 66 inches long
- 9 × 11 = 99 cut squares
Build a Cohesive Color Palette
A modern quilt benefits from color discipline. Begin with one dominant color, add two or three supporting colors, and choose a neutral. For example, combine deep navy, dusty blue, rust, pale peach, and warm white. Another option is olive, black, sand, and a small amount of bright citron.
Color value matters as much as hue. Value refers to how light or dark a fabric appears. A palette containing only medium-value colors can look flat, even when the individual fabrics are beautiful. Include light, medium, and dark pieces so the patchwork remains readable from across the room.
Take a phone photo of the fabrics and convert it to grayscale. If everything becomes the same shade of gray, add a lighter or darker fabric. This quick test is less dramatic than holding fabric swatches under a full moon, and considerably more reliable.
Tools and Materials
Fabric and Quilt Layers
- Enough quilting cotton to cut 99 squares measuring 6 1/2 inches
- Backing fabric measuring at least 62 by 74 inches
- Batting measuring at least 62 by 74 inches
- Approximately 1/2 yard of fabric for binding
- Quality cotton or polyester sewing thread
Backing and batting should extend several inches beyond the quilt top on every side. The extra material gives the layers room to shift slightly during quilting and makes final trimming easier.
Essential Quilting Tools
- Sewing machine in good working order
- Quarter-inch presser foot or a reliable seam guide
- Walking foot for quilting multiple layers
- Rotary cutter with a sharp blade
- Self-healing cutting mat
- Clear acrylic quilting ruler
- Iron and firm pressing surface
- Safety pins, basting spray, or thread for basting
- Fabric clips or straight pins
- Seam ripper, otherwise known as the tiny wand of personal growth
How to Make the Modern Patchwork Quilt
Step 1: Prepare the Fabric
Decide whether you want to prewash your quilting cotton. Prewashing removes manufacturing residue, reveals shrinkage, and reduces the chance of dye bleeding later. However, many quilters prefer not to prewash because unwashed fabric is crisp and easy to cut, and the slight shrinkage after finishing creates a soft, crinkled texture.
Whichever method you choose, be consistent. Mixing heavily prewashed fabric with unwashed fabric can produce uneven shrinkage. Press the fabric before cutting so folds and wrinkles do not distort your measurements.
Step 2: Cut Accurate Squares
Square one edge of the fabric before measuring. Align the folded fabric carefully on the cutting mat, position the ruler, and cut away the uneven edge. Then cut strips measuring 6 1/2 inches wide. Subcut those strips into 6 1/2-inch squares.
Do not trust the printed grid on the mat and the markings on the ruler simultaneously. Select one measuring system and use it consistently. A small discrepancy repeated across nine columns can make the quilt top noticeably crooked.
Replace a dull rotary blade rather than forcing it through the fabric. A sharp blade creates cleaner edges and requires less pressure. Always close or retract the blade when you put the cutter down.
Step 3: Design the Layout
Arrange all 99 squares on a design wall, clean floor, bed, or large table. Begin by distributing the darkest colors. Add the lightest pieces next, then fill the remaining spaces with medium values.
Step back frequently. Look for accidental clumps, obvious diagonal lines, or identical prints sitting next to one another. A modern layout does not have to be random. Controlled imbalance often looks more intentional than perfect repetition.
Try leaving one corner visually quiet by grouping neutral squares there. Create movement by allowing a bright color to travel loosely from the lower left toward the upper right. Rotate directional prints before sewing so birds, trees, words, and tiny bicycles are not all mysteriously upside down.
Once the arrangement works, take a clear reference photo. Label each row with a scrap of paper or numbered pin before carrying the pieces to the sewing machine.
Step 4: Sew the Squares Into Rows
Place the first two squares in a row right sides together. Align the raw edges and sew using an accurate quarter-inch seam allowance. Continue adding squares in order until the row is complete.
Chain piecing can speed up this stage. Feed one pair through the machine, take a few stitches beyond its edge, and insert the next pair without cutting the thread. The connected units form a fabric chain that can be clipped apart later.
Test your quarter-inch seam before sewing every row. Join two scrap squares, press the seam, and measure the result. A quarter-inch foot is helpful, but needle position, thread thickness, and the way fabric travels under the foot can affect the final measurement.
Step 5: Press the Seams
Press each seam before joining rows. Pressing is not the same as ironing. Lift and lower the iron rather than sliding it aggressively across the fabric, which can stretch the pieces out of shape.
For easy seam nesting, press the seams in the first row toward the right, the second row toward the left, and continue alternating directions. When two rows are placed right sides together, the opposing seam allowances will lock against one another. This helps the corners meet cleanly.
Pressing seams open is another option, especially when reducing bulk is more important than nesting. The critical rule is consistency. Do not switch methods randomly unless the layout requires it.
Step 6: Join the Rows
Place the first two rows right sides together. Match the seam intersections and secure them with pins or clips. Sew the rows together with a quarter-inch seam allowance, removing pins before they reach the needle.
Continue until all eleven rows are joined. Press the long horizontal seams in one direction or open, depending on your chosen method. Measure the quilt top and check that it lies flat. Slight variation is normal; large waves usually indicate inconsistent seams, stretching, or overly enthusiastic ironing.
Step 7: Make the Quilt Sandwich
Press the completed top and backing. Place the backing wrong side up on a clean, flat surface and secure it so it is smooth but not stretched. Center the batting over the backing, then position the quilt top right side up.
Smooth the layers from the center outward. Baste them together with curved safety pins, temporary basting spray, or long hand stitches. If using pins, space them closely enough to prevent shifting while leaving room for the quilting foot.
Check the batting manufacturer’s instructions before quilting. Different battings have different requirements for maximum spacing between quilting lines.
Step 8: Quilt the Layers
Straight-line quilting complements a modern patchwork design and is friendly to beginners. Attach a walking foot, which helps feed the top, batting, and backing through the machine at a similar rate.
Begin near the center and work outward to distribute any movement in the layers. You can quilt along both sides of every seam, stitch directly in the ditch, sew a large diagonal grid, or create parallel lines across the entire quilt.
For a clean contemporary effect, try lines spaced one to two inches apart. A slightly longer stitch often looks attractive when quilting through multiple layers, but test the stitch length on a sample sandwich first.
Roll or accordion-fold the portion of the quilt that must pass through the machine throat. Support the quilt’s weight on a table so it does not pull against the needle. Quilting is much easier when half the project is not attempting to escape into your lap.
Step 9: Trim and Square the Quilt
After quilting, lay the project on the cutting surface. Use a long ruler to trim the excess batting and backing even with the quilt top. Check the corners with a square ruler if available.
A handmade quilt does not need to match the geometry of a laboratory instrument, but the opposite edges should be reasonably parallel. Trim conservatively. You can always remove another sliver; persuading fabric to grow back is a less established technique.
Step 10: Make and Attach the Binding
Cut seven strips of binding fabric, each 2 1/2 inches wide, across the width of the fabric. Join the strips end to end with diagonal seams. Trim the seam allowances and press them open, then fold the entire binding strip in half lengthwise with wrong sides together.
Align the raw edges of the binding with the raw edge of the quilt. Sew it to the front using a quarter-inch seam allowance, mitering each corner. Leave several inches unsewn at the beginning and end so the tails can be joined neatly.
Fold the binding over the raw edge to the back. Finish it by hand with a slipstitch for a nearly invisible result, or machine-stitch it for speed and durability. A contrasting binding can act like a graphic frame, while a matching neutral creates a quieter finish.
Modern Patchwork Design Variations
Add Negative Space
Replace some colored squares with a solid background fabric. A broad area of white, cream, gray, or navy gives the eye a resting place and makes nearby colors appear stronger.
Change the Scale
Combine 6-inch finished squares with blocks measuring 12 inches. Four small squares can occupy the same space as one large square, allowing the basic grid to remain intact while the scale changes.
Try an Improvised Section
Sew scraps into an irregular panel, trim it into a 6 1/2-inch square, and insert it among the regular blocks. Repeating this two or three times creates surprise without making the entire project difficult to assemble.
Use a Limited Print Collection
Modern does not mean solids only. Choose low-volume prints, simple geometrics, narrow stripes, or abstract motifs. Keeping the palette controlled prevents multiple patterns from overwhelming the layout.
Common Patchwork Problems and Practical Fixes
The Corners Do Not Match
Check the seam allowance, cutting accuracy, and pressing direction. Pin directly through matching seam lines before sewing. Nesting opposing seam allowances can improve alignment considerably.
The Quilt Top Is Wavy
Waves often result from stretched fabric, inconsistent seams, or pressing with too much side-to-side movement. Apply starch or pressing spray carefully if the fabric is unusually soft, and let pressed pieces cool before moving them.
The Backing Has Tucks
Backing pleats usually indicate insufficient basting or uneven support during quilting. Smooth and secure the quilt sandwich carefully, begin quilting near the center, and inspect the back after every few lines.
The Machine Skips Stitches
Install a fresh needle suitable for quilting, rethread the machine, clean lint from the bobbin area, and test the tension on a sample sandwich. Confirm that the walking foot is attached correctly.
Caring for the Finished Quilt
Wash the completed quilt according to the care instructions for its fabric and batting. A cold or cool gentle cycle is generally a sensible choice for a cotton patchwork quilt. Use a mild detergent and consider adding a color-catching sheet during the first wash, especially when the quilt contains dark or saturated fabrics.
Dry on low heat or air-dry according to the materials used. Expect some texture to develop after washing, particularly when cotton batting or unwashed cotton fabric shrinks slightly. That soft crinkle is not a flaw. It is the quilt relaxing after all those quarter-inch seams.
Conclusion
Learning how to make a modern patchwork quilt is mostly an exercise in making small, thoughtful decisions. Accurate squares create straight rows. Consistent seams create a flat top. A focused palette creates visual unity. Careful basting and simple quilting transform the patchwork into a durable finished object.
Do not let minor imperfections keep the quilt folded in a closet. Handmade work carries evidence of the person who made it, and that character is part of its appeal. Choose colors you enjoy, begin with a manageable size, and let the design become more personal as you sew.
Experience Notes: What Quilters Learn After a Few Patchwork Projects
One of the first lessons experienced makers discover is that color selection changes once fabric is cut into smaller pieces. A large floral that looks calm on the bolt may become surprisingly energetic when divided into 6-inch squares. Conversely, a plain-looking solid can become the hero of the design because it gives the prints enough room to breathe. For that reason, arranging the entire quilt before sewing is worth the floor space, even when the living room temporarily resembles a fabric chessboard.
Makers also learn that accurate cutting saves far more time than it consumes. Rushing through the cutting stage often leads to trimming blocks, easing mismatched rows, or inventing increasingly creative explanations for why one side is longer. Checking the ruler alignment every few cuts feels slow, but it is faster than negotiating with 99 slightly different squares.
Another practical discovery concerns pressing. New quilters sometimes treat the iron as a tool for forcing seams into submission. Experienced quilters use it more gently. They set the seam first, press the allowance in the intended direction, and allow the fabric to cool. This simple habit keeps the blocks square and prevents long rows from developing stretched, rippled edges.
Layout decisions frequently improve after a break. Staring at the same arrangement for an hour can make every option look equally wrong. Taking a reference photo, leaving the room, and returning later makes color clumps and awkward lines much easier to spot. Viewing the photo at thumbnail size is particularly useful because the overall balance becomes more obvious than the individual prints.
The quilting stage teaches a different kind of patience. A beautifully pieced top can still develop backing tucks when the layers are not basted thoroughly. Many makers eventually decide that using a few extra safety pins is less irritating than removing a long line of quilting stitches. They also learn to support the quilt’s weight with a table, chair, or extension surface. The sewing machine should move the fabric; gravity should not drag it sideways.
Binding is another skill that becomes easier through repetition. The first mitered corner may look as though it was folded during an earthquake. By the fourth corner, the process usually makes sense. Clips help keep the binding controlled, and joining the final tails with a diagonal seam produces a cleaner finish than overlapping them.
Perhaps the most useful experience is realizing that a quilt should be judged from normal viewing distance. A slightly blunt point or wandering quilting line may look enormous when held six inches from your face. Place the quilt on a bed or sofa, step back, and the same detail often disappears into the larger design.
Modern patchwork rewards experimentation because the grid provides structure while color, scale, and negative space provide freedom. Each project teaches something useful: which batting creates the preferred drape, which thread behaves well in the machine, which colors feel comfortable at home, and which “random” layouts actually require three evenings of rearranging. The finished quilt is valuable, but the accumulated judgment gained while making it is what makes the next quilt even better.
Note: Fabric, batting, thread, and sewing machines vary. Test cutting, pressing, seam allowance, tension, and quilting distance on sample materials before applying them to the full quilt.