
If you have ever looked at a covered wagon and thought, “Yes, I too would like to build a charming wooden box on wheels that screams frontier optimism,” welcome. You are in the right place. A pioneer wagon is one of those projects that sits in the sweet spot between woodworking, history, and pure old-fashioned fun. It can be a garden display, a parade prop, a kid-size pull wagon, a photo booth star, or the sort of backyard conversation piece that makes neighbors lean over the fence and ask suspiciously cheerful questions.
Before we go any further, here is the first important truth: a practical modern DIY pioneer wagon is not the same thing as a full-scale, historically exact Oregon Trail wagon. Building a museum-grade reproduction means advanced joinery, wheelwright work, blacksmith-style hardware, and a healthy respect for gravity. For most people, the smart move is to build a small or medium wooden wagon inspired by the classic “prairie schooner” look. You keep the romance, lose the chaos, and dramatically reduce the odds of spending six months learning how to shrink iron tires onto wooden wheels.
This guide will show you how to make a sturdy, attractive pioneer wagon with a classic wooden body, simple running gear, an optional canvas cover, and enough historical flavor to feel authentic without becoming a reenactment of axle-related sorrow. Think of it as frontier style with modern common sense.
What a Pioneer Wagon Really Looked Like
Popular culture loves to mash every old wagon into one giant wooden celebrity. In reality, many emigrant wagons were reinforced farm wagons with straight beds, not the giant curved Conestoga freight wagons people often picture. That matters because it gives your build a better design target. If you want a wagon that looks historically plausible, aim for a straight-sided wagon box, moderate height, simple running gear, and a light canvas cover over bows. Not a rolling wooden battleship.
For a home project, that means the body should be rectangular and practical, the frame should be strong but not absurdly heavy, and the wheels should be chosen for safe rolling rather than theatrical suffering. A decorative covered-wagon shape is easy to add later with side rails, upright supports, and a canvas bonnet. The bones matter first. The frontier flair can come right after.
Choose the Right Version Before You Build
The smartest pioneer wagon starts with one question: what do you want it to do?
1. Display Wagon
This is the easiest version. It can hold flowers, pumpkins, party favors, or seasonal décor. You can use lighter materials, smaller wheels, and a decorative canvas top. If the wagon will mostly sit still and look handsome, you have a lot more design freedom.
2. Kid-Size Pull Wagon
This one needs a stronger frame, safer wheel hardware, smoother steering, and a finish that can handle weather, crumbs, and the laws of sticky fingers. Build this version only if you are willing to take the running gear seriously. Cute is great. Secure is better.
3. Garden or Utility Wagon
If you want to haul firewood, mulch, tools, or potted plants, build for durability first. A pioneer-style body can still look charming, but the chassis, axle mounts, and wheels should be selected like a utility cart, not a movie prop.
For most DIY readers, the best compromise is a medium-size wooden pull wagon: roughly 36 to 48 inches long, 20 to 24 inches wide, and 8 to 12 inches deep. Big enough to be useful, small enough to build in a weekend or two, and light enough that you will not need a mule named Harold.
Materials That Make Sense
A historically inspired wagon does not require historic suffering. Use materials that are durable, available, and realistic for your tools.
Best Wood Choices
For the frame and structural parts, white oak, ash, or maple are excellent because they are strong and wear well. If the wagon will live outdoors, white oak is especially appealing. For the box sides and rails, pine or poplar can work beautifully if sealed well. Exterior-grade plywood is a practical choice for the bottom panel because it stays stable and makes assembly easier.
If you are going for a more authentic look, use hardwood for highly stressed areas such as the tongue, side posts, and wheel supports. Historically, wagon makers used different woods for different parts for a reason. Harder, tougher woods went where stress lived. Lighter woods often served the body and bed.
Recommended Hardware
- Exterior wood screws
- Wood glue rated for exterior use
- Steel bolts, washers, and lock nuts
- Shaft collars or cap nuts for wheel retention
- Metal rod or axle bolts sized to your wheels
- Pillow block bearings if you want a modern, smoother axle setup
- Heavy eye bolts or hitch hardware for the handle
- Canvas drop cloth or duck cloth for the cover
Tools You Will Want Nearby
A circular saw or miter saw, drill, sander, jigsaw, clamps, square, wrench set, and measuring tape will handle most of the job. A router is nice for softening edges, but it is a luxury, not a requirement. If you can measure accurately and drill straight, you are already ahead of many historical wagon disasters.
Understand the Main Parts of the Wagon
A good pioneer wagon has five basic systems.
The Wagon Box
This is the body that carries the load. It includes the bottom, front, back, and side panels. In a pioneer-inspired build, the box can be straight-sided and plain. That simplicity is part of the charm.
The Chassis
The chassis is the foundation under the box. It supports the body and ties the running gear together. If the chassis is weak, the whole wagon becomes an expensive wooden opinion.
The Running Gear
This includes the front and rear wheel supports, axles, and steering assembly. Many successful modern wagon builds use a fixed rear axle and a pivoting front yoke or truck. That setup gives you simple steering without forcing you into heroic wheelwright territory.
The Tongue or Pull Handle
This is what lets you steer and pull the wagon. A strong wooden handle with a secure pivot point works well for smaller wagons. For larger utility-style versions, a sturdier tow bar or tongue is better.
The Bows and Cover
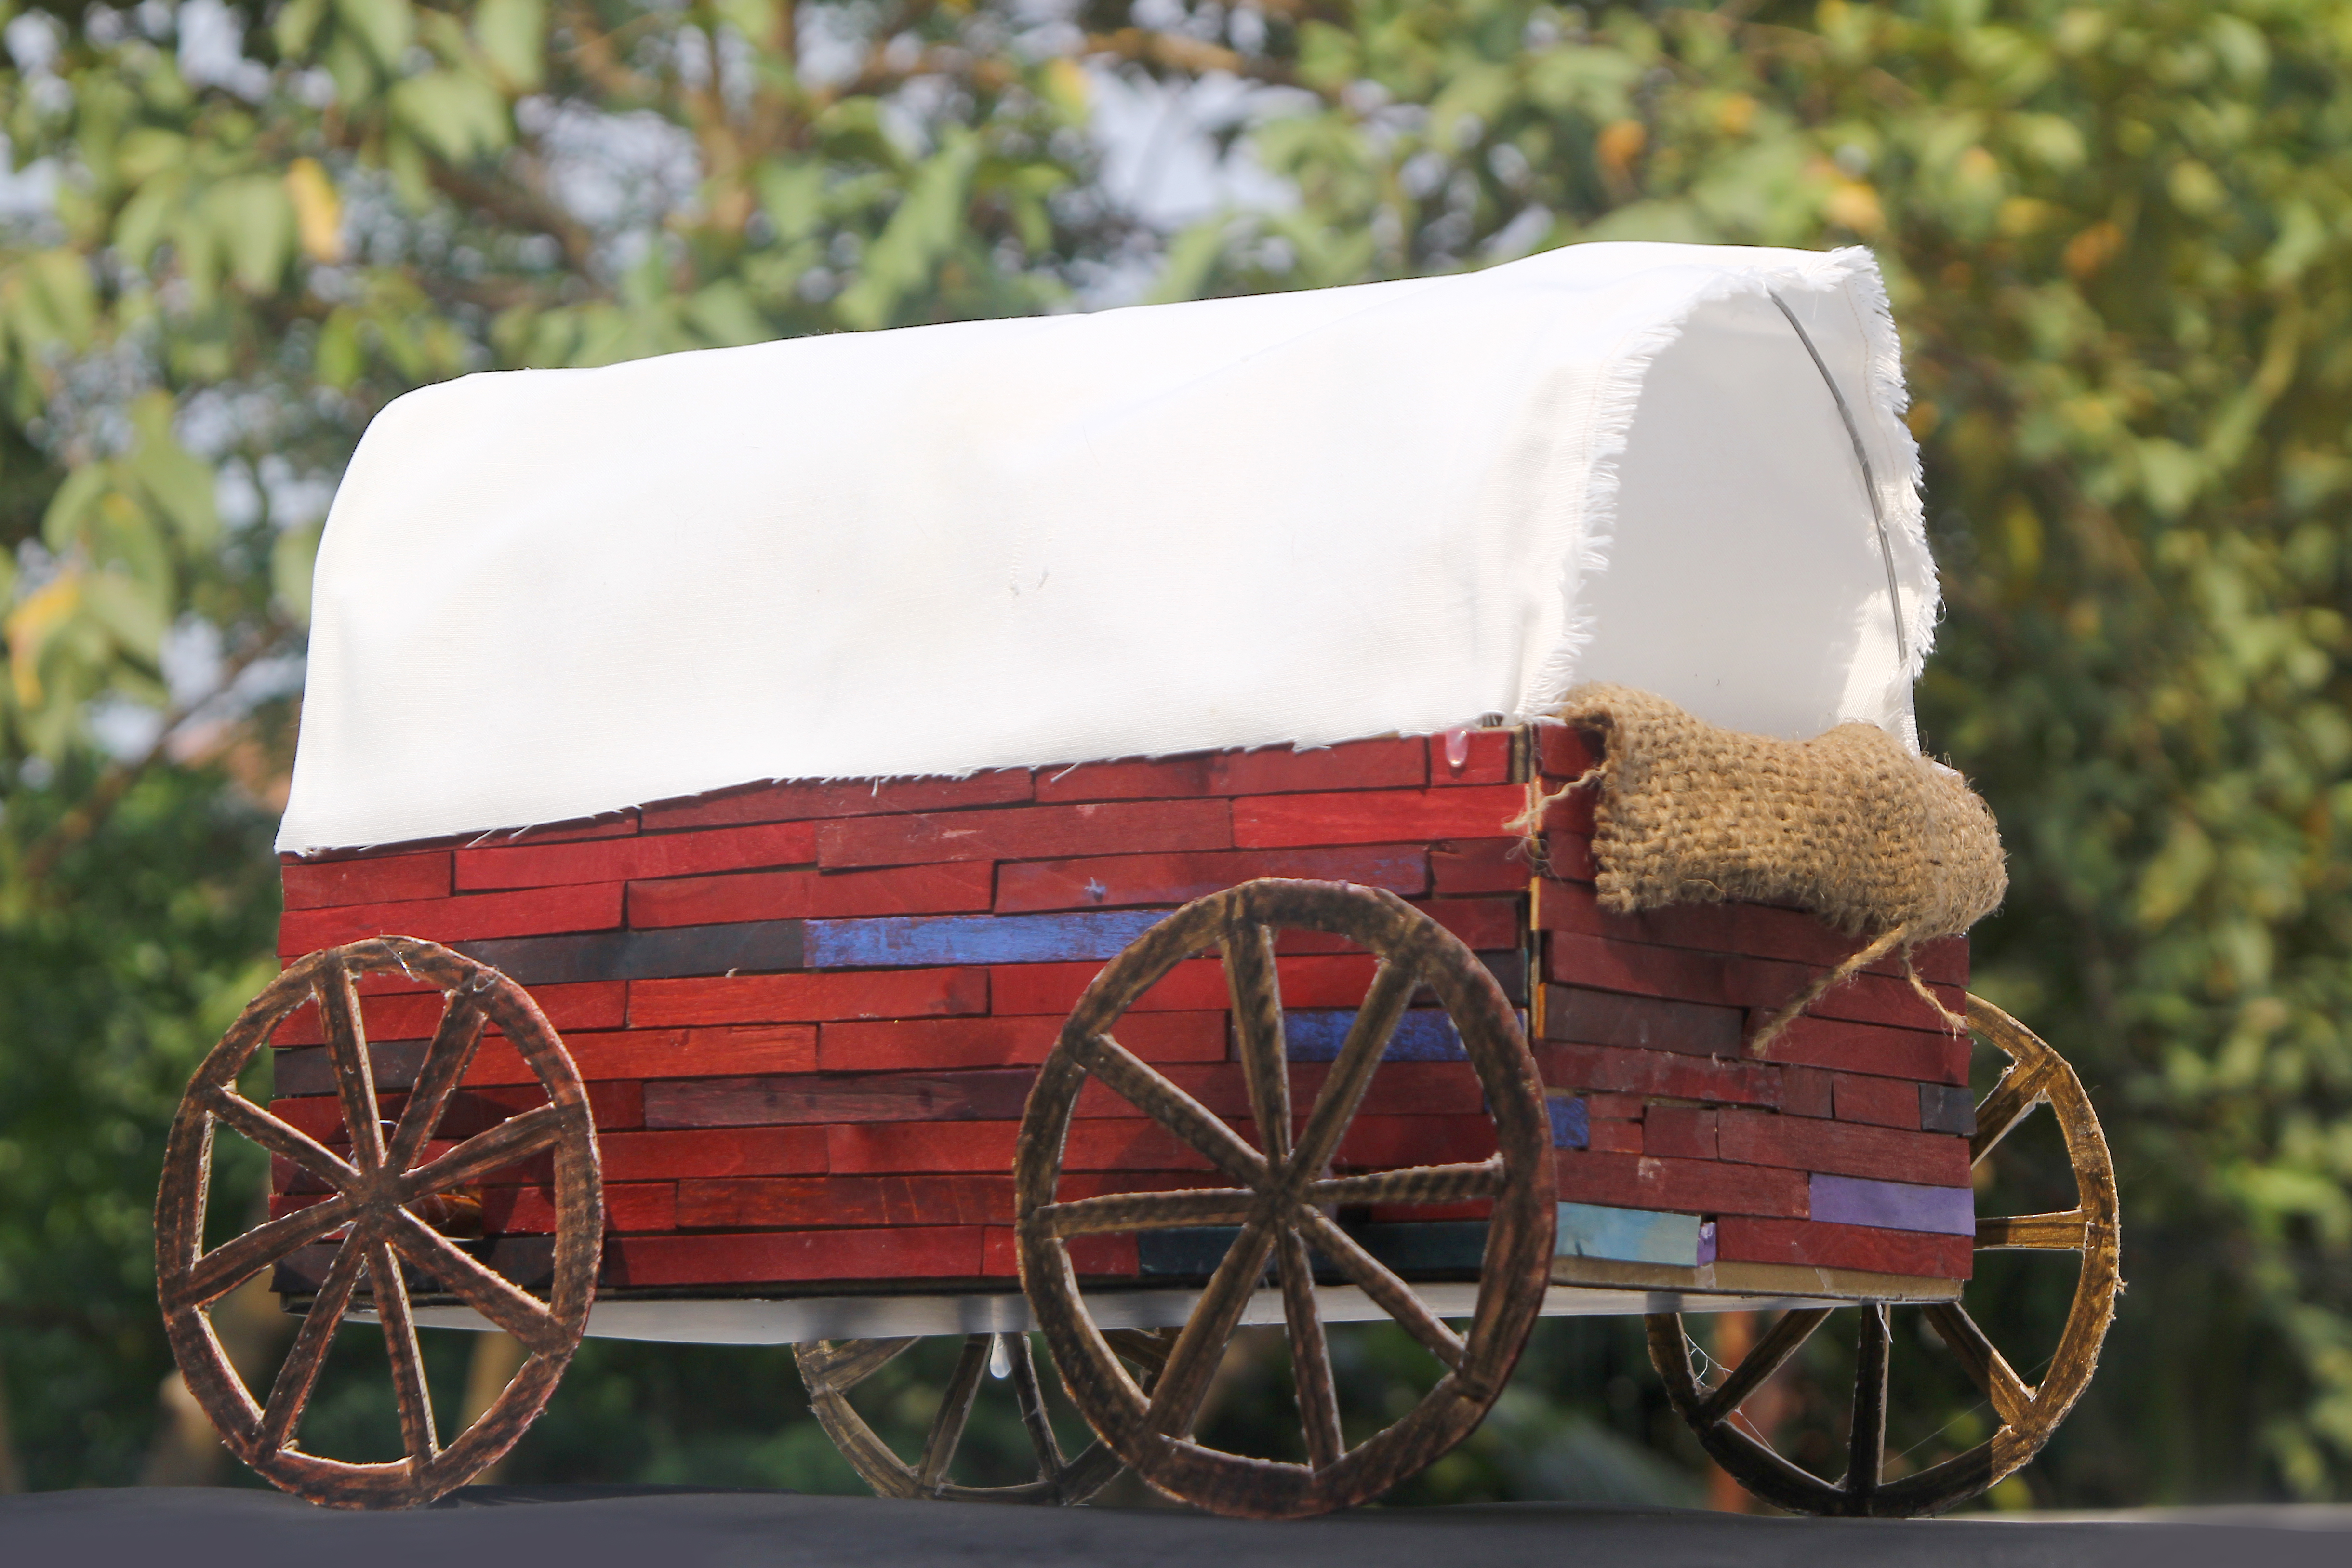
If you want the classic covered-wagon silhouette, use bent wood, thin dowels, or steam-bent strips to create bows over the wagon bed. Then attach a canvas cover. This is the part that makes people smile and say, “Now that looks like a pioneer wagon.”
How to Build a Pioneer Wagon Step by Step
Step 1: Build the Box First
Cut your bottom panel from exterior plywood. Then cut the side, front, and back panels from solid lumber or furniture-grade boards. Dry-fit everything before fastening. This is the moment where measurements stop being theoretical and start becoming slightly judgmental.
Glue and screw the sides to the front and back, then attach the box to the bottom panel. If you want a more refined look, add top rails around the upper edge of the box. They stiffen the structure and instantly make the wagon look more finished.
Step 2: Make a Strong Chassis
Build a rectangular frame under the box using solid lumber. For a medium-size wagon, 2×3 or 2×4 stock is usually enough. If you want a heavier-duty garden version, step up the thickness. Half-lap joints are excellent if you have the patience. Butt joints reinforced with glue, screws, and corner blocks also work.
The key is stiffness. You do not want the box flexing every time the wagon rolls over a pebble the size of a raisin.
Step 3: Plan the Running Gear
This is the make-or-break stage. For most DIY builders, the easiest safe route is to use purchased wheels and build the wagon around them. You can choose solid rubber wheels, pneumatic tires, or decorative wooden wheels made for craft or garden use. If children will ride in the wagon, prioritize reliability over drama. In plain English: choose wheels that actually roll well.
For the rear axle, mount the wheel supports square under the chassis. For the front axle, build a pivoting yoke or truck assembly that bolts through the center. This lets the front wheels turn left and right when you pull the handle. Keep enough clearance so the wheels do not hit the wagon body during tight turns.
Step 4: Mount Axles and Wheels Carefully
If you are using metal rod axles, slide on washers between the supports and the wheels to reduce rubbing. Then add the wheels, another washer, and secure each side with a shaft collar, cap nut, or locking hardware rated for the axle size. Nothing ruins the pioneer aesthetic like a wheel wandering off to start its own life.
Spin each wheel by hand. It should rotate freely without wobbling badly. A tiny bit of play is manageable. A wheel that looks like it is auditioning for a slapstick film needs adjustment before you continue.
Step 5: Build the Steering Handle
A simple handle can be made from a hardwood dowel or shaped wooden tongue attached to the front steering yoke with eye bolts or a pivoting bracket. The connection must move smoothly but stay secure. Test the full turning range before final tightening. The handle should pull the front assembly naturally without binding.
Step 6: Add Side Rails and Decorative Details
To lean into the pioneer look, add vertical corner posts and upper rails. Slight curves on the rails can soften the look and make the wagon feel more handcrafted. You can also add a rear gate if you want easier loading. For a decorative version, this is where the project gets photogenic.
Step 7: Make the Wagon Bows
Insert upright supports into the box sides, then add curved bows across the top. Thin hardwood strips, flexible dowels, or bent PVC wrapped in fabric can all work depending on how authentic you want to be. If you are going for historical appearance, wood looks better. If you are going for speed and weather resistance, modern materials are less dramatic and more forgiving.
Step 8: Add the Canvas Cover
Use heavy canvas or duck cloth. Stretch it over the bows and secure it with staples on the inside, small tacks, ties, or a removable lace-up method. Leave enough tension so the cover does not sag like a tired hammock. A light off-white or natural canvas tone looks best and feels period-appropriate.
Step 9: Sand, Seal, and Finish
Sand every surface that hands might touch. Round over sharp corners. Then apply exterior primer and paint, or use stain followed by a weather-resistant clear coat. Red is the classic storybook wagon color, but natural wood with a cream canvas cover is handsome too. If you want the piece to live outdoors, do not skip sealing the end grain and the underside. Moisture always finds the part you forgot.
Should You Make Wooden Wagon Wheels from Scratch?
You can, but that moves the project into advanced craft territory. Traditional wagon wheels rely on carefully shaped hubs, spokes, felloes, and an outer tire band. They are beautiful, brilliant pieces of engineering, but they are not casual Saturday work unless your hobbies already include words like “wheelwright” and “tolerance.”
For a realistic DIY pioneer wagon, the best move is usually one of these:
- Buy ready-made wooden decorative wheels for a display wagon
- Use sturdy utility wheels for a functional wagon
- Use wooden-looking wheels with hidden modern hardware if you want the old style without the old headaches
That choice is not cheating. It is called finishing the project this century.
Common Mistakes to Avoid
Making It Too Heavy
New builders often overbuild the body and underbuild the running gear. A wagon should feel sturdy, but it should still roll without requiring a livestock team.
Skipping Wheel Clearance Checks
Always test the front steering assembly through a full turn before final assembly. The wheels need room to swing. If they hit the box, the wagon becomes a decorative argument.
Using Weak Hardware
Do not trust tiny fasteners for a load-bearing build. If people, pumpkins, or heavy flowerpots are going in the wagon, use robust hardware and locking nuts.
Forgetting the Finish
Outdoor projects without a finish age quickly and badly. A pioneer wagon should look rugged, not abandoned.
How to Make It Look More Authentic
If you want a stronger historical vibe, keep the wagon bed simple, use a natural canvas cover, choose muted paint colors, and avoid modern-looking plastic parts where visible. Add rope lashings, wooden rails, and forged-style handles if you like. You can even stencil a family name on the side for parade or event use.
Just remember that authenticity should not beat safety. Hidden modern fasteners are allowed. The pioneers are not grading you.
What It’s Like to Build and Use a Pioneer Wagon: Real-World Experience
The experience of making a pioneer wagon is half woodworking project, half time machine, and half comedy sketch. Yes, that is three halves, which is fitting, because wagon projects tend to multiply once you begin. What starts as “I’ll build a simple little wagon” quickly turns into “Maybe it needs bows,” followed by “Should I sew a canvas cover?” and then, somehow, “Do I now have opinions about wheel spacing?” You do. You absolutely do.
The most memorable part of the build is usually the moment the wagon first stands on its own wheels. Until then, it is just a collection of boards, bolts, clamps, and ambition. Then suddenly it becomes a thing with character. You pull it across the driveway, hear the gentle rattle of wood and hardware, and for one glorious second you feel like a frontier genius. That feeling lasts right up until you notice the handle turns too far and the front wheel kisses the side panel. Then you go back inside, find a wrench, and become a frontier engineer.
People who build pioneer wagons for school projects, garden décor, photo props, or children’s play usually say the same thing: the wagon attracts attention far beyond its size. Put one in a yard with a stack of pumpkins, and it instantly looks like October knows what it is doing. Use one at a birthday party, and every child wants a turn pulling it. Park one near a porch with flowers spilling over the side, and it somehow upgrades the whole space without being bossy about it.
The practical experience teaches you a lot, too. You learn quickly that a smooth-rolling wheel matters more than a dramatic one. You learn that a slightly lighter wagon is often better than a monument to overconfidence. You discover that a canvas cover looks magical in photos but also catches wind like it has secret plans. You realize sanding the handle until it feels good in your hand is not fussy; it is the difference between “handcrafted” and “why is this thing attacking my palm?”
There is also something oddly satisfying about the sound and movement of a finished wagon. A good wagon does not just roll. It moves with a little presence. The box feels solid, the handle responds without wobbling, and the wheels track cleanly across the ground. Even when the wagon is small, the experience feels pleasantly old-fashioned. You are not pressing a button or updating firmware. You are pulling a wooden wagon you made with your own hands, and that scratches a very specific human itch.
And then comes the real reward: using it. Maybe it hauls potted herbs to a sunny spot. Maybe it carries blankets to an outdoor movie night. Maybe it becomes the star of a holiday display. Maybe your child loads it with stuffed animals, three rocks, and one deeply unnecessary stick. Whatever the use, the wagon stops being a project and starts being part of family life. That is the point where a good build becomes a great one.
So yes, making a pioneer wagon takes planning, measuring, test-fitting, and a few moments of muttered negotiation with bolts. But it also gives you something rare: a useful object with personality. It looks like history, works like a real tool, and tells a better story than most flat-pack furniture ever could.
Conclusion
If you want to make a pioneer wagon, the best approach is to combine historical inspiration with modern practicality. Build a strong box, a stiff chassis, reliable running gear, and a simple steering setup. Add bows and canvas for the classic covered-wagon shape, then finish it well so it lasts. The result can be decorative, functional, or delightfully both. In other words, build the wagon the pioneers would have admired and your back will still forgive.