
Dried orange slice ornaments are the rare holiday craft that looks fancy, smells cheerful, costs very little, and does not require you to own a glitter cannon. With a few oranges, a baking sheet, twine, and a little patience, you can turn ordinary citrus into glowing, stained-glass-style Christmas ornaments that feel rustic, cozy, and handmade in the best possible way.
These natural Christmas decorations work beautifully on trees, garlands, wreaths, wrapped gifts, place settings, and window displays. They fit farmhouse decor, cottage Christmas style, Scandinavian holiday decorating, old-fashioned Victorian-inspired trees, and modern minimalist homes that want a warm pop of color. Even better, dried orange ornaments are beginner-friendly. If you can slice fruit and operate an oven without giving the smoke alarm a starring role, you can make them.
In this guide, you will learn exactly how to make dried orange slice ornaments, how thick to cut the slices, how long to dry them, how to keep them from burning, how to decorate them, and how to store them so they last. We will also cover common mistakes, creative design ideas, and real-life tips from making batch after batch of these charming citrus decorations.
Why Dried Orange Slice Ornaments Are So Popular
Dried orange slice ornaments have become a holiday favorite because they check almost every box: they are affordable, natural, photogenic, nostalgic, and surprisingly versatile. When dried correctly, orange slices turn translucent in the center, allowing Christmas tree lights to shine through them like tiny amber windows. It is the kind of simple magic that makes people say, “Wait, you made those?” and then immediately inspect your tree like a craft detective.
Unlike plastic ornaments, dried citrus decorations bring texture and warmth. The rind keeps its bright orange edge, while the fruit flesh deepens into shades of gold, honey, and caramel. Each slice looks a little different, which is part of the charm. No two oranges dry exactly the same, and honestly, that is what keeps the tree from looking like it was assembled by a department-store robot.
What You Need to Make Dried Orange Slice Ornaments
You do not need a complicated craft supply haul for this project. Most of the materials may already be sitting in your kitchen or holiday storage bin.
Basic Supplies
- 3 to 5 fresh oranges
- A sharp knife or mandoline slicer
- Cutting board
- Paper towels or a clean kitchen towel
- Baking sheets
- Parchment paper or wire cooling racks
- Twine, ribbon, jute cord, or ornament hooks
- Scissors
- Skewer, needle, toothpick, or small knife tip for making holes
Optional Decorations
- Whole cloves
- Cinnamon sticks
- Star anise
- Dried cranberries
- Wood beads
- Evergreen sprigs
- Bay leaves
- Small bows
- Gold or natural cotton string
For the best-looking ornaments, choose oranges that feel firm and heavy for their size. Navel oranges are easy to find and work well, but blood oranges, Cara Cara oranges, mandarins, lemons, limes, and grapefruit can also be dried for a more colorful citrus ornament collection.
How To Make Dried Orange Slice Ornaments Step by Step
The secret to beautiful dried orange ornaments is not speed. It is even slicing, gentle heat, good airflow, and enough drying time. Think of this project as cozy holiday crafting, not a microwave dinner.
Step 1: Wash and Dry the Oranges
Start by washing the oranges under cool running water. Since the peel will remain on the ornament, you want to remove any dirt, waxy residue, or handling debris from the surface. Dry the fruit with a towel before slicing so it is easier to hold safely.
Step 2: Slice the Oranges Evenly
Cut the oranges into slices about 1/8 inch to 1/4 inch thick. Thinner slices dry faster and become more translucent, while thicker slices look bold and rustic but take longer to dry. The main goal is consistency. If some slices are paper-thin and others look like citrus hockey pucks, they will not dry at the same rate.
A sharp chef’s knife works fine, but a mandoline can make more even slices. If you use a mandoline, protect your fingers. Holiday crafting is delightful; holiday crafting with a bandage is less delightful.
Step 3: Blot Away Extra Juice
Place the orange slices between layers of paper towels or a clean kitchen towel and gently press to remove excess juice. This small step makes a big difference. Less surface moisture means faster drying, less stickiness, and a lower chance of the slices steaming instead of drying.
Do not smash the slices flat. A gentle blot is enough. You want ornaments, not orange pancakes.
Step 4: Arrange the Slices on a Baking Sheet
Line a baking sheet with parchment paper, or place a wire cooling rack over the baking sheet for better airflow. Arrange the orange slices in a single layer with space between them. Do not overlap the slices, because overlapping traps moisture and creates uneven drying.
A wire rack is especially helpful because air can circulate around both sides of the fruit. If you only have parchment paper, that works too; you will just need to flip the slices regularly.
Step 5: Dry the Orange Slices in the Oven
Set the oven to a low temperature, usually between 170°F and 200°F. Some ovens can go lower, and lower heat can help preserve a brighter orange color. If your oven runs hot, choose the lowest setting and check the slices often.
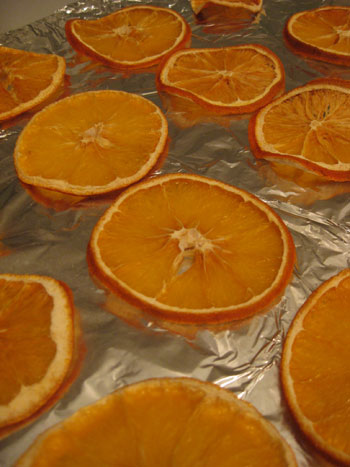
Bake the orange slices for 3 to 6 hours, flipping them every 30 to 60 minutes. The exact time depends on your oven, the thickness of the slices, how juicy the oranges are, and whether you use parchment or a rack. The slices are ready when they feel dry to the touch, the centers are no longer wet or sticky, and the rind has firmed up.
If the slices begin browning too quickly, lower the oven temperature. If they still feel tacky after several hours, continue drying them in short intervals. Patience wins here. High heat may seem efficient, but it can scorch the fruit before the moisture fully leaves.
Step 6: Let the Slices Cool Completely
Once the orange slices are dry, transfer them to a cooling rack and let them cool completely. Cooling helps you judge the final texture. A slice may feel slightly softer while warm but firm up as it cools.
If any slices still feel sticky, damp, or squishy in the center, return them to the oven for more drying time. Moisture is the enemy of long-lasting dried orange ornaments.
Step 7: Make a Hole for Hanging
Use a skewer, toothpick, large needle, or the tip of a small knife to make a hole near the top of each dried slice. Place the hole through the orange flesh just below the rind rather than directly through the peel. This helps prevent tearing.
Thread twine, ribbon, or ornament cord through the hole and tie a loop. For a simple look, plain jute twine is perfect. For a polished Christmas tree ornament, use velvet ribbon, satin ribbon, or metallic cord.
Step 8: Decorate the Ornaments
You can hang dried orange slices exactly as they are, or dress them up. Tie a cinnamon stick across the front, add a few wooden beads above the slice, tuck in a tiny evergreen sprig, or pair the citrus with dried cranberries. Whole cloves can be pressed into fresh slices before drying for a spiced look and scent, but use them sparingly so the slice still dries evenly.
How To Use a Dehydrator for Orange Slice Ornaments
If you own a food dehydrator, this project becomes even easier. Arrange the blotted orange slices in a single layer on dehydrator trays. Set the dehydrator around 135°F to 140°F and dry the slices until they are no longer sticky. Depending on thickness and moisture level, this may take 6 to 12 hours.
The dehydrator method usually produces more even results because the machine is designed for steady heat and airflow. It also reduces the risk of browning. The trade-off is time, but because dehydrators are hands-off, you can start a batch in the morning and come back later to a tray of golden citrus ornaments.
How To Tell When Dried Orange Slices Are Done
A finished dried orange slice should feel dry, lightweight, and slightly firm. The center may be leathery or crisp depending on thickness, but it should not feel wet, juicy, or sticky. Hold a slice up to the light. If it glows warmly and the pulp looks set rather than glossy with moisture, it is likely ready.
Some slices will curl a little as they dry. That is normal and often makes them look more handmade. However, if slices curl dramatically, they may have been cut unevenly or dried too quickly. Flipping regularly can help.
Common Mistakes to Avoid
Cutting the Slices Too Thick
Thick orange slices look pretty at first, but they can take a very long time to dry. If the outside seems done while the middle stays damp, the ornament may mold later. Aim for thin, even slices whenever possible.
Using Too Much Heat
Drying is not the same as roasting. A hot oven can brown or burn the citrus before it fully dehydrates. Low and slow is the way to go. If your kitchen starts smelling like caramelized orange candy, check the oven. A little fragrance is lovely; smoke is a review from your oven that says, “Please reconsider.”
Skipping the Blotting Step
Fresh oranges contain a lot of juice. Blotting removes extra moisture and helps the drying process begin more efficiently. It also reduces sticky spots and improves the final color.
Storing Ornaments Before They Are Fully Dry
This is the big one. If orange slices are stored with moisture still inside, they may develop mold. Always cool them completely and check for tackiness before packing them away.
Creative Dried Orange Ornament Ideas
Classic Rustic Orange Ornaments
Thread each dried orange slice with jute twine and hang it directly on the tree. This simple style looks beautiful with warm white lights, wooden ornaments, popcorn garlands, and handmade paper decorations.
Spiced Orange Slice Ornaments
Before drying, press whole cloves around the peel or into the orange flesh in a star or ring pattern. Once dry, tie the ornament with cinnamon sticks and a small bow. These ornaments look old-fashioned and smell wonderfully festive.
Orange and Evergreen Ornaments
Attach a small faux or dried evergreen sprig to the top of the orange slice with twine. Add a tiny bow for a gift-ready look. This design works especially well for natural Christmas trees and woodland-style decor.
Boho Citrus Ornaments
Add wood beads to the hanging loop before tying it off. Use cotton cord or macrame string for a softer, bohemian look. Pair orange slices with dried grapefruit or lemon slices for a layered color palette.
Gift Tag Ornaments
Dried orange slices make beautiful gift toppers. Tie one onto a wrapped present with kraft paper, ribbon, and a sprig of rosemary. The recipient can move the orange slice from the package to the tree, which is a charming little bonus gift.
How Long Do Dried Orange Slice Ornaments Last?
If dried thoroughly and stored correctly, dried orange slice ornaments can last through the holiday season and often for several years. Their color may darken over time, especially if exposed to sunlight or humidity, but many people love the deeper vintage look that develops.
To make them last longer, keep them dry. Avoid hanging them outdoors in wet weather unless you treat them as temporary decorations. Humidity can soften the fruit and shorten its lifespan.
How To Store Dried Orange Ornaments
At the end of the season, remove the ornaments from the tree and inspect them. Discard any that feel soft, sticky, or show signs of mold. Store the remaining ornaments in a breathable container or a cardboard box lined with tissue paper. Keep them in a cool, dry place away from moisture.
If your home is humid, add a small food-safe silica packet to the storage box, or store the ornaments loosely wrapped in paper rather than sealed tightly in plastic. Airtight containers can work only if the slices are completely dry, but if there is any hidden moisture, sealing it in can cause problems.
Are Dried Orange Slice Ornaments Edible?
These ornaments are made from real oranges, but they are intended for decoration, not snacking. Once they have been handled, hung on a tree, touched by curious guests, and possibly admired by a pet with suspicious enthusiasm, they should be treated as craft items. If you want dried oranges for food or drinks, make a separate batch using food-safe equipment and storage methods.
Can Kids Help Make Dried Orange Ornaments?
Yes, this is a wonderful family craft, with a few safety notes. Adults should handle slicing and oven work. Kids can blot the slices, arrange cooled dried oranges, choose ribbon, thread twine through pre-made holes, and decorate gift packages. Younger children may enjoy sorting slices by size or choosing which ornament goes where on the tree.
This project is also a great way to slow down during a busy holiday season. It smells good, looks good, and gives everyone a job that does not involve untangling lights from last year’s mysterious knot monster.
Experience Notes: What I Learned Making Dried Orange Slice Ornaments
After making dried orange slice ornaments several different ways, the biggest lesson is that the “perfect” batch usually comes from not rushing. The first time people make these, they often expect them to behave like cookies: put them in the oven, set a timer, remove finished product. But oranges are fruit, and fruit has opinions. Some slices dry quickly. Some stay juicy in the middle like they are personally committed to delaying your decorating schedule. The best approach is to check often and adjust as needed.
The most reliable results came from cutting slices as evenly as possible and blotting them well before drying. When I skipped blotting, the slices took much longer and a few developed darker spots. When I took the time to press them gently between towels, they dried more evenly and looked brighter. A wire rack also made a noticeable difference because air could move underneath the slices. Parchment paper worked, but it required more flipping and attention.
Another useful discovery: not every slice needs to become an ornament. The center slices are usually the prettiest because they show the full round shape and clear citrus segments. The smaller end slices can be used in bowls, wreaths, garlands, simmer pot mixes, or gift wrapping. This keeps the project low-waste and gives you more decorating options.
I also learned that oranges are not all the same. Navel oranges are dependable, but Cara Cara oranges create a softer pink-orange tone that looks beautiful with cream ribbon. Blood oranges can dry darker and moodier, which is stunning on a dramatic tree with burgundy, gold, and evergreen accents. Lemons and limes dry into smaller ornaments that work well as filler pieces on garlands.
For decorating, simple usually wins. A dried orange slice with plain twine can look more elegant than one overloaded with five accessories and a bow the size of a small squirrel. That said, a cinnamon stick tied to the front or a few wood beads on the hanging loop can add just enough detail. If you are making ornaments as gifts, matching ribbon colors to the recipient’s decor makes them feel thoughtful without adding much cost.
One final practical tip: make more than you think you need. A few slices may brown too much, tear when threaded, or look less attractive once dry. Extra slices are never a problem because they can be used on presents, in garlands, on wreaths, or in a decorative bowl. Dried orange ornaments are the rare craft where leftovers still look intentional.
Conclusion
Learning how to make dried orange slice ornaments is simple, affordable, and deeply satisfying. With fresh oranges, low oven heat, and a bit of patience, you can create natural Christmas ornaments that look warm, nostalgic, and beautifully handmade. The key is to slice the oranges evenly, blot away extra juice, dry them slowly, flip them often, and make sure every slice is fully dry before hanging or storing.
Whether you use them on a Christmas tree, garland, wreath, wrapped gift, or holiday table setting, dried orange ornaments bring a cozy handmade feeling that store-bought decorations often cannot match. They are charming without trying too hard, festive without being flashy, and budget-friendly enough to make by the dozen. In other words, they are the holiday craft equivalent of a warm mug of cider: simple, comforting, and always welcome.