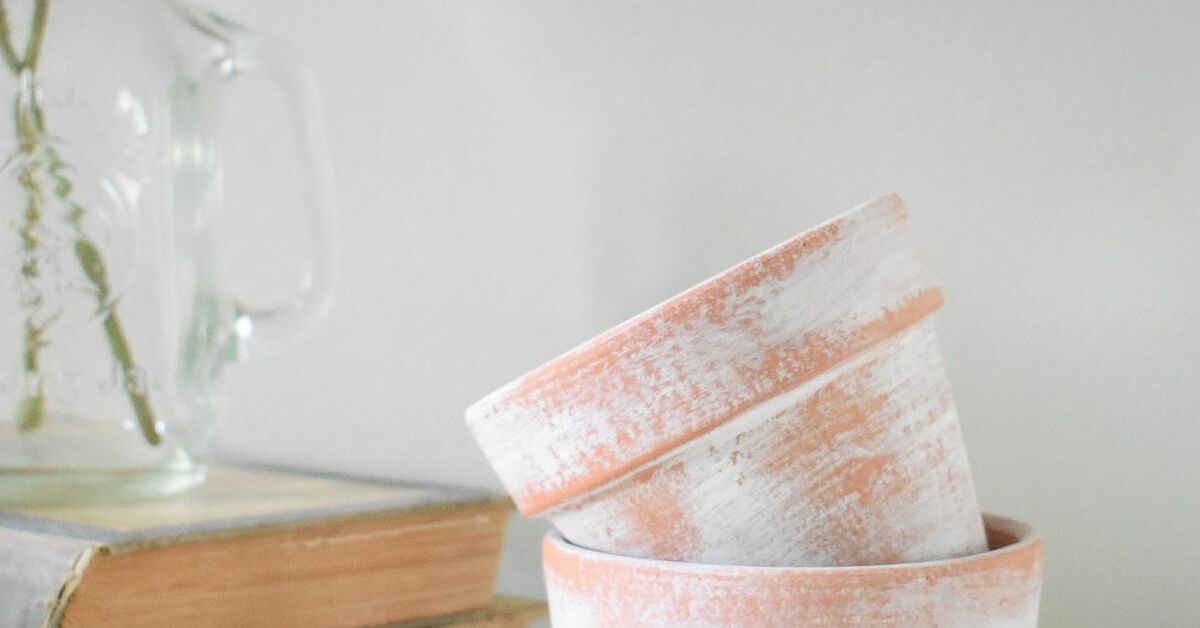

There is something suspiciously magical about an aged terracotta pot. A brand-new clay planter is perfectly fine, of course. It holds soil. It has a drainage hole. It does its job without causing drama. But an aged terracotta pot? That pot looks like it spent the summer in a charming Italian courtyard, learned three gardening secrets, and returned home with excellent texture.
The good news is that you do not have to wait ten years for rain, minerals, sunshine, and garden dust to do their slow little dance. With a few basic materials, you can paint aged terracotta pots yourself and create a weathered, limewashed, antique garden look in an afternoon. This DIY project is budget-friendly, beginner-friendly, and wonderfully forgiving. In fact, the more imperfect your brushstrokes are, the better the pot usually looks. Finally, a craft where “oops” counts as character.
This guide walks you through how to paint aged terracotta pots DIY style, including what paint to use, how to prep the clay, how to create a realistic patina, how to seal the finish, and how to avoid common mistakes. Whether you are styling a patio herb garden, refreshing old planters, or giving new clay pots that “found at a French flea market” attitude, this tutorial will help you get a soft, rustic, timeworn finish without overcomplicating the process.
Why Aged Terracotta Pots Look So Good
Terracotta has a warm, earthy color that works with almost every garden style. It looks natural beside herbs, olive trees, lavender, succulents, geraniums, and trailing vines. The material is porous, which means unglazed clay naturally absorbs and releases moisture. Over time, minerals from water can leave pale marks on the surface, and outdoor exposure can soften the bright orange tone into something more muted and beautiful.
That aged look is popular because it feels collected rather than purchased. A weathered pot has layers: pale chalky patches, uneven edges, soft whitewashing, darker clay peeking through, and sometimes a mossy or dusty finish. When done well, painted aged terracotta pots look organic, not plastic-coated or overly designed. The goal is not to make the pot look “painted.” The goal is to make it look like it has lived a very tasteful life.
Supplies You Will Need
You do not need a craft store shopping cart that looks like it is preparing for battle. Most aged terracotta pot painting projects use simple supplies:
- Terracotta pots and saucers
- Stiff brush or sponge for cleaning
- Drop cloth, cardboard, or newspaper
- Painter’s tape, if you want clean sections
- Acrylic craft paint, chalk paint, or outdoor-safe paint
- White, cream, gray, beige, taupe, or mossy green paint
- Baking soda, garden lime, or plaster-style texture additive
- Water for thinning paint
- Foam brush, chip brush, or old paintbrush
- Paper towels, rag, or sponge
- Fine-grit sandpaper
- Clear matte sealer for outdoor use, if desired
- Gloves and a mask if sanding or working with powders
For the most natural aged terracotta finish, choose matte products instead of glossy ones. Real patina is not shiny. It is soft, dusty, chalky, and slightly uneven. Glossy sealer can make a rustic pot look like it has been dipped in candy coating, which is festive but not exactly “old-world garden.”
Step 1: Choose the Right Terracotta Pot
Both new and old pots work for this project. New pots are easier because they usually have clean surfaces and no hidden plant disease issues. Old pots, however, already have texture and natural discoloration, which makes them wonderful candidates for a painted aged finish.
If you are reusing a pot, inspect it carefully. Avoid pots with major cracks unless you plan to use them only as decorative covers. Check the drainage hole, remove old soil, and scrub away mineral crust, roots, algae, or flaking paint. A little staining is fine. Loose debris is not. Paint sticks best to a clean, dry surface.
Step 2: Clean and Dry the Pot Thoroughly
Cleaning is the least glamorous step, which means it is probably important. Terracotta can hold dust, soil, salts, and moisture in its pores. If you paint over dirt, your finish may peel or look blotchy in the wrong way. There is charmingly uneven, and then there is “this paint is leaving the group chat.”
Use a stiff brush to scrub the outside and inside of the pot. For old containers, remove soil and plant debris completely. Rinse the pot and let it dry for at least several hours, preferably overnight. The clay should feel dry to the touch before you paint. If moisture is trapped inside the pot, the finish may not bond as well.
Step 3: Decide on Your Aged Terracotta Style
Before opening the paint, decide what kind of aged look you want. Aged terracotta pots can lean in several directions:
Soft Whitewashed Terracotta
This style uses watered-down white or cream paint brushed lightly over the pot. It lets the orange clay show through and creates a sun-faded Mediterranean look.
Chalky Stone-Look Terracotta
This finish uses baking soda or garden lime mixed with paint to create a rough, mineral-like surface. It is perfect if you want pots that look like old limestone or plaster.
Mossy Garden Patina
This style adds muted green, gray, or brown tones in small patches to mimic outdoor aging. Use a very light hand. Too much green can make the pot look less like an antique planter and more like it lost a fight with spinach dip.
Distressed Painted Terracotta
This method uses a base paint layer, then sanding or dry brushing to reveal the clay underneath. It works well for farmhouse, cottage, and vintage patio designs.
Step 4: Mix Your Aged Paint Finish
For a beginner-friendly aged terracotta paint mixture, combine one part matte white or cream acrylic paint with one part water. Stir until it has the consistency of thin cream. This creates a simple wash that settles into the clay and softens the original color without hiding it completely.
For more texture, mix two tablespoons of baking soda into about half a cup of paint. Add a small splash of water if the mixture becomes too thick. The baking soda creates a gritty, stone-like surface that looks especially convincing after sanding. Garden lime can create a similar chalky effect, but handle it carefully, avoid breathing dust, and keep it away from children and pets while you work.
If you want a warmer aged look, add a drop of tan or taupe paint to the white mixture. If you want a cooler stone look, add a tiny amount of gray. The keyword here is tiny. A little gray goes a long way, and suddenly your terracotta pot may look like it is preparing for a thunderstorm.
Step 5: Apply the First Thin Coat
Place the pot upside down on a covered work surface. Use a chip brush or foam brush to apply the paint mixture in uneven strokes. Do not aim for full coverage. Let the terracotta color show through in places, especially around the rim, raised edges, and lower portion of the pot.
Brush in different directions instead of making perfect horizontal lines. Real aging is random. A pot sitting outdoors does not receive a polite, symmetrical patina. It gets rain splashes, sun exposure, soil dust, and minerals in all the oddest places. Your brushwork should feel loose and relaxed.
After brushing on the paint, use a rag or paper towel to blot some of it away. This softens harsh marks and presses the paint into the clay. If the pot looks too white, wipe more off. If it looks too orange, add another thin layer later. Thin coats are better than one heavy coat because they create depth.
Step 6: Build Layers for a Realistic Aged Look
Let the first coat dry completely. Then add a second layer using a slightly different tone. For example, if your first coat was creamy white, make the second layer beige-gray or warm taupe. Dab it lightly around the rim, base, and any raised details. Use a dry brush technique by dipping the brush into paint, wiping most of it off, and dragging the almost-dry bristles over the surface.
This is where the pot starts to look expensive in that “small garden shop with classical music playing” kind of way. Dry brushing catches texture and creates highlights without covering the whole pot. If you are working with a plain pot, focus on the rim and lower third. These areas naturally collect wear and mineral marks.
For a mossy effect, mix a muted sage green or olive tone with water. Dab it sparingly into creases and near the base. Blend with a damp rag so it looks faded. The trick is restraint. You want a whisper of moss, not a full biography of moss.
Step 7: Sand for Natural Distressing
Once the paint is dry, use fine-grit sandpaper to distress the pot. Lightly sand the rim, edges, and high points where natural wear would happen. This reveals bits of the terracotta underneath and prevents the finish from looking flat.
Do not sand aggressively unless you want a heavily worn look. Start gently and step back often. Aged terracotta should have variation. Some spots can be pale and chalky; others can show raw clay. The best results look accidental, even when you are absolutely standing there engineering every smudge like a patio archaeologist.
Step 8: Seal the Pot or Leave It Breathable
Whether to seal painted terracotta pots depends on how you plan to use them. If the pot will live indoors as a decorative cover pot, a matte clear sealer can protect the finish from scratches. If the pot will stay outdoors, an outdoor-safe matte sealer can help the paint last longer through rain and sun.
However, sealing changes how terracotta behaves. Unglazed clay is naturally porous, and that porosity helps moisture move through the pot. A full seal, especially inside and outside, may reduce breathability. For live plants, many DIYers seal only the painted exterior or skip sealer for a softer, more naturally weathering finish.
If you do seal, use light coats and follow the product label. Let the pot cure fully before planting. Avoid sealing wet clay or applying a thick glossy coating. Matte is your friend here.
Step 9: Let the Finish Cure Before Planting
Dry does not always mean cured. Paint may feel dry within an hour, but it can take longer to harden. Give your painted aged terracotta pot at least 24 hours before adding soil and plants. If you used multiple layers, textured paint, or sealer, wait longer.
When planting, keep the drainage hole open. Add a well-draining potting mix, not heavy garden soil. Terracotta dries faster than plastic, so check moisture regularly after planting. Herbs, succulents, lavender, rosemary, thyme, and many Mediterranean-style plants look especially good in aged clay pots because they suit the rustic texture and typically appreciate good drainage.
Alternative Aging Methods for Terracotta Pots
The Yogurt Method
Some gardeners use plain yogurt brushed onto dry terracotta to encourage a natural aged surface outdoors. This method is best for outdoor pots and people with patience. It creates a more organic patina over time, especially in a shaded, slightly damp garden area. The result is unpredictable, which is either charming or mildly rude depending on your personality.
The Baking Soda Paint Method
Baking soda mixed with paint creates instant texture. It is one of the easiest ways to make new terracotta pots look aged without waiting for natural weathering. Use it for a chalky stone finish, then sand lightly after drying.
The Limewash-Inspired Method
A diluted white or beige mixture brushed unevenly over the clay can mimic old mineral deposits. This method is excellent for subtle aging because it keeps the warm terracotta visible underneath.
The Dry Brush Method
Dry brushing is ideal if you want control. Load the brush with paint, wipe almost all of it off, then skim the surface. This highlights texture and gives the pot that dusty, antique look.
Best Paint Colors for Aged Terracotta Pots
The most convincing aged terracotta pots use colors found in nature. Try warm white, oatmeal, ivory, sand, mushroom gray, limestone, putty, soft sage, olive, charcoal brown, and muted clay. Avoid neon colors if your goal is old-world charm. Neon pink may be many things, but “aged Tuscan courtyard” is not usually one of them.
For a classic look, use three tones: a warm white wash, a beige-gray dry brush, and a tiny amount of mossy green. For a darker antique finish, add watered-down brown or charcoal into creases and wipe most of it away. For a sun-bleached finish, layer white and cream heavily on the upper rim and lightly over the body.
Common Mistakes to Avoid
Using Paint Too Thickly
Heavy paint can hide the natural clay and make the pot look manufactured. Thin layers create a more believable aged effect.
Skipping the Cleaning Step
Dust, soil, and old mineral flakes can interfere with adhesion. Clean first, paint second, celebrate third.
Making the Finish Too Perfect
Symmetry is not the goal. Aged terracotta should look uneven, faded, and naturally worn.
Forgetting Drainage
A pretty pot still needs to function. Keep the drainage hole clear and use appropriate potting mix.
Using Glossy Sealer
Gloss can make an aged finish look artificial. Choose matte or low-sheen protection when possible.
Styling Ideas for Painted Aged Terracotta Pots
Aged terracotta pots look beautiful when grouped in odd numbers. Try three pots in different sizes near a front door, or line several small pots along a kitchen windowsill with herbs. Mix painted aged pots with raw terracotta, stone planters, woven baskets, and galvanized metal for a layered garden look.
For a Mediterranean style, plant rosemary, lavender, olive, thyme, and trailing ivy. For a cottage garden look, use geraniums, pansies, violas, sweet alyssum, and small ferns. For modern rustic styling, pair chalky aged pots with sculptural succulents or snake plants.
You can also use aged terracotta pots as table decor. A small painted pot can hold napkins, utensils, seed packets, or a candle in a protected setting. Just remember: if the pot will touch food items, use a liner or keep the food separate from painted surfaces.
How to Maintain Painted Aged Terracotta Pots
Outdoor pots will continue to change over time. That is part of their charm. Rain may soften the finish, sun may fade the color, and minerals may add new marks. If you want the finish to last longer, keep pots in a covered porch or patio area. If you love natural weathering, place them in the garden and let them evolve.
Clean painted pots gently with a dry cloth or soft brush. Avoid harsh scrubbing unless you want to remove some of the finish. At the end of the season, empty soil from pots you are not using, let them dry, and store them in a protected place if you live in an area with freezing temperatures. Terracotta can crack when moisture inside the clay freezes and expands.
Experience Notes: What DIYers Learn When Painting Aged Terracotta Pots
The first experience most people have with painting aged terracotta pots is realizing that the ugly middle stage is completely normal. At some point, the pot may look streaky, patchy, and slightly tragic. Do not panic. Aged finishes usually come together in layers. The first coat softens the clay, the second coat adds depth, sanding reveals warmth, and the final dry brushing makes everything look intentional.
Another lesson is that cheap brushes can actually be useful. For smooth cabinet painting, a rough old brush is bad news. For aged terracotta, it can be perfect. Split bristles and uneven strokes help create texture. A foam brush gives a smoother wash, while a chip brush gives rustic marks. Many DIYers end up using both: foam brush for the first watery coat, chip brush for the dry-brushed highlights.
Testing color on the back of the pot is also worth the extra five minutes. White paint can look very bright against orange terracotta. Adding beige or gray makes it feel more natural. If the finish looks too pale, wipe it back with a damp rag before it fully dries. If it looks too dark, add a soft white dry brush after drying. The project is flexible, which is why it is so satisfying.
Texture additives can be wonderful, but moderation matters. A baking soda mixture creates a convincing stone-like surface, but too much can become clumpy. The best texture looks lightly mineral, not like cake frosting. Start with a small amount, stir well, and apply thinly. If the surface becomes too rough, sand it gently after it dries.
Working in batches is another helpful habit. If you are painting several pots, mix enough wash for all of them so the color stays consistent. Still, do not make every pot identical. Vary the pressure, paint placement, and sanding. A group of aged terracotta pots looks more authentic when each one has its own personality. Think siblings, not clones.
One practical experience that surprises beginners is how much pot color changes after planting. Soil, foliage, flowers, and surrounding surfaces all affect the final look. A pot that seems too white on the worktable may look perfect once filled with dark soil and green herbs. Before repainting, place the pot where it will live and view it in natural light.
Finally, aged terracotta pots teach a valuable DIY lesson: imperfection is often the whole point. A tiny drip can become weathering. A pale patch can become mineral bloom. A sanded edge can become history. The project rewards patience, but it does not demand perfection. That makes it ideal for beginners, weekend gardeners, renters with small patios, and anyone who wants a high-end garden look without paying high-end garden shop prices.
Conclusion
Learning how to paint aged terracotta pots DIY style is one of the easiest ways to upgrade a patio, porch, windowsill, or garden corner. With simple supplies like acrylic paint, water, baking soda, a brush, and sandpaper, you can turn plain clay pots into rustic planters with soft color, chalky texture, and vintage charm.
The key is to work in thin, uneven layers. Clean the pot well, let it dry, apply a diluted wash, add texture where needed, dry brush for depth, sand the edges, and seal only if it makes sense for your use. Keep the finish matte, natural, and imperfect. In the end, your pot should not look newly painted. It should look discovered, admired, and possibly passed down by a very stylish gardener with excellent taste in herbs.
SEO Tags