
A butcher’s knot is one of those kitchen skills that looks suspiciously fancy until you do it twice. Then suddenly you feel like you should be wearing a clean apron, nodding thoughtfully at a pork loin, and saying things like, “We’ll truss this for even cooking.” The good news? You do not need culinary school, a meat locker, or a dramatic mustache to learn it.
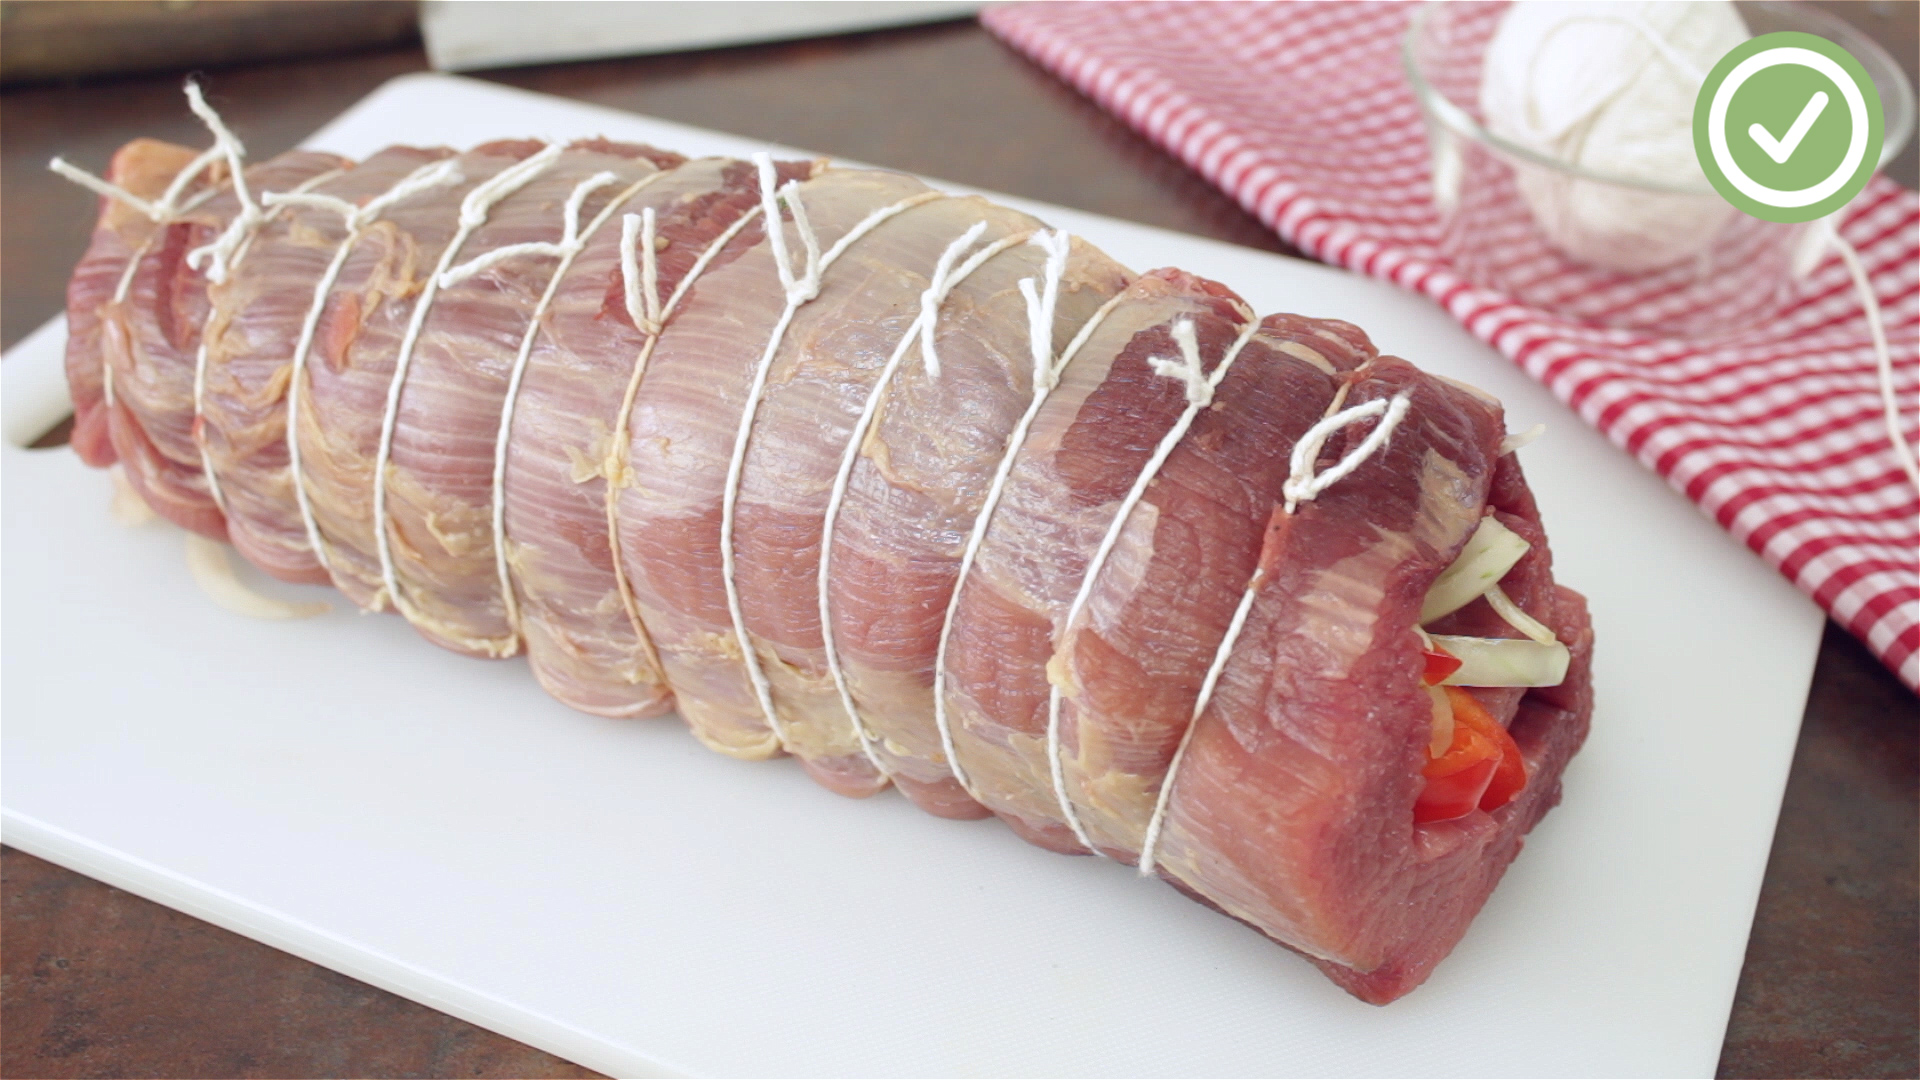
Learning how to tie a butcher’s knot helps keep roasts, rolled meats, stuffed loins, poultry, and uneven cuts compact while they cook. A neat shape means more even heat exposure, better browning, cleaner slicing, and a final presentation that says, “Yes, I absolutely meant to do that.” The knot is especially useful because it tightens under tension, holds securely, and can be repeated along the length of a roast without needing three hands and a motivational speech.
Below is a practical, beginner-friendly guide to tying a butcher’s knot in 15 steps, plus tips on twine, safety, common mistakes, and real kitchen experience so your roast does not enter the oven looking like it lost a wrestling match.
What Is a Butcher’s Knot?
A butcher’s knot is a secure slip-style knot used to tie meat with butcher’s twine. It is commonly used for beef tenderloin, pork loin, prime rib, lamb roast, turkey breast, stuffed chicken, roulades, and other cuts that benefit from being held in a uniform shape.
Unlike a regular square knot, a butcher’s knot is designed to tighten around the meat as you pull. That is the magic trick. You can cinch it snugly, lock it down, trim the ends, and move to the next tie. When repeated at even intervals, the knots create a tidy cylinder that cooks more consistently and slices beautifully.
Why Tie Meat Before Cooking?
Tying meat is not just about making dinner look ready for a magazine cover, though that is a nice bonus. It serves several practical purposes:
- Even cooking: A compact roast cooks more predictably than a floppy, uneven piece of meat.
- Better presentation: Tied roasts hold their shape and slice into cleaner portions.
- Secure stuffing: Stuffed pork loin, turkey breast, or roulade stays closed instead of spilling its delicious secrets into the pan.
- Improved browning: A neat surface helps the meat brown more evenly.
- Easier handling: Tied meat is simpler to move, season, sear, roast, and carve.
What You Need Before You Start
1. Butcher’s Twine
Use food-safe kitchen twine, usually made from 100% cotton. Cotton butcher’s twine is preferred because it grips well, tolerates oven heat, and does not melt like synthetic string. Avoid plastic-coated string, craft yarn, rubber bands, colored thread, or anything that smells like it belongs in a gift-wrapping drawer.
2. A Roast or Practice Object
A beef tenderloin, pork loin, boneless lamb roast, turkey breast, or rolled chicken works well. If you are nervous, practice on a rolled towel first. The towel will not judge you, and if it does, you can still use it to wipe the counter.
3. Kitchen Shears or a Sharp Knife
You will need to trim the twine after each knot. Kitchen shears are easiest, but a sharp knife works if you use it carefully.
4. A Clean Cutting Board
Use a stable cutting board with enough room to move the twine under and around the roast. If working with raw meat, follow safe handling rules: wash hands, clean surfaces, avoid cross-contamination, and cook to the correct internal temperature using a food thermometer.
How to Tie a Butcher’s Knot: 15 Steps
Step 1: Place the Meat on the Cutting Board
Set the roast lengthwise in front of you. If it has a seam, flap, or stuffed opening, position that side so the twine will help hold it closed. For a roast with a fat cap, many cooks place the fat side up or follow the recipe’s direction.
Step 2: Slide the Twine Under the Roast
Pull a length of butcher’s twine from the spool, but do not cut it yet if you plan to tie multiple knots from the same spool. Slide the twine under one end of the roast, about one inch from the edge.
Step 3: Bring the Far End Over the Top
Take the loose end of the twine from the far side and bring it up and over the roast toward you. The twine should now loop around the meat like a belt around a very delicious suitcase.
Step 4: Position the Cut End on Your Left
Arrange the short, loose end on your left side and the long end attached to the spool on your right. This setup helps create the slip action that makes the butcher’s knot so useful.
Step 5: Pinch Both Strands Together
Use your non-dominant hand to pinch both strands where they meet near the front of the roast. Keep steady tension, but do not squeeze so tightly that the meat bulges. The goal is snug, not medieval.
Step 6: Wrap the Loose End Around Your Thumb
With your dominant hand, take the loose end and wrap it around your thumb to form a loop. This thumb loop is the foundation of the knot, so keep it open enough for the twine to pass through.
Step 7: Pass the Loose End Under the Main Strand
Reach under the two strands and bring the loose end through, moving it beneath the main line of twine. This creates the locking structure that will cinch around the roast.
Step 8: Feed the Loose End Through the Thumb Loop
Guide the loose end through the loop around your thumb. Pull it in the same direction as the loop naturally opens. If the knot looks twisted, loosen it and try again. Butcher’s twine is forgiving; it has seen worse.
Step 9: Pull Both Ends to Form the Knot
Pull the loose end and the spool end in opposite directions to tighten the knot. You should see the knot begin to grip while still allowing you to adjust the tension.
Step 10: Cinch the Loop Around the Meat
Pull the long end attached to the spool to tighten the loop around the roast. The twine should be snug enough to hold the meat together but not so tight that it cuts deeply into the surface.
Step 11: Lock the Knot
Once the tension feels right, pull down firmly to lock the knot in place. A good butcher’s knot holds without slipping, even when the meat shrinks slightly during cooking.
Step 12: Trim the Short End
Use kitchen shears to trim the extra twine from the short end. Leave a small tail so the knot does not unravel, but do not leave long strings dangling like party streamers.
Step 13: Move One Inch Down the Roast
Slide the twine or start a new loop about one inch away from the first knot. Consistent spacing helps the roast keep an even shape. For smaller cuts, spacing can be slightly closer; for larger roasts, one to two inches often works well.
Step 14: Repeat the Knot Along the Roast
Continue tying butcher’s knots down the length of the meat. Keep the pressure even from knot to knot. If one loop is dramatically tighter than the others, the roast may cook or slice unevenly.
Step 15: Check the Shape Before Cooking
Look over the roast. It should appear compact, evenly tied, and stable. Adjust any loose loops before cooking. Once everything looks neat, season and cook according to your recipe, using a food thermometer to confirm doneness.
How Tight Should a Butcher’s Knot Be?
The best butcher’s knot is snug but not aggressive. Imagine holding a firm handshake, not trying to win a carnival grip contest. If the twine barely touches the meat, it will loosen as the roast cooks. If it digs too deeply, it can squeeze juices out and create unattractive grooves.
A simple test: after tying, gently lift the roast. The twine should hold its position without sliding. The meat should stay shaped, but the surface should not look strangled. If the roast looks like it is wearing a belt two sizes too small, loosen and retie.
Best Meats for Practicing a Butcher’s Knot
Beef Tenderloin
Beef tenderloin is naturally uneven, with a thinner tail end. Tying helps create a more uniform shape so the thinner section does not overcook before the center reaches the desired temperature.
Pork Loin
Pork loin is a great beginner cut because it is firm, affordable, and easy to handle. It is also excellent for stuffed preparations, where twine helps keep filling tucked inside.
Prime Rib
Prime rib benefits from tying because the twine helps hold the roast compact and can keep the meat attached neatly to the bones if prepared that way.
Turkey Breast or Chicken Roulade
Rolled poultry can be slippery, especially when stuffed with herbs, butter, or vegetables. A butcher’s knot keeps everything in place and helps the roast cook more evenly.
Common Mistakes to Avoid
Using the Wrong String
Not all string belongs in the oven. Use food-safe cotton butcher’s twine. Avoid synthetic string, rubber bands, dyed craft string, and anything with wax or fragrance. Your roast should smell like dinner, not a candle shop.
Tying Too Loosely
Loose twine can slide around as the meat contracts. This defeats the purpose of tying and may leave your roast looking lopsided.
Tying Too Tightly
Over-tightening can squeeze the meat and leave deep marks. Tighten just enough to hold the shape.
Uneven Spacing
Random spacing creates random results. Keep knots about one inch apart for most roasts, adjusting slightly based on size.
Forgetting to Remove the Twine
Butcher’s twine is helpful during cooking, but it is not part of the meal. Remove it before serving unless you enjoy watching guests politely wrestle their dinner.
Food Safety Tips When Tying Meat
Because butcher’s knots are often used with raw meat, safe handling matters. Wash your hands before and after touching raw meat. Clean cutting boards, knives, counters, and shears with hot, soapy water. Keep raw meat away from ready-to-eat foods, and never reuse twine that has touched raw meat.
Most importantly, use a food thermometer. Appearance is not a reliable safety test. Beef, pork, veal, lamb steaks, chops, and roasts are generally cooked to at least 145°F with a rest time, while ground meats and poultry require higher safe internal temperatures. Follow trusted food-safety guidance and your specific recipe.
Butcher’s Knot vs. Regular Kitchen Knot
A regular knot can work in a pinch, but it often slips while you are trying to tighten it. That is why the butcher’s knot is so useful. It behaves like an adjustable loop: tighten first, lock second. Once you understand that rhythm, the process becomes faster and cleaner.
For a single small roast, individual knots are fine. For a larger roast or roulade, many cooks use a continuous trussing method, looping the twine along the meat and finishing with a final knot. Both methods work. The butcher’s knot is especially beginner-friendly because each loop is controlled separately.
Helpful Tips for Better Results
- Practice before the holiday meal: Do not let Thanksgiving turkey be your first rodeo.
- Keep the twine dry: Dry twine grips better and is easier to handle.
- Trim after tying: Long ends can burn or get in the way.
- Use steady tension: Consistency matters more than brute force.
- Season after tying if needed: This helps seasoning land evenly on the final shape.
- Rest meat before slicing: Resting helps juices redistribute and makes carving cleaner.
Experience Notes: What Actually Happens in a Real Kitchen
The first time many home cooks try to tie a butcher’s knot, the roast seems to grow extra corners. The twine slides, the loose end disappears under the meat, and suddenly the whole project feels like a craft activity sponsored by beef. That is normal. The trick is to slow down and focus on one loop at a time.
In real kitchen use, the most helpful habit is setting up the roast properly before touching the twine. Pat the meat dry with paper towels so it is not slippery. If you are tying a stuffed pork loin, roll it tightly first and place the seam side down. If you are tying beef tenderloin, tuck the thin tail under so the whole piece has a similar thickness. The butcher’s knot is powerful, but it is not a miracle worker. Give it a decent shape to hold, and it will reward you.
Another lesson: extra twine is better than not enough twine. Running short halfway through tying a roast is a tiny kitchen tragedy. It is not dramatic enough for sad music, but it is annoying. Keep the spool nearby, and when cutting separate lengths, add a few more inches than you think you need. Twine is cheap. Your patience is not.
Pressure is where beginners often struggle. A loose knot feels safe, but it lets the meat spread as it cooks. A knot that is too tight can pinch the roast and create deep lines. The sweet spot is firm contact. When you pull the twine, watch the surface of the meat. It should gently compress and hold, not bulge dramatically around the string.
For stuffed roasts, butcher’s knots are especially useful. Imagine a pork loin filled with spinach, garlic, herbs, breadcrumbs, or cheese. Without twine, the filling may escape as the meat contracts in the oven. With evenly spaced knots, the filling stays where it belongs. You still may get a little bubbling at the seams, but that is not failure. That is flavor making a small announcement.
For poultry, the same principle applies. A rolled turkey breast or chicken roulade benefits from a compact shape. When tied evenly, it browns better and slices into attractive spirals. This is one of those small techniques that makes a home-cooked dish feel restaurant-level without adding expensive ingredients.
Cleanup also deserves attention. Twine that has touched raw meat should go straight into the trash. Do not place the spool on a contaminated cutting board. One smart method is to pull out more twine than needed before handling the meat, or have someone with clean hands help manage the spool. If cooking alone, wash your hands before touching cabinets, drawers, scissors, or seasoning containers.
After roasting, let the meat rest before removing the twine if the recipe allows. Resting helps the roast settle, and the twine continues to hold the shape while juices redistribute. When ready to carve, snip each loop carefully and pull the twine away. Do not saw through the meat trying to remove it. A clean snip is all you need.
The biggest confidence boost comes from repetition. Tie three knots on a towel. Then tie three on a pork loin. Then try a continuous row on a roast. By the third or fourth attempt, your hands will remember the movement. At that point, the butcher’s knot stops feeling like a puzzle and starts feeling like a kitchen superpower. A small, string-based superpower, yes, but still useful.
Conclusion
Knowing how to tie a butcher’s knot is a simple skill that improves the way roasts cook, carve, and look on the plate. With food-safe cotton twine, steady tension, and a little practice, you can shape beef tenderloin, pork loin, prime rib, lamb, turkey breast, chicken roulade, and stuffed meats like a confident home cook.
The key is not perfection. The key is control: keep the spacing even, tighten each loop snugly, lock the knot, trim the ends, and cook the meat safely. Once you learn the rhythm, you will wonder why you ever let roasts wander into the oven untied and unsupervised.