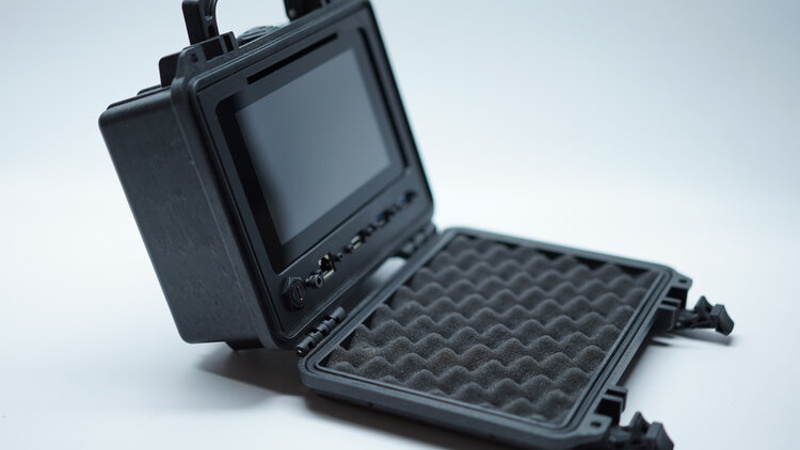

A tough little Raspberry Pi computer becomes far more interesting when it is simple enough for other makers to recreate, remix, and improve.
A Raspberry Pi Project With a Very Unusual Superpower
Some Raspberry Pi projects are built to impress. Others are built to survive. The best ones, however, are built to be copied. That may sound like a backhanded compliment, but in the maker world it is practically a trophy. A ruggedized Raspberry Pi that looks cool in a Pelican case is fun. A ruggedized Raspberry Pi that someone else can realistically build on a weekend, without a machine shop, a heroic parts hunt, or a nervous relationship with solder smoke, is something much more valuable.
That is the charm behind the Raspberry Pi Quick Kit concept: a compact, field-ready computer centered on a Raspberry Pi 4, an official touchscreen, a protective hard case, panel-mount connectors, and a small set of 3D-printed parts. It does not try to be a laptop killer. It does not pretend to be a military-grade supercomputer dropped from a helicopter into a thunderstorm. Instead, it solves a maker problem that matters: how do you put real computing power into a rugged enclosure while keeping the build approachable?
The answer is refreshingly practical. Start with reliable off-the-shelf hardware. Use a case that already knows how to protect delicate things. Reduce the number of custom printed parts. Avoid drilling holes in the shell when possible. Keep the wiring sane. Leave room for people to modify the idea. In other words, the project succeeds not because it is impossible to copy, but because copying it is part of the design philosophy.
What Makes This Ruggedized Raspberry Pi Different?
Many DIY portable computers fall into one of two traps. The first trap is overbuilding. A maker crams in a screen, keyboard, batteries, speakers, switches, sensors, expansion boards, antennas, and enough wiring to make a spaghetti dinner jealous. The result looks amazing online but can be hard to repair, heavy to carry, and nearly impossible for a beginner to reproduce.
The second trap is underbuilding. A Raspberry Pi gets taped into a plastic box with a USB battery pack and a screen balanced somewhere nearby like a nervous dinner guest. It works, technically, but the moment you move it from the desk to the garage, the design begins negotiating with gravity.
The Quick Kit-style rugged Raspberry Pi sits in the useful middle. It is rugged because the enclosure is doing what it was born to do: protect gear. It is portable because the Pi and display are mounted together as a single unit. It is copyable because the custom fabrication is limited. Instead of requiring a complete custom shell, the design uses a real protective case as the foundation and prints only the parts needed to hold the electronics neatly in place.
The Pelican Case Advantage
A protective case changes the personality of a Raspberry Pi project immediately. The Pi is no longer a fragile board waiting for a coffee spill to become a tragic short story. Inside a hard case, it feels more like a field tool. The lid closes. The display is protected. The connectors are organized. The whole thing can be carried, stored, or tossed carefully into a gear bag without treating it like a newborn bird.
Using a Pelican-style case also removes a huge design burden. Building a tough enclosure from scratch is difficult. Printing one can be expensive, slow, and not always as strong as it appears. Starting with a commercially available case lets the maker focus on the computer layout, the mounting frame, airflow, cable paths, and usability. That is smart engineering: spend your effort where it actually improves the build.
The Hardware: Simple, Familiar, and Flexible
The Raspberry Pi 4 remains a strong choice for this kind of project because it brings enough performance for Linux desktop tasks, coding, light server work, media playback, network utilities, and educational experiments. It includes Wi-Fi, Bluetooth, Gigabit Ethernet, USB 3.0, USB 2.0, micro-HDMI, camera and display connectors, and the familiar 40-pin GPIO header. For a small field computer, that is a buffet table of possibilities.
The official Raspberry Pi touchscreen is another practical choice. A touchscreen reduces dependence on a mouse, keeps the build compact, and gives the project a clean front-panel look. It is not meant to compete with a glossy tablet display, but for dashboards, terminals, setup utilities, diagnostics, coding, notes, and tinkering, it does the job. It also benefits from strong community knowledge, which matters when a project is meant to be copied.
Panel-mount USB, Ethernet, and USB-C connectors make the design feel less like a science fair prototype and more like a real piece of equipment. Instead of reaching into the case and poking cables directly into the Pi, the user plugs accessories into accessible ports below or near the display. That small detail makes a large difference. Good rugged design is not only about surviving drops and dust. It is also about reducing the number of awkward moments when your fingers are wedged between a ribbon cable and a plastic frame while you whisper, “Please do not break.”
No Built-In Keyboard? That Is Not a Dealbreaker
One obvious compromise is the lack of an integrated keyboard. Some cyberdeck fans may see that as a missing limb. But for this specific project, leaving out the keyboard makes sense. A keyboard adds thickness, complexity, mounting challenges, and another part that people must source. A compact Bluetooth keyboard or small USB keyboard can be packed separately, replaced easily, and upgraded without rebuilding the whole system.
The same logic applies to batteries. Integrated power looks elegant, but battery management can quickly turn a beginner-friendly build into a more complicated electrical project. External USB-C power banks are not as glamorous, but they are easy to replace, easy to charge, and safer for many users. The project becomes less “all-in-one fantasy machine” and more “rugged modular platform,” which is exactly why it is so copyable.
Why “Built To Be Copied” Is a Feature, Not a Flaw
In traditional product design, being copied sounds like a nightmare. In open maker culture, it can be the whole point. A good DIY hardware project becomes more useful when other people can study it, print the parts, swap components, adapt the layout, and share improvements. The original creator still deserves credit, of course, but the project becomes a living idea rather than a museum piece.
This is where the ruggedized Raspberry Pi concept shines. It uses widely available parts. It keeps the printed pieces manageable. It relies on familiar Raspberry Pi hardware. It avoids unnecessary custom electronics. It turns the case into a platform. That lowers the barrier for students, hobbyists, educators, field technicians, emergency-preparedness enthusiasts, and anyone who wants a portable Linux machine without buying a rugged laptop that costs more than a used motorcycle.
Copyability also improves reliability. When many people build a project, they discover what works and what fails. One maker may improve the cooling. Another may add a better keyboard mount. Someone else may adapt the frame for a newer Raspberry Pi, a different display, or a lower-cost protective case. The design becomes stronger because it is exposed to real-world hands, real-world budgets, and real-world mistakes.
Real-World Uses for a Rugged Raspberry Pi
A rugged Raspberry Pi computer is not for everyone. If your biggest computing challenge is answering email on the couch, a normal laptop is still the sane option. But this kind of device makes sense when portability, protection, and flexibility matter more than elegance.
Field Diagnostics
A rugged Pi can serve as a compact diagnostic workstation for network checks, sensor testing, serial console access, equipment configuration, and quick data collection. It is especially useful in places where a regular laptop feels too delicate or too large.
Education and Workshops
For classrooms and maker spaces, the design is a conversation starter. Students can learn about single-board computers, 3D printing, connectors, enclosure design, Linux, and basic hardware integration in one project. Better yet, the rugged format makes the device easier to store and transport between sessions.
Portable Servers and Offline Knowledge Kits
A Raspberry Pi can host local documentation, learning materials, project files, reference pages, maps, or software repositories. In an offline or limited-connectivity environment, a small self-contained computer can be surprisingly useful. It will not replace the internet, but it can keep important resources nearby when the network decides to take a nap.
Creative Cyberdeck Builds
The cyberdeck community loves personal expression. Some builds look like props from a 1980s science-fiction movie. Others look like lunchboxes that learned Linux. A rugged Pi kit gives builders a solid base to customize. Paint it. Label it. Add a keyboard. Change the color scheme. Mount it in a different case. The design invites personality without demanding that every builder reinvent the wheel.
Design Lessons From the Quick Kit Approach
The best lesson here is restraint. It is tempting to add every possible feature, but restraint makes a project easier to finish and easier to copy. A ruggedized Raspberry Pi does not need to include everything on the first version. It needs to work well enough that version two feels exciting rather than necessary.
Use Common Parts When Possible
Common parts reduce frustration. A standard Raspberry Pi, a known touchscreen, common screws, panel-mount cables, and a popular protective case are much easier to source than rare surplus connectors or mystery components from a forgotten online listing. When parts are easy to find, more people can build the project.
Make Repairs Boring
Boring repairs are good repairs. If a cable fails, the builder should be able to replace it. If a printed bracket cracks, it should be printable again. If the Pi is upgraded, the mount should be adaptable. Rugged projects are not only about resisting damage; they are about recovering gracefully when damage happens anyway.
Think About Heat Early
Raspberry Pi boards can throttle performance when they get too hot, especially under sustained load. A sealed or semi-enclosed case can trap heat, so airflow, spacing, heatsinks, and realistic workloads matter. The goal is not to turn the case into a wind tunnel. The goal is to understand what the computer will actually do and design cooling around that use.
Do Not Confuse Rugged With Invincible
A rugged case protects against many common hazards, but it does not make electronics magical. Ports still need care. Screens still dislike sharp impacts. Power supplies still matter. Moisture, heat, dust, and vibration still deserve respect. A rugged Raspberry Pi is tougher than a naked board, not a superhero wearing GPIO-shaped armor.
How This Project Fits the Bigger Cyberdeck Moment
Cyberdecks have become more than niche props for retro-futurist hobbyists. They represent a pushback against sealed, identical consumer devices. A smartphone is powerful, but it is not very personal. A laptop is useful, but it rarely feels like something you built with your own hands. A cyberdeck says, “This machine works the way I want it to work, even if the cable management looks like a raccoon helped.”
Recent cyberdeck projects range from polished dual-screen Raspberry Pi builds to playful devices hidden in purses, lunchboxes, retro computer shells, and custom 3D-printed bodies. The rugged Pi Quick Kit belongs to the practical branch of that family tree. It is less about fashion and more about function, but it still has the visual drama that makes people stop scrolling.
That combination is powerful for SEO and for readers because it connects several high-interest topics: Raspberry Pi projects, DIY portable computers, rugged electronics, open-source hardware, 3D printing, cyberdeck design, and field-ready Linux tools. The project is technical enough to interest experienced makers but simple enough that newcomers can imagine building one. That is a rare balance.
What Could Be Improved in Future Versions?
No DIY project is perfect, and this one is more useful when viewed as a platform rather than a finished product. A future version could add a removable keyboard tray, a cleaner power system, a low-profile cooling fan, a modular GPIO breakout, or a swappable internal storage option. Another builder might adapt the frame for Raspberry Pi 5, although that would require careful attention to thermals and connector layout.
There is also room for software refinement. A rugged Pi becomes more valuable when it boots into a clean dashboard, includes offline documentation, offers simple network tools, and keeps recovery utilities close at hand. The hardware gets attention first because it photographs well. The software, however, determines whether the device becomes a useful companion or just a very handsome box.
The smartest upgrade path is modularity. Add features without trapping the builder in a maze. A clip-in keyboard is better than a permanently awkward one. A replaceable power bank may be better than a complex internal battery. A labeled port panel is better than hidden cables. The more understandable the design remains, the more likely it is to survive contact with other makers.
Conclusion: The Best Rugged Raspberry Pi Is the One People Actually Build
This ruggedized Raspberry Pi was built to be copied, and that is exactly why it matters. It proves that a portable Linux computer can be tough, attractive, and approachable without becoming an engineering obstacle course. By combining a protective case, a Raspberry Pi, a touchscreen, panel-mount connectors, and a small number of printable parts, the project makes rugged computing feel accessible.
Its biggest achievement is not the case, the screen, or even the satisfying cyberdeck look. Its biggest achievement is clarity. You can understand the idea at a glance. You can see how the parts fit. You can imagine what you would change. That is the mark of a strong open hardware-inspired project.
For makers, teachers, tinkerers, and Raspberry Pi fans, the lesson is simple: do not hide your best ideas behind unnecessary complexity. Build something useful. Document it well. Leave room for remixing. If people copy it, improve it, and make it their own, that is not failure. That is the project doing exactly what it was built to do.
Experience Notes: What Building a Rugged Raspberry Pi Teaches You
The first experience most people have with a rugged Raspberry Pi build is not technical. It is emotional. You place the Pi, screen, and connectors into a hard case and suddenly the project feels serious. The same board that once sat naked on a desk, blinking politely beside a keyboard, now looks like it belongs in a field kit. That feeling is addictive. It is also dangerous, because it can trick you into adding too much too quickly.
A good rugged build teaches patience. Before printing parts, it helps to test the Pi, screen, power supply, cables, and operating system on the bench. This is not glamorous, but it saves hours later. Nothing tests a maker’s character like discovering that a ribbon cable is loose after everything has been mounted behind a beautifully printed frame. The lesson is clear: make the boring checks early, and future-you will send present-you a thank-you card.
The second lesson is that cable routing matters more than expected. In a tight enclosure, cables are not just cables. They are tiny plastic snakes with opinions. A cable that bends cleanly in your hand may press against the screen once the frame is installed. A connector that looks accessible in an exploded view may become annoying when you actually plug in a keyboard. Good routing makes the device feel professional. Bad routing makes every upgrade feel like defusing a spaghetti bomb.
The third lesson is about heat. A rugged case protects the computer, but it can also reduce airflow. That does not mean the design is doomed. It means the builder should match the cooling plan to the workload. A Pi used for notes, dashboards, and light coding has different thermal needs than one compiling software for hours. Testing temperatures during real use is better than guessing. Guessing is how tiny computers become tiny space heaters.
The fourth lesson is that modularity saves projects. External keyboards, removable power banks, replaceable cables, and accessible screws may not look as sleek as a fully integrated design, but they make the build easier to maintain. Rugged gear should not require a ceremony every time something needs to be fixed. The best field computer is the one that lets you solve the problem and get back to work.
Finally, this kind of project teaches humility. A rugged Raspberry Pi can look like a movie prop, but the real reward comes from making it useful. Label the ports. Keep a spare microSD card. Store a short setup note inside the case. Add only the tools you truly use. After a few trips between the desk, garage, classroom, or workshop, the machine begins to reveal what matters. The scratches, fingerprints, and small revisions become part of the story. That is when the build stops being a gadget and starts becoming your own portable workbench.
SEO Tags
Note: This HTML article is original, written for web publishing, and intentionally contains no source-link blocks or contentReference markers inside the article body.