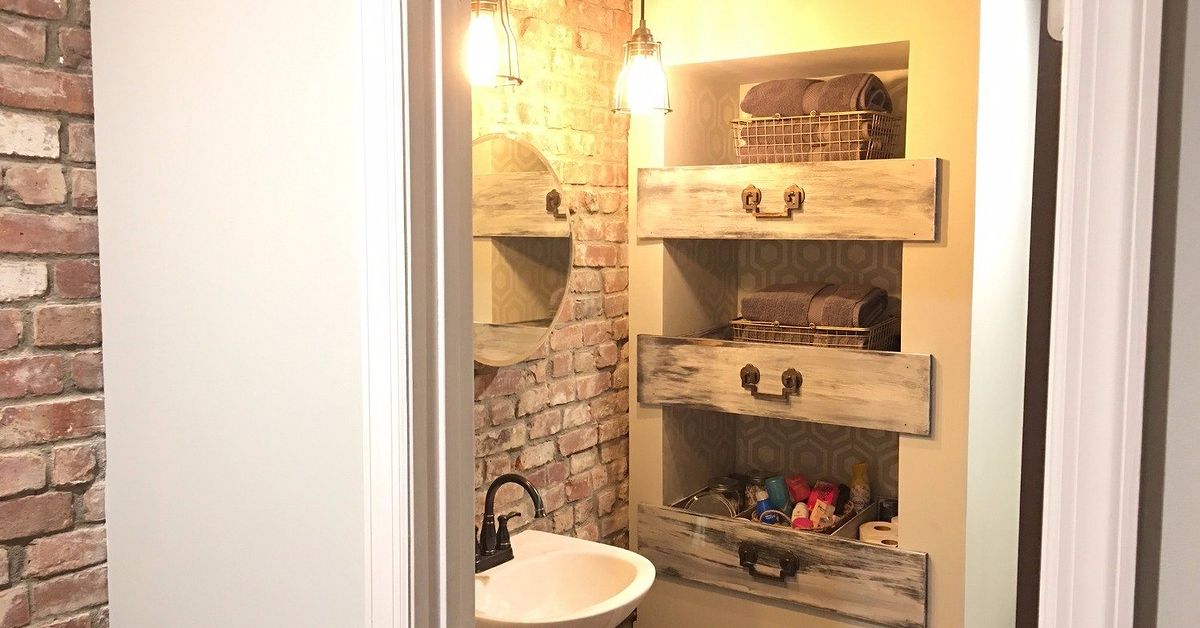

An old dresser with a broken frame may look ready for the curb, but its drawers could be the answer to your bathroom-storage problems. With a little cleaning, paint, protective sealer, and imagination, those wooden boxes can become wall cubbies, rolling bins, open shelves, or countertop organizers.
This project is especially useful in a small bathroom, where every lotion bottle appears to have invited three friends. Repurposed dresser drawers add character without requiring expensive cabinetry, and they can be customized to fit awkward walls, empty corners, or the unused space beneath a vanity.
Before reaching for a drill, however, remember that bedroom furniture was not designed for steamy bathrooms. The wood must be in good condition, the finish needs moisture protection, and anything mounted on a wall must be properly secured. Here is how to turn old dresser drawers into practical bathroom storage without creating a wobbly wooden science experiment.
Why Dresser Drawers Work So Well as Bathroom Storage
A dresser drawer is essentially a ready-made wooden storage box. It already has four sides, a bottom, and a decorative front. Many drawers also include useful details such as dovetail joints, vintage hardware, carved trim, or labels.
Reusing the drawers can provide several benefits:
- Lower project cost: Salvaged drawers are often free or inexpensive.
- Flexible installation: They can be stacked, mounted, placed on a counter, or fitted with casters.
- Custom sizing: A narrow drawer may fit where standard bathroom furniture cannot.
- Less waste: Useful wood stays out of the landfill.
- More personality: Vintage drawer fronts offer details rarely found on mass-produced organizers.
Better Homes & Gardens, Bob Vila, Family Handyman, and This Old House have all featured old drawers or dressers as useful foundations for storage projects. The basic idea is simple: preserve the part that still works and give it a better job.
Choose the Right Drawers for the Project
Inspect the Wood and Joints
Start by examining every drawer. Check the corners, bottom panel, handle, and joints. A little surface wear adds charm; loose joints and a sagging bottom add future profanity.
Press gently on each side to see whether the drawer twists. Repair small gaps with wood glue and clamps. Reinforce a loose bottom with narrow wood strips if necessary. A drawer intended to hold folded washcloths can be relatively light, but one holding large bottles or cleaning products needs a stronger base.
Skip drawers with extensive rot, severe water damage, active mold, or major insect damage. Particleboard drawers that are swollen or crumbling are also poor candidates. Once engineered wood absorbs enough water to puff up like a breakfast pastry, it rarely returns to its original shape.
Check for Old Paint
If the drawer is vintage and has an unknown painted finish, avoid aggressive sanding until you know what you are dealing with. Older coatings may contain lead. Use an appropriate lead test, follow the product instructions, and take suitable containment precautions. If the finish is badly deteriorated or the project seems risky, consult a qualified professional.
Measure the Bathroom
Measure the available wall, floor, countertop, or under-sink space. Record the drawer’s exterior width, height, and depth, and remember to account for the handle. A beautiful drawer that prevents the bathroom door from opening is not storage; it is an architectural prank.
For wall-mounted storage, shallow drawers are usually the easiest to use. Deep drawers can protrude too far into a narrow room and require stronger supports. Also check for plumbing, wiring, tile, mirrors, towel bars, and other obstacles before deciding where to drill.
Tools and Materials You May Need
- Screwdriver and adjustable wrench
- Mild detergent, clean cloths, and a soft brush
- Wood glue, clamps, and wood filler
- Medium- and fine-grit sandpaper
- Primer suitable for the existing surface
- Durable cabinet, trim, or furniture paint
- Water-resistant clear topcoat, when compatible with the paint
- Paintbrush, small roller, and painter’s tape
- Drawer liner or washable bins
- Wall-mounting hardware rated for the load and wall type
- Stud finder, level, drill, and appropriate bits
- Optional casters, feet, hooks, shelf brackets, or replacement pulls
Product compatibility matters. Follow the instructions for the primer, paint, and topcoat, including ventilation requirements and curing times. A finish can feel dry while still being too soft for daily use.
How to Prepare Dresser Drawers for a Bathroom
1. Remove and Clean the Hardware
Unscrew the existing pulls and label the parts if you plan to reuse them. Wash the drawer with mild detergent to remove dust, wax, hair-product residue, and the mysterious stickiness inherited from its former life.
Use as little water as practical and dry the wood promptly. Do not soak it. If the drawer smells musty, place it in a dry, ventilated area and determine whether the odor comes from active moisture or simply years of closed storage.
2. Make the Necessary Repairs
Glue loose joints, fill unwanted holes, and secure the bottom. Allow repairs to dry fully before sanding. If you want to replace a two-hole pull with a single knob, fill the original holes and drill the new one after the filler has cured.
3. Sand Without Erasing Its Character
Light sanding helps primer adhere and smooths repaired areas. You do not need to remove every sign of age unless you want a polished modern finish. Rounded edges, shallow scratches, and worn corners can make a vintage drawer more appealing.
Remove all sanding dust with a vacuum and clean cloth. Dust trapped under paint has a remarkable talent for becoming visible immediately after you announce that the finish looks perfect.
4. Prime and Paint
Apply a primer suited to the drawer’s material and existing finish. Stain-blocking primer is useful when old wood tannins, knots, or discoloration might bleed through a light paint color. Home Depot’s bathroom-cabinet guidance recommends using an appropriate high-adhesion or stain-blocking primer before applying a durable finish.
Apply thin, even coats of cabinet, trim, or furniture paint, allowing the recommended drying time between coats. Satin and semigloss finishes are generally easier to wipe clean than flat paint. Paint the interior, exterior, edges, and bottom if those areas may be exposed to humid air.
5. Add Moisture Protection
This Old House recommends a water-resistant finish when adapting dresser furniture for bathroom use. If your chosen paint requires additional protection, apply a compatible clear topcoat according to the manufacturer’s directions. Pay particular attention to end grain, seams, the bottom panel, and screw holes.
No coating makes ordinary furniture invincible. Wipe up spills quickly, repair plumbing leaks, and run the bathroom exhaust fan. The Environmental Protection Agency emphasizes controlling moisture and increasing ventilation to discourage mold growth.
Five Ways to Turn Dresser Drawers Into Bathroom Storage
1. Create Wall-Mounted Drawer Shelves
Turn the drawer on its side so the bottom becomes the back of an open cubby. Depending on its size, it can hold rolled washcloths, toilet paper, small baskets, decorative bottles, or guest supplies.
The decorative drawer front can face upward, downward, or to one side. Facing it downward often leaves the handle available as a small towel bar, provided the pull and front are strong enough for that use.
Do not rely on the thin drawer bottom alone to support the shelf. Reinforce the mounting area when necessary and secure the unit with hardware appropriate for the wall and expected load. Whenever possible, fasten supports into wall studs. Tile installation may require specialized bits and techniques; avoid drilling where hidden pipes or electrical cables may be present.
2. Build a Freestanding Drawer Tower
Stack two or three sturdy drawers with their open sides facing forward to create cubbies. Connect the drawers securely rather than simply balancing them. Add a stable base or short furniture feet to lift the wood above occasional floor moisture.
This design is useful beside a pedestal sink or in an empty corner. Place heavier items in the lowest compartment and lighter supplies above. If the finished unit has drawers, shelves, or a tall profile, anchor it to the wall. The U.S. Consumer Product Safety Commission recommends anchoring furniture to help prevent tip-over injuries.
3. Make Rolling Under-Vanity Bins
A wide, shallow dresser drawer can become a pullout bin with the addition of small casters. This is a practical place for spare toilet paper, unopened toiletries, or bathroom cleaning supplies.
Confirm that the drawer clears the sink plumbing and that the casters roll smoothly over the flooring. Use locking casters if the bin tends to wander. In households with young children, store cleaners and other hazardous products in locked, inaccessible locations rather than an open rolling drawer.
4. Design a Countertop Organizer
Small drawers can be placed directly on a wide vanity counter. Add compartments for skincare, grooming tools, washcloths, or guest toiletries. A removable washable liner will protect the drawer from dripping bottles and make cleanup easier.
Keep only frequently used products on the counter. Real Simple and Better Homes & Gardens recommend grouping bathroom supplies by category and using smaller containers or drawer dividers to prevent items from becoming a jumble.
5. Turn a Deep Drawer Into a Towel Caddy
Stand a deep drawer on its back or place it horizontally on a stable shelf. Rolled hand towels can be arranged in rows, while smaller compartments hold washcloths. Add labels such as “Fresh Towels,” “Guest Supplies,” or “Emergency Chocolate.” The last category is optional but emotionally sound.
Store only completely dry textiles. Humid bathrooms can leave towels musty, especially when ventilation is poor. If the room remains damp for long periods, keep bulk linens in a nearby closet and use the bathroom drawer only for a small rotating supply.
How to Organize the Finished Storage
A successful bathroom organizer should shorten your routine, not merely relocate the clutter. Divide supplies according to how and when they are used.
- Daily care: Toothpaste, deodorant, cleanser, and frequently used skincare.
- Hair care: Brushes, styling products, clips, and dry hair tools.
- Guest supplies: Wrapped soap, spare toothbrushes, and clean hand towels.
- Backstock: Unopened shampoo, tissue, and extra toilet paper.
- Cleaning supplies: Store separately and securely, especially around children and pets.
Use clear bins when visibility matters and opaque baskets when packaging creates visual noise. Choose removable containers so spills can be cleaned without carrying the entire drawer to the sink.
Avoid keeping items in the bathroom if their labels call for a cool, dry environment. Medications, certain cosmetics, and moisture-sensitive products may deteriorate in heat and humidity. Follow the manufacturer’s storage instructions rather than assuming that a “medicine cabinet” is automatically a good place for medicine.
Design Ideas for Different Bathroom Styles
Farmhouse
Use warm white, muted green, or charcoal paint. Preserve a little surface texture and pair the drawer with aged-brass or black hardware. Small wire baskets and simple printed labels complete the look.
Coastal
Try soft blue, pale gray, or sandy beige. Add a light wood pull and line the interior with a subtle striped pattern. Resist covering everything with seashells unless you want the drawer to look as though it owns a vacation rental.
Modern
Fill decorative holes, smooth the surface, and use a crisp satin finish. Matte-black bar pulls, straight legs, and matching containers can make an old drawer feel surprisingly contemporary.
Vintage Eclectic
Keep the original handle, line the inside with removable wallpaper, and use coordinated glass jars or enamel containers. Apartment Therapy, Architectural Digest, and House Beautiful frequently highlight vintage furniture as a way to bring warmth and individuality into bathrooms.
Common Mistakes to Avoid
- Skipping moisture protection: Bare wood can stain, swell, or support mold when repeatedly exposed to damp conditions.
- Mounting through a weak drawer bottom: Reinforce the drawer and use properly rated hardware.
- Overloading wall storage: Toiletry bottles become surprisingly heavy when grouped together.
- Ignoring ventilation: Paint and sealer cannot compensate for a persistent humidity problem.
- Storing wet towels: Damp fabric inside a wooden box is an invitation to musty odors.
- Using uncured paint: Organizers and bottles may stick to a finish that has not fully hardened.
- Forgetting child safety: Anchor tall units and secure medicines, razors, chemicals, and other hazards.
Composite DIY Experience: What a Weekend Makeover Can Teach You
The following project diary combines common lessons reported across dresser makeovers and bathroom-storage projects. It is an illustrative example rather than a claim of personal firsthand experience.
The project began with three drawers rescued from a dresser whose frame had become less “vintage heirloom” and more “wooden accordion.” The smallest drawer was selected for a countertop organizer, the medium drawer for a wall cubby, and the largest for a rolling bin beneath a pedestal sink.
The first surprise was how much cleaning mattered. The drawers looked dusty but otherwise respectable. Once the hardware came off, darker rings revealed years of furniture polish and accumulated grime. A careful wash followed by thorough drying made the later sanding and priming much more consistent.
The second lesson involved repairs. One corner seemed solid until light pressure opened a narrow gap. Gluing and clamping it added an extra day to the schedule, but it was better than discovering the weakness after loading the drawer with shampoo bottles. The large drawer also needed reinforcement beneath its thin bottom before the casters could be installed.
Color testing prevented another mistake. A bright white sample looked attractive in the workshop but appeared harsh beside the bathroom’s cream tile. A warmer off-white worked better and allowed the original brass pulls to stand out. Testing the paint in the actual room saved the drawers from looking like replacement teeth under fluorescent lighting.
The wall-mounted drawer required the most planning. Its old bottom panel was decorative but not strong enough to serve as the primary attachment point. Reinforcement was added inside the drawer, the wall location was checked, and the mounting hardware was selected for the wall construction and expected weight. Once installed and leveled, the drawer held two baskets of lightweight toiletries and a row of rolled washcloths.
The countertop organizer proved easiest to build but hardest to organize. Filling it with every bottle from the medicine cabinet recreated the original mess in a prettier box. The solution was to keep only morning and evening essentials in the drawer and move duplicate products elsewhere. Small removable trays stopped hair ties, floss picks, and sample-size products from migrating into one shared plastic wilderness.
The rolling drawer became the most useful piece. It fit beneath the sink, pulled out easily, and kept unopened paper products together. Raising the drawer on casters also prevented the wood from sitting directly on the bathroom floor. A washable liner protected the interior from dusty packaging and minor spills.
The final lesson was patience. Paint may become dry to the touch quickly, but full curing takes longer. Loading the drawers too soon would have left rings and dents in the new finish. Waiting according to the coating instructions was not exciting, but neither is repainting around the permanent silhouette of a mouthwash bottle.
After the project, the bathroom gained three coordinated storage zones without a full renovation. More importantly, each drawer had a specific purpose. The transformation worked because it combined visual charm with realistic decisions about moisture, weight, cleaning, and accessibility.
Conclusion
Turning dresser drawers into bathroom storage is a practical way to reuse old furniture while adding organization and personality. A drawer can become a wall shelf, towel cubby, countertop station, rolling bin, or part of a freestanding storage tower. The best design depends on the drawer’s construction, the bathroom layout, and what you need to store.
Take time to repair the wood, apply a bathroom-appropriate finish, use washable organizers, and install every piece safely. When the project is complete, you will have storage that looks custom-madebecause it iseven if its previous assignment was guarding a collection of lonely socks.
Research note: This article synthesizes practical guidance and design concepts from the U.S. Environmental Protection Agency, U.S. Consumer Product Safety Commission, Better Homes & Gardens, The Spruce, Bob Vila, Family Handyman, The Home Depot, Lowe’s, Apartment Therapy, House Beautiful, This Old House, Real Simple, Architectural Digest, and Houzz.