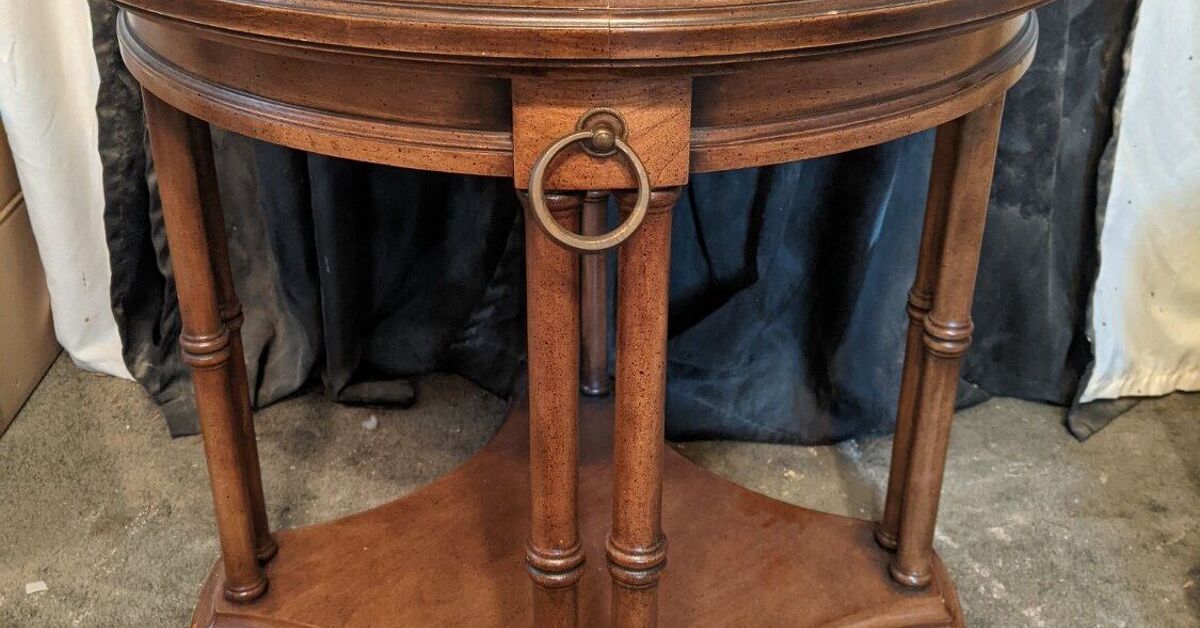

A vintage round accent table is one of those small furniture pieces that quietly waits in the corner, hoping someone notices its potential. Maybe it has a scratched top, a tired brown finish, a wobbly personality, or the kind of dated shine that says, “I was very popular in 1987.” Good news: with paint and resin appliques, that little table can go from forgotten thrift-store sidekick to charming statement piece.
Updating a vintage round accent table using paint and resin appliques is a budget-friendly DIY furniture makeover that blends old-world detail with fresh color. The project works beautifully for side tables, plant stands, nightstands, entryway tables, and small pedestal tables. Because the table is round, the shape already feels graceful. Add decorative resin appliques, a thoughtfully chosen paint color, and a durable topcoat, and suddenly you have a custom accent table that looks boutique, not bargain bin.
This guide walks through the entire process: choosing the right table, prepping the surface, attaching resin appliques, painting for a smooth finish, sealing the piece, and styling it in your home. We will also cover common mistakes, design ideas, and real-world experience tips that can save your project from becoming a sticky, lumpy, glue-covered tragedy. Nobody invited that drama.
Why A Vintage Round Accent Table Is Perfect For A Paint And Applique Makeover
Round accent tables are ideal for decorative furniture makeovers because they offer a compact canvas with strong visual impact. Unlike a large dresser or dining table, a small round table does not require a week of your life, three emotional breakdowns, and an apology letter to your garage. It is manageable, affordable, and easy to move while you work.
The circular shape also pairs beautifully with raised decorative details. Resin appliques can be arranged around the apron, along the pedestal, beneath the tabletop edge, or centered on drawer fronts if the table has one. Floral swags, scrolls, medallions, laurel leaves, shells, and vintage-inspired moulding pieces all look natural on a round silhouette.
Paint gives the piece its new personality, while resin appliques add dimension. A plain table becomes romantic, French country, cottagecore, Victorian-inspired, farmhouse elegant, or modern vintage depending on your color palette and finish. Soft white with gold highlights feels classic. Deep green with dark wax feels moody and expensive. Dusty blue with pearl accents whispers “antique shop in a coastal town,” which is a very specific whisper, but a lovely one.
Before You Begin: Inspect The Table Like A Furniture Detective
Before grabbing a paintbrush, inspect the table carefully. A successful vintage table makeover begins with structure. Paint can hide scratches, discoloration, and style crimes, but it cannot fix a table that wobbles like a nervous flamingo unless you repair it first.
Check For Stability
Place the table on a flat floor and gently press on the top. If it rocks, tighten screws, check leg joints, and inspect the pedestal connection. For loose joints, wood glue and clamps may help. If screws are stripped, replace them with slightly larger ones or use wood filler and re-drill pilot holes.
Look For Veneer Damage
Many vintage accent tables have veneer tops. If the veneer is lifting, glue it down before painting. If it is chipped, fill the missing area with wood filler, let it dry fully, and sand it smooth. A painted finish is forgiving, but raised cracks will still show through like tiny furniture speed bumps.
Consider Lead Safety
If the table has an old painted finish and you suspect it dates from before 1978, avoid aggressive sanding until you know whether lead-based paint is present. Use a lead test kit or consult a professional. Disturbing old lead paint can create dangerous dust. When in doubt, choose safety over speed. No side table is worth turning your workspace into a hazardous confetti machine.
Supplies You Will Need
The exact products depend on the look you want, but most painted furniture projects with resin appliques require the same basic toolkit.
- Vintage round accent table
- Mild cleaner or degreaser
- Lint-free cloths
- Wood filler for chips or dents
- Fine-grit sandpaper, usually 180 to 220 grit
- Tack cloth or vacuum with brush attachment
- Primer suitable for wood or glossy surfaces
- Furniture paint, chalk-style paint, acrylic enamel, or cabinet paint
- Resin appliques or silicone moulds with casting resin
- Strong craft glue, wood glue, or construction adhesive suitable for resin and wood
- Painter’s tape and measuring tape
- Small clamps, painter’s tape, or weights for holding appliques in place
- Detail brush for raised areas
- Clear topcoat, furniture wax, or water-based polyurethane
- Optional glaze, dark wax, metallic wax, or gilding paint
Step 1: Clean The Table Thoroughly
Cleaning is not glamorous, but it is the difference between a durable furniture makeover and paint that peels off in sheets like it is trying to escape. Vintage tables often carry furniture polish, hand oils, dust, candle residue, and mystery grime. Mystery grime is the villain of paint adhesion.
Wipe the entire table with a mild degreasing cleaner. Pay attention to carved areas, turned legs, and the underside of the tabletop edge. If the table has years of wax buildup, you may need a stronger cleaner designed for furniture prep. After cleaning, wipe again with plain water and let the table dry completely.
Step 2: Repair Chips, Dents, And Loose Areas
Fill small dents, gouges, and missing veneer with wood filler. Use a putty knife to press filler into damaged areas, then smooth away the excess. Let it dry according to the product directions. Once dry, sand until the repaired area feels level with the surrounding surface.
If the table has decorative grooves or carved trim, do not overfill them. Preserving those lines keeps the table looking intentional after paint. Think of it as furniture contouring. Yes, the table gets cheekbones.
Step 3: Sand For Better Adhesion
Most painted furniture benefits from light sanding, especially if the existing finish is glossy. The goal is not to remove every trace of stain or old finish. The goal is to scuff the surface so primer and paint can grip.
Use 180- or 220-grit sandpaper and sand with gentle, even pressure. On a round tabletop, follow the curve and avoid creating flat spots along the edge. For turned legs or pedestal bases, use a sanding sponge because it wraps around curves more easily.
After sanding, remove all dust with a vacuum or tack cloth. Dust trapped under paint can create a gritty finish, and gritty furniture is rarely the aesthetic we are chasing unless the theme is “abandoned shed chic.”
Step 4: Plan Your Resin Applique Design
Before gluing anything, lay the resin appliques on the table and experiment with placement. This is the fun part, also known as “moving tiny decorative pieces around until your brain says yes.”
Popular Placement Ideas
- Centered medallion: Add a round or oval applique to the center of the tabletop for a dramatic focal point.
- Apron detail: Place small scrolls or floral appliques evenly around the table apron.
- Pedestal accent: Add vertical appliques to a pedestal base for a carved furniture look.
- Edge embellishment: Use repeating small pieces beneath the tabletop rim to mimic antique moulding.
- Asymmetrical botanical design: Arrange flowers and leaves to look like they are naturally climbing one side.
For a round table, symmetry usually looks polished. Measure the circumference or divide the table visually into quarters. Mark placement lightly with pencil or painter’s tape. If your appliques are flexible polyresin, they may bend around curved surfaces. If they are rigid resin castings, use them on flatter areas or smaller curves.
Step 5: Attach The Resin Appliques
Once you love the layout, it is time to glue. Choose an adhesive that bonds well to both resin and painted or primed wood. Many furniture artists use thick craft glue, construction adhesive, or strong wood glue depending on the applique material and table surface.
Apply adhesive to the back of the applique, spreading it close to the edges without using so much that it gushes out like a frosting accident. Press the applique firmly onto the table. Wipe away excess glue immediately with a damp cloth, cotton swab, or small brush.
Use painter’s tape, clamps, or gentle weights to hold the applique in place while it dries. On curved surfaces, tape is often easier than clamps. Let the adhesive cure fully before painting. This is not the time to test your patience by poking the applique every seven minutes. It is still there. It is doing glue things.
Step 6: Prime The Table
Primer improves adhesion, blocks stains, and creates a more even base for paint. This matters especially on vintage furniture because old stain or tannins can bleed through light paint colors. If you are painting the table white, cream, blush, pale gray, or light blue, primer is your loyal friend.
Use a bonding primer for slick or glossy surfaces. Apply a thin, even coat with a brush, roller, or sprayer. A small angled brush works well around appliques and carved details. Let the primer dry completely, then lightly sand any rough spots with fine-grit sandpaper.
Step 7: Paint With Thin, Even Coats
Paint transforms the table, but thick paint can bury applique detail. Use thin coats and let each coat dry before applying the next. Two or three light coats usually look better than one heavy coat. Heavy paint can drip, pool around raised appliques, and make delicate details look like they are wearing a winter coat.
For a vintage round accent table, chalk-style paint is popular because it creates a soft matte finish and distresses easily. Acrylic furniture paint or cabinet paint can be more durable and may require less sealing depending on the product. Choose the paint based on how the table will be used. A decorative table in a guest room has different needs than a living room table that will hold coffee mugs, books, keys, and the occasional snack plate that nobody admits belonged to them.
Color Ideas That Work Beautifully
- Antique white: Classic, bright, and perfect for highlighting applique details.
- Sage green: Soft, earthy, and ideal for cottage or farmhouse style.
- Charcoal gray: Elegant and dramatic, especially with gold accents.
- Dusty blue: Vintage, calm, and lovely in bedrooms or reading corners.
- Black satin: Sophisticated and modern, especially with raised moulding.
- Muted blush: Romantic without becoming overly sweet.
Step 8: Highlight The Resin Appliques
Once the painted finish is dry, the resin appliques can be left tone-on-tone or highlighted for depth. Tone-on-tone is subtle and elegant. Highlighting makes the raised details pop.
For a soft antique effect, brush dark wax or glaze into the crevices of the applique, then wipe the high points clean. For a more glamorous look, use a small amount of metallic wax or gilding paint on the raised edges. Gold, champagne, bronze, pearl, or silver can all work depending on the table color.
The key is restraint. Metallic accents should look kissed by light, not attacked by a craft-store disco ball. Use a nearly dry brush and build slowly. You can always add more, but removing too much metallic paint from tiny floral grooves may lead to words your family should not hear before dinner.
Step 9: Seal The Table For Durability
A topcoat protects the painted finish from scratches, fingerprints, and everyday use. For a round accent table, the top surface needs the most protection. Water-based polyurethane or polycrylic finishes are popular for painted furniture because they dry clear and are easy to clean up. Furniture wax creates a beautiful soft sheen but may require more maintenance and curing time.
Apply the sealer in thin coats. Use a quality synthetic brush for water-based topcoats, and avoid overbrushing once the finish begins to set. On the tabletop, follow the curve and keep a wet edge to reduce brush marks. Around appliques, use a detail brush to prevent pooling.
Let the finish cure before heavy use. Dry is not the same as cured. A table may feel dry in a few hours, but the protective coating often needs days or longer to fully harden. During this period, avoid hot mugs, heavy objects, and dramatic floral arrangements involving wet vases.
Design Styles You Can Create
French Country Charm
Paint the table in warm white or pale gray, add scroll or floral appliques, and finish with subtle brown glaze. This style works well in bedrooms, sitting rooms, and cozy corners with linen curtains or vintage books.
Moody Vintage Drama
Use deep green, navy, aubergine, or charcoal paint. Highlight the appliques with antique gold or bronze wax. This gives the table an expensive, collected-over-time look.
Soft Cottagecore
Choose sage, dusty blue, buttercream, or faded rose. Add botanical appliques and lightly distress the edges. The result feels sweet, handmade, and perfectly at home beside a reading chair.
Modern Romantic
Paint the table satin black or creamy beige, keep the applique placement minimal, and use a clear topcoat instead of heavy glaze. The raised detail adds interest without feeling overly ornate.
Common Mistakes To Avoid
Skipping cleaning: Paint does not bond well to oil, wax, or furniture polish. Clean first, celebrate later.
Using too much glue: Excess adhesive can squeeze out and dry around appliques. Use enough for full contact, but wipe away the overflow quickly.
Painting too thickly: Thick paint hides delicate resin details. Thin coats preserve texture and look more professional.
Forgetting to measure: Round tables expose uneven spacing. If you are placing appliques around the apron, measure and mark first.
Skipping the topcoat: Accent tables get touched, bumped, and used. Seal the finish so your makeover lasts.
Rushing cure time: Let glue, paint, and sealer fully cure. The table may look finished, but the finish still needs time to harden.
How Much Does This DIY Furniture Makeover Cost?
The cost depends on what you already own. A thrifted vintage round accent table might cost $20 to $75. Paint may cost $15 to $40. Resin appliques or moulds can range widely, from inexpensive small accents to more detailed decorative sets. Primer, adhesive, brushes, and topcoat may add another $25 to $60.
If you already have basic supplies, updating a vintage round accent table using paint and resin appliques can be completed for under $100. If you buy premium paint, multiple moulds, specialty waxes, and a table with “potential” that somehow costs more than your first car payment, the budget can climb. Still, compared with buying a custom accent table, this DIY project offers serious style for a reasonable price.
Where To Use The Finished Table
A painted vintage round accent table is surprisingly versatile. Place it beside a sofa with a lamp and a small stack of books. Use it as a bedside table in a guest room. Put it in an entryway with a bowl for keys. Let it hold a plant near a sunny window. If the topcoat is durable enough, it can even serve as a small coffee station or tea table.
The raised resin appliques make the piece decorative, so style it with simple accessories. A ceramic vase, brass candlestick, framed photo, or small tray lets the table shine without making the surface look crowded.
Experience Notes: What This Project Teaches You In Real Life
The first thing you learn when updating a vintage round accent table using paint and resin appliques is that small furniture is not always simple furniture. A little table can have curves, grooves, spindles, old finish, hidden dust, and at least one area that refuses to sand smoothly because apparently it has chosen rebellion. That is normal. The charm of vintage furniture is that it has history. The challenge is that some of that history may include water rings, chipped veneer, and a layer of furniture polish thick enough to qualify as weatherproofing.
One of the best experiences from this kind of project is watching the table’s character appear in stages. After cleaning, it looks better but still tired. After sanding and priming, it looks slightly alarming, like it has entered a furniture witness protection program. Then the first coat of paint goes on, and suddenly the shape makes sense again. The appliques may look dramatic at first, especially before paint unifies them with the table. But after the second coat, they begin to look carved into the piece rather than glued onto it.
Another lesson is that layout matters more than you expect. On a rectangular dresser, a slightly uneven applique may not shout. On a round table, uneven spacing can wave at you from across the room. Dry-fitting the appliques before gluing is worth the extra time. Painter’s tape is helpful for marking quarters around the apron. If using several small floral pieces, take a photo of the arrangement before removing them to add glue. Otherwise, you may spend ten minutes trying to recreate a design that your past self apparently understood and your present self does not.
Glue control is another real-world skill. The best bond comes from full contact, especially at the edges, but too much adhesive creates squeeze-out. Keep cotton swabs nearby. They are perfect for cleaning glue around raised petals, scrolls, and corners. If glue dries in a visible ridge, it may show after painting, especially with metallic wax or glaze. A small cleanup moment early can prevent a big annoyance later.
Paint also behaves differently around resin appliques than it does on flat wood. A brush can leave extra paint in the crevices, so use light pressure and watch for pooling. A small detail brush helps reach tight areas without flooding them. If you want an aged look, glaze is wonderfully forgiving. It settles into the applique details and instantly gives the piece depth. The trick is to wipe more than you think. The goal is soft shadow, not “rescued from a chimney.”
The final lesson is patience. The table may look finished after the topcoat dries, but it still needs gentle treatment while curing. Do not immediately put a heavy lamp, wet plant pot, or hot mug on the surface. Give the finish time to harden. After that, the table becomes more than a makeover. It becomes proof that a small, overlooked piece of furniture can completely change the mood of a room with a little paint, a few raised details, and enough patience not to touch wet glue.
Conclusion
Updating a vintage round accent table using paint and resin appliques is one of the most satisfying DIY furniture projects because it delivers a big transformation on a small scale. With proper cleaning, light sanding, thoughtful applique placement, thin coats of paint, and a protective topcoat, an outdated table can become a custom piece full of texture and personality.
The beauty of this project is flexibility. You can make the table elegant, rustic, romantic, bold, or quietly classic. Resin appliques add the kind of detail that makes people ask, “Where did you buy that?” and you get the pleasure of saying, “Actually, I made it,” which is the DIY equivalent of a mic drop.
Whether your table came from a thrift store, a family attic, a flea market, or the mysterious corner of your garage, it deserves a second chance. Paint gives it freshness. Resin appliques give it charm. Your creativity gives it a reason to be loved again.