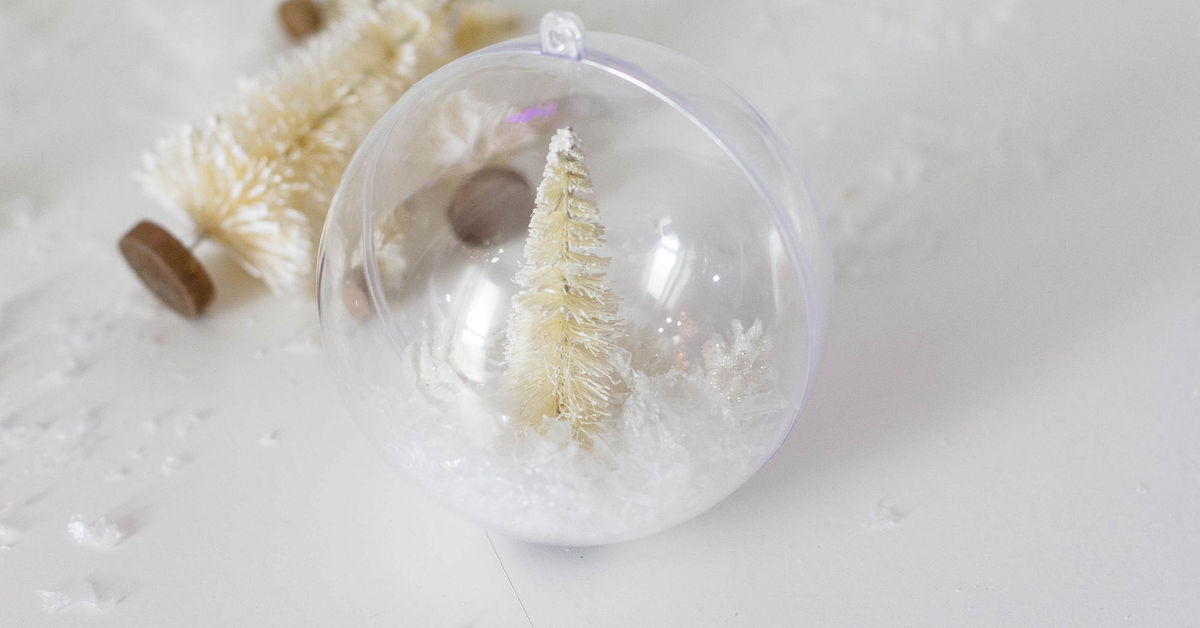

A Winter Wonderland Ornament is a tiny holiday world with excellent real estate: one miniature tree, a few snowy drifts, perhaps a deer that looks suspiciously confident, and enough sparkle to make the whole scene feel magical. Whether you use a clear fillable ball, a flat disc ornament, or a small dome, this project turns simple craft supplies into a handmade keepsake that looks far more complicated than it really is.
The best part is flexibility. You can create a classic white Christmas scene, a rustic woodland ornament, a pastel village, or a midnight forest glowing beneath silver stars. The method stays simple: plan the composition, secure the scenery, add faux snow, close the ornament, and finish it with ribbon. No actual blizzard is required.
What Is a Winter Wonderland Ornament?
A Winter Wonderland Ornament is a clear or open-front holiday ornament containing a miniature snowy scene. It borrows the charm of a snow globe without necessarily using water. Most versions are made with a transparent plastic ornament, miniature bottle-brush trees, small figures, faux snow, glitter, paint, and ribbon.
The dry design is especially practical for a Christmas tree. It is lighter than a liquid-filled globe, easier to seal, and less likely to leak onto the electrical cord while everyone pretends not to panic. A dry ornament also gives you more freedom to use paper, wood, felt, preserved greenery, and other materials that would not behave well underwater.
“`
Why This DIY Christmas Ornament Works
Miniature scenes are visually effective because they combine depth, texture, and storytelling. The clear shell frames the design, the snowy base establishes the setting, and one or two focal pieces give the eye somewhere to land. Even inexpensive materials can look polished when the scale is consistent and the color palette is controlled.
“`
Supplies for a DIY Winter Wonderland Ornament
You do not need every item below. Think of the list as a miniature buffet rather than a craft-store scavenger hunt designed by an elf with a clipboard.
- Clear fillable plastic ornament, flat disc ornament, or small clear dome
- Miniature bottle-brush trees, tiny houses, deer, snowmen, or woodland animals
- White felt, craft foam, cork, cardstock, or a thin wood circle for the base
- Faux snow, white pom-pom fibers, mica-style flakes, or iridescent glitter
- Clear-drying tacky glue or another adhesive appropriate for the materials
- Tweezers, craft sticks, small scissors, and a fine paintbrush
- White acrylic paint for snowy accents
- Ribbon, velvet cord, baker’s twine, or metallic string
- Optional micro LED light designed for small craft displays
- Optional personalized tag, date charm, tiny photo, or handwritten message
“`
Should You Choose Plastic or Glass?
Glass provides beautiful clarity and a traditional feel, but plastic is usually the better choice for family crafting, shipping, classroom projects, and homes with curious pets. A quality shatter-resistant blank still reflects tree lights nicely and allows you to press the two halves together without holding your breath like a movie bomb technician.
“`
How to Make a Winter Wonderland Ornament Step by Step
“`
1. Plan the Scene Before Gluing
Open the ornament and place the pieces inside without adhesive. Test the tree, figure, house, and snow base from several angles. The tallest element should fit comfortably without scraping the shell, and the main subject should face the front. If you are using a round ornament, decide which side will be the primary viewing side before construction begins.
Limit the scene to one main focal point and two or three supporting details. A tree, deer, and tiny sign can feel charming. Seven trees, four deer, a cabin, a snowman, and a miniature sleigh can look like the parking lot outside a holiday superstore.
2. Build a Stable Snowy Base
Trace the lower half of the ornament onto felt, craft foam, or cardstock. Cut the base slightly smaller so it fits inside without buckling. For extra dimension, layer two pieces of foam or add a small mound beneath the felt. Paint exposed edges white and let everything dry completely.
A flat disc ornament may need a narrow platform rather than a full circle. In that case, cut a slim strip of foam and angle it gently upward toward the back. This creates the illusion of a hill and helps a miniature tree stand upright.
3. Secure the Miniature Elements
Glue the largest object first. Hold it in place until the adhesive grips, then add the smaller pieces. Tweezers are helpful when your fingers suddenly become the size of winter mittens. Follow the adhesive label for drying time instead of assuming “looks dry” means “survives gravity.”
For bottle-brush trees, trim the base peg if it is too tall. A small dot of glue beneath the trunk is often enough. Lightweight plastic figures can be attached directly to felt or foam. Heavier pieces may require a stronger craft adhesive and a longer curing period.
4. Add Snow Without Burying the Village
Brush a thin layer of clear-drying glue around the base, then sprinkle on faux snow. Add a second light layer only where you want deeper drifts. Keep the faces of figures and the lower branches of trees visible. The goal is “fresh snowfall,” not “archaeological excavation.”
Loose snow can also be added after the scene is secured. Use only a small amount at first, close the ornament temporarily, and shake it gently. If the scene disappears, remove some. A combination of fixed snow and a teaspoon or less of loose flakes creates movement without turning the ornament opaque.
5. Add Frost, Sparkle, and Depth
Dry-brush white paint onto tree tips, rooftops, and raised edges. A tiny amount creates a convincing frosted effect. For shimmer, mix fine iridescent glitter with faux snow or add a few larger translucent flakes. Silver glitter feels icy and modern, while pale gold gives the scene a warmer, candlelit mood.
You can also paint a few dots or stars on the inside back wall of a flat ornament. Keep them sparse. The miniature landscape should remain the star, while the glitter performs its important supporting role of appearing in places you will continue finding until April.
6. Close and Finish the Ornament
Remove stray glue strings and snow from the rim. Close the ornament carefully, checking that no branches or ribbon fibers are caught in the seam. If the ornament will be handled frequently, add a discreet line of clear adhesive along the closure.
Thread ribbon or cord through the cap or hanging loop. Use a secure knot and test the ornament over a soft surface before placing it on the tree. Finish with a small bow, bell, date tag, or name charm. The final detail should complement the scene rather than compete with it.
“`
Winter Wonderland Ornament Design Ideas
“`
Classic Snowy Forest
Use two bottle-brush pines, a white deer, bright faux snow, and a silver ribbon. Keep the colors limited to green, white, and metallic silver. This design works with nearly any Christmas tree theme and looks especially good near cool-white lights.
Rustic Farmhouse Scene
Choose natural wood trees, a tiny cabin, jute twine, and coarse white flakes. Add a narrow strip of plaid ribbon at the top. Matte textures and warm neutrals keep the scene cozy rather than overly sparkly.
Midnight Winter Village
Paint the back interior navy blue and add tiny white stars. Use a white house, dark green tree, and silver snow. A warm micro LED can create the look of a glowing window, but the battery component should remain accessible and lightweight.
Personalized Memory Ornament
Add a miniature copy of a family photo, a tiny map of a favorite destination, or a printed house number from a first home. Include the year on a small tag. The snowy theme makes the ornament festive, while the personal detail turns it into a keepsake worth unpacking every December.
Kid-Friendly Shatter-Resistant Version
Use a plastic ornament, felt shapes, pom-pom snow, and lightweight foam trees. Adults should handle cutting and strong adhesives, while children can choose colors, arrange pieces, and add stickers. Avoid loose small parts when crafting with very young children, and treat the finished item as décor rather than a toy.
“`
Common Mistakes and How to Fix Them
“`
Overcrowding the Ornament
If the ornament looks busy, remove the smallest or least meaningful piece. Negative space makes miniature objects easier to see. One memorable deer beats an entire herd attempting a rush-hour commute.
Using Too Much Loose Snow
Excess faux snow collects at the front and hides the scene. Start with less than you think you need. You can always add another pinch, but removing static-charged flakes from a tiny tree is a character-building exercise.
Closing the Ornament Too Soon
Trapped moisture can cloud the clear shell, and uncured glue can allow pieces to shift. Let paint and adhesive dry fully before assembly. Overnight drying is often the safest choice for layered scenes.
Ignoring Weight and Balance
A heavy figure placed far to one side can make the ornament tilt. Center the base and keep dense objects close to the hanging point. If needed, counterbalance the scene with a small tree or foam mound on the opposite side.
Choosing Materials That Shed
Some decorative moss, flocking, and coarse glitter shed constantly. Seal loose surfaces with an appropriate clear craft medium before placing them inside. Test sealers on a scrap because certain finishes can dull glitter or react with painted plastic.
“`
How to Display, Gift, and Store the Ornament
Hang the ornament on a sturdy branch where light can pass through the clear shell. Positioning it a few inches in front of a tree light creates depth and makes the snow sparkle. Avoid pressing the ornament directly against a bulb or heat source.
For gifting, nest the ornament in tissue paper inside a rigid box. Include a small card with the year, recipient’s name, and a sentence explaining the scene. A custom ornament becomes more meaningful when the recipient knows why you chose the tiny cabin, red bird, or comically dignified moose.
After the holidays, wrap the ornament in acid-free tissue or soft fabric and store it upright in a divided ornament box. Keep it away from high heat, direct sunlight, and damp basements. Before packing, inspect the seam and remove any loose ribbon that could snag neighboring decorations.
Safety and Material Considerations
Holiday ornaments often contain small pieces, breakable components, glitter, wire, batteries, or artificial snow. Keep decorative miniatures and loose craft materials away from babies, toddlers, and pets. Place fragile ornaments higher on the tree and use shatter-resistant blanks in high-traffic areas.
Follow product labels for adhesives, paints, sealers, artificial snow, and lights. Work in a well-ventilated area when a label recommends it, protect the table, and wash your hands after handling craft materials. Never place paper, dried greenery, or other flammable decorations near candles, fireplaces, or hot lighting.
For a lower-waste project, reuse miniature figures, ribbon scraps, old gift-box inserts, paper offcuts, and ornament blanks from previous years. A damaged tabletop village can donate one tiny tree to a glorious second career inside a bauble.
Conclusion: A Small Scene With Big Holiday Charm
A Winter Wonderland Ornament succeeds because it turns a familiar Christmas decoration into a story. The clear shell invites a closer look, the snowy landscape creates instant atmosphere, and personalized details make the finished piece feel unique. Build the scene in layers, use snow sparingly, allow adhesives to cure, and choose a palette that suits your holiday décor.
Once you have made one, the project tends to multiply. Soon there is a woodland ornament, a tiny village ornament, a family-photo ornament, and one mysterious snowman who somehow appears in every design. That is not a crafting problem. That is a collection.
A Realistic Maker’s Experience: From First Attempt to Gift-Worthy Ornament
The first experience many people have with a Winter Wonderland Ornament begins with confidence and a suspiciously large pile of miniatures. Everything looks tiny on the craft table, so it seems reasonable to place all of it inside one ornament. Then the shell closes, the deer disappears behind a tree, the cabin blocks the snowman, and the carefully planned winter village becomes a miniature storage unit.
The useful lesson arrives quickly: editing matters more than shopping. A successful second attempt often uses half as many pieces. One tree is moved toward the back, a figure is turned slightly toward the center, and the snowy base is raised just enough to make the scene visible. That small adjustment changes the project from “things inside a ball” to a composition with a foreground, middle ground, and background.
Snow is the next teacher. Faux snow looks harmless in the bag, but inside a clear ornament it becomes a weather system with ambitions. Add too much and every shake produces a whiteout. Add a modest amount, however, and the flakes settle around the tree trunks while leaving the focal point visible. Many makers discover that permanently gluing most of the snow in place and adding only a pinch of loose flakes creates the best balance between movement and clarity.
Adhesive choice also shapes the experience. A glue that grabs slowly allows time to adjust the scene, but the pieces may lean while drying. A faster adhesive holds quickly, yet it offers less forgiveness. The practical solution is to build in stages. Secure the base, let it set, attach the largest object, pause again, and finish with the smallest details. Crafting patience is not glamorous, but neither is opening a storage box next year and finding the tiny pine tree lying dramatically across the deer.
The most satisfying moment usually comes when the ornament is held near tree lights. Materials that looked ordinary on the worktable suddenly gain depth: iridescent flakes catch the light, the clear shell reflects nearby colors, and a simple white-painted roof looks genuinely frosted. This is also when imperfections become less important. A slightly crooked sign or uneven snowbank often makes the ornament feel handmade rather than manufactured.
Gift-making adds another layer to the experience. A generic snowy scene is attractive, but one personalized detail can transform it. A house number may commemorate a first home. A tiny red bird may honor a family tradition. A printed date can mark a wedding, a baby’s first Christmas, or a memorable trip. Recipients tend to notice the story before they notice the glue line, which is excellent news for every crafter who has ever whispered, “The ribbon will cover that.”
Batch-making teaches efficiency. Prepare all bases at once, paint all trees together, and organize miniatures by size before assembly. Keep one finished sample nearby so the color palette remains consistent. Even then, allow each ornament to vary slightly. Handmade sets look more charming when they feel related rather than cloned.
The final experience is unpacking the ornament in a later season. Store-bought décor can be beautiful, but a handmade winter scene carries the memory of choosing the pieces, solving the tiny construction problems, and creating something for a particular person or year. That emotional durability is the real reason the project earns a place on the tree. The ornament may be small enough to fit in your palm, yet it can hold an entire holiday chapter.
SEO Data