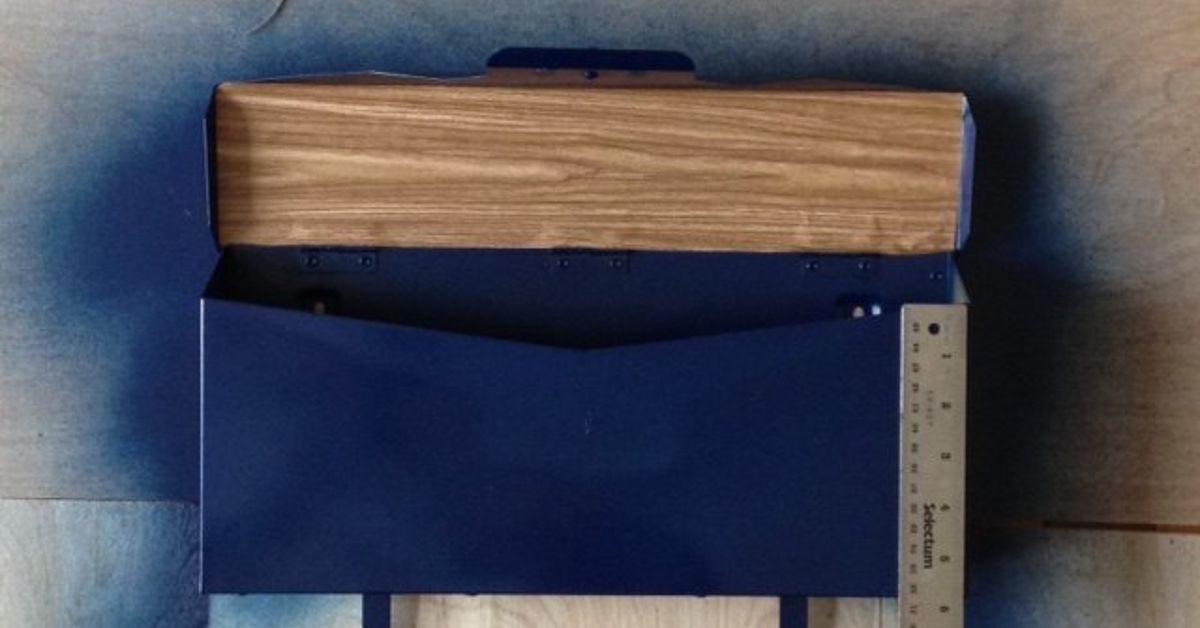

A mailbox is one of those hardworking little home features that rarely gets applause. It stands outside in the rain, sun, wind, dust, pollen, and the occasional neighborhood sprinkler attack, all while holding bills, birthday cards, coupons, and mysterious envelopes that look far more official than they need to. But here is the good news: you do not need to replace your mailbox to make it look fresh, charming, and surprisingly custom. A DIY mailbox makeover with contact paper liner can turn a plain metal box into a cheerful curb appeal moment in one afternoon.
This project is affordable, beginner-friendly, and delightfully satisfying. The outside gets a clean refresh, while the inside gets the fun little surprise: a peel-and-stick contact paper liner. Think floral prints, faux marble, wood grain, geometric patterns, gingham, botanical designs, or a bright pop of color that says, “Yes, even my mailbox has a personality.”
In this guide, you will learn how to clean, prep, paint, line, seal, and style your mailbox so it looks polished without feeling overdone. We will also cover practical tips for durability, weather resistance, pattern placement, and mistakes to avoid. Your mail carrier may not throw a parade, but they might pause for half a second and think, “Well, that is cute.” That counts.
Why Try a DIY Mailbox Makeover?
A mailbox makeover is one of the easiest exterior upgrades because it is small, affordable, and highly visible. Unlike painting an entire house or building a new porch, this project does not require a giant budget, a contractor, or three weekends of questioning your life choices. Most homeowners can complete it with basic supplies such as cleaner, sandpaper, spray paint, painter’s tape, scissors, a utility knife, and contact paper.
The contact paper liner is the secret ingredient. While exterior paint refreshes the mailbox from the road, the liner makes the inside feel intentional and custom. Every time you open the mailbox, you get a tiny design moment. Is it necessary? Absolutely not. Is it charming? Extremely.
This project is especially useful if your mailbox is still structurally sound but looks faded, rusty, scratched, or outdated. Instead of replacing it, you can give it a new finish, clean hardware, updated numbers, and a decorative interior. It is a simple way to boost curb appeal while reducing waste and saving money.
What Is Contact Paper, and Why Use It Inside a Mailbox?
Contact paper is an adhesive-backed decorative vinyl or paper-like material commonly used to line shelves, drawers, cabinets, trays, furniture, and other smooth surfaces. It comes in many finishes, including matte, glossy, patterned, textured, metallic, faux stone, faux wood, and solid colors. For a mailbox liner, contact paper works best when it has a wipeable surface and a strong adhesive backing.
The inside of a mailbox is a good candidate for contact paper because it is usually a smooth, enclosed surface. The liner can cover scratches, brighten the interior, and make the mailbox feel cleaner. However, it is important to remember that mailboxes live outdoors. Moisture, heat, cold, and daily use can challenge any adhesive material. That means prep work matters. A clean, dry, smooth surface gives your liner the best chance of staying put.
Supplies You Will Need
Basic Materials
- Peel-and-stick contact paper or removable wallpaper
- All-purpose cleaner or mild dish soap
- Microfiber cloths or paper towels
- Fine-grit sandpaper or sanding sponge
- Painter’s tape
- Rust remover or wire brush if needed
- Outdoor spray primer suitable for your mailbox material
- Exterior spray paint suitable for metal or plastic
- Clear outdoor sealant if desired
- New mailbox numbers or vinyl decals
Helpful Tools
- Tape measure
- Scissors
- Sharp utility knife or craft knife
- Plastic smoothing tool, old gift card, or wallpaper smoother
- Ruler or straightedge
- Drop cloth or cardboard
- Screwdriver for removing the mailbox or hardware
- Gloves and eye protection
Choose materials based on the type of mailbox you have. A metal mailbox usually benefits from rust-preventive primer and paint. A plastic mailbox needs paint that bonds properly to plastic. If your mailbox is wooden, make sure the surface is sealed and dry before applying paint or liner.
Before You Start: Check Practical Mailbox Rules
Before giving your mailbox a glow-up, make sure your makeover does not interfere with mail delivery. Your address numbers should remain easy to read from the road, the door should open smoothly, and the flag should remain visible and functional. If your mailbox is curbside, it should also stay properly positioned for carrier access. A pretty mailbox that confuses delivery is like a beautiful cake made of cardboard: impressive, but not useful.
Keep decorations tasteful and practical. Avoid adding bulky objects that block the mailbox door, cover the address, trap water, or create sharp edges. Contact paper should stay inside the box unless you are using an outdoor-rated adhesive vinyl on exterior surfaces. Even then, exterior vinyl needs careful sealing and maintenance.
Step 1: Remove and Inspect the Mailbox
If possible, remove the mailbox from its post before painting or lining it. This makes the project easier, cleaner, and safer. Use a screwdriver or drill to remove screws, then place the mailbox on a covered work surface outdoors or in a well-ventilated area.
Inspect the mailbox carefully. Look for rust, flaking paint, loose screws, dents, water damage, and a door that does not close properly. If the box is badly damaged, replacement may be the smarter choice. But if the structure is solid, a makeover can work wonders.
Do not skip this inspection. Paint and contact paper are decorative, not magical. They cannot fix a door that hangs like it has given up on life or a bottom panel that has rusted through.
Step 2: Clean the Mailbox Thoroughly
Cleaning is the least glamorous part of the project, but it is also one of the most important. Dirt, dust, pollen, adhesive residue, and oily grime can prevent paint and contact paper from bonding properly.
Wash the mailbox with mild soap and water or an all-purpose cleaner. Scrub the inside and outside, paying close attention to corners and seams where dirt collects. Rinse if necessary, then dry completely. If the mailbox has sticky residue from old numbers or decals, remove it with a gentle adhesive remover and wipe the area clean afterward.
The inside must be bone dry before you apply contact paper. Moisture under adhesive is a fast ticket to peeling edges, bubbles, and the kind of disappointment usually reserved for opening a snack bag that is mostly air.
Step 3: Sand and Remove Rust
If your mailbox is metal and has rust spots, remove loose rust with a wire brush or sanding sponge. Sand any rough, chipped, or glossy areas so the primer and paint can grip better. You do not need to sand the mailbox into a mirror-smooth sculpture, but you do want to remove flakes and create a clean, stable surface.
After sanding, wipe everything down again with a clean cloth. Any sanding dust left behind can create bumps under paint or contact paper. For stubborn rust, use a rust-inhibiting primer or product designed for outdoor metal surfaces.
Step 4: Tape Off Areas You Do Not Want Painted
Use painter’s tape to cover the flag, handle, numbers, hinges, or any decorative trim you want to keep. If you plan to replace the numbers, remove the old ones first. Tape inside the mailbox if you only want to paint the exterior, or paint the entire box before adding the liner.
For the cleanest finish, remove hardware when possible instead of taping around it. It takes a few extra minutes, but the final result usually looks more professional. Your future self will appreciate this small act of patience.
Step 5: Prime and Paint the Mailbox
Choose an exterior paint designed for the mailbox material. For metal mailboxes, look for rust-preventive spray paint or a primer-and-paint formula suitable for outdoor metal. For plastic mailboxes, choose paint labeled for plastic adhesion. Work outdoors or in a very well-ventilated space, and follow the paint manufacturer’s instructions.
Place the mailbox on cardboard or a drop cloth. Apply light, even coats instead of one heavy coat. Heavy coats can drip, wrinkle, or take forever to cure. Hold the spray can at a consistent distance and move steadily across the surface. Let each coat dry as directed before adding another.
Popular exterior mailbox colors include black, white, navy, forest green, charcoal, red, bronze, and soft sage. If your house has strong trim colors, match or complement them. If your home is neutral, the mailbox is a great place to add a small but confident accent.
Step 6: Measure the Interior for the Contact Paper Liner
Once the paint has dried and cured enough to handle, measure the inside of the mailbox. Most traditional curbside mailboxes have a curved top, flat bottom, and side seams. You can line only the bottom, only the back panel, the full interior, or the inside of the door. For beginners, lining the bottom and back is easier than wrapping the entire curved interior.
Use a flexible measuring tape to measure the inside width, depth, and height. If the top is curved, make a paper template first. Press a piece of kraft paper, newspaper, or scrap paper inside the mailbox and mark the edges. Trim the template until it fits, then use it to cut your contact paper.
Always cut the liner slightly larger than needed, then trim it down after applying. It is much easier to remove excess material than to stretch a piece that is too small. Contact paper is cooperative, but it is not pizza dough.
Step 7: Dry Fit the Contact Paper
Before peeling off the backing, place the cut contact paper inside the mailbox to check the fit. Confirm that the pattern is straight, the edges reach the corners, and the door still closes properly. If the pattern has stripes, checks, or strong directional lines, take extra care with alignment.
A dry fit prevents surprises. This step is especially helpful for curved mailboxes because the material may want to wrinkle near corners or seams. If it feels difficult to line the entire interior in one piece, divide the liner into smaller sections. A bottom piece, two side pieces, and a back piece can look neat and be much easier to install.
Step 8: Apply the Contact Paper Slowly
Peel back only a few inches of backing at first. Align the exposed adhesive edge inside the mailbox, press it down, then slowly peel more backing while smoothing the paper into place. Use a plastic smoother, old gift card, or your fingers wrapped in a soft cloth to push air bubbles toward the edges.
Work from the center outward. Do not rush. Contact paper rewards patience and punishes dramatic confidence. If the piece goes crooked, gently lift it and reposition it before pressing it firmly. Some removable liners allow repositioning better than others, so test carefully.
For curved areas, make small relief cuts where the liner needs to bend around corners. Keep cuts small and hidden near seams. Once the liner is smooth, press along all edges firmly. Trim extra material with a sharp utility knife and straightedge.
Step 9: Seal Edges for Better Durability
Because mailboxes deal with humidity, temperature changes, and daily use, the edges of the contact paper are the most likely areas to lift over time. To help the liner last longer, press all seams firmly and consider sealing the edges with a thin bead of clear outdoor-safe sealant. Use only a small amount so it does not create bulky ridges.
If your mailbox tends to collect condensation or rainwater inside, solve that problem before adding liner. Contact paper performs best on dry surfaces. Check that the mailbox door closes well and that water is not entering through gaps, screw holes, or a damaged top.
Step 10: Reattach Hardware and Add Fresh Numbers
Once everything is dry and the liner is secure, reattach the flag, handle, and hardware. Add new house numbers if the old ones were faded or removed. Choose numbers that are large enough to read easily from the road and contrast clearly with the mailbox color.
Vinyl numbers are simple and clean, while metal numbers can look more polished. For a farmhouse style, try black numbers on a white mailbox. For a modern look, use matte black paint with brushed brass or white numbers. For a cottage look, pair soft green paint with floral contact paper inside. The liner does not need to match perfectly; it just needs to feel intentional.
Design Ideas for a Contact Paper Mailbox Liner
Classic Floral Interior
A floral contact paper liner works beautifully with white, black, navy, or sage mailboxes. It adds a sweet, garden-inspired touch without taking over the exterior. This is a great choice if your front yard has roses, hydrangeas, lavender, or cottage-style landscaping.
Faux Marble for a Clean Modern Look
Faux marble contact paper gives the inside of the mailbox a crisp, polished feel. Pair it with a black, charcoal, or white exterior. It is stylish without shouting, which is ideal if your home leans modern or minimalist.
Wood Grain for Warmth
Wood-look contact paper can soften a metal mailbox and coordinate with natural wood posts, porch details, or rustic landscaping. Choose a realistic grain pattern and avoid overly glossy finishes if you want a more natural effect.
Bold Geometric Pattern
Geometric liners are perfect for homeowners who like playful details. Try black-and-white checks, small-scale triangles, or art deco patterns. Since the liner is mostly hidden until the door opens, you can be bolder inside than you might be outside.
Bright Solid Color
A solid-color liner is simple but effective. A sunny yellow, cheerful coral, sky blue, or apple green interior can make the mailbox feel fresh and happy. It is like giving your mail a tiny vacation home.
Common Mistakes to Avoid
Applying Contact Paper to a Dirty Surface
If the interior is dusty, oily, rusty, or damp, the liner may peel quickly. Clean and dry the surface thoroughly before application.
Using Indoor Paper in a Wet Mailbox
Not all contact paper is equal. Choose a durable, wipeable product, and avoid delicate paper liners that cannot handle moisture or temperature changes.
Skipping the Dry Fit
A dry fit helps you catch sizing problems before the adhesive is exposed. This matters even more with patterned liners.
Painting Too Heavily
Thick coats of spray paint can drip and look uneven. Light coats create a smoother finish and better durability.
Covering Address Numbers
Your mailbox makeover should not make your address harder to find. Keep numbers visible, high-contrast, and easy to read.
How to Maintain Your Mailbox Makeover
Clean the outside of the mailbox occasionally with a soft cloth and mild soap. Avoid harsh scrubbing pads that can scratch paint. Inside, wipe the liner gently if dust or pollen builds up. If an edge starts to lift, clean and dry the area, then press it back down with a little adhesive or sealant if needed.
Check the mailbox seasonally. Heat, freezing temperatures, and rain can affect paint and adhesive. A quick inspection every few months helps you catch small issues before they become annoying ones. If the liner gets damaged, simply peel it out and replace it with a new pattern. That is part of the beauty of this project: it is refreshable.
Budget Breakdown
A DIY mailbox makeover with contact paper liner can often be completed for a modest budget, especially if you already own basic tools. Contact paper may cost only a few dollars per roll, and one roll is usually more than enough for a mailbox interior. Spray paint, primer, sandpaper, cleaner, and numbers can raise the total, but the project is still typically less expensive than buying a high-end decorative mailbox.
If you want the biggest impact for the lowest cost, focus on three things: fresh paint, clean numbers, and a neat liner. Those details do most of the visual heavy lifting.
Best Style Pairings for Different Home Exteriors
Farmhouse Home
Try a white or matte black mailbox with gingham, ticking stripe, or simple floral contact paper. Add black numbers and a clean post for a crisp farmhouse look.
Modern Home
Choose charcoal, black, bronze, or deep green paint. Use marble, terrazzo, or minimal geometric contact paper inside. Keep the numbers sleek and simple.
Cottage Home
Soft blue, sage green, cream, or warm white paint works well. Pair it with botanical, floral, or vintage-inspired liner. Add a small flower bed around the post for extra charm.
Traditional Home
A glossy black mailbox with brass-style numbers feels classic. Inside, use a subtle pattern such as small dots, muted plaid, or soft gray faux grasscloth.
Coastal Home
Use navy, white, pale aqua, or sandy beige. A blue-and-white stripe or watercolor-style liner can bring in a relaxed beachy feel without looking like a souvenir shop exploded.
Real-Life Experience Tips for a Better DIY Mailbox Makeover
After doing small outdoor DIY projects, one lesson becomes very clear: the tiny projects are often the ones where details matter most. A mailbox is small, so every drip, crooked number, trapped bubble, or wrinkled liner is easy to spot. The good news is that careful prep solves most of those issues before they happen.
The first experience-based tip is to work on a mild, dry day. Paint and adhesive both behave better when the weather is not too hot, too cold, too windy, or too humid. If the sun is blazing, the metal mailbox can get hot quickly, which may cause paint to dry too fast or contact paper adhesive to become tricky. If the air is damp, the liner may not stick as well. A calm morning or late afternoon is usually ideal.
Second, do not choose the contact paper pattern only by how it looks on the roll. Unroll a section and imagine it inside a small curved space. Large patterns may disappear awkwardly or look chopped up inside a mailbox. Smaller prints, subtle textures, and medium-scale patterns usually work better. For example, a huge tropical leaf print might look amazing on a wall but strange inside a mailbox because only half a leaf appears. A small botanical print, on the other hand, can look intentional from every angle.
Third, keep your first liner attempt simple. Lining the entire curved interior in one piece sounds elegant, but it can become frustrating. A segmented approach is more forgiving. Start with the bottom panel, then add the back panel, then line the sides if desired. The seams are not very noticeable when the mailbox is in use, and the final result still feels custom. The goal is charming and clean, not museum-level perfection.
Fourth, use a sharp blade. A dull utility knife drags the contact paper, creates ragged edges, and makes you question your personality. Change the blade before trimming. Use light pressure and several gentle passes instead of one aggressive cut. Place a piece of cardboard underneath loose sections if you need to protect the painted surface.
Fifth, press the edges more than you think you need to. Edges and corners are where peeling begins. After smoothing the main surface, go back and press every seam with a plastic card wrapped in a soft cloth. Then check it again after an hour. Adhesive sometimes relaxes slightly after application, especially around curves.
Sixth, let paint cure before adding the liner. Paint may feel dry to the touch long before it is fully hardened. If you apply contact paper too soon, the adhesive can pull at the paint or leave marks if you reposition it. Follow the paint label’s cure guidance whenever possible. Waiting is annoying, but so is accidentally peeling up your beautiful new finish.
Seventh, think about mail traffic. If your mailbox receives large envelopes, catalogs, or small packages, avoid thick seams or raised decorations inside. The liner should sit flat so mail slides in and out easily. A pretty liner that catches every envelope corner will quickly become less adorable.
Eighth, keep a small scrap of the liner. Store it in a drawer or toolbox for future patching. If one corner gets damaged, you can cut a tiny repair piece rather than replacing the entire liner. This is especially useful if you chose a pattern that may not be available later.
Finally, accept that outdoor DIY projects age. Your mailbox will continue to face weather, dust, bugs, and daily use. That does not mean the project failed. It means your mailbox has a job. The beauty of a contact paper liner is that it can be changed whenever you want. You can go floral in spring, plaid in fall, metallic for the holidays, or classic marble when you decide your mailbox has matured emotionally.
Conclusion
A DIY mailbox makeover with contact paper liner is a small project with a surprisingly big payoff. With good cleaning, light sanding, the right outdoor paint, clear address numbers, and carefully applied liner, you can transform a tired mailbox into a polished curb appeal detail. The project is practical, affordable, and customizable, whether your style is farmhouse, modern, cottage, coastal, or classic.
The best part is the little surprise inside. A contact paper liner adds color, pattern, and personality where nobody expects it. It makes an everyday object feel thoughtful, and that is the heart of good DIY: turning ordinary things into small moments of delight.
Note: This article is written for web publication and is based on practical DIY mailbox maintenance, exterior painting, peel-and-stick liner application, and general U.S. mailbox usability guidance. Always follow local mailbox placement rules and product label instructions for paint, primer, adhesive liner, and sealant.