
DNA may sound like something that belongs in a high-security lab with microscopes, white coats, and people saying “fascinating” while staring at glowing screens. But the basic structure of DNA is surprisingly easy to understand when you build it with materials you already have at home or in a classroom. Candy, paper, pipe cleaners, beads, straws, toothpicks, pasta, tape, and markers can all become part of a hands-on DNA model.
That is the magic of a good science project: it turns an invisible molecule into something you can hold, twist, label, and occasionally rescue from a cat who thinks pipe cleaners are prey. A DNA model helps students see the famous double helix, the ladder-like shape of the molecule, and the way the four basesadenine, thymine, cytosine, and guaninepair with one another. Adenine pairs with thymine, while cytosine pairs with guanine. Once that pattern clicks, DNA becomes less like a scary biology term and more like a very tiny instruction manual written with only four letters.
In this guide, you will learn three practical ways to make a model of DNA using common materials. Each method is simple, affordable, and useful for school projects, science fairs, homeschool lessons, or weekend experiments. You will also find tips for making your model more accurate, stronger, more colorful, and easier to explain.
What a DNA Model Should Show
Before grabbing candy or construction paper, it helps to know what the model needs to represent. DNA stands for deoxyribonucleic acid. It carries genetic information that helps living things grow, function, and pass traits from one generation to the next. In a real DNA molecule, two long strands twist around each other to form a double helix. Imagine a ladder that someone gently twisted into a spiral. Congratulations, you are now thinking like a molecular biologist with better snacks.
The sides of the ladder are called the sugar-phosphate backbone. In real DNA, this backbone is made from alternating sugar and phosphate groups. The rungs of the ladder are base pairs. There are four bases in DNA: adenine, thymine, cytosine, and guanine. Scientists often shorten them to A, T, C, and G. These bases do not pair randomly. A always pairs with T, and C always pairs with G. This predictable pairing is one reason DNA can copy itself so reliably.
A strong DNA model should show three main ideas: the two outer backbones, the paired bases in the middle, and the twisted double helix shape. It does not have to be perfectly realistic at the molecular level. Nobody expects a marshmallow to behave like a phosphate group. But the model should make the structure clear enough that someone looking at it can understand how DNA is organized.
Way 1: Make a Candy DNA Model
A candy DNA model is one of the most popular versions because it is colorful, easy to assemble, and has the bonus feature of being extremely motivating. Students who are not thrilled about nucleotides may become deeply committed once gummy candies enter the chat.
Materials You Need
To make a candy DNA model, gather soft candy pieces in four colors, such as gumdrops, gummy bears, mini marshmallows, or jelly candies. You will also need toothpicks, two long flexible candies such as licorice ropes or fruit strips, paper labels, and a marker. Use one candy color for each DNA base: A, T, C, and G. For example, red can represent adenine, yellow can represent thymine, green can represent cytosine, and blue can represent guanine.
Step-by-Step Instructions
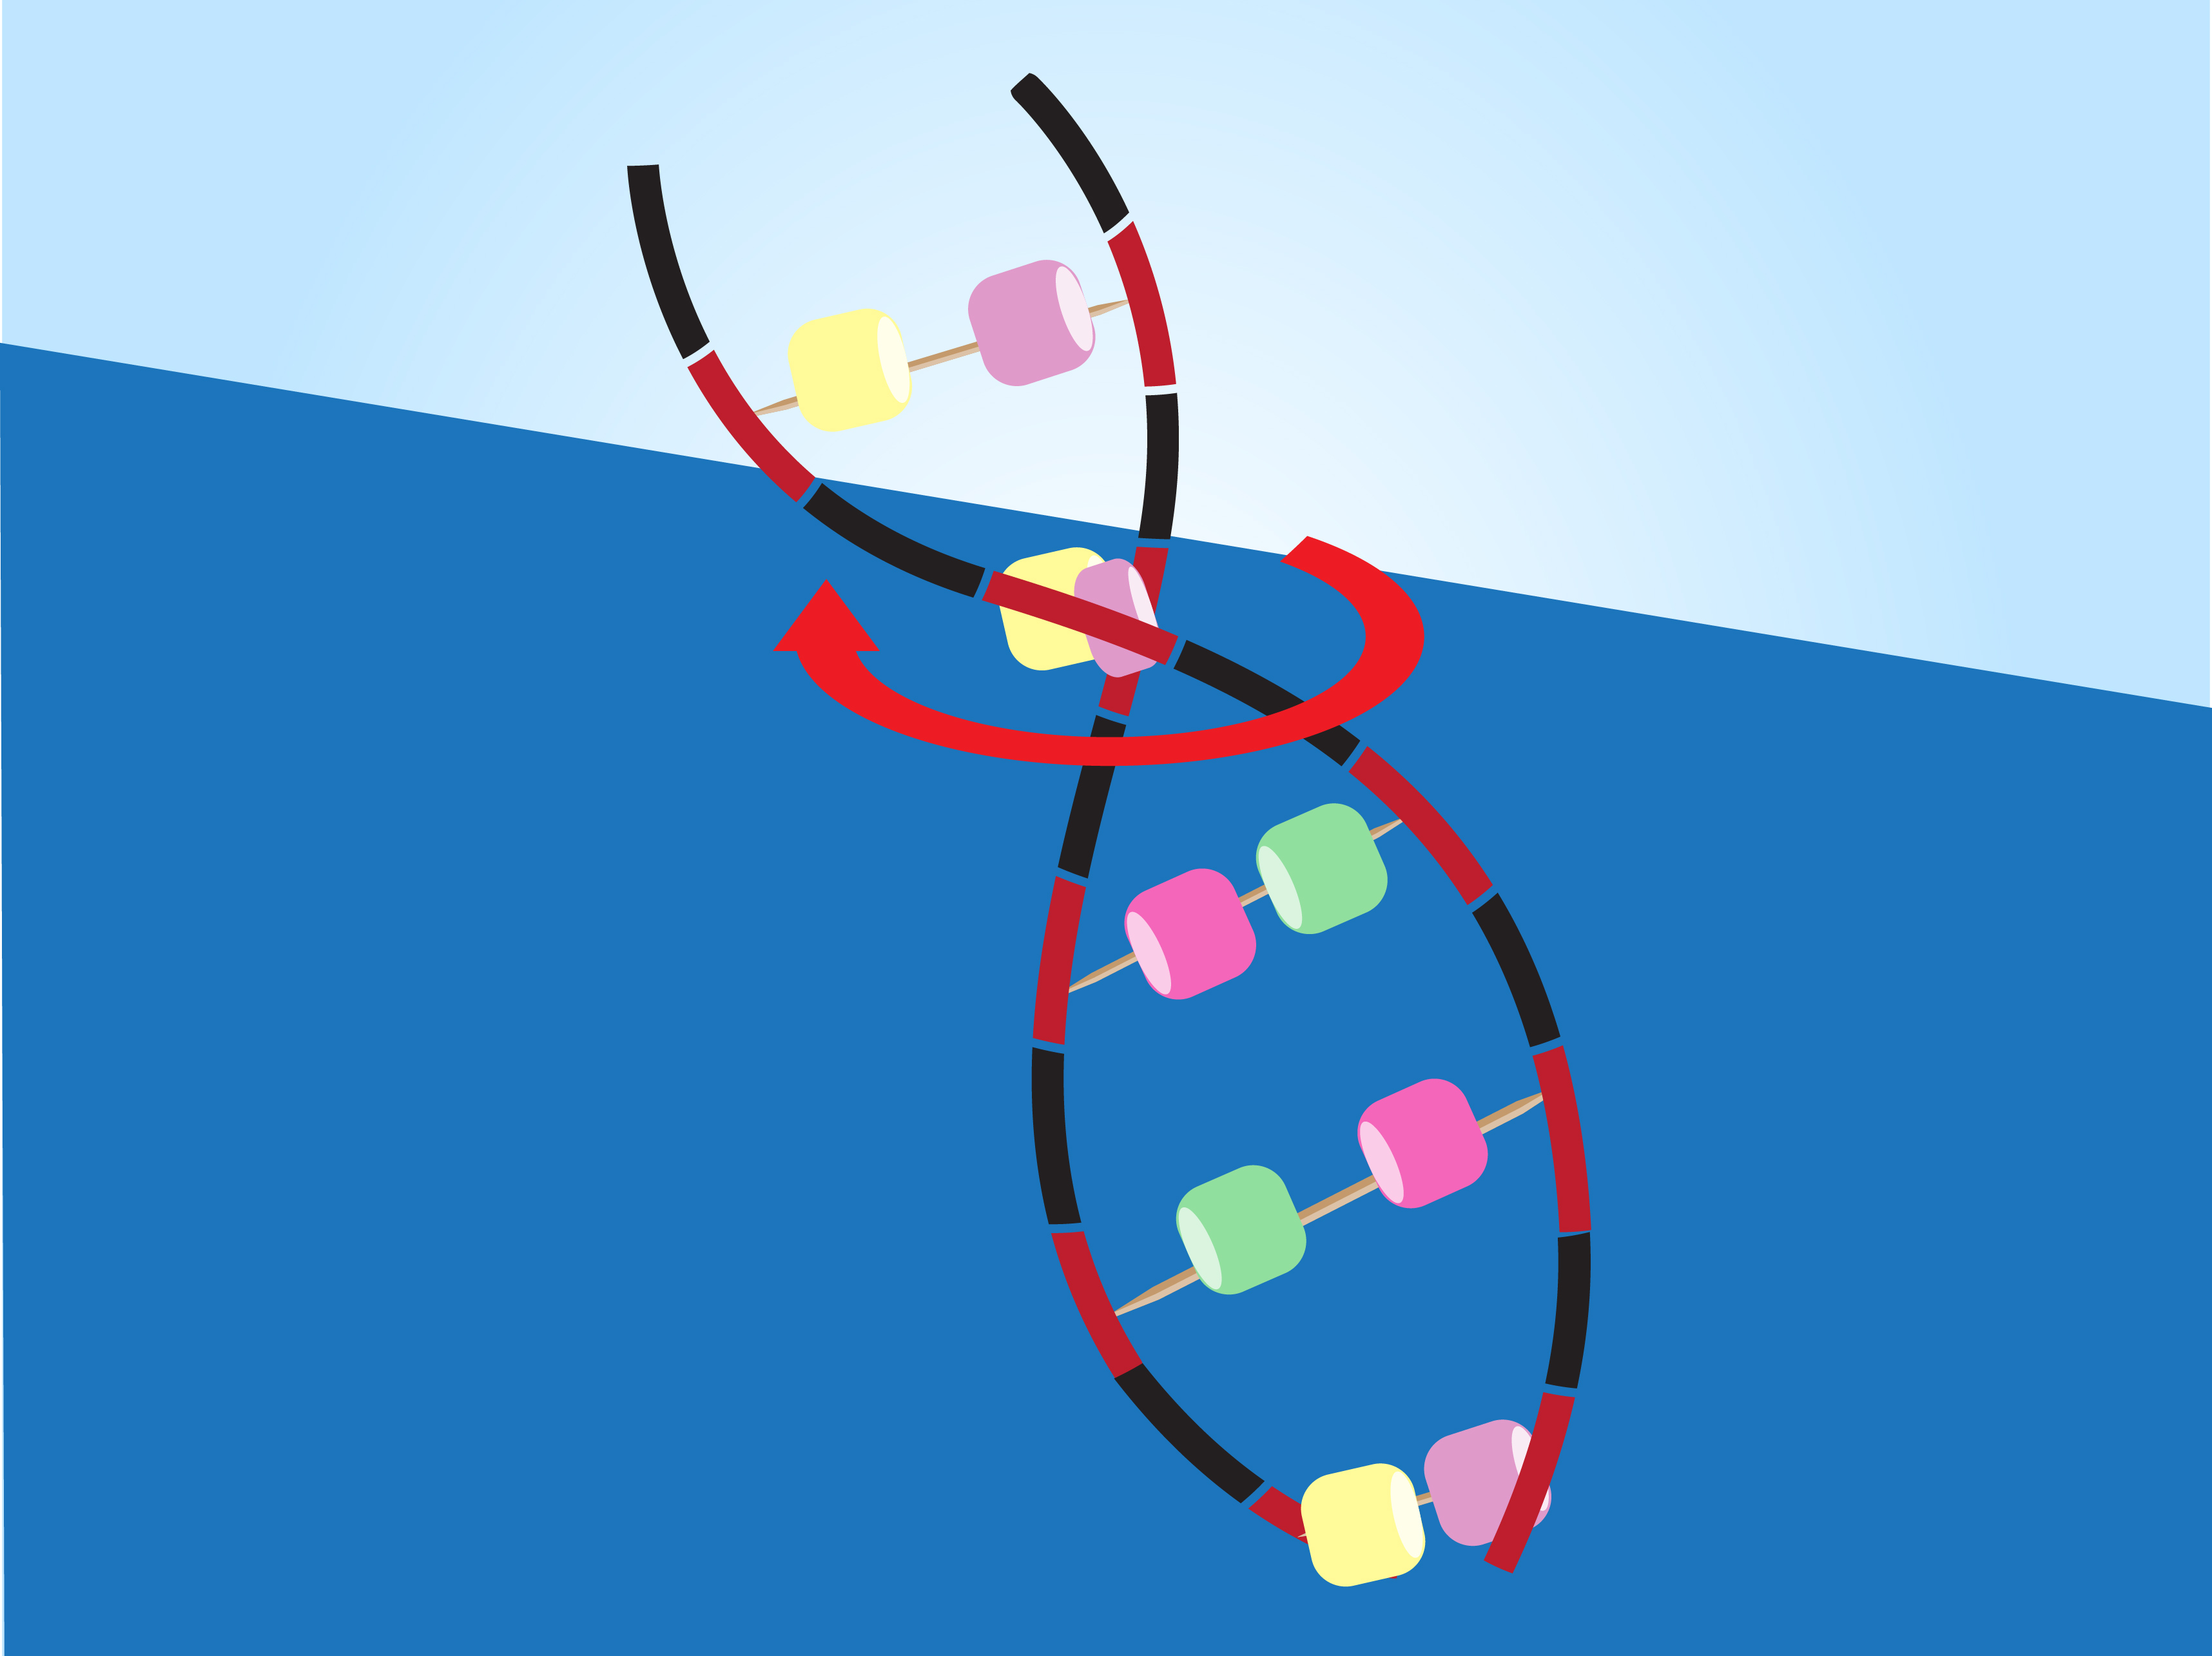
Start by assigning each candy color to a base. Write down your color key so the model stays consistent. Next, create base pairs by pushing two candies onto a toothpick. Remember the pairing rules: A goes with T, and C goes with G. If red is A and yellow is T, those two colors should always appear together. If green is C and blue is G, they should always appear together. Random candy matchmaking may be fun at parties, but DNA prefers commitment.
After making several base-pair rungs, attach each end of the toothpick to one of the long candy strands. These strands represent the sugar-phosphate backbone. Space the rungs evenly so the model looks like a ladder. Once your ladder is complete, gently twist it to create the double helix shape. Do not twist too aggressively, or your DNA may become a sticky modern art sculpture.
Add labels to identify the backbone, base pairs, and each base letter. If this is for a school presentation, place a small card next to the model explaining that DNA stores genetic information in the sequence of bases. You can also write a sample sequence, such as A-T, C-G, G-C, T-A, and explain that the order of these base pairs is part of DNA’s code.
Why This Method Works Well
The candy model is excellent for visual learners. The different colors make base pairing easy to see, while the toothpicks clearly show the ladder-rung structure. The flexible candy backbone makes it simple to twist the model into a helix. This method is especially good for elementary and middle school projects because it makes an abstract idea friendly and memorable.
The downside is durability. Candy can dry out, melt, attract ants, or mysteriously disappear during “quality control testing.” If you need a model that lasts for weeks, candy may not be the best choice. But for a classroom activity, quick science fair demo, or one-day lesson, it is deliciously effective.
Way 2: Make a Paper DNA Model
A paper DNA model is inexpensive, clean, and easy to customize. It is also a great option when food is not allowed in the classroom. With paper, markers, scissors, tape, and string, you can build a neat DNA model that clearly shows structure and base-pairing rules.
Materials You Need
You will need colored construction paper or cardstock, scissors, tape or glue, markers, a ruler, yarn or string, and optional paper clips. Choose four colors for the bases and two additional colors for the sugar-phosphate backbone. Cardstock works better than thin paper because it holds its shape when twisted.
Step-by-Step Instructions
Cut strips of paper for the base pairs. Use the same color system throughout your model: one color for A, one for T, one for C, and one for G. Write the letters clearly on each piece. Then create paired strips by taping A to T and C to G. You can make each pair look like a single rung by joining the two base pieces in the center.
Next, cut two long strips or chains for the backbone. Attach the base-pair rungs between them, keeping equal spacing from top to bottom. When finished, your model should look like a flat ladder. To make it more realistic, hold the top and bottom of the ladder and gently twist it into a spiral shape. Tape the ends to help it stay twisted, or hang it vertically using string.
For a more advanced version, label alternating sections of the backbone as “sugar” and “phosphate.” This shows that the outer strands are not just random rails; they represent the repeating sugar-phosphate structure that supports the DNA molecule. You can also draw arrows on each backbone to show that the two DNA strands run in opposite directions, a feature called antiparallel orientation.
Why This Method Works Well
The paper model is one of the easiest models to explain because it gives you plenty of space for labels. It is also ideal for students who want a neat project board display. Unlike candy, paper will not melt in a backpack, which is a strong advantage unless your backpack doubles as a sauna.
This method works especially well for showing that the DNA code is based on sequence. You can write several base pairs in a row and explain that changing the order changes the genetic message. For older students, the model can be extended with vocabulary such as nucleotide, base pair, sugar-phosphate backbone, complementary bases, and double helix.
Way 3: Make a Pipe Cleaner and Bead DNA Model
A pipe cleaner and bead model is sturdy, colorful, and flexible. It looks more three-dimensional than paper and lasts longer than candy. This makes it a great choice for science fairs, classroom demonstrations, and students who enjoy building things with their hands.
Materials You Need
You will need two long pipe cleaners or flexible wires for the backbone, smaller pipe cleaner pieces or toothpicks for the rungs, beads in four colors for the bases, and optional labels. If you do not have beads, you can use cut straws, dry pasta, buttons, or small foam pieces. The key is consistency: each base should always have the same color or shape.
Step-by-Step Instructions
Choose four bead colors and assign each one to A, T, C, and G. Slide beads onto short pipe cleaner pieces in correct base pairs: A with T and C with G. These short pieces will become the rungs of the DNA ladder. Attach each rung between two long pipe cleaners. The long pipe cleaners represent the sugar-phosphate backbones.
Once the rungs are attached, bend the entire ladder gently into a twist. Pipe cleaners are perfect for this because they hold their shape without much tape or glue. Adjust the spacing so the rungs look evenly arranged. Add labels by tying small paper tags to the model or creating a separate key that explains what each color represents.
For extra accuracy, alternate two bead colors along each long backbone to represent sugar and phosphate groups. This small detail makes the model more scientifically meaningful and gives it a polished look. You can also build a longer model by adding more rungs, but do not go overboard unless you want your DNA model to become the classroom jump rope.
Why This Method Works Well
This model is sturdy enough to carry, display, and reuse. It also shows the twisted ladder shape better than many flat models. Because pipe cleaners bend easily, students can adjust the helix without destroying the structure. The bead colors make base pairing clear, and the model can be scaled up or down depending on the project requirements.
The pipe cleaner method is especially useful for middle school, high school, and science fair projects. It gives students a chance to discuss both structure and function. The outer backbone provides support, the base pairs carry information, and the twist creates the famous double helix shape.
Tips for Making Your DNA Model More Accurate
No matter which method you choose, accuracy matters. A DNA model should not just look pretty; it should teach the right concept. The first rule is to keep the base pairs consistent. A should always pair with T, and C should always pair with G. If your model has A paired with C, the biology teacher may raise an eyebrow so high it needs its own zip code.
Second, make the backbone continuous. DNA has two long strands, not a pile of disconnected pieces. Whether you use candy ropes, paper strips, or pipe cleaners, the outside rails should look like continuous supports. Third, add the twist. A flat ladder is a helpful starting point, but DNA is known for its double helix shape. A gentle spiral makes the model look more realistic and memorable.
Fourth, use labels. Even a beautiful model can confuse viewers if they do not know what they are seeing. Label the backbone, base pairs, adenine, thymine, cytosine, guanine, and double helix. A small legend or color key can make your model much easier to understand.
Common Mistakes to Avoid
One common mistake is using too many colors without explaining them. Color is helpful only when it means something. If every part of the model is rainbow chaos, viewers may admire it but learn very little. Assign colors carefully and keep a written key nearby.
Another mistake is forgetting the complementary base-pairing rule. DNA is not a free-for-all. Adenine pairs with thymine, and cytosine pairs with guanine. A third mistake is making the model too fragile. If the model has to travel to school, survive a hallway, and sit on a table all day, build it with stronger materials like pipe cleaners, cardstock, beads, or straws.
Finally, do not skip the explanation. A model is more powerful when you can describe what it shows. Practice saying, “The sides represent the sugar-phosphate backbone, the rungs represent base pairs, and the whole structure twists into a double helix.” That one sentence can save your presentation from awkward silence, which is the natural predator of science fair confidence.
Which DNA Model Should You Choose?
Choose the candy model if you want something fun, fast, and memorable. It is ideal for younger students or short activities. Choose the paper model if you want a clean, labeled display that is easy to attach to a poster board. Choose the pipe cleaner and bead model if you want a durable 3D structure that looks impressive and can be handled without falling apart.
All three models teach the same core ideas: DNA has two strands, the strands twist into a double helix, and the rungs are made of complementary base pairs. The best model depends on your materials, age group, time limit, and whether the finished project needs to survive longer than a sandwich.
Real-Life Learning Experiences From Building DNA Models
One of the most useful experiences students get from building a DNA model is realizing that science is not only something written in textbooks. It can be built, touched, tested, adjusted, and occasionally taped back together after a dramatic collapse. Many students understand the term “double helix” much better after twisting a paper ladder or pipe cleaner structure with their own hands. The shape becomes less mysterious because they have physically created it.
Another valuable experience is learning through mistakes. For example, a student might accidentally pair adenine with guanine and then notice that the pattern does not match the base-pairing rule. That mistake becomes a learning moment. Instead of simply memorizing A-T and C-G, the student sees that DNA follows a specific structure. Correcting the model reinforces the concept far better than copying a definition ten times.
Group projects also turn DNA modeling into a teamwork lesson. One student can cut materials, another can build base pairs, another can label parts, and another can prepare the explanation. This division of work mirrors real scientific collaboration in a small, classroom-friendly way. Of course, every group usually has one person who becomes the “official tape manager,” a powerful role that should not be abused.
Building a model also helps students connect structure with function. When they see the base pairs lined up in a sequence, they can begin to understand how DNA stores information. The model is not just a twisted decoration. It represents a code. That code helps determine traits and guides many biological processes. Even a simple model made from beads or paper can open the door to bigger topics such as genes, chromosomes, inheritance, mutation, and DNA replication.
Teachers and parents often find that DNA models encourage better questions. Students may ask why A pairs with T, why the molecule twists, how DNA copies itself, or how a change in the sequence can affect a living thing. These questions are signs that the project is working. A good model does not end curiosity; it starts it.
Science fair students can also use DNA models to practice presentation skills. They can explain their material choices, describe what each part represents, and compare the model to real DNA. For example, a pipe cleaner backbone is not chemically the same as a sugar-phosphate backbone, but it represents the same structural role: support. This helps students understand that models are simplified versions of reality. Scientists use models for the same reason students doto make complex systems easier to study.
Another experience worth mentioning is creativity. Two students can follow the same DNA model instructions and produce very different results. One may build a neat paper helix with careful labels. Another may create a bright candy model that looks like it belongs at a science-themed birthday party. A third may use recycled materials, such as bottle caps, cardboard, yarn, or old buttons. This creativity makes the lesson more personal and memorable.
Finally, building a DNA model teaches patience. The first twist may look uneven. The base pairs may slide around. The tape may stick to everything except the thing it is supposed to stick to. But adjusting the model is part of the process. Science often involves revising, improving, and trying again. A homemade DNA model quietly teaches that lesson while also making biology more approachable.
Conclusion
Making a model of DNA using common materials is one of the easiest ways to turn biology from “Wait, what?” into “Oh, I get it.” Whether you use candy, paper, pipe cleaners, beads, straws, or recycled supplies, the goal is the same: show the double helix, the sugar-phosphate backbone, and the base-pairing rules that make DNA so important.
The candy model is fun and quick, the paper model is clean and easy to label, and the pipe cleaner model is sturdy and highly visual. Each version helps students understand how DNA is built and why its structure matters. Best of all, these projects prove that science does not always require expensive equipment. Sometimes, it only needs curiosity, common materials, and enough tape to make peace with gravity.