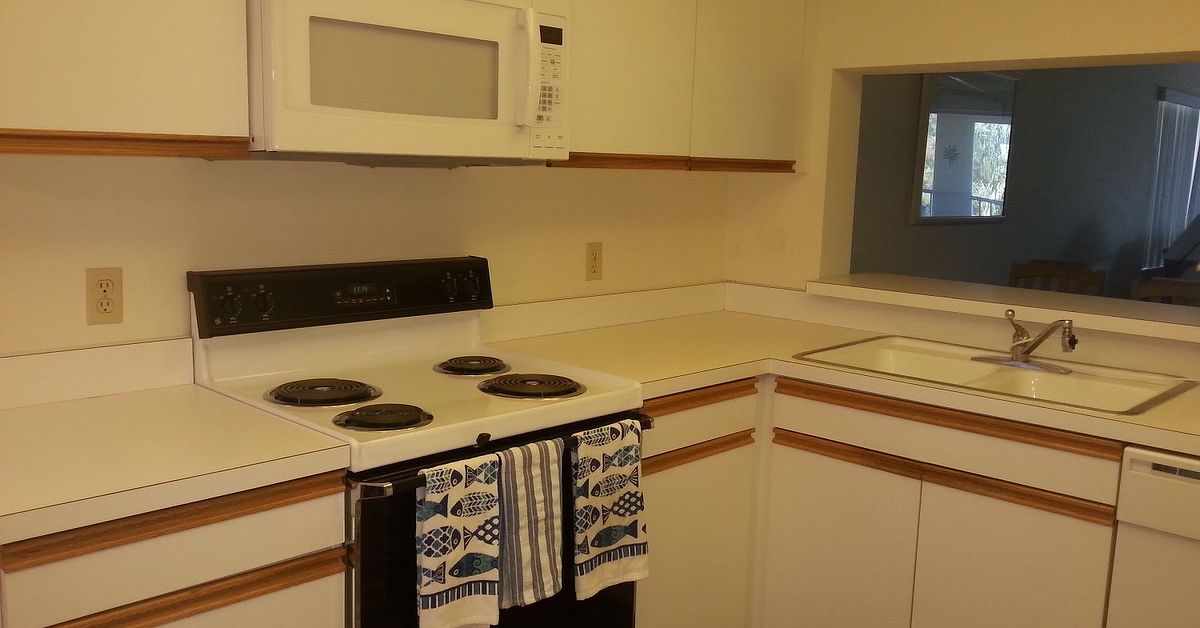

There is a special kind of confidence that comes with 1970s kitchen cabinets. They do not whisper. They announce themselves with dark stain, heavy wood grain, orange undertones, chunky hardware, and sometimes a mysterious glossy finish that seems capable of surviving a small meteor strike. If your kitchen still looks like it is waiting for a fondue party to begin, you are not aloneand you do not need a luxury remodel to bring it back to the present day.
A smart DIY redo for your 70’s kitchen cabinets on a budget can completely change the mood of your kitchen without replacing the cabinet boxes. Paint, new hardware, better lighting, open shelving, peel-and-stick accents, fresh hinges, and small trim upgrades can make old cabinets look intentional instead of outdated. The secret is not spending more. The secret is prepping better.
This guide walks through practical, affordable ways to update 1970s kitchen cabinets, including how to clean, sand, prime, paint, repair, style, and finish them like a careful DIYernot like someone who panic-painted at midnight before guests arrived.
Why 1970s Kitchen Cabinets Are Worth Saving
Before you start dreaming about ripping everything out, take a slow look at what you already have. Many 1970s cabinets were built with sturdy plywood boxes, solid wood doors, or durable face frames. They may look dated, but structurally, they can be stronger than some modern budget cabinets. If the boxes are square, the drawers work, and the layout makes sense, you may have a good candidate for a cabinet makeover.
The biggest problems are usually cosmetic: dark stain, worn finish, greasy edges near the stove, dated pulls, exposed hinges, flat slab doors, or decorative trim that screams “avocado appliance era.” A budget-friendly kitchen cabinet redo focuses on changing what people see first while keeping the expensive bones in place.
Start With A Realistic Budget
A DIY cabinet makeover can be very affordable, but “budget” does not mean “free plus one heroic weekend.” You will still need supplies. For a basic repaint, expect to buy cleaner or degreaser, sandpaper, wood filler, primer, cabinet paint, brushes, rollers, painter’s tape, drop cloths, and possibly new knobs or pulls.
A small kitchen may be updated for a few hundred dollars if you already own tools. A larger kitchen with new hardware, hinges, trim, and high-quality paint may cost more, but it will still usually be far less than replacing cabinets. To control spending, divide your project into three tiers:
Budget Tier 1: Clean, Touch Up, And Change Hardware
This is the fastest upgrade. Deep clean the cabinets, polish or touch up worn wood, replace old pulls, and add brighter lighting. It works best if the cabinet finish is not badly damaged.
Budget Tier 2: Paint The Existing Cabinets
This is the best value for most 1970s kitchens. Paint can hide orange-toned wood, calm down busy grain, and make the room feel brighter. It requires patience, but the transformation can be dramatic.
Budget Tier 3: Paint Plus Small Style Upgrades
This version includes paint, new hardware, soft-close hinges, trim, open shelving, glass inserts, or peel-and-stick wallpaper inside open cabinets. It costs more than paint alone, but it can make the finished kitchen feel custom.
Safety First: Check For Lead Paint In Older Homes
If your home was built before 1978, pause before sanding old painted surfaces. Homes from that era may contain lead-based paint. Sanding, scraping, or disturbing lead paint can create hazardous dust. If the cabinets have old paint layers, test before you sand. Use an EPA-recognized lead test kit or hire a certified professional if you are unsure.
If your cabinets are stained wood with a clear finish, lead paint may not be the issue, but old finishes can still produce dust and fumes. Wear a respirator or quality mask, ventilate the space, and keep children and pets away from the work area. DIY pride is great. Breathing mystery dust is not.
Step 1: Remove Doors, Drawers, And Hardware
Do not try to paint cabinet doors while they are hanging unless you enjoy drips, awkward angles, and regret. Remove every door and drawer front. Take off knobs, pulls, hinges, and bumpers. Place screws and hardware in labeled bags so you do not spend the final day crawling around muttering, “Where did this tiny screw come from?”
Label each door with painter’s tape or a numbered system. Put the label where paint will not cover it, such as inside the hinge cup or on the back under tape. Older cabinet doors may not be perfectly interchangeable, so this step saves time during reassembly.
Step 2: Deep Clean The Cabinets
Kitchen cabinets collect a charming blend of cooking grease, hand oils, dust, and ancient snack history. Paint will not stick well to grease, no matter how expensive the paint is. Clean every surface with a degreasing cleaner or a mild detergent solution. Pay special attention to areas around handles, above the stove, and near the sink.
After cleaning, wipe the cabinets with clean water and let them dry fully. This step may feel boring, but it is one of the biggest differences between a paint job that lasts and one that peels when you look at it too confidently.
Step 3: Repair Nicks, Holes, And Dated Hardware Marks
If you are switching from old center pulls to modern knobs or bar pulls, you may need to fill the previous holes. Use wood filler for small holes and dents. Overfill slightly because filler can shrink as it dries. Once dry, sand smooth.
Look for chipped veneer, loose trim, cracked corners, or swollen areas near the sink. Glue down loose veneer with wood glue and clamp it until dry. If a door is badly warped or damaged, replacing just that door may be cheaper than forcing a repair that will always look suspicious.
Step 4: Sand For Adhesion, Not Destruction
You usually do not need to sand cabinets down to bare wood. The goal is to dull the glossy finish and create a surface that primer can grip. Use medium-grit sandpaper, sanding sponges, or a small orbital sander for flat areas. For grooves and profiles, use a flexible sanding sponge.
Laminate or glossy cabinets need extra attention because paint has a harder time sticking to slick surfaces. Light sanding plus a strong bonding primer is the winning combination. After sanding, vacuum the dust and wipe everything with a tack cloth or lightly damp microfiber cloth.
Step 5: Choose The Right Primer
Primer is not optional on a serious cabinet makeover. It helps paint bond, blocks stains, and creates an even base. For 1970s cabinets with dark stain or shiny finish, choose a high-quality bonding primer. If you are painting over oak or another grainy wood, primer also helps reduce color bleed and blotchiness.
Use a brush for corners and a foam roller for flat surfaces. Thin coats are better than thick coats. Thick primer can leave ridges, take longer to dry, and make your doors look like they were frosted like a birthday cake. Let primer dry according to the label, then lightly sand before painting.
Step 6: Pick A Cabinet Paint That Can Handle Real Life
Kitchen cabinets are not decorative wall art. They get touched, bumped, wiped, splashed, and occasionally attacked by spaghetti sauce. Choose a durable cabinet paint, enamel, or hybrid alkyd paint designed for trim, doors, or cabinetry. Semi-gloss and satin finishes are popular because they are easier to clean than flat paint.
For a 1970s kitchen, the most budget-friendly modern colors include warm white, soft cream, greige, muted sage, navy, charcoal, mushroom, or light taupe. If your countertops are busy or dated, choose a calmer cabinet color. If the kitchen is small, lighter cabinets can make the room feel larger and less cave-like.
Step 7: Paint Slowly And Let Each Coat Cure
Cabinet painting rewards patience. Apply thin, even coats with a quality brush and foam roller. Brush into corners and details first, then roll flat areas. Watch for drips along edges and inside grooves. Most cabinets need two coats of paint after primer, sometimes three if you are covering dark stain with a light color.
Dry time and cure time are not the same thing. Paint may feel dry within hours but can take days or weeks to fully harden. Be gentle when reinstalling doors. Add felt bumpers to reduce sticking and protect the fresh finish.
Budget-Friendly Design Ideas For 70’s Cabinets
1. Replace Old Hardware
New hardware is the jewelry of a kitchen makeover. Swap ornate brass pulls or dark wooden knobs for simple bar pulls, round knobs, cup pulls, or matte black handles. To save money, choose hardware that matches the existing hole spacing. If you change spacing, use a cabinet hardware jig for accuracy.
2. Add Trim To Flat Slab Doors
Many 1970s cabinets have plain slab doors. You can add thin molding around the edges to create a shaker-style look. Keep the trim simple and lightweight. Attach it with wood glue and small brad nails, fill seams, sand, prime, and paint. This one upgrade can make old doors look far more current.
3. Remove A Few Upper Cabinet Doors
If your kitchen feels heavy, remove one or two upper cabinet doors and style the shelves with everyday dishes, glass jars, or baskets. Paint the inside of the cabinet for a finished look. This creates an open-shelf effect without buying new shelves.
4. Use Peel-And-Stick Wallpaper Inside Cabinets
Peel-and-stick wallpaper on the back panel of open cabinets adds personality without permanent commitment. It is especially useful if you want a small pattern but do not want your entire kitchen to look like it joined a wallpaper cult.
5. Update Hinges If The Budget Allows
Old exposed hinges can make cabinets look dated even after painting. If your cabinet style allows it, consider replacing hinges with a cleaner style or upgrading to soft-close hinges. Measure carefully before buying. Hinges are surprisingly specific, and guessing can lead to a drawer full of shiny mistakes.
6. Add Under-Cabinet Lighting
Battery-powered or plug-in LED light strips can make a budget cabinet redo look more expensive. Better lighting also helps countertops, backsplash, and paint colors appear fresher. It is one of the easiest upgrades with a big visual payoff.
What If You Hate The Wood Grain?
Some 1970s cabinets, especially oak, have strong visible grain. Paint can cover the color, but the texture may still show. If you want a smoother finish, use grain filler before primer. This step takes more time but creates a more modern surface. For a budget project, you can also embrace slight grain as character. Not every cabinet needs to look factory-sprayed to look beautiful.
When Refacing Makes More Sense Than Painting
Cabinet refacing means keeping the cabinet boxes but replacing doors and drawer fronts or covering visible frames with veneer. It costs more than painting but less than a full replacement. Refacing may be a smart choice if the cabinet boxes are sturdy but the doors are damaged, warped, or too dated to rescue.
For a tight budget, consider a partial reface. Replace only the most visible doors, such as upper cabinets, and paint the remaining frames. Another option is ordering unfinished replacement doors and painting them yourself.
Common Mistakes To Avoid
Skipping The Cleaning
Grease is the enemy of adhesion. Paint over grease and you will eventually see peeling, bubbling, or soft spots.
Using Wall Paint
Wall paint is not built for cabinet abuse. Choose paint made for cabinets, trim, furniture, or doors.
Painting Too Thick
Thick coats look uneven and take longer to cure. Thin coats create a smoother, stronger finish.
Reinstalling Too Soon
Fresh paint can chip if doors are handled roughly. Let the finish harden as long as possible before heavy use.
Ignoring The Rest Of The Kitchen
Newly painted cabinets can make old outlets, yellowed switch plates, and dated lighting stand out. Save a small part of the budget for these finishing touches.
A Simple Weekend-By-Weekend Plan
Weekend One: Prep
Remove doors and hardware, label everything, clean thoroughly, fill holes, repair damage, and sand. This weekend is not glamorous, but it sets up the whole project.
Weekend Two: Prime And Paint
Prime doors, drawers, and cabinet frames. Sand lightly. Apply the first coat of paint, let it dry, then apply the second coat. Keep pets away unless you want tiny paw-print accents.
Weekend Three: Reassemble And Style
Install hardware, rehang doors, adjust hinges, add bumpers, organize shelves, and touch up small marks. Add under-cabinet lighting or peel-and-stick accents if desired.
Real-Life Experience: What A Budget 70’s Cabinet Redo Actually Feels Like
A DIY cabinet redo always begins with optimism. You stand in the kitchen holding a paint swatch, imagining a bright, magazine-worthy space where coffee tastes better and nobody leaves crumbs on the counter. Then you remove the first cabinet door and discover three layers of old hardware holes, one mystery stain, and a hinge screw that refuses to participate in society.
The most important experience to understand is that prep takes longer than painting. In many budget makeovers, the painting step feels like the reward. The real work is cleaning sticky corners, sanding glossy frames, labeling doors, filling dents, and waiting for primer to dry. It can feel slow, but every careful step prevents future peeling. A rushed cabinet job may look good for two weeks. A well-prepped one can look good for years.
Another lesson: your kitchen will look worse before it looks better. Doors may be spread across the garage, drawers may sit on a folding table, and your everyday dishes may temporarily live in the dining room like confused houseguests. This is normal. Take photos before removing doors, keep hardware organized, and create a drying zone where cabinet fronts can sit undisturbed. If space is limited, paint in batches instead of trying to tackle every door at once.
Color choice also feels different in real life than it does online. A white that looks crisp in a photo may look cold under fluorescent lighting. A sage green that looks charming on a sample card may turn muddy next to orange countertops. Always test paint on a piece of poster board or the back of a cabinet door. Look at it in morning light, afternoon light, and evening light. The 1970s loved warm tones, so slightly warm whites, creamy neutrals, and muted earth colors often work better than stark modern shades.
Hardware can become the happy surprise of the project. Many old cabinets look instantly cleaner with simple pulls. If you are keeping the same hole spacing, the upgrade is quick. If you are drilling new holes, use a template. Measuring by eye sounds brave, but crooked handles are the kind of thing you will notice every single morning while making coffee.
Expect small imperfections. DIY painted cabinets may show a faint brush mark, a tiny dust speck, or a place where the old grain still peeks through. That does not mean the project failed. A budget cabinet redo is not about creating a showroom kitchen with a five-figure invoice. It is about making the kitchen feel clean, loved, useful, and current without emptying your savings account.
The best moment usually comes after the doors go back on. Suddenly the same kitchen feels lighter. The old cabinet boxes are still there, but the room has a new personality. Add a washable runner, a brighter light fixture, a few organized shelves, and maybe a plant that is emotionally prepared for kitchen life. The result is not just a cheaper alternative to remodeling. It is proof that careful work, smart materials, and a little patience can drag a tired 1970s kitchen into the presentwithout needing a demolition crew or a second mortgage.
Conclusion
A DIY redo for your 70’s kitchen cabinets on a budget is one of the most practical ways to refresh an outdated kitchen. You do not have to replace solid cabinet boxes just because the finish belongs to another decade. With deep cleaning, light sanding, bonding primer, durable paint, updated hardware, and a few creative design tricks, you can turn dark, dated cabinets into a brighter and more modern focal point.
The key is patience. Prep carefully, choose materials made for cabinets, respect drying times, and make small upgrades that support the new look. Whether you paint everything creamy white, add shaker-style trim, remove a few doors, or simply replace the hardware, your kitchen can feel dramatically different on a realistic budget. The 1970s had their moment. Now it is your kitchen’s turn.