
Note: This article is written as copy-ready HTML body content for web publishing, based on real project documentation, open-source repositories, hardware references, and home automation community practices.
Why rtl_433 on ESP32 Is a Big Deal
The world is full of tiny wireless gadgets whispering into the air. Weather stations, outdoor temperature sensors, rain gauges, tire pressure monitors, doorbells, leak detectors, power meters, and cheap remote controls often send simple radio packets over unlicensed ISM bands such as 433 MHz, 315 MHz, 868 MHz, and 915 MHz. For years, one of the most popular ways to listen to those signals was rtl_433, a powerful open-source decoder originally used with RTL-SDR dongles and a computer.
That setup works beautifully, but it is not always convenient. A USB SDR dongle, Raspberry Pi, laptop, or mini PC can feel like bringing a marching band to play a doorbell chime. Useful? Absolutely. Elegant? Not always. That is why the arrival of an Arduino library that brings rtl_433 to the ESP32 matters. It turns a small, low-cost microcontroller into a compact radio gateway that can decode many common 433 MHz sensor transmissions without needing a full desktop-style setup.
Instead of parking an RTL-SDR receiver next to a computer, makers can pair an ESP32 with a radio transceiver such as a CC1101 or SX127x module. The result is a small, Wi-Fi-enabled device that can listen for supported wireless sensor packets and forward the decoded data to systems such as MQTT, OpenMQTTGateway, or Home Assistant. In plain English: your cheap weather sensor can finally talk to your smart home without needing a big hardware parade.
What Is rtl_433?
rtl_433 is an open-source program designed to decode radio transmissions from many consumer devices that operate in ISM radio bands. Despite the name, it is not limited to 433 MHz. The project is widely used with 433.92 MHz devices, but it also supports other common bands depending on hardware, region, and configuration.
The original appeal of rtl_433 is simple: it can turn mystery radio bursts into readable data. A weather station might transmit temperature and humidity. A rain gauge might report rainfall totals. A leak sensor might send a wet-or-dry alert. Instead of seeing meaningless pulses, rtl_433 attempts to identify the protocol, decode the payload, and output structured information.
In traditional setups, rtl_433 often runs on Linux with an RTL-SDR USB receiver. That combination is flexible and powerful. It can scan, analyze, and decode a wide range of signals. However, it also requires more power, more space, and more software maintenance than many simple home automation projects need.
What the ESP32 Changes
The ESP32 is a favorite microcontroller for makers because it combines processing power, Wi-Fi, Bluetooth, and broad Arduino ecosystem support in a small package. It is inexpensive, widely available, and comfortable for hobbyists who already know the Arduino IDE or PlatformIO.
Bringing rtl_433-style decoding to the ESP32 changes the shape of a project. A builder can create a small always-on receiver that sits near a window, in a garage, beside a weather station, or in a utility room. The ESP32 can listen through a connected radio chip, decode supported transmissions, and publish the data over Wi-Fi. That makes it especially attractive for smart home users who want sensor data without relying on cloud services or proprietary hubs.
The rtl_433_ESP Arduino library is an attempt to port device decoders from the rtl_433 project to ESP32 boards using compatible transceiver modules. It is especially relevant to OpenMQTTGateway users because it can become part of a broader MQTT-based gateway strategy. In other words, it helps bridge the scrappy world of inexpensive RF sensors with the organized world of home automation dashboards.
How the Arduino Library Works
The library does not magically turn the ESP32 itself into a radio receiver. The ESP32 still needs a radio module. Common choices include the CC1101 transceiver and SX127x LoRa-style modules. These chips handle the radio side, while the ESP32 runs the logic needed to process incoming data and communicate over Wi-Fi.
At a high level, the workflow looks like this:
- A sensor transmits a short RF packet.
- The CC1101 or SX127x module receives the signal.
- The ESP32 reads the received data from the radio module.
- The rtl_433-style decoder attempts to identify the device protocol.
- The decoded result is printed, logged, displayed, or published to MQTT.
This setup is not a full replacement for every RTL-SDR use case. A USB SDR with rtl_433 remains more flexible for broad exploration, signal analysis, and advanced troubleshooting. However, for a known group of home sensors, the ESP32 approach can be cleaner, cheaper, and easier to deploy permanently.
Hardware You Need
1. ESP32 Development Board
Most makers start with a common ESP32 development board. It should have enough GPIO pins to connect the radio module and should be supported by the Arduino-ESP32 core. Boards such as ESP32 DevKit-style modules are popular because they are inexpensive and easy to flash over USB.
2. Radio Module
The radio module is the heart of the receiver. The CC1101 is a common choice for sub-GHz RF projects and is frequently used for 433 MHz experiments. Some ESP32 LoRa boards include SX1276 or SX1278 chips, which may also be used depending on frequency and board support. The exact module matters because RF performance, antenna quality, and wiring can make or break the project.
3. Antenna
An antenna is not optional decoration. It is the difference between “I can hear the weather station outside” and “apparently my sensor has moved to another planet.” A simple quarter-wave antenna for 433 MHz is often around 17.3 centimeters, though the best choice depends on the module, enclosure, and placement. Even a modest antenna upgrade can improve reception dramatically.
4. Optional Display or Storage
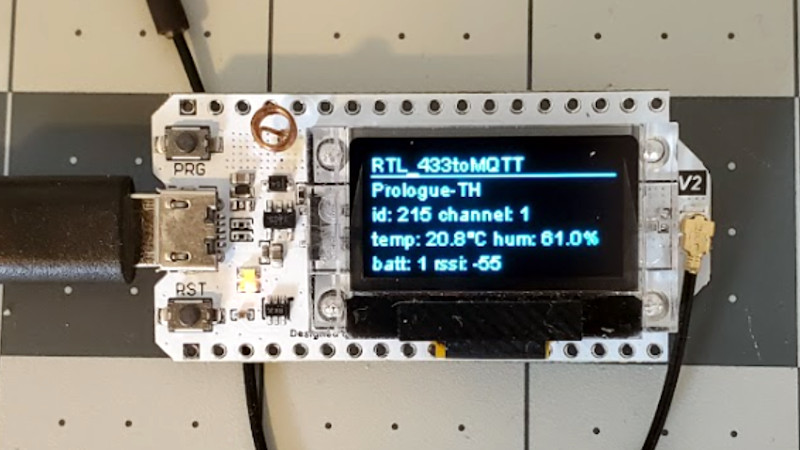
Some boards, such as LILYGO LoRa32-style devices, include an OLED screen and sometimes microSD support. A display can show decoded packets in real time, which is useful during testing. Storage can help with logging, although many users simply publish data to MQTT and let another system handle history.
Popular Use Cases
Home Weather Stations
One of the most satisfying uses for rtl_433 on ESP32 is decoding outdoor weather sensors. Many consumer weather stations transmit temperature, humidity, wind, rain, or battery data over simple RF protocols. Once decoded, that information can feed a local dashboard, automation system, or long-term database.
Smart Home Sensors Without the Cloud
Some leak sensors, contact sensors, and environmental monitors use basic RF signals. With an ESP32 gateway, those signals can be captured locally and sent to MQTT. That means a home automation system can react without waiting for a cloud API, subscription service, or vendor app that decides to redesign itself at exactly the wrong time.
Garage, Garden, and Utility Monitoring
RF sensors are useful in places where Wi-Fi may be weak or power is limited. A battery-powered sensor near a greenhouse, freezer, mailbox, or garage door may transmit short bursts that a nearby ESP32 gateway can receive. The gateway can then forward readings over Wi-Fi from a better location.
Learning RF the Friendly Way
Radio frequency projects can feel intimidating, but rtl_433 makes the learning curve less scary. Instead of starting with raw waveforms and protocol reverse engineering, beginners can begin by watching known sensors transmit recognizable values. It is like learning a new language by starting with “hello” instead of ancient poetry.
Why MQTT Is Usually Part of the Conversation
MQTT is a lightweight messaging protocol commonly used in home automation. It works well for sensor data because devices can publish small messages to topics, and other systems can subscribe to those topics. An ESP32 receiver that decodes rtl_433-style packets becomes much more useful when it can publish results to MQTT.
For example, a weather sensor might become a topic such as home/weather/outdoor/temperature. A leak detector might publish to home/basement/leak. Home Assistant, openHAB, Node-RED, or a custom dashboard can then consume those messages.
This architecture is flexible. The ESP32 does the listening. MQTT does the delivery. The automation platform does the thinking. Everyone gets a job, and nobody has to pretend a microcontroller should also be a database administrator.
OpenMQTTGateway and rtl_433_ESP
OpenMQTTGateway is an open-source project that turns microcontrollers into gateways for different wireless technologies. It supports ESP8266, ESP32, RF modules, infrared, Bluetooth Low Energy, and more. The connection between rtl_433_ESP and OpenMQTTGateway is important because it gives users a more integrated path from RF reception to MQTT publishing.
For many builders, OpenMQTTGateway is the practical way to deploy this idea. Rather than writing everything from scratch, users can configure a gateway environment, choose supported hardware, and publish decoded events into their home automation stack. That does not mean setup is always one-click easy, but it does mean the project has a real ecosystem around it.
ESP32 vs RTL-SDR: Which Setup Should You Use?
The best choice depends on your goal. If you want to explore unknown signals, inspect raw radio activity, hop across frequencies, or use the full feature set of rtl_433, an RTL-SDR dongle with a computer remains the stronger laboratory tool.
If you already know which sensors you want to receive and you want a small, always-on gateway, the ESP32 approach can be better. It uses less power, needs less physical space, and can be installed in places where a laptop or Raspberry Pi would be awkward. It also feels more appliance-like once configured.
Think of RTL-SDR as the big toolbox and ESP32 as the dedicated gadget. The toolbox is better when you are diagnosing, discovering, and experimenting. The gadget is better when you want a compact device that does one job every day without complaining.
Limitations to Know Before You Start
Not Every Device Will Decode
rtl_433 supports many devices, but not every RF gadget uses a supported protocol. Some devices may use encryption, unusual modulation, rolling codes, or proprietary formats that are difficult to decode. Others may transmit at a frequency your module is not configured to receive.
Radio Reception Can Be Fussy
RF projects are sensitive to antenna placement, module quality, noise, wiring, and distance. A sensor that works perfectly on your desk may become shy when moved behind a wall, near metal, or next to a noisy power supply. Debugging reception is part science, part patience, and part politely glaring at the antenna.
Memory and Processing Are Limited
The ESP32 is capable, but it is not a desktop computer. A ported decoder library must live within microcontroller constraints. That can mean fewer features, limited protocol coverage, or more careful configuration compared with full rtl_433 running on a PC.
Receiving Is Not the Same as Controlling
Many rtl_433 ESP32 setups are focused on receiving and decoding transmissions. Receiving weather data is different from controlling devices. Users should understand what their hardware and firmware actually support before expecting two-way communication.
Setup Tips for Better Results
Start with one known sensor. Do not connect five mystery devices, three antennas, and a questionable breadboard, then wonder why the output looks like a radio goblin sneezed. Choose a common 433 MHz sensor, place it near the receiver, and confirm that the ESP32 sees consistent packets.
Use short, clean wiring between the ESP32 and the radio module. Breadboards are convenient, but loose connections can create strange behavior. If the project becomes permanent, consider soldered headers or a small custom board.
Pay attention to power. Some radio modules are sensitive to voltage stability. A noisy USB charger or weak cable can cause unreliable reception. A decent power supply is boring until it saves three hours of debugging.
Test antenna placement. Moving the gateway a few feet can change reception. Higher placement, distance from metal objects, and a tuned antenna can all help. For outdoor sensors, placing the gateway near a window may improve results.
Security and Privacy Considerations
Many simple RF sensors broadcast data openly. That is convenient for local automation, but it also means the signals were not designed like modern encrypted network traffic. Use decoded data responsibly. Monitor your own devices, respect privacy, and avoid publishing sensitive sensor information to public dashboards.
For home automation, keep the MQTT broker secured with authentication and sensible network rules. The ESP32 gateway may be small, but it still becomes part of your smart home infrastructure. Treat it like a real device, not a disposable science fair gremlin.
Why Makers Are Excited
The appeal of this project is not just technical. It is philosophical. rtl_433 on ESP32 represents the maker ideal: take inexpensive hardware, open-source software, and everyday signals already floating through the house, then turn them into useful local data.
It also helps extend the life of simple sensors. Instead of buying an entire proprietary ecosystem, users can often reuse affordable RF devices and integrate them into modern automation platforms. That saves money, reduces e-waste, and gives builders more control over their own data.
Practical Experience: Building Around Arduino, rtl_433, and ESP32
In real-world ESP32 RF gateway projects, the first lesson is that the software is only half the story. The library may compile, the board may flash, and the serial monitor may open like a stage curtain, but the antenna decides whether the show actually starts. Many builders spend more time improving reception than writing code. That is normal. RF work rewards small adjustments.
A practical build usually begins with choosing between a bare ESP32 plus CC1101 module or an integrated LoRa-style ESP32 board. The bare-module route gives flexibility, especially for people who want to tune wiring, enclosure layout, and antenna choices. The integrated-board route feels neater because the radio chip, display, and ESP32 already live together. For beginners, integrated boards can reduce wiring mistakes, but they still require careful attention to frequency version. A 915 MHz board is not the right tool for a 433 MHz sensor project.
The second lesson is to test in layers. First, confirm the ESP32 can be programmed. Next, confirm the radio module is detected or communicating properly. Then test one sensor nearby. Only after that should you move the receiver to its final location and connect it to MQTT or a home automation platform. Skipping those steps is how people end up blaming firmware for what is actually a bad jumper wire.
The serial monitor is your friend during early testing. Raw logs can show whether packets are being received, whether decoders are matching a known protocol, and whether the same device ID appears consistently. When a sensor reports changing values, such as temperature or humidity, compare the decoded output with the sensor display. Small differences may be normal due to update timing, but wildly wrong values suggest protocol mismatch or decoding trouble.
MQTT integration is where the project starts feeling powerful. A packet that once disappeared into the air becomes a live value in a dashboard. A freezer temperature sensor can trigger an alert. A rain gauge can help pause irrigation. A weather station can feed charts. Even a simple battery status message becomes useful when it prevents the classic smart home mystery: “Why did this sensor stop existing?”
One underrated experience is learning how noisy the RF environment can be. Neighborhood weather stations, tire sensors, doorbells, and random low-power devices may all appear depending on location. That can be exciting, but it also means filtering matters. In a production setup, it is wise to focus on known device IDs and ignore the rest. Clean data is better than a dashboard full of mysterious signals named after nothing in particular.
Another practical tip is to document the build. Record the board model, radio module, antenna type, frequency, firmware version, pin mapping, MQTT topic structure, and sensor IDs. Future you will not remember. Future you will claim to remember. Future you is lying. A simple text file or spreadsheet can save a weekend when something needs to be rebuilt six months later.
The best part of using an Arduino library for rtl_433 on ESP32 is the feeling of turning invisible household chatter into useful information. It is not just a gadget project; it is a translation project. The sensors were already talking. The ESP32 simply learns enough of the language to bring those messages into your smart home.
Conclusion
Arduino Library Brings Rtl_433 To The ESP32 is more than a clever headline. It points to a practical shift in how makers can handle low-power RF sensor data. By combining an ESP32, a compatible radio module, and rtl_433-inspired decoding, builders can create compact gateways for weather stations, leak sensors, utility monitors, and other common wireless devices.
The setup will not replace every SDR workflow, and it still demands patience with antennas, frequencies, and supported protocols. But for many smart home and DIY monitoring projects, it offers exactly the right balance: low cost, local control, Wi-Fi connectivity, and open-source flexibility.
If you enjoy projects where tiny devices reveal hidden data from the air, this is a rabbit hole worth entering. Bring an ESP32, bring a decent antenna, and bring patience. The 433 MHz world is chatty. Now your microcontroller can join the conversation.