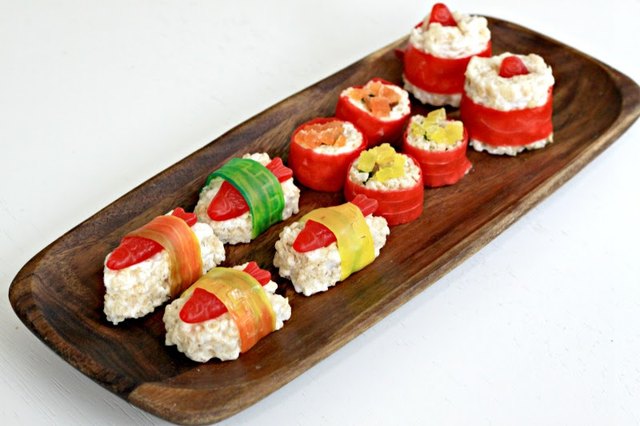

Candy sushi is the kind of party food that makes people do a double take, then immediately grab their phone, then immediately grab a second piece. It looks like sushi, tastes like a sugar-powered celebration, and somehow manages to be both adorable and gloriously ridiculous at the same time. In other words, it is perfect party food.
If you have ever wanted a dessert that doubles as a conversation starter, this is it. Candy sushi is usually made with a crispy marshmallow-and-cereal base that plays the role of “rice,” fruity candy wrappers that mimic seaweed, and colorful gummy or licorice pieces that stand in for fish and fillings. It is easy to customize, beginner-friendly, and ideal for birthdays, sleepovers, classroom celebrations, movie nights, or anytime you want your snack table to feel like it took way more effort than it actually did.
This guide walks you through exactly how to make candy sushi, which ingredients work best, how to shape it without a sticky meltdown, and how to create a party platter that gets all the attention. Bring your sweet tooth and your inner sushi chef. The knife skills are optional. The fun is not.
What Is Candy Sushi?
Candy sushi is a no-bake dessert designed to look like classic sushi rolls and nigiri. Instead of rice, you use a chewy cereal treat mixture or ready-made marshmallow cereal bars. Instead of nori, you use fruit roll-ups, fruit leather, sour belts, or other flexible candy strips. Instead of raw fish, you add gummy fish, licorice ropes, gummy worms, marshmallow fluff, or fruit-flavored ropes and cut the finished roll into neat rounds.
The beauty of candy sushi is that it is part recipe and part edible craft. That makes it especially great for parties because guests can help assemble their own rolls. It is also wonderfully forgiving. A lopsided roll still tastes like candy. A slightly overstuffed roll just becomes “chef’s choice.”
Why Candy Sushi Works So Well for Parties
There are plenty of cute desserts in the world, but candy sushi has a few advantages that make it a real party MVP. First, it is visually playful. The platter looks colorful and clever without requiring fondant-level patience or bakery-level skills. Second, it is easy to portion. Slice the rolls into bite-size rounds and suddenly your dessert table looks organized, festive, and suspiciously sophisticated for something built from candy aisle ingredients.
Third, it is highly customizable. You can make rainbow candy sushi for kids, pastel candy sushi for baby showers, red-and-green versions for the holidays, or school-color sushi for graduation parties. You can also set up a DIY candy sushi station so guests can build their own combinations. This is especially helpful when entertaining mixed ages, because adults enjoy the nostalgia and kids enjoy the fact that dessert has turned into arts and crafts with better rewards.
Ingredients You’ll Need
For the “Rice” Base
You have two easy options:
Option 1: Use ready-made crispy rice cereal treats. This is the shortcut version, and honestly, party hosts deserve shortcuts.
Option 2: Make your own marshmallow cereal treat mixture with butter, marshmallows, and crispy rice cereal. This gives you more flexibility for shaping and thickness.
For the Wrapper
Choose one of these:
Fruit roll-ups, fruit leather, sour belts, or wide sour candy strips. You want something soft, flexible, and easy to wrap around the candy rice without cracking or sticking to your soul.
For the Filling
Good options include licorice ropes, gummy worms, gummy fish, jelly candies, fruit-flavored ropes, mini chewy candies, or a thin layer of marshmallow fluff for extra sweetness. You can even combine fillings for a more dramatic look when sliced.
Optional Decorations
Chocolate syrup for “soy sauce,” green-tinted frosting or whipped topping for “wasabi,” pink shredded candy or coconut for “pickled ginger,” and extra gummy fish for nigiri-style pieces.
How to Make Candy Sushi Step by Step
Step 1: Prepare Your Work Surface
Line a tray, cutting board, or baking sheet with parchment or wax paper. Lightly grease your hands, spatula, or rolling pin with cooking spray or butter. This is not the moment to act brave around sticky marshmallow. Be proactive.
Step 2: Make or Soften the Rice Base
If you are making the cereal base from scratch, melt butter over low heat, stir in marshmallows until smooth, then fold in crispy rice cereal until evenly coated. Work with the mixture while it is still warm but not lava-level hot. If you are using store-bought bars, place them side by side and flatten them with a rolling pin until they form a solid rectangle about half an inch thick.
Step 3: Flatten the Base
Press the mixture into a thin, even rectangle. For maki-style candy sushi rolls, aim for a rectangle that is long enough to roll but not so thick that it turns into a dessert dumbbell. Even thickness matters because it helps the slices look cleaner and keeps the candy center in the middle instead of wandering off like it has other plans.
Step 4: Add the Wrapper
Lay your fruit roll-up, fruit leather, or sour strips flat. Place the cereal base on top, or if you are using wide sour belts, arrange them side by side first and then flatten the cereal treats over them. Leave a small border around the edge if possible so the wrapper can seal around the roll.
Step 5: Add the Filling
Place licorice ropes, gummy worms, or another chewy candy down the center. Keep the filling in a straight line. This is the candy sushi version of structural engineering. Too much filling makes rolling difficult. Too little filling leaves you with slices that look a bit emotionally unsupported.
Step 6: Roll It Up
Carefully roll the candy and cereal base into a log, starting from the side closest to the filling. Press gently but firmly as you roll so the shape holds together. If your wrapper sticks a little, use the parchment or wax paper to guide the roll. You are aiming for compact and neat, not squeezed into submission.
Step 7: Slice with a Warm, Sharp Knife
Dip a sharp knife in warm water, wipe it lightly, and slice the roll into even rounds. Warm blades cut through sticky candy much more cleanly than dry ones. Between slices, wipe the knife if needed to keep the edges from getting messy.
Step 8: Make Nigiri-Style Pieces
For candy nigiri, cut your cereal treat base into small rectangles or ovals. Top each one with a gummy fish or another colorful candy. Wrap a narrow strip of fruit leather or sour strip around the middle to mimic the look of seaweed. These are especially cute on a platter because they break up the round shapes of the rolls.
Best Ingredient Combinations for Candy Sushi
Classic Candy Sushi Roll
Crispy rice treat base + fruit roll-up + licorice rope center. This is the easiest version and a great place to start.
Rainbow Party Roll
Fruity cereal treat base + sour belt wrapper + rainbow candy rope. Bright, cheerful, and impossible to ignore on a dessert table.
Gummy Fish Nigiri
Cereal treat rectangles + gummy fish topping + green fruit strip around the center. It is the tiny tuxedo of candy sushi.
Fluffy Dessert Roll
Fruity cereal base + thin layer of marshmallow fluff + gummy strips. Soft, sweet, and slightly more decadent than the classic version.
Tips for Making Candy Sushi Look Better
Work while the cereal base is warm: Warm cereal treats are much easier to flatten and shape than cold ones.
Grease your hands: A lightly greased hand is the difference between “I made party food” and “I have become one with the marshmallow.”
Do not overmix the cereal base: Too much mixing can make it dense and harder to shape.
Keep the layers thin: Thick layers make rolling clumsy and slicing messy.
Use fresh marshmallows: Fresher marshmallows melt and shape more smoothly.
Serve the same day if possible: Candy sushi tends to look and taste best when freshly made, especially if you want neat slices and soft wrappers.
Common Mistakes to Avoid
Making the base too hot: If the marshmallow mixture is scorching, it becomes harder to handle and can turn the project into a sticky wrestling match.
Using brittle candy wrappers: If the fruit leather is dry or stiff, it may crack instead of wrapping cleanly.
Overstuffing the center: A dramatic filling looks exciting right up until the roll bursts open like a sugar volcano.
Cutting with a dull knife: This squashes the roll instead of slicing it, which is rude to your hard work.
How to Serve Candy Sushi at a Party
Presentation is half the fun. Arrange the candy sushi on a platter in neat rows, just like real sushi. Add a tiny bowl of chocolate syrup as “soy sauce,” a little green frosting or whipped topping as “wasabi,” and pink candy shreds or tinted coconut as “pickled ginger.” Suddenly your dessert tray has a theme, a personality, and probably more compliments than the main course.
For birthday parties, consider using mini cupcake liners or paper trays to hold individual servings. For kids’ parties, a build-your-own candy sushi station is a smart move. Set out cereal treats, fruit wrappers, fillings, plastic knives, and parchment squares. Guests can assemble their own rolls and compare the results. Some will look surprisingly elegant. Others will look like dessert abstract art. Both are valid.
Can You Make Candy Sushi Ahead of Time?
Yes, but with a little strategy. You can make the cereal base ahead, store it airtight, and assemble the rolls closer to party time. Fully assembled candy sushi is best the day it is made, because the wrappers stay softer and the slices look cleaner. If you need to prep in advance, keep the finished pieces in an airtight container at room temperature for a short period and avoid refrigerating unless the candy or filling specifically requires it. Cold storage can make some wrappers tough and less pleasant to bite into.
If you are planning for a large event, pre-cut some rolls and keep a few logs unsliced until just before serving. That way your platter still looks fresh even after the first sugar stampede.
Fun Variations to Try
Holiday Candy Sushi
Use red and green candy for Christmas, orange and black for Halloween, or pastel pink, yellow, and blue for Easter or spring parties.
Movie Night Candy Sushi
Use theater-box candies as fillings and serve the sushi with popcorn on the side. It is delightfully chaotic in the best possible way.
School Color Candy Sushi
Match the wrappers and fillings to school colors for graduations, pep rallies, or team celebrations.
Mini Candy Sushi Bites
Make smaller, one-bite pieces for dessert tables, bake sales, or party favor boxes.
Why Kids and Adults Both Love It
Candy sushi hits that sweet spot between novelty and nostalgia. Kids love that it is colorful, chewy, and hands-on. Adults love that it is clever, photogenic, and just self-aware enough to be funny. It also encourages people to interact with the food, which makes parties feel more relaxed and playful.
That is really the secret here. Candy sushi is not trying to be fancy. It is trying to be fun. And it succeeds brilliantly.
Experiences and Ideas Inspired by Making Candy Sushi
One of the best things about candy sushi is the experience around making it. This is not a dessert you quietly assemble in a corner while everyone waits politely. This is the kind of recipe that pulls people into the kitchen. Somebody volunteers to flatten the cereal treats. Somebody else gets overly invested in arranging gummy fish like a tiny food stylist. Someone absolutely pretends to be a famous sushi chef for no reason at all. It becomes less of a recipe and more of an event.
At birthday parties, candy sushi works especially well because it feels interactive without being complicated. Kids are naturally drawn to the bright colors and funny fake-sushi concept, and adults usually jump in once they realize it is impossible to mess up beyond repair. Even if a roll comes out crooked, everyone still wants to eat it. That removes the pressure and keeps the mood light. In a world where some party desserts look too perfect to touch, candy sushi invites people to laugh, experiment, and snack at the same time.
It is also a surprisingly good activity for family nights at home. If you are looking for a weekend kitchen project that does not require an oven, a candy thermometer, or elite baking confidence, this checks every box. Parents can handle the warm marshmallow mixture, then let kids decorate, roll, and slice with supervision. The result feels creative and a little silly, which is often exactly what family cooking should be. Not every kitchen memory has to involve a holiday roast or a layer cake. Sometimes it can just be a tray of gummy-fish nigiri and a lot of laughing.
Candy sushi also shines at themed gatherings. A movie night becomes more memorable when the snack table includes “dessert sushi.” A sleepover instantly levels up when everyone makes their own candy roll. A classroom celebration becomes more engaging when students can assemble colorful bite-size treats. It bridges the gap between food and activity, which is probably why it tends to disappear from the serving platter so quickly.
Another fun part of the experience is customization. People love putting their own spin on the recipe. Some want sour candy wrappers and chewy centers. Others want extra marshmallow fluff and soft gummies. Some aim for realism, building a platter that actually looks like sushi. Others go completely off-script and create neon rainbow rolls that would make any traditional sushi chef dramatically remove their hat. There is room for all of it.
If you are hosting, candy sushi can even become a signature treat people remember from your party. Guests may forget which chips were in the bowl or what playlist was on, but they will remember the candy sushi platter. They will remember the chocolate “soy sauce.” They will remember the gummy fish. And they will probably ask how you made it, which is always a nice little win when you are trying to serve something memorable without spending half your life in the kitchen.
That is the real charm of candy sushi. It is playful, low-stress, and genuinely fun to share. It gives you a dessert, an activity, and a conversation starter all in one. Not bad for a recipe that begins with marshmallows and ends with everyone taking pictures before they eat the evidence.
Conclusion
If you want a dessert that is easy, funny, colorful, and genuinely crowd-pleasing, candy sushi deserves a spot on your party menu. It is simple enough for beginners, creative enough for themed events, and flexible enough to match almost any occasion. Start with a crispy cereal base, wrap it in fruity candy, add a chewy center, and slice it into pieces that look far fancier than the ingredient list would suggest.
Whether you make a classic version with licorice and fruit roll-ups or go full rainbow with sour belts and gummy ropes, candy sushi proves that party food does not need to be serious to be successful. Sometimes the best dessert is the one that makes people smile before they even take a bite.